Winner of Graphic 45 Give-Away

I’d like to extend a HUGE thank you to Graphic 45 and their guest designer Maria Cole for sharing such a wonderful project and for their generous give-away of their collection shown below.

918frenchcountrycollectiongiveaway

And now, the moment you’ve all been waiting for…….the winner is……Martie Rollin!

918blogwinner

Congratulations Martiei!! Be sure to email us at customerservice@papercrafterslibrary.com to claim your prize. Please be sure to put “Graphic 45 Winner” in the subject line of the email, and then in the email itself, be sure to include your full mailing address and phone number.

For those of you that didn’t win, each week on PCL we feature a different company, and each of those companies generously sponsors a prize. Join us next week when we feature another great company.

andreasiggypcl

Trendy Tuesday – Projects with Flair

 Trendy Tuesday – Projects with Flair
by Katherine Elliot

When first approached to work on a trend article about “flair” I had to pause and ask precisely what she meant.  My only cultural reference for the concept of flair came from the 1999 movie, Office Space.  Flair is the term used for all the unique buttons that servers wore on their vests or shirts at the restaurant featured in the movie, and of course, those became a feature for laughs in the show.

Office Space Box of Flair - P 2013Buttons from Office Space Box of Flair, image source Hollywood Reporter

 I don’t know if flair persists in the restaurant service industry so much anymore, but sure enough, these unique, trendy buttons are considered flair in the paper crafting world!  The shiny buttons make quite an impact on projects and as you’ll see today, many types of flair are available to coordinate with your favorite paper craft brands.

Laura Craigie shows off a fun style in her project using traditional buttons and flair in her circle inspired card.Card by Laura Craigie, image source Paper Lulu

The flair on Suzanne Dahlberg’s card also serves as the focal sentiment on her stylish creation…_DSC0001

Card featuring flair by Suzanne Dahlberg,  image source Freshly Noted

Brands like Simple Stories, Lawn Fawn, Prima Marketing, Paper Bakery, and Fancy Pants Designs are just some of the brands that offer flair to coordinate with their products.

Snap Studio flair from Simple Stories, image source Create for Less

into the woods adhesive flair

into the woods adhesive flairHello Card and Into the Woods Flair from Lawn Fawn

Combine flair with other embellishments to add fresh, unexpected elements to your project.  Scraps of Elegance blog posted some lovely pages featuring their September kit including Romy Veul’s shabby chic page. Her page features vintage style flair from Prima Marketing along side more delicate feminine details of a doily, lace ribbon, feather, and flowers.Shabby Chic scrapbook page by Romy Veul, image source Scraps of Elegance

 Delight Flair Buttons from Prima Marketing, image source Two Peas in a Bucket

Let’s hear it for the boys!  Flair can be a terrific embellishment for your masculine themed projects, too.

Allstar olgacardBest Guy Ever card by Olga Vasilieva, image source Prima Marketing blog

Allstar sampleprima

Scrapbook page by Larissa Albernaz, featuring Prima Marketing All Star flair, image source Prima Marketing blog

 All Star Flair buttons from Prima Marketing, image source Two Peas in a Bucket

 The mix of textures on Ashli Oliver’s card featuring flair from Paper Bakery look fresh and inspired.  The splatters, burlap, twine and flair combine to create a very artistic project… Paper-Bakery-Ashli-Oliver-August-Mixed-Media-Kit-Printables-Flair-Card-Excslusive-Stamp-1Card by Ashli Oliver, image source Paper Bakery

Oh Yeah! SetOh Yeah Flair set from Paper Bakery

Paper Bakery offers many different sets of flair to coordinate with their scrapbooking kits.katrina-hunt-boardwalk-paper-bakery-july-kit-simple stories-flair-stamps-1Scrapbook page by Katrina Hunt, image source Paper Bakery Kits

Fancy Pants Designs has matching flair for many of their product lines, too, that are great for cards and scrapbooks.

Fancy Pants Designs Memories Captured Flair, image source Two Peas in a Bucket 

Card by Laura Craigie featuring Fancy Pants Designs flair, image source Paper Lulu

Oh, my!  How much flair I found once I started looking for it!  Several custom flair companies offer even more choices.  Panda Eight Designs and A Flair for Buttons are two companies I found with Etsy shops that offer an amazing array of flair to suit your fancy.

Set of 8 October Halloween Craft Badges PinsPanda Eight Designs Halloween badges, image source Etsy.com

Scrapbooker 1 FlairScrapbooker Flair from A Flair for Buttons, image source Etsy.com

The blogs for Panda Eight Designs and A Flair for Buttons also had some fun DIY decor projects using flair. Check these out! F3Wall decor with flair, instructions and image source Panda Eight Designs blog

Corkboard decorated with flair, image source A Flair for Buttons

Using flair as decorative pins on a corkboard makes perfect sense if you find flair that includes an attached pin or alter your flair by adding a tack like they did for this project.  Most paper craft inspired embellishments are flat to make it easy to glue to your project, but I love the idea of sending someone a project with a detachable gift, and pinned flair could be such a fun way to do that.  Ready to add some flair to your project now?  Enjoy and happy crafting!

Featured Artist: Claudine Hellmuth & Give-Away

Today on the Paper Crafter’s Library blog, we’re continuing our all new weekly featured artist whereby each week we spotlight a different artist/designer in the paper crafting & mixed media world and introducing you to their fabulous work.

Today we’re thrilled to welcome back – Claudine Hellmuth.  She was a featured artist for Paper Crafter’s Library earlier this year and has returned with more wonderful projects and a give-away of the stamp sheet used in her projects.  You can see the stamp sheet below and read more about the give-away at the end of the post.

919claudinehalloween_stampsggiveaway

Before we show you her fabulous projects, let’s get to know her a little bit more..

hellmuthclaudine_CHA_croppedHello! I am an artist & illustrator. I enjoy combining my drawings with happy patterns to create quirky, retro-whimsical artworks that I license to the gift, home and craft markets.

In my 12 years as a full time illustrator, I have been featured in The New York Times, appeared on The Martha Stewart Show, HGTV and The DIY Network. My client list includes projects with major companies like Smart Car, Capitol Records and national publications such as The Saturday Evening Post.

I recently launched an exclusive paper crafting line with The Home Shopping Network and I continue to make live appearances on air with each new product release. In 2008, I developed a product line with Ranger Industries called Claudine Hellmuth Studio, of high-quality craft paints, mediums and canvas. I have also written three books and produced three DVDs, all centering on art and collage techniques that I teach in my workshops.

Originally from Orlando Florida, I now live in Washington, DC with my husband Paul and our very spoiled pets.

Featured Projects

919claudine_halloween1919claudine_halloween2919claudine_halloween3919claudine_halloween4

SUPPLIES FOR ALL CARDS
• Claudine Hellmuth Studio Clear Stamps Halloween Set
• Claudine Hellmuth Studio Mini Paints – charcoal black • Claudine Hellmuth Studio Mini Multi-Medium – Matte
• Claudine Hellmuth Studio Mini Black Gesso
• Ranger Acrhival ink in Jet Black
• Inkssentials™ White Pen
• Inkssentials™ Non-Stick Craft Sheet™ • Inkssentials™  Glue Stick
• Crafter’s Companion Rock A Blocks for stamping clear stamps
• 4.5”x6” cardstock cards pre folded (PaperSource)
• Assorted scrapbook papers, in blacks, oranges and purples

DIRECTIONS FOR CARDS 2 and 4

  1. Choose pre folded colored  cardstock cards in the colors you would like. Here I am using a blue  and a black.
  2. Using Jet Black Archival ink  by Ranger Stamp the houses from the Claudine Hellmuth Studio Stamp set  onto colored paper (I used Purple for one and Orange Polka dots for the other) I  also stamped the crow and the pumpkin at the same time.
  3. Cut out around houses.
  4. When Ink is dry color in a few windows using the  Inkssentials™ White Pen, this will give the  house a spooky feel!
  5. Cut hill shapes out of scrapbooking paper. Here I  cut one hill shape from Orange dotted paper and the other from black  cardstock
  6. Cut out any extra papers like the moon and find scraps  in your stash that coordinate. I also used a piece of Claudine Hellmuth  Studio Sticky back canvas that I had printed handwriting cursive
  7. Layer the papers and the stamped houses on the cards  so it looks like the houses are on the hills/landscape
  8. Glue everything down with Claudine Hellmuth Studio  multi medium. Or if you are in a hurry, use the Ranger Inkssentials™ Glue Stick!
  9. As a finishing touch I added a white fence line drawing  to the card with the black hill using the Inkssentials™ White  Pen and then to both cards I added tiny dimensional dots using the tips  of the Claudine Hellmuth Studio mini paints.

Two quick and easy Halloween cards that should take  you under 20 minutes to make!

We hope you have enjoyed today’s projects courtesy of Claudine Hellmuth.  To enter for a chance to win the stamp sheet give-away shown above, simply leave a comment at the end of this post about her projects.  Winner will be posted on Paper Crafter’s Library next week. Also, be sure to stop by Claudine’s blog to see even more of her beautiful work (and let her know we sent you).


Featured Company: Graphic 45


We are happy to bring you this week’s Featured Company: Graphic 45. We are so excited to be featuring them regularly on Paper Crafter’s Library. And this week we have a French Country Collection prize package give-away.
918frenchcountrycollectiongiveaway

You can get more details on this prize package at the end of the post.

For those of you unfamiliar with Graphic 45 , we’d like to take a minute to re-introduce them to you.

Graphic 45 is an award-winning scrapbook and paper crafting company­— owned and operated by a mother and her two daughters.

Diane Schultz—Designer and CEO (aka mother)

“I’m passionate about being creative and eager to make it possible for others to find their creative voice. My background includes stints as a designer for, McCalls, Simplicity, Vogue/ Butterick, Mattel Toy Company and a host of other jobs that each, in some way, led me to what I do now. At 45 I went back to school and got my degree in graphic design— I named the company to celebrate that achievement.”

Aimee Filimoehala —Director of Operations

“I wear a lot of hats and love it that way. Business, marketing, operations, etc. have made me a pro at multitasking (aka juggling‑figuratively and literally). When we launched Graphic 45 just three years ago we had no idea what was in store, working together as a family has been an amazing journey that we all feel so grateful to be apart of.”

Charee Filimoehala —Director of Customer Service and Design Team Coordinator

“I joined the team a little over three years ago and haven’t looked back…what a life-changing experience this has been. I love working with and around creative people and products (not to mention I like my co-workers quite a bit). I spend my days working with our friendly stores and talented design team…the occasional trip to a workshop or tradeshow pretty nice too.”

Together we create vintage inspired crafting products that capture the flamboyant style of the 1920’s and 30’s – with vibrant color, irresistible texture and imaginative design to create products with decades-old appeal that’s both fresh and familiar. Let our products inspire your next scrapbook layout, card, album or home decor project.

Graphic 45 Designer Maria Cole

Our Graphic 45 Guest Designer for this week is Maria Cole who is part of the 2013 Graphic 45 Design Team. You can see Maria’s fabulous project below as well as a video, but first, here is a little more about Maria:

918Maria ColeMy papercrafting journey began in April 2011. On a whim one day, I decided to check out a scrapbooking store. Little did I know that one visit would change my life! I was instantly drawn to Graphic 45’s vintage designs and rich colors, and not to mention, the art of papercrafting.

It didn’t take long for me to get lost in this new hobby. Eventually, I got to teach classes at two different scrapbooking stores in the Pacific Northwest. This year, my wildest dream came true when I found out that I made Graphic 45’s 2013 Design Team!

My favorite projects to create are mini albums and upcycled projects, but I also love making layouts and everything in between, like this altered frame. I love fussy cutting Graphic 45 papers because there are no limitations with what you can do. For this frame, I used Graphic 45’s French Country line and even some papers from Steampunk Spells to create a festive fall look.

Graphic 45 Designer Project
918Graphic45-Maria-Cole-French-Country-1-of-4

I love flowers, so I added quite a bit of fussy cut sunflowers and dimensional flowers that I made using a couple different kinds of dies.

918Graphic45-Maria-Cole-French-Country-4-of-4918Graphic45-Maria-Cole-French-Country-3-of-4For one last bit of fall, I added in some fun Petaloo foliage.

918Graphic45-Maria-Cole-French-Country-2-of-4

Supply List:
French Country Sunflower
French Country Grandeur
French Country Promenade
French Country Rendezvous
French Country Bon Appetit
French Country Montage
Steampunk Spells 6×6 Patterns & Solids
French Country Alphabet Stickers
French Country Chipboard 2
Ornate Metal Key Holes
Ornate Metal Keys
Ornate Metal Brads
Metal Flowers
Antique Metal Door Pull
Petaloo Darjeeling Foliage Assorted Greens
Sierra Pacific Crafts Wooden Frame
Spellbinders Bitty Blossoms die
Tim Holtz Tattered Florals die
Martha Stewart Doily Lace Double Edge Punch


We hope you have enjoyed this fun creation from Maria. I would also like to extend a warm thank you to Maria for sharing her fabulous project with us! Please take a minute to stop by Maria’s Blog and of course the Graphic 45 blog to check out all their amazing creations! And don’t forget to leave a comment below to enter to win the Graphic 45 collection listed above.

Trendy Tuesday – Birds

Trendy Tuesday – Birds
By Colleen Harshaw

Birds are a trend that have been around in the paper crafting world for a very long time.  It is one of those trends that has kept its popularity and as a result, has been able to stand the test of time.  There are a few different ways that I like to categorize the different types of birds that are a part of this enduring trend.  First there are the owls.  Owls have been so popular that they kind of deserve a category of their very own.  They have also been the subject of a trend article here at the Paper Crafters Library in the past.  Next we have what I refer to as the ‘elegant’ birds.  You know the ones…they are the bird images that actually look like real birds.  They are used in Victorian era themed projects and on wedding layouts.  Lastly, there are what I refer to as the ‘cutsie’ birds.  They are the birds that have a cartoon-ish look about them and they are often found coupled with captions such as ‘Happy Bird-day’.  You will see examples of both the ‘elegant’ birds and the ‘cutsie’ birds on the projects and products below.  I have decided to leave the owls to themselves because, as I mentioned, they have already had an entire article written all about them!

This first sample product is a digital scrapbooking kit.  I cannot emphasize enough the ENDLESS number of choices of bird themed digital products that are available.  Those of you who are fans of digital scrapbooking will have no shortage of bird themed choices for your projects.  All it takes is a google search of ‘scrapbooking birds’ and then click on images.  There are hundreds of them!  The sample that I have chosen to share caught my eye because of the colour palette and the title.  It is a 33 piece kit called Love Birds.

TT14-1
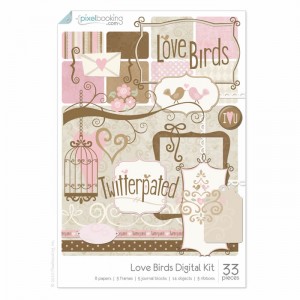
Love Birds Digital Kit
www.pixelbooking.com

Next I have some 12 x 12 double sided paper to share with you from Echo Park.  These little birdies definitely fall into the ‘cutsie’ category!  Aren’t they sweet?  That is coming from a person who has completely resisted this whole bird trend since its infancy.  I just couldn’t get on board with it, but I do admit to liking this adorable paper.

TT14-14

Echo Park – Hello Summer Collection – 12 x 12 double sided paper
www.scrapbook.com

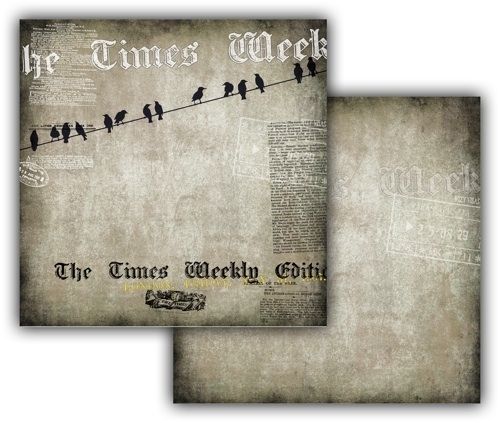
This next item is a 12 x 12 double sided paper by 7 Gypsies called Off the Wall.  There are many, many bird themed papers available, this is just one example which is slightly less ‘cutsie’ than the Echo Park sample above.

TT14-3
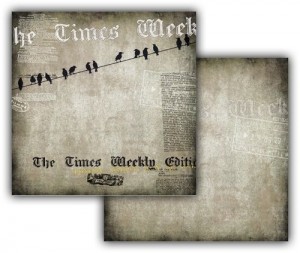
7 Gypsies Off the Wall double sided paper – 12 x 12 – birds
www.bluemoonscrapbooking.com

This next product is a template by Crafters Workshop.  It measures 6 x 6 inches and can be used with many different mediums such as: mist, ink, paint, chalk, charcoal or coloured pencil.

TT14-2Crafters Workshop Template – Birds – 6 x 6
www.bluemoonscrapbooking.com

The next item in the line up is a bird punch by McGill.  The punch is a lever punch which is designed to allow you to layer the wings and even punch them in a different colour of paper.

TT14-4
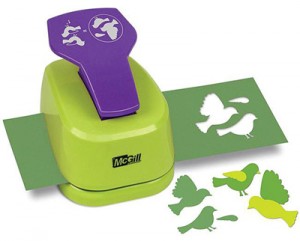
Bird punch by McGill
www.allwomenstalk.com

This next punch is an edge punch by Martha Stewart.  Edge punches are also very popular right now…so combine an edge punch and birds, and you have a winner!

TT14-12

Birds on a Wire Edge Punch – Martha Stewart
www.scrapbook.com

Next I have a die cutting template to share with you.  I have to preface this once again by saying that there are a TON of different die cutting templates available in bird themes.  Almost every company that manufactures dies has one.  I saw several options from both Sissix and Spellbinders.  There are also numerous embossing folders available too.  I found at least four different embossing folder options from Sissix Textured Impressions alone!  This particular template is a bit unique because it is a caged bird.

TT14-13

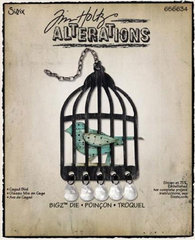
Sissix Bigz Die – Tim Holtz Alterations Collection – Caged Bird
www.scrapbook.com

Now lets move on to some inspiration!

This first 12 x 12 layout is entitled ‘Early Bird’.  I have an early bird in my house too.  This would be an appropriate page to make for my eleven year old son, Noah!  The page features the artist’s early bird daughter in a cute and whimsical way.

TT14-5Early Bird Layout by Adriana Puckett
www.debbiehodge.com

This next 12 x 12 layout is a digital layout.  All the products used are from Designer Digitals.  I love the cool colour palette, the layering and the subtle use of the birds on the right hand side.  Super sweet.

TT14-6
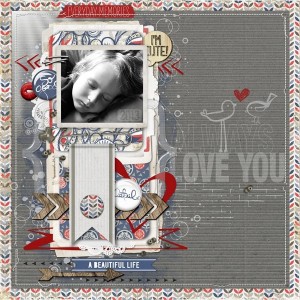
Everyday Memories layout by mamabean379
www.twopeasinabucket.com

Another big trend that we have talked about here at PCL are Project Life inspired albums.  This next layout is a great example of a Project Life page which includes memories of a pregnancy.  See those tiny birds the artist used in the middle…over by the title?  Subtle but also super sweet.

TT14-7
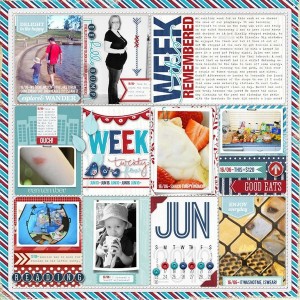
Project Life layout – Week 24 by tracermajig
www.twopeasinabucket.com

Now I have a couple of cards to share with you.  This first sample falls into my ‘cutsie’ category.  With its ‘Happy Bird-day’ sentiment, it could be appropriate for almost anyone.

TT14-8
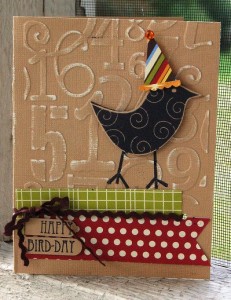
Card by kimbermcgray
www.twopeasinabucket.com

Next is a more ‘elegant’ card sample.  The subtle colours combined with the roses and pearls give the card less of a ‘cutsie’ vibe.  Although, this card still shares the ‘Happy Bird-day’ sentiment with the sample above.

TT14-9
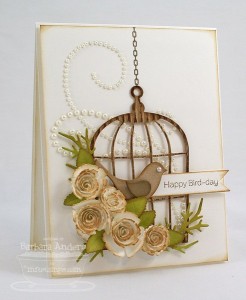
Card by Barbara Anders for mftstamps.com
www.twopeasinabucket.com

Next we have this super creative three dimensional project.  It is a bird box created using a Silhouette die cutting machine.  The colour reminds me of the Angry Birds video game that my kids love to play.  This little red bird could go a long way if you were planning an Angry Birds themed birthday party, don’t you think?

TT14-10
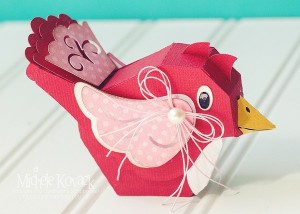
Bird box by Michele Kovack
www.chelemom.blogspot.com

The last project that I have to share is another three dimensional project.  This one is a fall wreath, topped with a bird.  In this case the bird was die cut using the Picturesque cartridge from Close to My Heart.

TT14-11
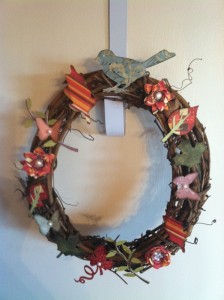
Fall Wreath by dennycakes
www.scrapbook.com

I hope all of these lovely project samples have given you some inspiration!  I cannot stress how many options there are available to you on the market if you are a fan of this bird trend.  The possibilities really are endless!

Until next time, happy crafting!

Featured Artist: N@ Ali

Today on the Paper Crafter’s Library blog, we’re continuing our all new weekly featured artist whereby each week we spotlight a different artist/designer in the paper crafting & mixed media world and introducing you to their fabulous work.

Today we’re thrilled to welcome back – N@ Ali!

Before we show you her fabulous project, let’s get to know her a little bit more..

n@aliheadshotHi there! I’m Nathalie from the island of Mauritius, online I go by the name N@ Ali. I am so thrilled to be the Featured Artist on Paper Crafters Library once more today!
My twins are now nearly two; things are getting a lot easier at home. My eldest is 4.5 and has started school a couple of weeks ago; she’s loving it, how exciting! When I have time I enjoy reading fictions and following TV series, but above all I like paper crafting.I am still on the CAS(E) this Sketch! design team, where I also design sketches. I have great news as I now also design for The Alley Way Stamps, they have a new release every month and I can’t wait to show you everything that’s coming! I’ve prepared three cards for you today, hope you’ll like them 😉 I’m sticking with a theme I really enjoy: recycling.

Featured Projects

For the gift on my first card I used some lovely corrugated paper which has a design printed on it, recycled from a beautiful paper gift bag.

912nathalie1

Cardstock: (red, white)  Clear stamps: (sentiment from Give Thanks, border from Calypso) The Alley Way Stamps  Dye ink: (Tuxedo Black) Tsukineko  Fibers: (twine)  Adhesive: (foam tape)  Other: (recycled paper gift bag)

I’m wearing pink today, and this morning the little ribbons used for hanging kept showing up so I just cut both and used one on a card straight away! The second one will have to be stored until I have time to craft again.

 912nathalie2

Cardstock: (grey, white)  Clear stamp: (sentiment from Flower Power #3) Uniko Studio  Dye ink: (Tuxedo Black) Tsukineko  Accent: (pink rhinestones)  Other: (recycled ribbon)

Going with the freestyle collage trend for my last card, here the “Happy” comes from the name of an Echo Park collection of papers (on the strip at the bottom of a 12×12); and the gold oval from a chocolate box.

 912nathalie3

Cardstock: (textured off-white)  Patterned paper: (red stripes, pink stripes) scrap ; (sentiment from Happy Days) Echo Park  Clear stamp: (sentiment from It’s Your Day) Hero Arts  Dye ink: (Tuxedo Black) Tsukineko  Accent: (sequins)  Dies: (Heart-2-heart #11, Double-Ended Banners) Papertrey Ink  Tape: (Pickle Juice Chevron) Bella BLVD  Other: (gold oval) Ferrero Rocher

Thank you for having me here, I hope to see you around some time 😉

We hope you have enjoyed today’s projects courtesy of N@ Ali.  Also, be sure to stop by N@ Ali’s blog to see even more of her beautiful work (and let her know we sent you).


Winner of Designs by Ryn Give-Away

DesignsByRyn-250px

I’d like to extend a HUGE thank you to Designs by Ryn and all the wonderful designers that created the samples she shared with us.  She also had a generous give-away package shown below.

828Ryngiveaway

And now, the moment you’ve all been waiting for…….the winner is……Karen P.!

904winnerdesignsbyryn

Congratulations Karen!! Be sure to email us at customerservice@papercrafterslibrary.com to claim your prize. Please be sure to put “Designs by Ryn Winner” in the subject line of the email, and then in the email itself, be sure to include your full mailing address and phone number.

For those of you that didn’t win, each week on PCL we feature a different company, and each of those companies generously sponsors a prize. Join us next week when we feature another great company.

andreasiggypcl

Trendy Tuesday – On the Farm

Trendy Tuesday – On the Farm
by Katherine Elliot

Summer is soon to come to a close and fall harvest ideas are showing up in the paper craft blogosphere.  I”m not yet ready to let go of summer just yet, but I can slowly start the transition with these popular farm themes.   To start, check out these cute & fun project & images from stamp sets from LawnFawn, Hambo Stamps, and Paper Smooches.

critters on the farm

critters on the farm

Lawn Fawn Critters on the Farm card and stamp set, images from Lawn Fawn

Cute critters and punny statements combine to help you create fun projects with a farm theme.

Adding a trendy hexagon texture simulates a chicken wire look that looks great with these cute hens from Hambo Stamps in Lyn Tomlin”s project below…

Card by Lyn Tomlin featuring images from Hambo Stamps, image source My Purple House

This next project is a fun 3D card by Sue Kment with lots of cute images from Paper Smooches.  Sue has some more photos, links and information on her blog for how to create the barn, too, so check the link below the photo.

Barn card creation by Sue Kment, featuring images from Paper Smooches, image source Sue”s Stamping Stuff

Green Acres stamp set from Paper Smooches, image source Paper Smooches.com

A country inspired theme has a lot of homespun charm as Danielle Flanders” cards display using the graphic images from Papertrey Ink”s stamp set, On the Farm.

Cards by Danielle Flanders image source Homespun with Heart

For stamp sets that have some realistic farmland images and sophisticated phrases, check out these sets from Flourishes and Stampin” Up!

Country Road stamp set from Flourishes

Country Road

Card by Silke Ledlow featuring Country Road stamp set, image source Flourishes Gallery

Harvest Blessings Clear-Mount Stamp SetHarvest Blessings stamp set from Stampin” Up!

Card by Julie Gearinger featuring image from Harvest Blessings stamp set from Stampin” Up!, image source Splitcoast Stampers

Patterned paper, embellishments and diecuts can help you add some country flair to any project, no ink required.  Scrappers and card makers alike can enjoy these next products from Paper House Productions,  We R Memory Keepers, Jolee”s Boutique and October Afternoon.  These are welcome additions to a growing craft collection of farmland themes.

Paper House Productions 12×12 patterned paper, 100 Percent Country, image source Scrapbook.com

farm fresh w banner sized

Farm Fresh decor project by Linda Auclair, image source {bliss}

We R Memory Keepers Town Paper from Country Livin” Collection, image source Scrapbook.com

Jolee”s Boutique Barnyard stickers, image source JoAnn Crafts

Product # DC-194Miscellany die cuts from October Afternoon Farm Girl CollectionMiscellany die cuts from October Afternoon Farm Girl Collection

Kim Kesti shows off some down home country charm in her project using some October Afternoon die cuts with a My Favorite Things Dienamics Mini Chicken Wire background featured next…

Kesti_MFT_ChickenWireHowdy Card by Kim Kesti, image source Think Fast

By now I hope you may be humming a happy, country tune.  I cannot seem to get the Green Acres tv show theme song out of my head after having hunted down these products and projects!  Inspired now to grow your own creative farm themed project?.  With craft ideas spreading out so far and wide, go get your ink and glue and give it a country try!  Happy crafting, everyone.


Featured Artist: Andrea Ewen

Today on the Paper Crafter’s Library blog, we’re continuing our all new weekly featured artist whereby each week we spotlight a different artist/designer in the paper crafting & mixed media world and introducing you to their fabulous work.

Today we’re thrilled to welcome back – Andrea Ewen!

Before we show you her fabulous project, let’s get to know her a little bit more…

AndreaEwenProfilePicHello crafty friends! My name is Andrea Ewen and I’ve been married to my high school sweet heart for almost 18 years (together for 27!). We have two children together, a 15 year old son and a 13 year old daughter. I live in New Jersey near the beautiful shore and work full time in a small pharmacy that is 2 blocks from the ocean. Crafting has always been a passion of mine…in high school I funded my extra curricular activities by sewing hair ‘scrunchies’ (remember those?) and making Christmas wreaths out of pinecones. One fateful day in 2002 I went to a Stampin’ Up! party and about blew my life savings on paper crafting supplies. I was so hooked! I have to say though, card making initially looked a lot easier than it was…for me. I made many ‘interesting’ cards in the following years but seemed to have found my stride 8 years later when I started my blog, EwenStyle. Maybe starting my blog gave me more confidence, or maybe more accountability, not sure…but either way I have learned immense lessons from this experience. For example, I’ve learned that there are blue-ish browns and red-ish browns. I’ve learned that more is not always better. I’ve learned that I REALLY love flowers and anything girly. And most importantly, I’ve learned that I still really have a lot to learn! I try to concentrate on absorbing as much as I can and experimenting as much as possible. I adore “paper manipulating” whether it be in the form of die cuts, border punches or flower making. I love to use lots of vintage and feminine items like ribbons, lace, pearls and flowers. My style has been evolving over the years, but I’ve seemed to have settled into the comfy chair of Vintage/Shabby Chic/Antique designs. I currently design for Verve Stamps, Zva Creative, Maja Design Vintage Papers, Paper Sweeties Stamps and 3 challenge blogs…the Ribbon Carousel, CASE Study and Vintage Card Cafe challenge.
Thanks so much for letting me ramble a bit…now for what I’m sure you’ve come to see…artwork!Autumn Wishes Card Project
904andreaewen1

Bow Making 101:You’ll need a length of ribbon (a little longer than you think you’ll need
so you have room to play) and two pencils, or any long stick things, chopsticks, drumsticks, etc:
905andreaPCL090513b

First I need to tie the bow. My main method for doing this is ‘bunny ears’.  I start off with forming two loops, one in each hand:
905andreaPCL090513c
Next, I cross the loops:
905andreaPCL090513d
Then push one of the loops around the back and through the middle:
905andreaPCL090513e
Pull the loop ends apart:
905andreaPCL090513f
Voilá! There is some necessary tweaking at the point, pulling the loops, and then pulling the ends:
905andreaPCL090513g
Ok, this where the magic starts. 🙂 Put the sticks into each of the loops:
905andreaPCL090513h
Now grab the tails with your thumbs and middle fingers while your hands pull the loops apart. This action tightens the knot in the middle while giving you a chance to adjust the size of the loops. Keep pulling on the pencils while pulling down on the tails until you’ve got the lengths just right:
905andreaPCL090513i
When the dimensions look correct, pull on the pencils and tails with the same amount of pressure to tighten the knot and make the bow ‘permanent’:
905andreaPCL090513j
Fluff the loops and cut the tails on an angle:
905andreaPCL090513k
You can also adjust the tails at this point to make one go up and one go down, as I’ve done with my sample:
905andreaPCL090513l 
Easy Peasy? I will say that it does require some practice because although my brain knows what my hands/fingers need to do, they don’t always listen…  🙂
905HarvestBlessings_200 905andrea
Supplies:
Stamps: Harvest Blessings (Verve Stamps)
Paper: Walking in the Forest collection (When Leaves Are…, Last Flowers, The Colors of Fall, Maple-bs, Knitted Sweater, Mountain Ash) Maja Design, Black, Mellow Moss (SU!)
Ink: Versafine Onyx Black
Accessories: Willow Satin-faced ribbon (Papermart), Wooded Mini-Medley Accents (CTMH), doily, Hot Cocoa Liquid Pearls (Ranger), tulle accents, charm, gems, pearls, needle & thread, paper distresser, gold leaves
Size: 4 1/4″ X 5 1/2″
 
Here are some other helpful hints I’ve learned along the way…
 
Helpful Hint #1. Die cutting. I’ve received many emails about this one…how do you make the paper come out of your intricate dies without tearing? How do you get the die to cut all the way through?Simple fix! I learned this one from Emma Lou from Heartfelt Creations. Their dies were pretty intricate and to get them out of the die…oy! All you have to do is put a piece of wax paper in between the die and the paper. The paper will easily come out of the die. If the die is not cutting all the way through, you either need another piece of paper (shim) between your plastic plate and the cutting board. One piece should suffice and I always tape down my design to the die and then rotate it 90º and then cut again. That way I’m assured that all surfaces have cut through.
 
Helpful Hint #2. Liquid Pearls. Some crafters asked me how I make my Liquid Pearls uniform. That, unfortunately requires practice and lots of patience. However, when you are outlining a Nestie or die cut of that sort, usually there is a indention around the outer perimeter, usually about 1/8″ in. You can use that as a guide. I usually try to place my dot right on the line. Then keep going using the same repetitive movement. Try to keep going in one fluid motion, stopping only to turn your paper (or to keep from dipping your pinky in them…been there, done that!). Sometimes an air pocket will form in the bottle and squirt out onto your paper in one big blob. Easily fixed. Get out your paper piercer or other sharp object and slowly draw the liquid away from the area, taking just tiny portions away at one time. Then scrape the paper gently to remove any excess residue. As long as the ‘paint’ is still wet, you’ll be able to remove it.
 
Helpful Hint #3. Sponging. Sponging is a very delicate process. Some of my best sponging is done when there is almost no ink left on the sponge. I prefer to use Stampin’ Up!’s daubers, because they are easy to use…they fit right on the tip of your finger and I feel like I have more control that way. I usually dip the dauber in ink (mostly distress ink) and then blot off a lot on a piece of scrap paper. Then I start rubbing it on the scrap until I get a uniform blend. Take the Nestie or die-cut still in the metal die and gently in circular motions work into the paper. Start off very light and increase pressure to make a more dramatic look.
 
Thanks for joining me for this labor-intensive post…I hope you come away with some useful advice!

We hope you have enjoyed today’s projects courtesy of Andrea Ewen. Also, be sure to stop by Andrea’s blog to see even more of her beautiful work (and let her know we sent you).


Featured Company: Graphic 45

We are happy to bring you this week’s Featured Company: Graphic 45. We are so excited to be featuring them regularly on Paper Crafter’s Library. For those of you unfamiliar with Graphic 45 , we’d like to take a minute to re-introduce them to you.

Graphic 45 is an award-winning scrapbook and paper crafting company­— owned and operated by a mother and her two daughters.

Diane Schultz—Designer and CEO (aka mother)

“I’m passionate about being creative and eager to make it possible for others to find their creative voice. My background includes stints as a designer for, McCalls, Simplicity, Vogue/ Butterick, Mattel Toy Company and a host of other jobs that each, in some way, led me to what I do now. At 45 I went back to school and got my degree in graphic design— I named the company to celebrate that achievement.”

Aimee Filimoehala —Director of Operations

“I wear a lot of hats and love it that way. Business, marketing, operations, etc. have made me a pro at multitasking (aka juggling‑figuratively and literally). When we launched Graphic 45 just three years ago we had no idea what was in store, working together as a family has been an amazing journey that we all feel so grateful to be apart of.”

Charee Filimoehala —Director of Customer Service and Design Team Coordinator

“I joined the team a little over three years ago and haven’t looked back…what a life-changing experience this has been. I love working with and around creative people and products (not to mention I like my co-workers quite a bit). I spend my days working with our friendly stores and talented design team…the occasional trip to a workshop or tradeshow pretty nice too.”

Together we create vintage inspired crafting products that capture the flamboyant style of the 1920’s and 30’s – with vibrant color, irresistible texture and imaginative design to create products with decades-old appeal that’s both fresh and familiar. Let our products inspire your next scrapbook layout, card, album or home decor project.

Graphic 45 Designer Maiko Miwa

Our Graphic 45 Guest Designer for this week is Maiko Miwa who is part of the 2013 Graphic 45 Design Team.

You can see Maiko’s fabulous project below, but first, here is a little more about Maiko:

904maiko miwaI am a wife to a lovely husband and a mother to a 6 year old girl.
I started scrapbook in year 2008 because I wanted to store all memories with my family in this beautiful way.

Nowdays, I teach scrapbook near Kyoto and Osaka. I also love to create and have fun by myself at home! I am willing to challenge many things trough scrapbook. I can say my style is soft and feminine. I love to crop many elegant photos. When I am making a layout, I always try to make it look like the whole layout is one picture and like a page of astorybook.

The important technique of my style is cutting out patterns of the papers. I love to use a lot of rhinestones, stamps and inks for my creations.

Graphic 45 Designer Project

For today’s project I started with four 2.5″ x 2 .5″ snack food boxes.  I altered them using Graphic 45’s Steampunk Spells Collections to create blocks that can be used for Halloween Decorations.

904Steampunk Spells Altered Blocks Graphic45 Maiko Miwa 1of7 904Steampunk Spells Altered Blocks Graphic45 Maiko Miwa 2of7 904Steampunk Spells Altered Blocks Graphic45 Maiko Miwa 3of7As you can see from the photos above, the blocks can be arranged vertically or horizontally. Each box was decorated so that the patterns on the side aligned one with the other when the boxes are stacked. 

904Steampunk Spells Altered Blocks Graphic45 Maiko Miwa 4of7 904Steampunk Spells Altered Blocks Graphic45 Maiko Miwa 5of7 904Steampunk Spells Altered Blocks Graphic45 Maiko Miwa 6of7 904Steampunk Spells Altered Blocks Graphic45 Maiko Miwa 7of7

We hope you have enjoyed this fun creation from Maiko. I would also like to extend a warm thank you to Maiko for sharing her fabulous project idea with us! Please take a minute to stop by Maiko’s Blog and of course the Graphic 45 blog to check out all their amazing creations!