Today I thought I’d pop in and share a video tutorial for the art journal page you see above. In addition to paper crafting, a few years ago I discovered the world of mixed-media and art journaling, and quickly fell in love. I especially loved the fact that all the supplies I’ve been using in my paper crafting can all be used in my mixed media work. If you haven’t yet tried art journaling I encourage you to give it a go – it’s a wonderful way to stretch and grow your creativity. I showcase most of my art journaling and mixed media work on my personal blog www.andreawalford.com, as it’s something that for the most part is personal. To watch the “Trust” Art Journal Page Video Tutorial Click Here. If you enjoyed our Ranger Week featuring the Tim Holtz Distress Stains, then this video will show you how you can use those distress stains in art journaling.
Trendy Tuesday – Banners and Flags
By Colleen Harshaw
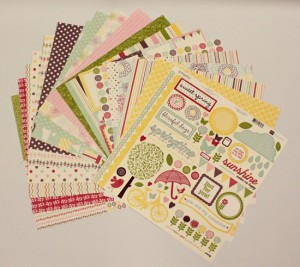
When it came time to begin my research for this article, I didn’t have to look very far! The Freebie Friday post over at the Paper Crafter’s Library blog this week has a prize pack of Echo Park paper and embellishments from their Springtime line. It contains some beautiful papers along with banners and flags, ready to go! Echo Park is one of many companies who are jumping on this very trendy bandwagon, and offering us a selection of banners and flags to use in our crafting.
It seems that banners and flags were found at every turn at CHA (Craft and Hobby Association) Winter 2012. That is what I read anyways…..I wasn’t fortunate enough to actually attend the show myself…..sniff.
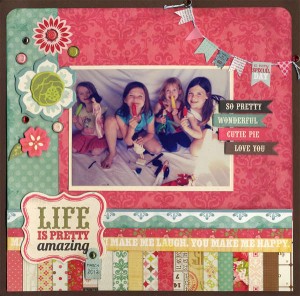
See below for a cute scrapbook page created by our very own Keren Baker from the Paper Crafter’s Library. Keren created three different design team projects for the month of April (you can see them posted over at the Paper Crafter’s Library blog), and I would be neglecting my duties if I didn’t point out the fact that all three of Keren’s projects included a banner or flag in some form! How is that for staying on trend?!
Scrapbook page created by Keren Baker for Paper Crafter’s Library
In this gorgeous sample of a layout, Jill used Echo Park supplies as well. The line is the This and That Collection – Graceful. It looks like Echo Park has a lot of good options if you are looking for flags and banners, folks!
Page created by Jill for www.scrapbook.com
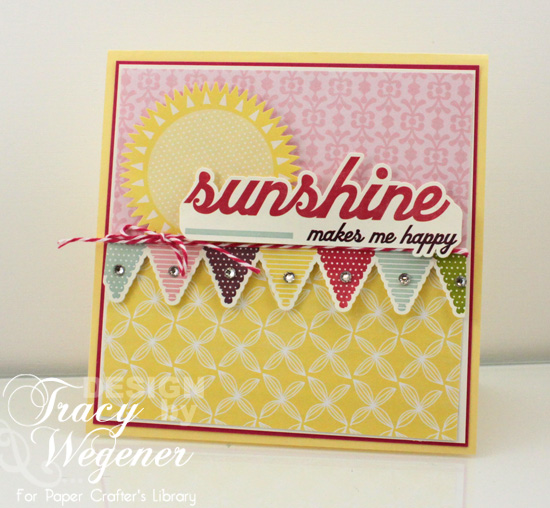
Next, we have a card sample created by Tracy Wegener. She used some of that Echo Park Springtime paper that was up for grabs on Freebie Friday for her sunny sample!
Card by Tracy Wegener for Paper Crafter’s Library
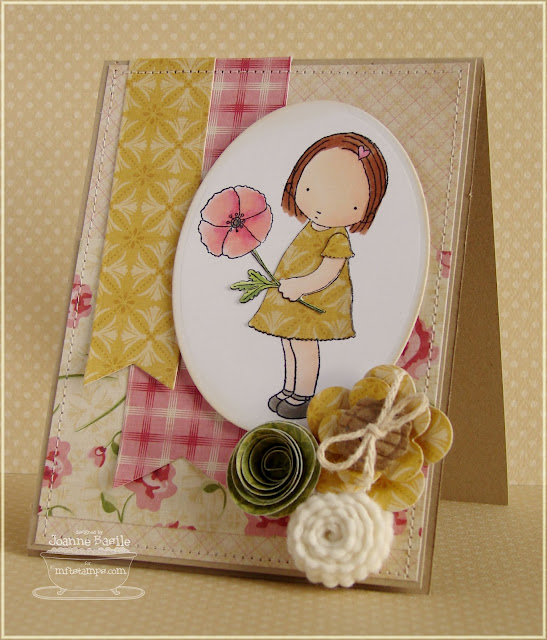
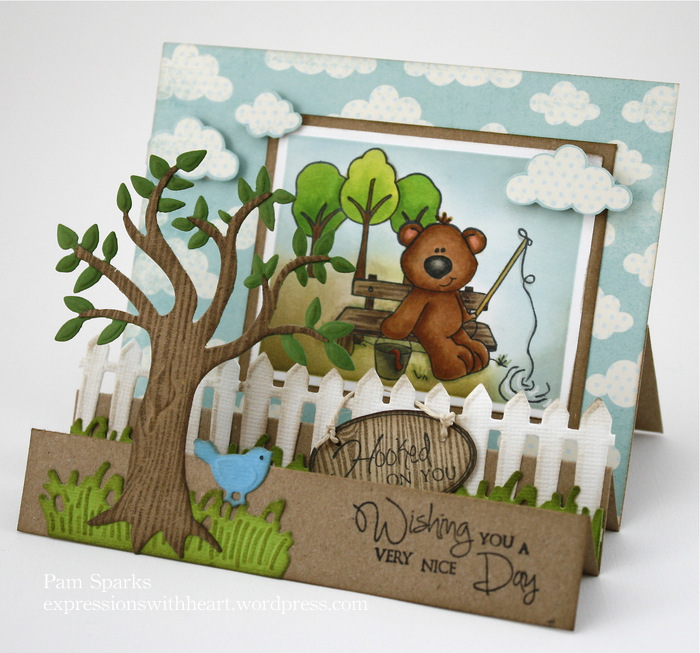
This cute little card was created by my friend Joanne, from over at My Favorite Things. She used MFTs Die-namics Stackable Fishtail Flag dies to create those background flags in the pink and yellow patterns. You can find out more about those dies in the supply list at the end of this article.
Card by Joanne Basile for My Favorite Things
Nancy, from The Cat’s Pajamas, used some little flags in a very creative way for this masculine card. Check out that shirt collar!
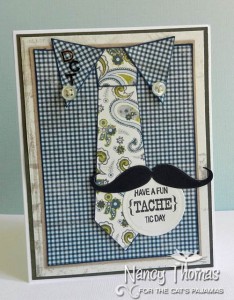
Card by Nancy Thomas for The Cat’s Pajamas
I found this card sample over at The Cat’s Pajamas as well. Those girls have been busy using their flag dies! The nice thing about thin metal dies is that you can use them in so many different machines. If you have a Cuttlebug, a Big Shot, a Side Kick or a Wizard….you are pretty well set!
Card by Amy Sheffer for The Cat’s Pajamas
This sample shows how you can use a large sized flag to create a tag. Isn’t it cute?
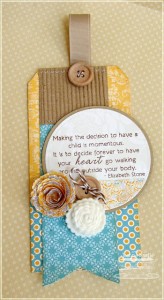
Tag by Joanne Basile for My Favorite Things
OK, so here comes the good stuff! The list of suppliers who sell the tools to make your own flags and banners, as well as a list of the ready- made stuff, for those of us who don’t have the time (or inclination) to make our own! Just stick with me….you will be glad you did!
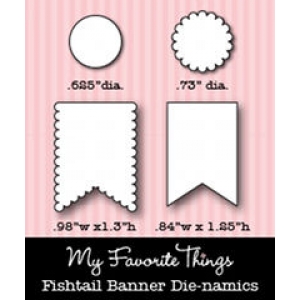
Flags and Tags die set from Lil’ Inker Designs.
Photo courtesy of www.iheart2stamp.com
Sentiment Flags die set from Lil’ Inker Designs
Photo courtesy of www.lilinkerdesigns.com
Thin banner die from My Favorite Things
Stackable fishtail flag dies from My Favorite Things
Stackable banner dies from My Favorite Things
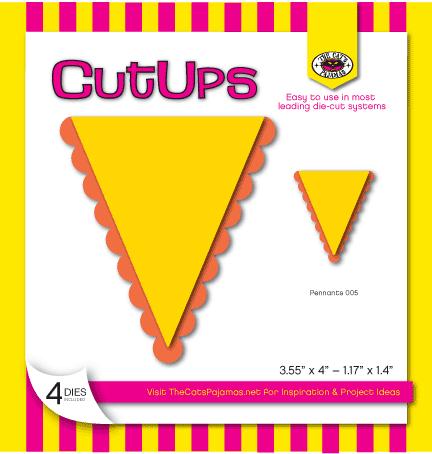
Next we have The Cat’s Pajamas variety of dies for creating a banner. They are sold under the name CutUps.
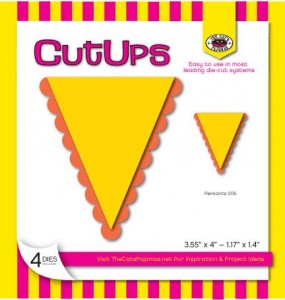
Thin banner dies from The Cat’s Pajamas
If you aren’t into die cuts, over at Gina K. Designs, they have an adorable stamp set, designed by Melanie Meunchinger, featuring a banner. It is just one other way to get your banner fix. Imagine how cute that banner would look paper pieced! What a great way to use up all of those scraps! I have a habit of keeping every little scrap. I just can’t bear to recycle such beautiful papers, plus, it makes me feel a little bit less guilty about the gigantic size of my scrappy carbon footprint!
Basket Additions 2 – stamp set by Melanie Meunchinger
Photo courtesy of Gina K. Designs
Mini flags from October Afternoon
Photo courtesy of www.amazon.com
Little Flyers from October Afternoon
Photo courtesy of www.CreatingKeepsakesBlog.com
Flags by Maya Road
Photo courtesy of www.CreatingKeepsakesBlog.com
Little wooden fish tail flags from Jillibean Soup
Photo courtesy of www.CreatingKeepsakesBlog.com
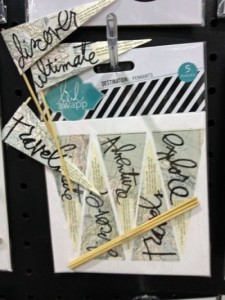
Heidi Swapp flags from Pink Paislee
Photo courtesy of www.CreatingKeepsakesBlog.com
Flags from BasicGrey
Photo courtesy of www.CreatingKeepsakesBlog.com
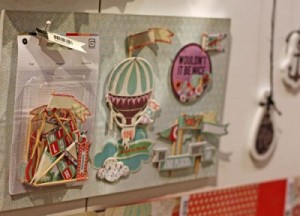
Echo Park Springtime Collection
Photo courtesy of Paper Crafter’s Library
Now, if you don’t want thin metal dies, stamps, paper OR stickers, I still have one more option for you! For all of you digi scrapbookers out there, www.designerdigitals.com actually offers a digital banner template!
Digital Banner Twine Template
Photo courtesy of www.designerdigitals.com
So, I think it is safe to say, that no matter what type of paper crafter you are, when it comes to banners and flags, there are definitely options! You really have no reason not to give this fun trend a try. Oh, and don’t forget to post your projects in an online gallery so that others can be inspired too!
Project Newsletter Makeover Challenge – With Love
Welcome to the Makeover Monday challenge. Every Monday, as part of our project ideas newsletter we’re going to make over one of our own older cards, showing you how easy it is to use existing designs (your own OR someone else’s) as inspiration. This week Tracy has designed this “With Love” card.
Your challenge – as with our previous Makeover Monday Challenges – is to use our piece as inspiration and make it into a card, scrapbook page, or other project. You can use the layout, the colors, an element you like…it can look like our piece, or nothing at all like our piece. We want to see where YOU take this. This challenge is strictly a “work from your stash” challenge.
As a newsletter subscriber you will have received a link to a private web page, from which you can watch the video tutorial. If you didn’t receive the video tutorial link then please be sure to email us at customerservice@papercrafterslibrary.com. In order to ensure you don’t miss any more of our Makeover Monday Challenge video tutorials, please be sure you sign up for our FREE email newsletter from the top right sidebar of this blog. Please note that the video tutorial will be available for general viewing for one week only – and then will be moved into our library for our members only
Every Monday, here on the blog, we’re going to post the original picture, and the made over picture. You will have ONE week to upload your challenge piece.
Instead of a weekly prize though, we’re going to award a prize monthly. So for each week you participate and each project you submit – you will get one entry into our monthly draw. On the first Monday each month – we will announce one challenge winner, who will receive one of our grab bags featuring over $30 of paper crafting products. Our next draw will take place on Monday, May 7th, 2012.
Our inspiration piece, shown below, is an archived project from the Andrea Walford blog.
Here are the details on how you can participate in the Makeover Monday Challenge:
A new Makeover Monday Challenge video tutorial will be emailed out to newsletter subscribers every Monday (so make sure you are signed up). Then, here on the blog, we will post a picture of our inspiration piece and made-over project along with an Inlinkz button for you to enter your project. Here are the details:
- Work from your own stash to create a project based on the inspiration project provided – you can use any products you would like, and make any type of project you like – card, scrapbook page, album, 3D item etc.
- Post your project on your blog, in your gallery or on any other photo-hosting site (such as photobucket or flickr).
- Click on our inLinkz button below to add a link to your project for our challenge
- You will have until 7am, Monday, May 7th to add your link to the list to be eligible to win. And you can enter as many times as you like.
- One randomly selected winner will be chosen from ALL the entries on Monday, May 7th.
- For each project you submit, your name will be entered into our monthly draw. The winner will be announced on Monday, May 7th.
Good luck to everyone and we look forward to seeing your projects!
Product Spotlight & Freebie Friday: Springtime Collection by Echo Park
This week’s Freebie Friday Give-Away comes from the fun Echo Park collection called “Springtime”. We’re giving away a set of eighteen Springtime 12″ x 12″ double sided patterned papers and a 12″ x 12″ sticker element sheet.
For today’s Freebie Friday Video Tutorial, Tracy has created this “Sunshine Makes Me Happy” card using paper and stickers from the Springtime Collection:
You can watch Tracy’s video here:
In addition, Tracy also created this “You Are My Sunshine” card. This project features the Springtime Collection by Echo Park as well as bakers twine by The Twinery.
We have a video tutorial and pdf handout for the You Are My Sunshine card available to our Paper Crafter’s Library members – please make sure you are logged in first. If you’re not already a member, it’s worth checking out. As a member, along with our existing video library of over 700 videos, you’ll receive daily inspiration, great project ideas, fun techniques, instruction on how to use your products, and more! For more information and to join, click here.
If you are not already receiving our weekly email newsletter, make sure you take a minute to sign up from the top right sidebar of our blog. Every Sunday we create an exclusive project with a video tutorial for all of our newsletter subscribers. This project will be made available to all Paper Crafter’s Members on the following Monday.
How to enter this week’s giveaway:
All you have to do is leave us a comment in the comments section of this blog. Winner will be announced on Friday, May 4th at the bottom of that Freebie Friday post!
Technique Thursday: Faux Crazed Porcelain
This week on Paper Crafter’s Library’s Technique Thursday Sophia features a really cool technique called Faux Crazed Porcelain. I can’t even begin to tell you what it’s all about other than it involves the use of Rock Candy Distress Paint Crackle LOL. I love the look of it though and am going to have to check out Soph’s video to see how it’s done.
For those of you unfamiliar with Technique Thursday , this is where we create and feature projects for our Club 52 online class (our year-long technique club), which our Paper Crafter’s Library members also access as a free benefit of their membership.
If you’re interested in checking out what we’ve covered so far, you can look at our Club 52 page. If you’re a technique junkie and would like to learn new techniques (as many of them are ones we have created), or revisit old ones – you can still sign up from this page – you’ll be able to access all 34 weeks we’ve done so far, plus the remaining weeks, and your access to the classroom will last for 15 months.
If you are not already receiving our weekly email newsletter, make sure you take a minute to sign up from the top right sidebar of our blog. Every Monday we create an exclusive project with a video tutorial for all of our newsletter subscribers and Paper Crafter’s Library members. So make sure that you sign up now, so that you don’t miss out!
April Design Team Projects from Keren Baker
Welcome to my turn this April to show you the projects I’ve created. This month, I’ve been really lucky to get a load of Darcie’s products to play with. This company was new to me, but after trying stamps and her tin pins and papers, I’ll certainly be using their products again!
This first project is a simply stamped card using the Darcie’s acrylic stamps and is really quick and easy. You only need limited supplies; 2 pieces of patterned paper & 3 colours of ink. Just by adding some tiny punched red circles and little green gems, makes the stamped image a real focal point and proves yet again, why stamping is so popular and versatile.
The second project is a bit of a favourite and is showcasing a little known craft product; cupcake cases!! I’m always on the lookout for something different to create with and when I spied these pretty cases in my local supermarket, I had to do something with them. The double bonus is that I don’t put on on any weight after I’ve finished with them! You’ll find out exactly how to create these on-trend rosettes by watching the accompanying video tutorials in the Paper Crafter’s Library. If you’re not sure about joining this brilliant craft resource- check out here– which is a link to the free section of video tutorials that will hopefully whet your appetite as to the quality and range of videos that you can access as a fully paid up member.
My last project is a scrapbook page. The tutorial will show you how to complete everything on the page- from the hidden journalling, to the punched flower rosette or the fun bunting.
It’s a page that I’ve designed especially to help you use up those smaller and less exciting photographs; the ones that tell a story and give you a flavour of what happened but would normally stay in the box or in the file as they’re perhaps not worthy of a single or double photo layout. It’s an extensive tutorial- definitely one where you need a cup of tea and chocolate biscuit to keep you company whilst you’re watching it!
Hope you’ve gained a little inspiration to go and create a new project- maybe from some kitchen products or go and dig out your stamps and get them inky!
Until next time… xx
Trendy Tuesday – Way to Score!
Way to Score!
By: Katherine Elliot
Whether you are new, or you”ve been paper crafting for a while, think of how many ways you score your projects. That list probably grows over time. But now more than ever, you can find many different tools and techniques to make a perfect score and make your project picture perfect.
Simple straight edge and bone folder in use. Image source from factorydirectcraft.com
Paper scoring is one of the first, most basic techniques you learn when working with paper crafts. There is so much more to it than just folding cardstock in half (although if you were like me, that”s exactly how you start!). The first time a friend saw me score cardstock before folding it was an “A ha!” moment for her. Instantly she reminded me that scoring is not always your first instinct when you start this hobby, but it becomes an important part of our craft as we try more advanced techniques.
Tools for scoring are as simple as a straight-edge, ruler and stylus or bone folder, or score blade for your favorite paper trimmer. Basic scoring tools are inexpensive and easy to find.
Cutterpede Scoring Blade shuttle and Martha Stewart Crafts Bone Folder, image source amazon.com
When it comes to following tutorials for the latest fancy fold cards or 3D projects, many companies now offer several options to help make precisely measured score lines super easy. You”ve just gotta love these tools when when it comes time to tackling more advanced crafts.
Scor-Pal, Martha Stewart Scoring Board and Simply Scored score boards shown. Image source from stampingtweets.com
Score boards from Scor-Pal, Martha Stewart Crafts, Stampin” Up! and many others offer the some of the best tools to perfectly align your score marks. Prices range from $15-$30(US) for most boards. The ruled guidelines and tools included with these boards can help make quick work of complex designs.
Straight and carefully measured folded score lines are key to many of the fancy fold cards you see, like these adorable step cards…
Step card by Pam Sparks, image source expressionswithheart.files.wordpress.com
Brighten Your Day by Paula Kay Bourland, image source splitcoaststampers.com
Crisp, scored & folded lines also help advance your card making skills to create engaging pop-up cards as well.
image source and instructions for Kirigami-Paper Bird Card from PapercraftCentral.net.
Beyond cards with a variety of mountain and valley folds, scored decorations are very trendy. Take for example, the very popular rosette. Simple hands-on scoring and folding of a strip of paper is all you need to make these fun decorations.
Scoring paper to create a rosette. Image source and tutorial found at Chasing Paper Dreams.
image source Chasing Paper Dreams
Paper rosette flower arrangement by Chavez Designs
Rosettes or other fan-folded decorations are fun dimensional additions to many projects.
Fan folded scallop circle skirt cards and image source from stampshacklady.com
Keep in mind, score lines are not just for folding. Score lines are an easy embossed accent. No embossing machine required! Check out the score lines used on these lovely cards…
image source Butternut Sage Designs
image source Debbies Designs Blog
image source DoStampingwithDawn.com
Stampin” Up”s new diagonal plate for their Simply Scored score board makes easy work of diagonal lines (that was the tool used in the Happy Birthday card shown above) and perfect folds for custom envelopes, too.

Simply Scored Diagonal Plate from Stampin” Up! featured above, image source lindastamps. wordpress.com

Crafters Companion Enveloper featured above, image source amazon.com
Envelope specific scoring tools come with the instructions you need for your custom projects. Most of the standard score boards you find also include envelope making instructions so customizing the packaging of your fancy fold card is at your fingertips.

Martha Stewart Crafts Score Board and envelope image source Craft Critique.com
Pick your favorite way to score and go for it. Keep it simple or find new ways to make scoring your project a home run. Whatever you do, score big this year!
Bonus Winner of Our Set of 12 Tim Holtz Distress Stains by Ranger Ink
I hope you all had a wonderful weekend. Ours was cold, and busy but still fun – mostly LOL. My father-in-law and my brother in-law along with his two boys (ages 5 and 3) were over on Saturday to help us put together a pergola for our deck that my brother-in-law had given us. Once it was all up we were hanging out a bit and all of a sudden noticed that it was awfully quiet. I went looking for the two youngest (my three year old and my 3 year old nephew). As I walked upstairs the first sight that greeted me was our second floor bathroom floor covered in water, with a pair of soaked pants and some toys sitting in the water. I found the boys hiding – my nephew in a closet and my son behind a pillow (not a great hiding spot LOL). They had been playing in the toilet (thankfully there was nothing in the toilet at the time). Later that night, when we tried to flush the toilet, it was plugged (no surprise). After working to unplug it for about 2 hours, about all my husband retrieved was a lego man, and two lego type cables. We finally gave in and called a plumber. He retrieved a pair of underwear, and a few more toys, but told us that there was something soft jammed into the toilet that he just couldn’t get out. He said he could take the toilet completely off and try, but there were no guarantees, and it would cost us about $350. His advice was to get a new toilet. Great! (not) So guess what we’ll be doing tonight?
Anyways, as we mentioned on Friday, since we were late putting up our post, we were going to pick one more person to win a set of 12 Tim Holtz Distress Stains. Congratulations to our bonus winner:
Lucy, please email us at customerservice@papercrafterslibrary.com to claim your prize. Be sure to put “Distress Stain Winner” in the subject line of the email and include your full phone number and shipping address.
Project Newsletter Makeover Challenge – My Princess
Welcome to the Makeover Monday challenge. Every Monday, as part of our project ideas newsletter we’re going to make over one of our own older cards, showing you how easy it is to use existing designs (your own OR someone else’s) as inspiration. This week Tracy has designed this “My Princess” card.
Your challenge – as with our previous Makeover Monday Challenges – is to use our piece as inspiration and make it into a card, scrapbook page, or other project. You can use the layout, the colors, an element you like…it can look like our piece, or nothing at all like our piece. We want to see where YOU take this. This challenge is strictly a “work from your stash” challenge.
As a newsletter subscriber you will have received a link to a private web page, from which you can watch the video tutorial. If you didn’t receive the video tutorial link then please be sure to email us at customerservice@papercrafterslibrary.com. In order to ensure you don’t miss any more of our Makeover Monday Challenge video tutorials, please be sure you sign up for our FREE email newsletter from the top right sidebar of this blog. Please note that the video tutorial will be available for general viewing for one week only – and then will be moved into our library for our members only
Every Monday, here on the blog, we’re going to post the original picture, and the made over picture. You will have ONE week to upload your challenge piece.
Instead of a weekly prize though, we’re going to award a prize monthly. So for each week you participate and each project you submit – you will get one entry into our monthly draw. On the first Monday each month – we will announce one challenge winner, who will receive one of our grab bags featuring over $30 of paper crafting products. Our next draw will take place on Monday, May 7th, 2012.
Our inspiration piece, shown below, is an archived project from the Andrea Walford blog.
Here are the details on how you can participate in the Makeover Monday Challenge:
A new Makeover Monday Challenge video tutorial will be emailed out to newsletter subscribers every Monday (so make sure you are signed up). Then, here on the blog, we will post a picture of our inspiration piece and made-over project along with an Inlinkz button for you to enter your project. Here are the details:
- Work from your own stash to create a project based on the inspiration project provided – you can use any products you would like, and make any type of project you like – card, scrapbook page, album, 3D item etc.
- Post your project on your blog, in your gallery or on any other photo-hosting site (such as photobucket or flickr).
- Click on our inLinkz button below to add a link to your project for our challenge
- You will have until 7am, Monday, April 30th to add your link to the list to be eligible to win. And you can enter as many times as you like.
- One randomly selected winner will be chosen from ALL the entries on Monday, May 7th.
- For each project you submit, your name will be entered into our monthly draw. The winner will be announced on Monday, May 7th.
Good luck to everyone and we look forward to seeing your projects!
Ranger Week: Winners of Our Set of 12 Tim Holtz Distress Stains

We’re SO sad that Ranger Week has come to an end! We’ve had a ton of fun playing with all the Distress Stains, and hope we’ve inspired you to take the leap and play with the Distress Stains too!
If you missed out on all the great Distress Stain Techniques we shared over the course of the week, click on any one of the links below to go to each post.
As promised, we are announcing five winners from each of the 5 days of our event. However, we have a surprise for you all. Because we put today’s post up late, we have decided to give you all one last opportunity to win a set of 12 Distress Stains. Leave a comment here telling us what you thought about Ranger Week and we’ll pick a winner from THIS post and announce the winner on Monday April 23rd at 12 pm EST.
So….Drumroll please…..the winners are:
If your name was drawn, please email us at customerservice@papercrafterslibrary.com to claim your prize. Be sure to put “Distress Stain Winner” in the subject line of the email and include your full phone number and shipping address.
Once again we’d like to thank you all for taking the time to visit and participate in our Ranger Week. We’d also like to extend a BIG thank you to Ranger for their generous donation of all the Distress Stains. We hope you come back and visit us often as we’re going to be having many more of these manufacturer spotlight weeks. Just to give you a hint, we have Spellbinders, May Arts Ribbon, Wow! Embossing, Maya Road and Crafter’s Workshop all on the horizon – so you definitely won’t want to miss out!
To keep up-to date on what’s coming up, be sure to sign up for our free email newsletter. As a subscriber to our free newsletter you’ll also receive a free weekly video tutorial. You can also keep up with us on our Paper Crafter’s Library Facebook page.


