Welcome to May Arts Week

Welcome to May Arts Week on the Paper Crafter’s Library Blog!  We’re so excited to partnering with May Arts to showcase their stunning ribbons. I don’t know about you, but here at Paper Crafter’s Library we’re ribbon lovers – you’ll find ribbon on almost all of our projects – which is why we’re so thrilled to have May Arts as an Invited Sponsor. You haven’t seen ribbon until you’ve seen May Arts Ribbon – they offer a multitude of different colors and styles of ribbon to suit any preference and taste –  and all of it, top quality!

Every day this week we’ll be sharing fantastic projects featuring May Arts ribbons created by both the May Arts Design Team as well as the Paper Crafter’s Library Designers/Educators. At the end of this week, two lucky winners will receive their choice of FOUR rolls of ribbon from the May Arts website. One winner will be drawn from all the comments left either here on the Paper Crafter’s Library blog or the Paper Crafter’s Library Facebook page , and one winner will be drawn from all the comments left either on the May Arts Blog or the May Arts Facebook Page. Remember, each comment you leave is one entry, so be sure to visit every day not only for the great project ideas, but also to enter your name into our give-away.

About May Arts

May Arts Ribbon was founded in the early 1980’s in Riverside, Connecticut. The original products were high-end silk flowers imported from Taiwan, which were decorated using quality ribbons. The decorative ribbons proved so popular among customers that the business gradually evolved into a dedicated ribbon wholesaler. 

As a family-owned and operated business, May Arts began a long-standing tradition of quality, affordability and exceptional customer service. We are dedicated to carrying on this same tradition by offering high quality products at competitive prices. Our friendly, knowledgeable staff is always happy to answer your questions or to assist you in placing your order. 

May Arts carries a wide selection of quality ribbons to choose from; such as grosgrain, silk, satin, burlap and a variety of prints and patterns. All inventory is held in stock, so we can ship orders out right away—typically the same day.
Where to Buy May Arts Ribbons

The May Arts website is their wholesale site for online and brink and mortar retailers.  We’ve linked to it so that you can easily view their entire product line in one place.  There are numerous places where you can purchase May Arts Ribbons including many local scrapbook stores as well as online stores. Two of the online stores that carry the biggest selections that we are aware of include Amazon, who carry the complete May Arts Ribbon Line (plus you can qualify for free shipping).  Click on the link we provided and it will take you to our May Arts Ribbon Search Results. To find a particular ribbon, go to the May Arts website, find the name of the ribbon and color and then enter that into your Amazon search results.  Please note that through Amazon you’re buying by the roll.  Most other online and local scrapbook stores sell May Arts Ribbon by the yard.  One of the online stores that carries a great selection is Ribbon Carousel.

May Arts Design Team Project

To start off the week, we have May Arts Designer Charlene Driggs.   You will find her project below, but first here is a little bit about Charlene:

Charlene DriggsHi!  My name is Charlene Driggs.  My husband and I live in the Tropical South with our little Havanese, Bentley.  We have two grown sons, one lovely daughter-in-law and 2 adorable (of course!) grandchildren.

My favorite paper art projects are gift sets.  I love to take ordinary everyday items and turn them into something beautiful using papers, ink, lush ribbons and other embellishments.  My style would probably be considered eclectic as I enjoy a variety of styles.  My current favorites are Clean and Simple (CAS) and romantic vintage.

I am humbled and honored to be a part of the amazing May Arts Design Team,and the Rubbernecker Stamps and the Sparkle N Sprinkle Design Teams.


Thrifty Gifting Altered Notebooks

As the Prima Ribbonista at May Arts Ribbon,  I’m so honored to be sharing with you today on the Paper Crafter’s Library blog.  I love all things crafty but my main love is paper crafting. Whether it’s altering an existing product or starting one from scratch, it’s all good.  I also love to save money on my paper crafting hobby (habit!) whenever I can.

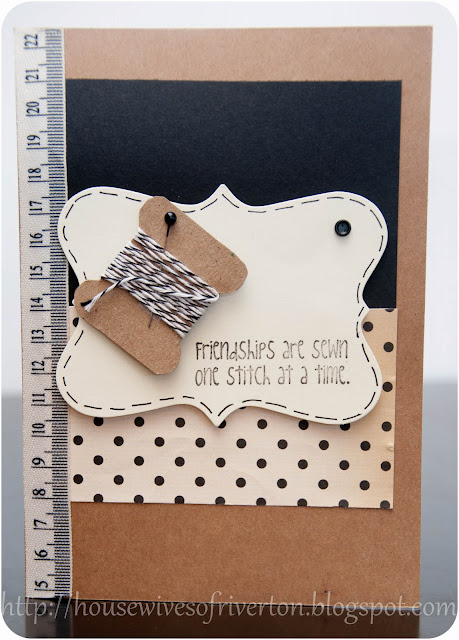
Gift giving is fun but it can also be costly, so when I’m out at the craft or department stores, I’m always on the lookout for things that can be altered.  I picked up a supply of plain notebooks a while ago.  I love to keep these in my stash ready to be altered for thrifty gift giving.  Using a few beautiful papers, some embellishments and gorgeous May Arts Ribbons, I’m going to show you how you can turn this:

May Arts Week Day 1

Into this:

May Arts Day 1

There are many adhesives available for this type of paper craft however; I like to use Tombow Mono- Multi because it allows me a few extra seconds to move my papers around to make sure they’re straight.   I chose the soft paper line called 5th Avenue by Melissa Francis.  I love the soft vintage color pallet in this paper pack.

I like to gather an assortment of ribbons, embellishments and letters together as I tend to create as I go rather than having an exact plan.  I try to pick up embellishments whenever I see them on clearance even if I don’t have a plan to use them right away as I’ve found they always get used or shared with a friend.

I chose May Arts 5/8” Crochet Lace (361-58-10), ¾” Velvet in a lush soft pink (PV-34-17), 3/8” Black Velvet Ric Rac

(WR10 ) and for the flower, I used May Arts 3” Black Bias wide Cut Satin (KK10) to compliment these papers beautifully.

To create the flower, I used a pattern by Pins and Needles, May Arts 3” Bias Cut Satin and a candle to curl the edges.  I simply followed the directions using the provided pattern, and then added a few pink beads from my collection for the center.

 May Arts Day 1

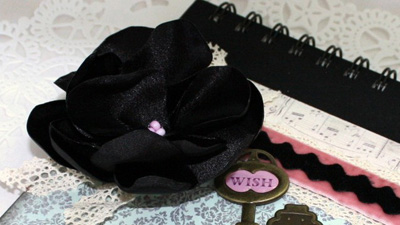
After creating my flower, I cut and measured my papers, then attached them to the notebook front using Tombow Mono-Multi.   Next, I layered May Arts Crochet Lace, Pink Velvet and Black Ric Rac ribbons using strong double sided tape over the seam created by the two papers I chose.  A strip of narrow double sided tape and some string pearls from my stash covers the top seam.  The flower was attached using Crystal Effects as I want to make sure it doesn’t come off during use.  A metal lock and Key by Dear Lizzy/American Crafts adds another touch of pink to the color scheme.

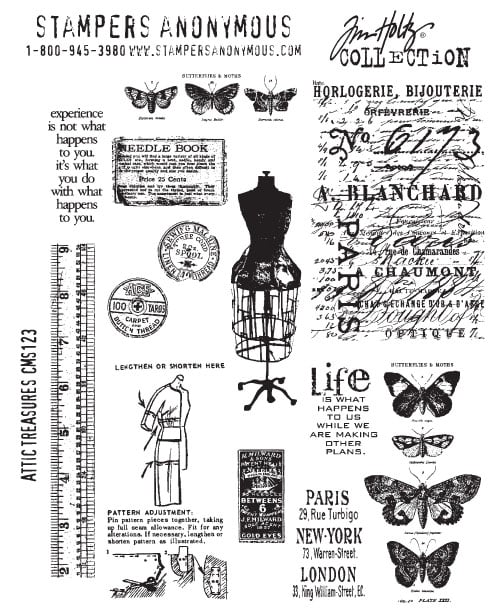
The Grunge letters by Tim Holtz (picked up at a local overstock store for $2.99!) were pressed into a black ink pad then attached with double sided tape.  For the pen, I just rolled up a narrow strip of the designer paper and shoved it into the pen barrel.

That’s it!  A useful, elegant, gift thanks to May Arts Ribbon.  Thanks for joining me at Paper Crafter’s Library.  I hope you’ve been inspired to create your own “Thrifty Gifts”!  You can find Charlene here: Charlene Driggs, May Arts Ribbon Prima Ribbonista

Paper Crafter’s Library Designer Projects

Now, below you can see some projects created by yours truly (Andrea – Creative Director & Founder of Paper Crafter’s Library) and Tracy- Senior Educator/Designer here at Paper Crafter’s Library.

In the card below I used some of the gorgeous May Arts Chevron Patterned Yellow Ribbon (called Twill/Stripes) as an accent to Prima’s Sun Kiss Collection which I used to create the card shown below.  We’ve filmed a free video tutorial on how to create the card which you can watch below.

Download the pdf handout here

You can watch a video on how to create this Sweet card here.

In the card below Tracy uses May Art’s Baker’s Twine to create the tail on her kite.

There is a video tutorial and handout for this project available to our Paper Crafter’s Library members.

So there you have it! Day 1 of our celebration of May Arts! Be sure to stay tuned for tomorrow’s post with more great projects and another free video tutorial!

A Bit About Paper Crafter’s Library

The world of paper crafting is HUGE! Whether you are a beginner, or you’ve been creating for years, the sheer number of different products, tools, techniques and project ideas can be overwhelmingAfter spending 6 years helping thousands of paper crafters around the world become more successful in the creative space through her series of kits, digital tutorials and online classes, Andrea Walford began looking for a new approach to education. In 2011 she launched Paper Crafter’s Library – the first, and still to this day, only website that provides an all-in-one learning solution for paper crafters. With almost 800 videos currently in their library and 4-5 new videos added each week, Paper Crafter’s Library offers comprehensive training on products, tools, techniques, and project ideas. From beginner through to advanced, whether your interest is in stamping, card making, scrapbooking, creating 3D items or altered art – you’ll find all the resources you need to navigate the world of paper crafting in ONE place, organized and indexed so that it’s quick and easy to find.

Be sure to sign up for our free email newsletter which features weekly video tutorials. For more information about Paper Crafter’s Library and how we can help you take your paper crafting to the next level, check out the Benefits of Becoming a Member.

May Arts Ribbon Give-Away

To enter to win 4 rolls of May Arts Ribbon of your choice, please leave your comment below. Also, be sure to stop by the May Arts Blog when you see the Paper Crafter’s Library post published for another chance to win, and tell them Paper Crafter’s Library sent you! Winner will be announced on Friday!

Project Newsletter Makeover Challenge – Wonderful Friend

Welcome to the Makeover Monday challenge. Every Monday, as part of our project ideas newsletter we’re going to make over one of our own older cards, showing you how easy it is to use existing designs (your own OR someone else’s) as inspiration. This week Tracy has designed this “Wonderful Friend” card.

Your challenge – as with our previous Makeover Monday Challenges – is to use our piece as inspiration and make it into a card, scrapbook page, or other project. You can use the layout, the colors, an element you like…it can look like our piece, or nothing at all like our piece. We want to see where YOU take this. This challenge is strictly a “work from your stash” challenge.

As a newsletter subscriber you will have received a link to a private web page, from which you can watch the video tutorial. If you didn’t receive the video tutorial link then please be sure to email us at customerservice@papercrafterslibrary.com. In order to ensure you don’t miss any more of our Makeover Monday Challenge video tutorials, please be sure you sign up for our FREE email newsletter from the top right sidebar of this blog. Please note that the video tutorial will be available for general viewing for one week only – and then will be moved into our library for our members only

Every Monday, here on the blog, we’re going to post the original picture, and the made over picture. You will have ONE week to upload your challenge piece. Instead of a weekly prize though, we’re going to award a prize monthly. So for each week you participate and each project you submit – you will get one entry into our monthly draw. On the first Monday of each month – we will announce one challenge winner, who will be featured as a guest designer on the Paper Crafter’s Library blog as well as our Facebook page. As a guest designer, we’ll feature your biography, some of your favorite paper crafting projects and we’ll link to your blog.

Our inspiration piece, shown below, is an archived project from the Andrea Walford blog.

Here are the details on how you can participate in the Makeover Monday Challenge:

A new Makeover Monday Challenge video tutorial will be emailed out to newsletter subscribers every Monday (so make sure you are signed up). Then, here on the blog, we will post a picture of our inspiration piece and made-over project along with an Inlinkz button for you to enter your project. Here are the details:

  • Work from your own stash to create a project based on the inspiration project provided – you can use any products you would like, and make any type of project you like – card, scrapbook page, album, 3D item etc.
  • Post your project on your blog, in your gallery or on any other photo-hosting site (such as photobucket or flickr).
  • Click on our inLinkz button below to add a link to your project for our challenge
  • You will have until 7am, Monday, May 21st to add your link to the list to be eligible to win. And you can enter as many times as you like.
  • For each project you submit, your name will be entered into our monthly draw. The winner will be announced on Monday, June 4th.

Good luck to everyone and we look forward to seeing your projects!


Technique Thursday: Embossed Metal Chipboard Embellishment

This week on Paper Crafter’s Library’s Technique Thursday Tracy embellished a chipboard element, with dry embossing on a foil sheet covering the chipbopard element. Then she coated the embossed piece with two different colors of Acrylic Paint, showcasing the Embossed Metal Chipboard Element Technique. 

For those of you unfamiliar with Technique Thursday, this is where we create and feature projects for our Club 52 online class (our year-long technique club), which our Paper Crafter’s Library members also access as a free benefit of their membership.

If you’re interested in checking out what we’ve covered so far, you can look at our Club 52 page. If you’re a technique junkie and would like to learn new techniques (as many of them are ones we have created), or revisit old ones – you can still sign up from this page – you’ll be able to access all 36 weeks we’ve done so far, plus the remaining weeks, and your access to the classroom will last for 15 months.

If you are not already receiving our weekly email newsletter, make sure you take a minute to sign up from the top right sidebar of our blog. Every Monday we create an exclusive project with a video tutorial for all of our newsletter subscribers and Paper Crafter’s Library members. So make sure that you sign up now, so that you don’t miss out!

Art Journaling: Life The Life Art Journal Page Video Tutorial

Today I thought I’d pop in and share an art journal page I created for my personal blog www.andreawalford.com – my place to share my mixed-media work. I use my art journals for a lot of different things – exploration, experimentation, reflection….The beauty of art journaling is that you don’t really need many special supplies above and beyond what you likely already have if you’re a paper crafter who enjoys working with different materials and mediums.

I’ve filmed a video tutorial that you can watch from www.andreawalford.com that shows you how I created this page. Now keep in mind, this is a relatively simple page- I usually like to add more layers, more 3D elements, more texture, but those types of pages are hard to film because they take way longer to create. 

Design Team May Projects – Ezlie Perez

Hello there!  It’s another month and I have some fun projects to share with you along with a fun technique using a Versamarker and chalks.

The first project I made is a neutral baby card.  On this card I used my Versamarker as an adhesive for my chalk.  Not only does this help the chalk go where you want it to go, but it also intensifies the colors.  I love that.  I hope you enjoy the video tutorial and try out this fun and easy technique.

My second project is a great one because it can be made in minutes!  These are fun clothespins that are also magnets.  I don’t know about you, but I always have artwork and papers from my kids school that I want to put on the fridge, but my magnets are not always strong enough.  But with these clips, it makes it easy to hang different work from the fridge as well as adds a nice decorative element.  An added bonus with this project is you can use up some of your smaller scraps or that one flower you may have left from a package.

I hope you enjoy this quick video tutorial for this fun project.

My final project is a bonus project, so there is no video tutorial for it.  It is a scrapbook layout that I got to use stamps, washi tape, twine, and sewing.  I was even able to use some of my die embosslits from Stampin’ Up!  that I’ve had just waiting to be used.  I hope you like this layout.  It is a different way to get 3 photos on a layout.  Having the middle photo smaller, popped up on dimensional adhesive, and having a wider photo mat really makes it stand out.

I hope you’ve been inspired by these projects.  Feel free to check out my blog for more inspiration by me.  Thank you for your support and happy crafting!

Trendy Tuesday – Sew Creative

Sew Creative
By: Katherine Elliot

I am always impressed by anyone who knows how to sew and it”s easy to see that many papercrafters are very talented in this amazing craft.  Whether sewing is used as a design tool, or a theme, there are lots of wonderful inspiration pieces to check out. 

Sew a RainbowImage source:  Sew Artsy,  stampingandstitching.blogspot.com

 “The Little Things” card by Pat Smethers, image source:  Splitcoaststampers

The combination of sewing & other trends, like the sewn on banners shown below (banners were featured in Colleen”s Trendy Tuesday article last week!), give this card a casually crafted appearance even though it is amazingly detailed.

Happy birthday - 2012-01-16Image source:  koolkittymusings.typepad.com

 Having no skills with a sewing machine myself, at least I know that the internet is my friend when it comes to finding any “how to”s” on this subject.  I”ve found a link or two that you may want to check out:  “How to Sew on Paper by Machine or Hand“,  “All Stitched Up – Machine Stitching on Paper Tutorial” and  “Sew, Mama, Sew!”

Click here to view this  “how to sew on paper” article from SewMamaSew.com.

Not simply confined to decorations on cards and scrapbook pages, sewing tools, like an embroidery hoop, can be used to create one of a kind decorative objects, combining fabric, sewing and paper crafts all in one.  Check out this decorative project…

IImage source:  Kim Dellow, Inspiration Monday

If you love the look of real stitching, but have no machine, hand sewing is an economical option.  A simple paper piercer and hand threading works, with some patience required (read How to Add Handstitching to Cards at About.com), but there are other things, like WeR Memory Keepers Sew Easy tools, designed to help you create more elaborate sewing designs on your projects.

Sew Easy stitching tools from WeR Memory Keepers shown above, image source:

Image source and more Sew Easy layouts and ideas at  WeRMemoryKeepers , WeRonthenet.

A basic piercing kit, with thread included, may also be a great starter kit for a sewing novice.

Martha Stewart Crafts Stitched Collection Piercing Kit, image source: Scrapbook.com

If a sewing machine or handstitching is not an option for you, then there are other ways to incorporate sewing themes in your cards and crafts.    Faux sewing,  drawing stitch lines on your paper with a pen, is a fun way to achieve the look, without risking pricking your finger on a needle!

Image source:  housewivesofriverton.blogspot.com

Even if you are skilled with sewing talent, you may not always have time to pull out needle and thread.  Luckily there are many stamp sets with a sewing theme that you can find today.   Sewing theme sets featuring stamps of stitch lines and seamstress essentials make this a fun and easy theme to pull off…

Sew Artsy - Clear Rubber Stamps

Hero Arts Sew Artsy stamp set, image source: 123stitch.com.  This stamp set featured in the first card shown in this article.


House Mouse “Alterations Sew and Go” stamp, image source at house-mouse.com

Tailor Made stamp set from Close to My Heart featured above, image source:  addierecoy. CTMH.com

If sewing isn”t really your thing, any “fashionista” you know is likely a happy recipient of anything fashion or sewing related.  A versatile stamp set can suit several styles.  The dress form stamp from Tim Holtz”s “Attic Treasures” set was used below (gotta love that little hanger embellishment, too).

Image source:  studiol3.blogspot.com

Stampers Anonymous – Tim Holtz Attic Treasures stamp set shown above, image source:  scrapbook.com

 Sewing is an amazing embellishment on its own, but added pins, thread, buttons and other accessories add that perfect, finishing touch to any sewing theme project. 

Poke holes in the card to make a guide for sewing on the buttons.

Read more about How to Make Button Embelished Cards, image source: craftstylish.com

Image source:  cardsbyamerica.blogspot.com

Hope you find the time to try a little stitching on a project and were inspired by these examples featuring some new products and tried and true methods.  Now, it”s time to test my skills with my paper piercer and see what I can create for my first sewing teacher, my mom!  Have fun with this theme and thank you “sew” much for reading this post.

Project Newsletter Makeover Challenge – Best Teacher

Welcome to the Makeover Monday challenge. Every Monday, as part of our project ideas newsletter we’re going to make over one of our own older cards, showing you how easy it is to use existing designs (your own OR someone else’s) as inspiration. This week Tracy has designed this “Best Teacher” card.

Your challenge – as with our previous Makeover Monday Challenges – is to use our piece as inspiration and make it into a card, scrapbook page, or other project. You can use the layout, the colors, an element you like…it can look like our piece, or nothing at all like our piece. We want to see where YOU take this. This challenge is strictly a “work from your stash” challenge.

As a newsletter subscriber you will have received a link to a private web page, from which you can watch the video tutorial. If you didn’t receive the video tutorial link then please be sure to email us at customerservice@papercrafterslibrary.com. In order to ensure you don’t miss any more of our Makeover Monday Challenge video tutorials, please be sure you sign up for our FREE email newsletter from the top right sidebar of this blog. Please note that the video tutorial will be available for general viewing for one week only – and then will be moved into our library for our members only

Every Monday, here on the blog, we’re going to post the original picture, and the made over picture. You will have ONE week to upload your challenge piece. Instead of a weekly prize though, we’re going to award a prize monthly. So for each week you participate and each project you submit – you will get one entry into our monthly draw. On the first Monday of each month – we will announce one challenge winner, who will be featured as a guest designer on the Paper Crafter’s Library blog as well as our Facebook page.  As a guest designer, we’ll feature your biography, some of your favorite paper crafting projects and we’ll link to your blog.

Our inspiration piece, shown below, is an archived project from the Andrea Walford blog.

Here are the details on how you can participate in the Makeover Monday Challenge:

A new Makeover Monday Challenge video tutorial will be emailed out to newsletter subscribers every Monday (so make sure you are signed up). Then, here on the blog, we will post a picture of our inspiration piece and made-over project along with an Inlinkz button for you to enter your project. Here are the details:

  • Work from your own stash to create a project based on the inspiration project provided – you can use any products you would like, and make any type of project you like – card, scrapbook page, album, 3D item etc.
  • Post your project on your blog, in your gallery or on any other photo-hosting site (such as photobucket or flickr).
  • Click on our inLinkz button below to add a link to your project for our challenge
  • You will have until 7am, Monday, May 14th to add your link to the list to be eligible to win. And you can enter as many times as you like.
  • For each project you submit, your name will be entered into our monthly draw. The winner will be announced on Monday, June 4th.

Good luck to everyone and we look forward to seeing your projects!


Product Spotlight: i-magicut Ribbon Cutter and Sealer & Video Tutorial

Today we wanted to share with you a product spotlight on the Imaginisce i-magicut Ribbon Cutter and Sealer.  I don’t know about you all, but I consider ribbon to be one of my paper crafting “staples”.  I use it in just about every project I make.  As much as I love ribbon, one of the things that has frustrated me for years when I work with ribbon, is that inevitably, when a project gets handled, the ribbon starts to fray. Now if you’re going for a shabby-chic look that’s fine, but when you’re striving for clean and simple, or simply clean, then frayed ribbon just doesn’t cut it! That’s where the Imaginisce i-magicut Ribbon Cutter and Sealer comes in.

Imaginisce i-magicut Ribbon Cutter and Sealer

This machine is designed to cut and seal synthetic ribbons up to 3″ in width – and it will give you straight cuts, angled cuts as well as fish-tail style cuts.   It’s important to note the “synthetic” part as it will not cut or seal cotton ribbons or natural fibbers properly – so make sure you keep that in mind when you are working on your projects.  We always recommend that if you’re not sure what your ribbon is made of, then it’s a good idea to test a little scrap of the ribbon.  

In the video below, Tracy shows you exactly how to use this little machine.  It’s filmed in two parts so make sure you watch both parts of the video.

Part 1

Part 2

In addition to the review, Tracy has also created a video tutorial for you on this Ribbon Thank You card, which uses the i-magicut Ribbon Cutter and Sealer.

Download the pdf handout here.

You can view a video on how to make this Ribbon Thank You card below:

If you’re currently not a member of Paper Crafter’s Library, we encourage you to take a look at the Benefits of Membership. Along with our existing video library of over 700 videos, you’ll receive daily inspiration, great project ideas, fun techniques, instruction on how to use your products and more! For more information and to join, click here.

Also, if you are not already receiving our weekly email newsletter, make sure you take a minute to sign up from the top right sidebar of our blog. Every Monday, we create a project with a video tutorial for all of our newsletter subscribers and Paper Crafter’s Library Members.

Freebie Friday: Winner of Last’s Week’s Echo Park Prize Pack

 Happy Friday everyone!  Since we’re gearing up for another round of manufacturer spotlights and of course lots of prizes, we’re not hosting a Freebie Friday event today, however, if you check out our second post for today, we do have two free video tutorials for you – one on the Imaginisce i-magicut Ribbon Cutter and Sealer, and a video tutorial for a card featuring ribbon and using i-magicut. In the meantime, I do want to announce the winner of last week’s Echo Park prize pack.

Drumroll please…………..And the winner is……….

Debbie, please email us at customerservice@papercrafterslibrary.com to claim your prize.  Be sure to put “Freebie Friday Winner” in the subject line of the email and include your full phone number and shipping address.

Win a One Year Membership to Paper Crafter’s Library & the May 1st Winners!

This past January Paper Crafter’s Library celebrated our first year anniversary – and in that time we have established ourselves as the THE all-in-one learning solution for paper crafters with the largest {and best} online library of video tutorials on the internet. From beginner through to advanced, covering product instruction, techniques and project ideas for stamping, card making, scrapbooking and altered art – we have something for everyone! We’re proud of how far we have come, and we’re hoping you can help us spread the word!

That’s why as part of our first anniversary celebrations we have an exciting new contest which we are running for a total of 9 months (this is now our second month) – where we will be giving away a total of 18 ONE YEAR MEMBERSHIPS to the Paper Crafter’s Library – each valued at $200! We will announce 2 winners at the beginning of EACH MONTH – we started in April, and well be ending in January of 2013.

There’s several ways to enter, and each way gives you 1 entry into our draw – so the more ways you participate the greater your chances of winning:

1. Put our Fan Badge on the sidebar of your blog or website. In the right hand sidebar of our blog, under the heading “Grab Our Fan Badge” you’ll find a box with the html code which you just need to copy and paste into the sidebar of your blog.

2. Create a post on your blog letting everyone know they can win a One Year Subscription to Paper Crafter’s Library and linking back to this post for instructions on how to win.

3. Post about our give-away on your FacebookPage linking back to this post.

Once you have done any or all of these things, leave us a comment here on this post letting us know, with a link back to your blog or FB page and we’ll pop by for a visit. When you leave your name, make sure that if you don’t put your full last name, at the very least you put your last initial.

So how do you enter if you don’t have a blog or FB page? Simple, leave us comments on our daily blog posts. We love hearing back from you, we love your feedback and we read each and every comment. For every comment you leave on one of our blog posts* you get one entry into that month’s draw. * Please note Freebie Friday is separate from this contest – comments left for our Freebie Friday give-aways do NOT count as entries in this contest.

Remember, we’ll be running this contest for the next 7 months, so you will have LOTS of opportunities to win. The next two winners will be announced at the beginning of June. Please note this contest is open to current Paper Crafter’s Library members – if you are a current member and you win, that time will be added on to the end of your subscription.

Here’s our First Winner for May.

And here’s our second winner for May.


Congratulations to the both of you! Please email us at customerservice@papercrafterslibrary.com and put “PCL One Year Subscription Winner” in the subject line. We’ll need you to email us all your info – first and last name, your choice of a username and password, your mailing address and phone number.

We’ll be picking two more winners in June – so if you’ve entered already but weren’t picked, there are still plenty of opportunities to win! Make sure the badge is still there on your blog, put up another post or tweet or FB letting people know about our contest and then leave a comment here in this post linking back, or simply keep visiting and leaving us comments.