Trendy Tuesday – Non-Traditional Christmas Colours

Trendy Tuesday – Non-traditional Christmas Colours
By Colleen Harshaw

Well, you haven’t ‘seen’ me here at the Paper Crafter’s Library lately, and that is because there have been a lot of momentous things happening in our family!  Firstly, my husband and I took a two week trip, during which time we went first to Thailand and then to Santorini, Greece.  The Greece portion of our trip had been planned for months, as a 15th anniversary trip.  The Thailand part of the trip came up much later as the result of a job offer that my husband received.  So, of course, before accepting the job, we had to go and visit Bangkok to see what it was like.  The end result of that trip is that we are moving to Thailand!

We were only home for 24 hours before Hurricane Sandy hit us here in New Jersey, and then we were without power and other services for a VERY long 13 days.  We are now back up and running, and trying to sell our house.  So, that is why I haven’t been around much!

I plan to continue to write articles here at the Paper Crafter’s Library after our move.  That is the beauty of technology…I can be anywhere in the world and still do the job!

Now, back to business!

The first sample that I have for you today is a card that is made with some pretty bright colours.  Bright colours are a trend that have been talked about here at the Paper Crafter’s Library in the past, and they are spilling over into the Christmas category too!  I actually have two different card samples for you, both of which use the same stamped image as their focal point.  I always find it fascinating how the same stamped image, or even the same sketch, can be used by more than one person and each can make it look so totally different!

Both ladies have used blues, greens and pinks as part of their colour palettes.  I think you will notice a trend with these particular colours this holiday season!

Card by Joanne Basile for mftstamps.com
Photo credit to www.stampedbyhand.blogspot.com

Card by Karen Giron for mftstamps.com
Photo credit to www.kgiron.blogspot.com

Next, I have another card sample for you.  This card uses some of the traditional reds and greens that we so often see at Christmas time, but they are paired with a couple of different shades of blue and even a mossy looking green, giving the palette a different look about it.

Card by Jen del Muro
Photo credit to www.iheart2stamp.com

Here is another beautiful card sample which uses some interesting polka dot paper as an accent piece across the bottom.  If you look at the colours of the polka dots, they are all colours that would not typically be associated with Christmas cards!

Card by Karen Giron for mftstamps.com
Photo credit to www.kgiron.blogspot.com

Lastly, I have a card sample from our very own Andrea Walford!  I love the palette that she has used to create this holiday card.  Even though these colours are not ones that you typically see on a Christmas card, you have no trouble identifying it as such due to the greeting and the snowflake image that she has chosen to use.

Card by Andrea Walford for Paper Crafter’s Library

For those of you who don’t have time to hand make your Christmas cards this year, even the folks at Snapfish are on trend with this design that they offer on their website!

Photo credit to www.shutterfly.com

Here is a scrapbooking layout that uses reds and greens along with golds and (my favourite) pale blue.

Layout by Sczosnek
Photo credit to www.scrapbook.com

I found this next two page layout really fun.  It reminds me so much of Thanksgiving due to the choice of colours, but once you really look, the title and the accents indicate otherwise!  Sneaky!

Layout by We R Memory Keepers
Photo credit to www.scrapbook.com

If you are looking for some further inspiration, you have got to see this!  I found this photo on the Better Homes and Gardens website.  How about adding some fuchsia to your colour scheme this year?!

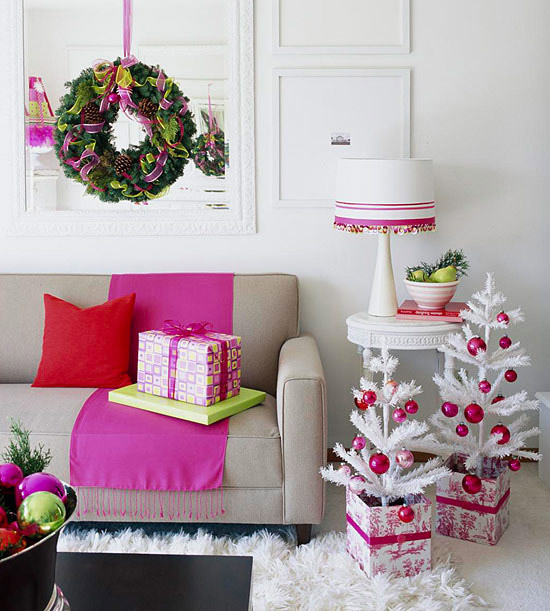
Photo credit to www.bhg.com

Purple can be nice too……  How about purple and cream to decorate your holiday table?

Photo credit to www.thedecorologist.com

OK, now for the product list!  I have a few paper lines to show you today, but keep in mind that many of these lines have other accessories too. 

Carta Bella Merry and Bright Collection Kit
Photo credit to cartabellapaper.com

My Mind’s Eye All is Bright Collection
Photo credit to www.mymindseye.typepad.com

This next line from SEI incorporates some bright colours and some birds.  That bird trend had been around for quite some time now…and I must admit, I am not a fan.  Are those bird ever going to go away?!

SEI Berry Melody Assortment Pack
Photo credit to www.scrapbook.com

And last, but not least, we have this cute line from Kaisercraft.  I am sure there are many more products out there that I haven’t mentioned today, but that means that you now get to have some fun hunting them down!  I don’t want to make it too easy for you to spend your hard earned money.  🙂

Kaisercraft Mind Twist Collection – Christmas – 6.5 x 6.5 Paper Pad
Photo credit to www.scrapbook.com

Enjoy your creative time this holiday season!  I look forward to ‘seeing’ you again soon here at the Paper Crafter’s Library.  Until next time…..


Project Ideas Newsletter: Hello

Baker’s twine is everywhere I look right now.  This is a great way to showcase multiple colors of baker’s twine  all on one card.  Go ahead and have some fun with all the colors that you love! Add a fantastic greeting with a few rhinestones to complete this fun and simple card!

Newsletter subscribers will have received a link to a private web page, from which they can watch the video tutorial for this Hello card. Please note that the video tutorial will be available for general viewing for one week only – and then will be moved into our library for our members only. In order to ensure you don’t miss any more of our Project Ideas Newsletter video tutorials, please be sure you sign up for our FREE email newsletter from the top right sidebar of this blog. If you didn’t receive the newsletter then please be sure to email us to confirm your subscription.

Thanks For All You Do Video Tutorial

The buzz in the studio was amazing this week.  We’ve been so focused on Christmas designing that both Andrea and myself are on a creative high!  I just love all the beautiful things that we have on hand for creating all things Christmas!  I hope that you all have enjoyed our projects and make sure to check back with us next week for even more amazing Christmas projects!


Thanks For All You Do

I really needed a break from Christmas card designs!  I looked around our studio and found this absolutely beautiful designer paper.  It is so bright and cheery that I wanted to showcase the pattern.  I pulled out my favorite color of CS (Daffodil Delight!), a few coordinating buttons and used my favorite scallop punch. With the addition of the big bold greeting, my card was complete!

Download the pdf handout here

Supplies:

Stamps: Thanks All Ways (papertrey ink)

Ink: Early Espresso Classic ink (Stampin’ Up!)

Paper: Daffodil Delight CS, Very Vanilla CS (Stampin’ Up!); Dark Chocolate CS (papertrey ink); Paradise Beach DP Collection (Echo Park)

Accessories: bone folder, mini glue dots, Stampin’ Dimensionals (Stampin’ Up!); Tape Runner XL (thermo-web); brown embroidery thread (Craft Store); Berry Sorbet Vintage buttons, Lemon Tart Vintage buttons and Spring Moss Vintage buttons (papertrey ink); Open Scallop Edger punch (EK Success); Repositionable adhesive (Dotto)


Have a great weekend!

October Design Team Project – Canvas Snowman Card

I wanted to create a scene using different textures. There’s texture in the felt snowflakes (Die-namics dies), the snowy acetate and also the printable canvas paper snowman. The snowman is a Hero Arts set called ‘Smiling Snowman’ and I’ve used stamp markers to add colour to the stamp. The papers are cute- from the ‘Happy Days’ set (Papermania). I’ve kept it sentiment-less as you can add a winter sentiment or a Christmas one too. I love the little guy- he makes me smile. The acetate is attached to the inside of the card so the little snowman is actually standing proud away from the card.  There is a video on how to create this Canvas Snowman card in the library for Paper Crafter’s Library members.

I hope you have enjoyed this project.  Stop by my blog to see more of my projects.


Darling Angel

I just love this Magnolia little girl stamp and thought she would look great on a Christmas card.  I colored her in using Copic markers and then applied glitter to her wings for some added sparkle.  I also used various flowers and some bead garland to embellish the card.

We have a video tutorial for our members here.  (You must be logged in to view the page.)

Supplies:

Stamps: Dancing With Stars Tilda (Magnolia)

Ink: Mel’s Diner Glimmer Mist (Tattered Angels); R32, R35, R37, R39, B0000, B000, B01,YG91, YG93, YG95, YG97, E31, E35, E37, E39, E0000, E00, E11, Y11, Y18, W0 and W1 Copic markers (Copic); Tudedo Black Memento ink (Tsukineko)

Paper: Ripe Avocado CS (papertrey ink); Cherry Cobbler CS (Stampin’ Up!); Handmade Holiday 6” x 6” pad (Simple Stories)

Accessories: bone folder, Dazzling Diamonds glitter, Framelits – Labels Collection, Craft scissors, paper snips, 2-way glue pen (Stampin’ Up!); Roses Paper Flower White -TK1933 (Maya Road); Perle Bebe En Francais flowers, Laraine Candy Apple flowers, Charme Rose Doodle-Deux (Prima); Rustic Jute Button twine, Simply Chartreuse ½” Luxe Satin ribbon (papertrey ink); floral branch, wire cutters (Craft Store); Shabby Chic Chandelier Garland – Green (Magnolia); Tape Runner XL, 3D Foam (thermo-web); Matte Removable Tape (Scotch); Heat It! tool (Ranger); hot glue (Martha Stewart)

Trendy Tuesday – Disney

Trendy Tuesday – The Magic of Disney
by Katherine Elliot

It”s not a surprise that many paper crafters are under the spell of Disney”s Magic Kingdom.  I have fond memories of family vacations spent at Disney theme parks, and the memories still warm my heart. While it”s a great place for creating magical family memories, you too can capture some of that magic in your crafts using Disney themed paper craft products.

magic-layout-2-greta-resized.jpg

Scrapbook page and image source Queen & Co.

Family memories of a trip to Disney can be displayed in a more decorative fashion using a printer tray or shadow box.  Disney themed embellishments and favorite photos make this a wonderful decoration to share….

 Disney shadow box by “Scrappy Cath” image source Scraps of Life

Even if you are not scrapping a trip to one of the theme parks, there are Mickey Mouse fans of all ages, so why not prepare a fun card or make fun crafts for a Disney theme party?

Mocjencasfairytale7812

Magical Day card and image source simply caffeinated

Mickey Mouse ears are easy to add to your Disney themed project.  There are tools like punches, dies, and electronic cutter cartridges, just to name a few, that are specifically designed for Disney.

                                Cuttlebug 3x3 Combo Die

              Mickey Mouse 3×3 Cuttlebug die, image source Overstock.com       

   EK Disney DPM002 Punch / Mickey Icon / Disney Medium


                           EK Success Disney punch, image source shopping.com

You can also create your own mouse ear shapes using circle punches, like the balloons featured in this Disney themed birthday card…

Disney birthday card, image source The Plains Stamper

 Punches are wonderful tools for creating your own custom shapes.  Taking Disney punch art to an amazing level of creativity and expertise, Sharon White created these fantastic punch art Disney characters.  How many of the shapes do you recognize from your own stash of punches?  I bet you”ll recognize a lot!

IMG_0931

Punch art Disney characters, image source Sharon”s Scrappy Space

IMG_1445

Snow White birthday card by Sharon White, image source Sharon”s Scrappy Space

Another trend you may have seen lately is using negative die cut shapes, the empty space left after punching out a shape from your cardstock.  Mickey Mouse ears look great using this technique.

Kay Kalthoff used the remaining punch shapes for decorating the interior of the card, too.

Circle punch Mickey Mouse card image source Stamping to Share

The next card used a Cricut cartridge to cut the Mickey & Minnie shapes and features the signature Disney font.   Search on-line using your favorite font source to find a Walt Disney font to add a little extra magic to your scrapbook pages or cards.

Mickey & Minnie anniversary card and image source Kreative Korner by Kelly

Cricut cartridge die cuts and the Disney font were used to create and decorate these fun character invitations, too…

Goofy Invitations by Lisas Handmade Cards

For some of us interested in finding a few simple Disney theme things to have in our paper crafting stash, there are Disney themed stamp sets, stickers and papers to match.  EK Success appears to be the most common brand for licensed Disney products.

Disney clear stamps from EK Success, image source Overstock.com


 EK Success scrapbook paper, image source Scrapbook.com

Queen and Co. also has some fun Disney embellishments including bling and washi tapes.

 Queen & Co. shaped bling, image source Scrapbook.com

So are you a Disney fan or do you know one?  In my latest Pinterest stalking, I just happened to find one other fun Disney theme item to share. Oreos and mini Oreos create those famous mouse ears on this Disney themed cupcake tower- what a great addition to any theme party. Love the little Minnie Mouse ribbons, too.  So cute and yummy!

image source artsyfartsymama.com

 Hope you enjoyed seeing the Disney projects these talented crafters have made.  They are certainly crafty “Imagineers!”  Have a magical day, everyone!


Project Ideas Newsletter: Merry

I just love glitter – and I love glittery alphabet.  For this card, I die cut the letters for my greeting from a scrap piece of fun foam.  I then applied the foam letters to an acrylic block and used them to stamp my greeting.  You can simply leave the greeting as a stamped image or you can apply Heat and Stick powder and glitter, as I did, to jazz up the card.

Newsletter subscribers will have received a link to a private web page, from which they can watch the video tutorial for this Merry card. Please note that the video tutorial will be available for general viewing for one week only – and then will be moved into our library for our members only. In order to ensure you don’t miss any more of our Project Ideas Newsletter video tutorials, please be sure you sign up for our FREE email newsletter from the top right sidebar of this blog. If you didn’t receive the newsletter then please be sure to email us to confirm your subscription.


May Arts Spotlight With Designer Christina Colón

May Arts Logo

Today we have our monthly May Arts Designer! After our successful May Arts week back in May, we asked them to come back with another Guest Designer each month for you. So, we’re so excited to have another designer from May Arts with us today.

Here at Paper Crafter’s Library we’re ribbon lovers – you’ll find ribbon on almost all of our projects – which is why we’re so thrilled to bring you another fabulous May Arts project. You haven’t seen ribbon until you’ve seen May Arts Ribbon – they offer a multitude of different colors and styles of ribbon to suit any preference and taste – and all of it, top quality!

And, we also have a give-a-way for you!! Two lucky winners will receive a “winners choice” of 3 spools of Ribbon from May Arts. One winner will be drawn from all the comments left here on the Paper Crafter’s Library blog to win AND one winner will be drawn from all the comments left on the May Arts Blog to win. You certainly have a lot to choose from:

May Arts Ribbon

Remember, each comment you leave is one entry, so be sure to visit today not only for the great project idea, but also to enter your name into our give-aways.

About May Arts

May Arts Ribbon was founded in the early 1980’s in Riverside, Connecticut. The original products were high-end silk flowers imported from Taiwan, which were decorated using quality ribbons. The decorative ribbons proved so popular among customers that the business gradually evolved into a dedicated ribbon wholesaler.

As a family-owned and operated business, May Arts began a long-standing tradition of quality, affordability and exceptional customer service. We are dedicated to carrying on this same tradition by offering high quality products at competitive prices. Our friendly, knowledgeable staff is always happy to answer your questions or to assist you in placing your order.

May Arts carries a wide selection of quality ribbons to choose from; such as grosgrain, silk, satin, burlap and a variety of prints and patterns. All inventory is held in stock, so we can ship orders out right away—typically the same day.


Where to Buy May Arts Ribbons

The May Arts website is their wholesale site for online and brink and mortar retailers. We’ve linked to it so that you can easily view their entire product line in one place. There are numerous places where you can purchase May Arts Ribbons including many local scrapbook stores as well as online stores. Two of the online stores that carry the biggest selections that we are aware of include Amazon, who carry the complete May Arts Ribbon Line (plus you can qualify for free shipping). Click on the link we provided and it will take you to our May Arts Ribbon Search Results. To find a particular ribbon, go to the May Arts website, find the name of the ribbon and color and then enter that into your Amazon search results. Please note that through Amazon you’re buying by the roll. Most other online and local scrapbook stores sell May Arts Ribbon by the yard. One of the online stores that carries a great selection is Ribbon Carousel.

May Arts Design Team Project

Today we have with us May Arts Designer Christina Colón. You will find her project below, but first here is a little bit about Christina:

Hi everyone!  My name is Christina, but I usually go by Chrissy and I am thrilled to be guest posting for you today!  I live in Temecula, California.  I am married to a wonderful man who is incredibly awesome and supportive. I have 4 children who range in age from 12 years to 4 years old.  Needless to say, they keep me very busy.  We also have two dogs, Einstein and Curie, and cat named Pookie.

I currently design for May Arts ribbon and am loving every moment of it.  I’ve been scrapbooking since 2008 but have recently found that I love “off the page” projects the most.  My style can be best described as fun, eclectic and quirky.  I especially love trying new techniques and using everyday “found” objects in my projects.  I am a HUGE fan of upcycling and turning “trash” into treasure.  My go-to products are paints, mists, background stamps, and of course, ribbon.

Speaking of misting and stamping, I have a quick and easy project for you today.   Since we are fast approaching the holiday season, tags are a must have.  They are a great way to dress up any present or gift bag.


Holiday Tag Project

I really loved the reverse side of my May Arts black velvet and crochet trim.  You can see the velvet peeking through the crochet and it adds a nice bit of texture.

Prima’s “Fairy Belle” vine was a perfect accent.  I threw in some pieces from a very old vine I had in my stash and a wonderful “Inspire” light bulb.  I misted the large flower using Glimmer.  To tie my purples together, I highlighted the tips of the petals as well as the petals on the vine with my pigment pad.   Some ZVA Creative bling, May Arts burlap cord, and a filigree heart and voila!  You have a tag ready for the giving!

Thank you for checking out my tag and I hope you all have a wonderful Thanksgiving and holiday season!

Supplies Used:

Ribbon/Fibers:  May Arts Burlap Cord (SM09), May Arts Crochet and Velvet Trim (372-15-10)
Florals:  Prima, Petaloo
Trinkets:  Prima, Graphic 45
Bling:  ZVA Creative
Ink:  Heidi Swapp, Ranger, Clear Snap, Tattered Angels

We hope you have enjoyed today’s projects. We want to extend a sincere thank you to Christina Colón for sharing her creations with us. And don’t forget to enter to win one of the great ribbon give-a-ways from May Arts. Please leave your comment below. Also, be sure to stop by the May Arts Blog when you see the Paper Crafter’s Library post published for another chance to win, and tell them Paper Crafter’s Library sent you! Winner will be announced next week!

Graphic 45 Spotlight With Designer Maiko Miwa

Here is the latest installment of our Grahpi 45 Guest Designers. Many of you may remember that back in April we hosted a Graphic 45 Week on the Paper Crafter’s Library Blog. It was week filled with projects and inspiration using Graphic 45’s Tropical Travelogue Collection. We had such a great experience partnering with Graphic 45 and their design team, and such a great response from you, that we’ve decided to partner with them on an ongoing basis. The first and third week of every month one of the Graphic 45 Designers will share a project they’ve created here on the PCL Blog. We started with our monthly designers in June and before I introduce you to our latest Designer, I just wanted to take a minute to re-introduce Graphic 45 for those of you that may not be familiar with the company.

Graphic 45 is an award-winning scrapbook and paper crafting company­— owned and operated by a mother and her two daughters.

Diane Schultz (pictured center)—Designer and CEO (aka mother)

“I’m passionate about being creative and eager to make it possible for others to find their creative voice. My background includes stints as a designer for, McCalls, Simplicity, Vogue/ Butterick, Mattel Toy Company and a host of other jobs that each, in some way, led me to what I do now. At 45 I went back to school and got my degree in graphic design— I named the company to celebrate that achievement.”

Aimee Filimoehala (pictured left) —Director of Operations

“I wear a lot of hats and love it that way. Business, marketing, operations, etc. have made me a pro at multitasking (aka juggling‑figuratively and literally). When we launched Graphic 45 just three years ago we had no idea what was in store, working together as a family has been an amazing journey that we all feel so grateful to be apart of.”

Charee Filimoehala (pictured right)—Director of Customer Service and Design Team Coordinator

“I joined the team a little over three years ago and haven’t looked back…what a life-changing experience this has been. I love working with and around creative people and products (not to mention I like my co-workers quite a bit). I spend my days working with our friendly stores and talented design team…the occasional trip to a workshop or tradeshow pretty nice too.”

Together we create vintage inspired crafting products that capture the flamboyant style of the 1920’s and 30’s – with vibrant color, irresistible texture and imaginative design to create products with decades-old appeal that’s both fresh and familiar. Let our products inspire your next scrapbook layout, card, album or home decor project.

***********

Here’s a picture of their booth at the CHA show which absolutely blows us away every year! The artwork inside is absolutely stunning and totally unique. At the last show as we were speaking with Diane she told us that many of the altered pieces were vintage finds which she and her team transformed with their gorgeous Graphic 45 products. We can’t wait to stop by their booth at the Chicago CHA and see what they’ve got in store this year!

Here’s a picture of the Graphic 45 team – they’re always dressed in period costumes to complement the themes in their collections – every day of the show brings a new set of costumes. The ones shown below were for their Little Darlings collection.

Graphic 45 Designer Maiko Miwa

Our next Graphic 45 Guest Designer for this month is Maiko Miwa who is part of the 2012 Graphic 45 Design Team. We are very excited to share Maiko’s project with you.  She is very talented.

You can see Maiko’s fabulous project below, but first, here is a little more about Maiko:

I am a wife to a lovely husband and a mother to a 5 year old girl. I started scrapbook in year 2008 because I wanted to store all the memories with my family in this beautiful way. Nowadays, I teach scrapbook near Kyoto and Osaka. I also love to create and have fun by myself at home! I am willing to challenge many things throughout scrapbook .
I can say my style is soft and feminine. I love to crop many elegant photos. When I am making a layout, I always try to make it look like the whole layout is one picture. I love to use a lot of rhinestones, stamps, mists, and inks for my creations.  I bring to you today a layout for Christmas using Nutscracker Sweet Collection.  I like Gingerbread Delight paper and I used the gingermen cutting from this paper like the embelishment.  The theme of this is “Bright Christmas”.So Mainly Pink ,Red and Gold are used  and added glitter and gemstones on this.  Thank you so much for looking.  You can visit my blog here:  http://shiny-scrap.blogspot.jp/

Christmas Nutcracker Layout

We hope you have enjoyed this beautiful creation from Maido. I would also like to extend a warm thank you to Maiko for sharing her lovely project with us! Please take a minute to stop by Maiko’s Blog  and of course the Graphic 45 blog to check out all their amazing creations!

Sending Holiday Joy

If you have ever though about giving Copic coloring a try, this would be a great card for you, as with a large image all you will need to do is just color and add shading!  With the addition of the beautiful background from the designer paper,  you just need to finish off the layout with a simple greeting and gorgeous Real Red Satin ribbon tied into a bow! Stepping up the colored Christmas trees with just a few tiny rhinestones enhances the card.

We have a video and pdf handout available for our members here. (You must be logged in to view the page)

Supplies:

Stamps: Merry Christmas Trees (Hero Arts); Framed Out #8 (papertrey ink)

Ink: Tuxedo Black Memento ink (Tsukineko); G20, G21, G24, G28, E23, E25 and E29 Copic markers (Copic)

Paper: Stamper’s Select White CS (papertrey ink); Mistletoe DP (Bo Bunny)

Accessories: bone folder, Real Red ⅝” Satin ribbon (retired), Craft scissors, paper snips, Stampin’ Dimensionals, basic rhinestones, mini glue dots (Stampin’ Up!); Tape Runner XL, 3D Foam (thermo-web); Rustic Jute Button twine, Framed Out #8 die (papertrey ink); Big Shot (Sizzix)


Two Free PCL Memberships up for Grabs

Our birthday celebration is almost over!  Have you entered our contest for a chance to win a free 1 year Paper Crafter’s Library membership?  There is only ONE month remaining in the contest, so be sure to check out the details here an leave a comment before the 1st of December,  in order to be eligable to win one of the two remaining 1 year subscriptions to Paper Crafter’s Library!