Project Ideas Newsletter Challenge: Dashing Through The Snow

Welcome to the Project Ideas Newsletter Challenge. Every Monday, we will design a card, scrapbook page or 3D item. Your challenge – is to use our piece as inspiration and make it into a card, scrapbook page, or other project. You can use the layout, the colors, an element you like…it can look like our piece, or nothing at all like our piece. We want to see where YOU take this. This challenge is strictly a “work from your stash” challenge. This week, Andrea designed this Dashing Through The Snow card.

As a newsletter subscriber you will have received a link to a private web page, from which you can watch the video tutorial. Please note that the video tutorial will be available for general viewing for one week only – and then will be moved into our library for our members only. In order to ensure you don’t miss any more of our Project Ideas Newsletter Challenge video tutorials, please be sure you sign up for our FREE email newsletter from the top right sidebar of this blog. If you didn’t receive the newsletter then please be sure to email us to confirm your subscription.

Every Monday, here on the blog, we’re going to post a picture of our project. You will have ONE week to upload your challenge piece. Instead of a weekly prize though, we’re going to award a prize monthly. So for each week you participate and each project you submit – you will get one entry into our monthly draw. On the first Monday of each month – we will announce one challenge winner, who will be featured as a guest designer on the Paper Crafter’s Library blog as well as our Facebook page. As a guest designer, we’ll feature your biography, some of your favorite paper crafting projects and we’ll link to your blog.

Here are the details on how you can participate in the Project Ideas Newsletter Challenge:

A new Project Ideas Newsletter video tutorial will be emailed out to newsletter subscribers every Monday (so make sure you are signed up). Then, here on the blog, we will post a picture of our project along with an Inlinkz button for you to enter your project. Here are the details:

•Work from your own stash to create a project based on the inspiration project provided – you can use any products you would like, and make any type of project you like – card, scrapbook page, album, 3D item etc.
•Post your project on your blog, in your gallery or on any other photo-hosting site (such as photobucket or flickr).
•Click on our inLinkz button below to add a link to your project for our challenge
•You will have until 7am, Monday, October 29th to add your link to the list to be eligible to win. You can enter as many times as you like.
•For each project you submit, your name will be entered into our monthly draw. The winner will be announced on Monday, November 5th.

Good luck to everyone and we look forward to seeing your projects!


Boo Spider Card Video Tutorial

When we are sent Sophia’s projects I am always in awe!  She is an amazing artist!  She has a nack for punch art, as showcased in this Boo! card.   When I saw her Haunted House Treat Box, I was absolutely blown away.  Sophia pays a ridiculous amount of attention to detail and it shows through in her paper crafting.  I know that I loved both of todays projects and hope that you all do too!


Boo Spider Card

Punch art is everywhere right now.  Sophia highlights a simple punch art spider with a strip of DP and her trademark sponging! 

Download the pdf handout here

Part 1

Part 2

Supplies:

Ink: Faded Jean, Black Soot, Broken China and Chipped Sapphire Distress inks (Ranger); Black and Silver Sharpie marker (Office Supply Store); White Pan Pastel (Colorfin)

Paper: Bermuda Bay CS, Whisper White CS, Basic Gray CS, Elegant Eggplant CS (Stampin’ Up!) unknown DP – glittery swirl pattern (K & Company); unknown DP – skull pattern (Karen Foster)

Accessories: bone folder, Small Oval punch (retired), ¾” Circle punch, paper snips, stamping sponges, sponge dauber, Stampin’ Dimensionals (Stampin’ Up!); Tombow multi-purpose liquid glue (Tombow); ¼” hole punch (Office Supply Store); Sofft Tool (Colorfin); Standard Circles Small Nestabilities die (Spellbinders); Big Shot, Smoothie Alphabet dies (Sizzix); Caribbean baker’s twine (The Twinery); tape (Scotch); Icicle Stickles (Ranger)


Haunted House Treat Box

I love this treat box!  If I created it I might not even be able to give it away. The time and attention to detail that Sophia spent on this treat box is incredible!  What an amazing treat to be able to gift this Halloween!!!

We have a video tutorial and pdf for our members here. (You must be logged in to view the page)

Supplies:

Stamps:  Woodgrain (Hero Arts), any ghost, bat, haunted tree , fence stamps (stamps by Judith and Heather work well)

Ink:  Black Soot, Faded Jean, Chipped Sapphire & Spiced Marmalade  Distress inks (Ranger); Black, B000 & B00 Copic markers (Copic); White Pan Pastel (Colorfin)

Paper: Basic Gray CS, Early Espresso CS, Basic Black CS, Daffodil Delight CS, Wild Wasabi CS (Stampin’ Up!); Stamper’s Select White CS (papertrey ink); unknown DP (any dark Halloween designer paper)

Accessories: bone folder, stampin’ sponges, White Signo gel pen, black brad (Stampin’ Up!); Yellow Stickles, White Opal Liquid Pearls (Ranger); Tweezers (Cutter Bee); Chipz Anchorz (Everlasting Keepsakes); Black Glitter (Art Institute Glitter); Grass Border punch, hot glue gun (Martha Stewart); Tombow multi-purpose liquid glue (Tombow); black wire (Craft Store); Silhouette Cameo, bat, ghost, fence and tree cut files (optional)(Silhouette America Inc.)


Have a great weekend!

Technique Thursday: Trick Or Treat Mini Album

I was looking through some of Andrea’s family Halloween photos from last year for inspiration and from those photos I came up with this mini album!  Andrea’s daughter made me laugh when I saw her photos…for Julia is so not a scary kind of girl, but to my surprise she pulled off the vampire costume.  I had a blast with this album and when the kids saw it they loved it too.  Now Andrea’s youngest child wants to be Spiderman again!

We have a video and pdf handout available for our members here. (You must be logged in to view the page)

Supplies:

Ink: White Signo Gel pen, Basic Black Stampin’ Write marker (Stampin’ Up!)

Paper: Ebony CS, Plastic Paper (Bazzill); Haunted Manor DP (Doodlebug Design)

Accessories: bone folder, paper trimmer and scoring blade , Stampin’ Dimensionals, paper snips, Big Shot, Spider Web embossing folder, Craft scissors (Stampin’ Up!); Haunted Manor Cute Cuts (Doodlebug Design); Metal Antique Silver Reinforcers (7 Gypsies); Black ⅝” Satin/Scalloped Edge ribbon (May Arts); Glitter Spider Dimensional stickers (Jolee’s Boutique); Black rhinestones (KaiserCraft); Crystal Twinkles (Taylored Expressions); Crop-A-Dile (We R Memory Keepers); red liner tape (Simon Says Stamp); Glossy Accents (Ranger); Tape Runner XL (thermo-web); Tombow multi-purpose liquid glue (Tombow)


Graphic 45 Spotlight With Designer Laura Denison

Here is the latest installment of our Graphic 45 Guest Designers. Many of you may remember that back in April we hosted a Graphic 45 Week on the Paper Crafter’s Library Blog. It was week filled with projects and inspiration using Graphic 45’s Tropical Travelogue Collection. We had such a great experience partnering with Graphic 45 and their design team, and such a great response from you, that we’ve decided to partner with them on an ongoing basis. The first and third week of every month one of the Graphic 45 Designers will share a project they’ve created here on the PCL Blog. We started with our monthly designers in June and before I introduce you to our latest Designer, I just wanted to take a minute to re-introduce Graphic 45 for those of you that may not be familiar with the company.

Graphic 45 is an award-winning scrapbook and paper crafting company­— owned and operated by a mother and her two daughters.

Diane Schultz (pictured center)—Designer and CEO (aka mother)

“I’m passionate about being creative and eager to make it possible for others to find their creative voice. My background includes stints as a designer for, McCalls, Simplicity, Vogue/ Butterick, Mattel Toy Company and a host of other jobs that each, in some way, led me to what I do now. At 45 I went back to school and got my degree in graphic design— I named the company to celebrate that achievement.”

Aimee Filimoehala (pictured left) —Director of Operations

“I wear a lot of hats and love it that way. Business, marketing, operations, etc. have made me a pro at multitasking (aka juggling‑figuratively and literally). When we launched Graphic 45 just three years ago we had no idea what was in store, working together as a family has been an amazing journey that we all feel so grateful to be apart of.”

Charee Filimoehala (pictured right)—Director of Customer Service and Design Team Coordinator

“I joined the team a little over three years ago and haven’t looked back…what a life-changing experience this has been. I love working with and around creative people and products (not to mention I like my co-workers quite a bit). I spend my days working with our friendly stores and talented design team…the occasional trip to a workshop or tradeshow pretty nice too.”

Together we create vintage inspired crafting products that capture the flamboyant style of the 1920’s and 30’s – with vibrant color, irresistible texture and imaginative design to create products with decades-old appeal that’s both fresh and familiar. Let our products inspire your next scrapbook layout, card, album or home decor project.

***********

Here’s a picture of their booth at the CHA show which absolutely blows us away every year! The artwork inside is absolutely stunning and totally unique. At the last show as we were speaking with Diane she told us that many of the altered pieces were vintage finds which she and her team transformed with their gorgeous Graphic 45 products. We can’t wait to stop by their booth at the Chicago CHA and see what they’ve got in store this year!

Here’s a picture of the Graphic 45 team – they’re always dressed in period costumes to complement the themes in their collections – every day of the show brings a new set of costumes. The ones shown below were for their Little Darlings collection.

Graphic 45 Designer Laura Denison

Our next Graphic 45 Guest Designer for this month is Laura Denison who is part of the 2012 Graphic 45 Design Team. Laura is new to our list of designers and we are so excited to have her showcase her work today on Paper Crafter’s Library.  We also have a special prize give-a-way today!  Leave a comment below the post  telling us what you like about the project for a chance to win a package of Graphic 45’s Happy Haunting pictured below.
G45 Giveaway 10.17.12

You can see Laura’s fabulous project below, but first, here is a little more about Laura:

My name is Laura and I live  in the beautiful Pacific Northwest near Seattle. I am married with two teen children and a menagerie of pets.

I am best known for my Mini Albums and “containers” to hold them. I love to think outside the box and use materials in unexpected ways.

My background as an interior architect for 15 years has been a great resource for my projects. I teach weekly online classes via Ustream to share what I do and inspire others to step onto a new path of creativity.


Rickshaw Project

Graphic 45 101712

I’m excited to bring you this project.  This project was shown in the Graphic 45 Summer 2012 CHA booth and I’m happy to share it with you today.  This is a Rickshaw created from a Graphic 45  5″ x 5″ Altered Box. It features the new BGraphic 45 Birdsong Collection. The seat of the rickshaw opens to reveal a mini album.

Graphic 45 Products used:
Birdsong Collection
5″ x 5″ Altered Box
Antique Metal Door Pulls
Ornate Metal Key holes
Metal Button Brads
Metal Brads
Other Product used:
Paper Accents Cardstock
Wood dowels and strips
Sizzix Alterations Weathered Clock Die
Rayon Tassels

To see more of my projects just visit my blog: http://www.followingthepapertrail.blogspot.com/

We hope you have enjoyed this special creation today. I would also like to extend a warm thank you to Laura for being a part of Paper Crafter’s Library today.  Don’t forget to leave a comment below for a chance to win the fabulous package of Graphic 45’s Happy Haunting collection pictured above.  Also, please take a minute to stop by Laura’s blog and of course the Graphic 45 blog to check out all their amazing creations!

Trendy Tuesday – Vellum

Trendy Tuesday –  Versatile Vellum
by Katherine Elliot

Vellum inserts have been classy additions to wedding or other formal party invitations for a long time.  The delicately frosted, translucent look of vellum adds an air of sophistication to formal invitations, no doubt.  But as paper crafters, we learn vellum stands on its own as a creative, versatile paper crafting medium.  During my latest blog stalking sessions, I have found some terrific cards that share the many beautiful ways vellum is being used today.

The card below uses vellum as a lovely embossed window and as attractive die cut shapes on this soothing sympathy card.

Vellum Sympathy Card by Dianne Simpers, image source Back Porch Stamper

 A few vellum basics are good to know.  Vellum sheets and vellum cardstock vary in thickness.  Vellum cardstock is typically a heavier weight (stiffer) than vellum sheets.   Thicker vellum cardstock may be a better choice for embossing and 3-D projects, and lighter weight sheets are a good choice for delicate layers.  You can find vellum by many brands at your favorite craft store or other on-line retailers and direct marketing companies.

Reminiscent of an elegant invitation, the vellum insert adhered on the inside of the card below shows the interior greeting stamped directly on the vellum and the lovely stamping you can see through the translucent sheet.

Decorated vellum card interior by Ashley Cannon Newell image source Inspired, Paper Trey Ink

Used as an accent strip, a sentiment or image stamped on vellum can easily be added to any style on the front of a project, too.

Card by Danielle Flanders, image source Homespun with Heart

 No stamping required, vellum is your ultimate “neutral.”   Vellum lets your card”s colors and design stand on their own, while offering a pretty layer you can cut and adhere anywhere.

Sweet birthday wishes - 2012-09-14

Stitched vellum birthday card by Natalia Harandon, image source Kool Kitty Musings

Did you notice the examples above show virtually no detection of adhesive?  Was that by magic!?  Well, no, of course.  Stitching, brads, or a well placed button, jewel or decorative layer can help you attach your vellum flawlessly.  You may consider special vellum adhesives, or hide glue or glue dots with embellishments.

Therm O Web - Vellum Adhesive RunnerScotch Vellum Adhesive

Vellum adhesives, image source Scrapbook.com

Vellum can be a fun embellishment on its own.  While vellum may first bring the image of “frost” to mind, LeAnne Pugliese shows off an ingenious way to use vellum to depict steam coming out of this pretty holiday mug…

Vellum steam card by LeAnne Pugliese, image source

 Some lovely white flowers were stamped on vellum, then cut and adhered to the top of the delicate frame on this inspiring card…

Ray of Hope card with vellum accent piece by Angela Maine, image source From the Tool Shed

And now for something completely different…

Vellum Mug card by JJ Bolton, image source rgcards.blogspot.com

Gotta love a masculine card with a beer mug!  Yep, vellum”s not just for girlie cards any more…  This card reminded me, too, that not all vellum is white.   Besides various weights, vellum can come in different colors and some even have different textures or patterned designs.

 Grafix colored vellum, image source Nona Designs Artist Supplies

Of course, you don”t need colored or patterned vellum if you want to decorate it yourself.  There are different techniques to try with vellum, and if you search, you are sure to find at least one example of “stained glass vellum” as shown on the attractive, clean and simple card below…

Debra Burgin 1208 Stained Glass Leaves

Stained glass leaves card by Debra Burgin, image source Heartfelt Inkspiration

Vellum can also be dry embossed to give a very unique look for any occasion.


Card by Kay Kalthoff, image source Stamping to Share


Embossed vellum card created by Monika Davis, image source Splitcoast Stampers

Looking for inspiration for ways to use vellum outside of card making?  Vellum luminaries are a favorite 3-D party or holiday project.   Cut windows on each side of your square luminaries so you can decorate them with stamped vellum to suit the occasion.

H

Halloween lantern with vellum windows by Margit Alles, image source Margits Schatzruhe

Or print your own vellum paper with just the right words for your gathering…

Vellum Luminaries, tutorials and image source DIY or Don”t

  Just remember for any paper luminary, use battery operated LED type lights and NOT real candles on your paper crafted luminaries (ya know, fire hazard and all, don”t let your creativity go up in smoke)!

I hope you enjoyed these beautiful projects, and special thanks to all the creative folks in blog-land.  If you have not read my gratitude to you personally, I want to let you know how much I admire your talent.   Happy crafting, everyone!

Project Ideas Newsletter Challenge: Creepy Crawly

Welcome to the Project Ideas Newsletter Challenge. Every Monday, we will design a card, scrapbook page or 3D item. Your challenge – is to use our piece as inspiration and make it into a card, scrapbook page, or other project. You can use the layout, the colors, an element you like…it can look like our piece, or nothing at all like our piece. We want to see where YOU take this. This challenge is strictly a “work from your stash” challenge. This week, Tracy designed this Creepy Crawly card.

As a newsletter subscriber you will have received a link to a private web page, from which you can watch the video tutorial. Please note that the video tutorial will be available for general viewing for one week only – and then will be moved into our library for our members only. In order to ensure you don’t miss any more of our Project Ideas Newsletter Challenge video tutorials, please be sure you sign up for our FREE email newsletter from the top right sidebar of this blog. If you didn’t receive the newsletter then please be sure to email us to confirm your subscription.

Every Monday, here on the blog, we’re going to post a picture of our project. You will have ONE week to upload your challenge piece. Instead of a weekly prize though, we’re going to award a prize monthly. So for each week you participate and each project you submit – you will get one entry into our monthly draw. On the first Monday of each month – we will announce one challenge winner, who will be featured as a guest designer on the Paper Crafter’s Library blog as well as our Facebook page. As a guest designer, we’ll feature your biography, some of your favorite paper crafting projects and we’ll link to your blog.

Here are the details on how you can participate in the Project Ideas Newsletter Challenge:

A new Project Ideas Newsletter video tutorial will be emailed out to newsletter subscribers every Monday (so make sure you are signed up). Then, here on the blog, we will post a picture of our project along with an Inlinkz button for you to enter your project. Here are the details:

•Work from your own stash to create a project based on the inspiration project provided – you can use any products you would like, and make any type of project you like – card, scrapbook page, album, 3D item etc.
•Post your project on your blog, in your gallery or on any other photo-hosting site (such as photobucket or flickr).
•Click on our inLinkz button below to add a link to your project for our challenge
•You will have until 7am, Monday, October 22nd to add your link to the list to be eligible to win. You can enter as many times as you like.
•For each project you submit, your name will be entered into our monthly draw. The winner will be announced on Monday, November 5th.

Good luck to everyone and we look forward to seeing your projects!


Jack-O-Lantern Card Video Tutorial

I know that Andrea had a lot of fun today using the Jack Of All Trades stamp set.  Shown below are two ways to use the images in various ways.  I feel that most Halloween images are a bit on the creepy side and think that these pumpkins are actually on the cute side!  Andrea’s children ofter will come into the stamping studio to say hi to Mom and to check out our latest creations.  Little did we know that once the scrap page was completed, Andrea’s son Matthew was afraid of the picture of the family on the page. He took an eraser and tried to erase his older brother Josh’s face because he looked scary! To say the least we will be posting a few projects next week that are on the cute side of Halloween!


Jack-O-Lantern Card

This card goes to show you that sometimes all you need is a bit of designer paper and a simple greeting! Andrea just loved the Jack of All Trades stamp set and loved the way the pumpkin image popped off the card completing it!

Download the pdf handout here

Part 1

Part 2

Supplies:

Stamps: Jack of All Trades (Stampin’ Up!); Steampunk Happy Halloween (Inkadinkado)

Ink: Pumpkin Pie Classic ink, Basic Black Craft ink (Stampin’ Up!); Jet Black Archival ink (Ranger)

Paper: Black CS (papertrey ink); Whisper White CS (Stampin’ Up!); Too Cute To Spook DP (Bella Blvd)

Accessories: bone folder, paper snips, Stampin’ Dimensionals,  mini glue dots, Basic Black ½” Scallop Dots ribbon, Craft scissors (Stampin’ Up!); yellow rhinestones (Dollar Store); Tape Runner XL (thermo-web); Primary Ebony Super Fine embossing powder (WOW! Embossing); Heat It! Tool (Ranger); Charcoal baker’s twine (The Twinery); black button (papertrey ink)


Halloween Scrapbook Page

After creating a 3D pumpkin for the Jack-o-lantern card above, Andrea decided that it would make a great embellishment for a scrapbook page too.  Again the images add that little embellishment with not much more completing the scrap page.

We have a video tutorial and pdf for our members here. (You must be logged in to view the page)

Supplies:

Stamps: Jack Of All Trades, Spooky Bingo Bits, Toxic Treats (Stampin’ Up!)

Ink: Pumpkin Pie Classic ink (Stampin’ Up!); Jet Black StazOn ink (Tsukineko); Yellow Sharpie marker, Black Sharpie marker (Office Supply Store)

Paper: Whisper White CS, Basic Black Cs, Basic Gray CS, Pumpkin Pie CS, Howlstooth and Scaringbone DP, Designer Series Paper Stacks – Brights Collection DP (Stampin’ Up)

Accessories: paper snips, Stampin’ Dimensionals, basic rhinestones, Large Oval punch, 1 ⅜” x ⅝” Oval Large punch (retired), mini glue dot, SNAIL adhesive, Basic Black ⅛” Taffeta ribbon, paper trimmer, basic rhinestones (Stampin’ Up!); Tombow multi-purpose liquid glue (Tombow)


Have a great weekend!

Technique Thursday: Gravestone Treat Box

I had a blast creating this Gravestone Treat Box.  My son Jalen was having an allergic reaction this week and came to work with me, (I know I have the best Boss and job ever!!!). He saw the Gravestone Treat Box and asked if we could make these for his whole class for Halloween!

We have a video and pdf handout available for our members here. (You must be logged in to view the page)

Supplies:

Stamps: Fancy Flourishes (papertrey ink)

Ink: Basic Black and Old Olive Classic inks (Stampin’ Up!)

Paper: Basic Gray CS (Stampin’ Up!)

Accessories: paper snips, bone folder, Stampin’ Pierce Mat, sponge dauber (Stampin’ Up!); craft knife, ruler, self healing mat (Craft Store); red liner tape (Simon Says Stamp); Grass Edge punch (Martha Stewart); Tombow multi-purpose liquid glue (Tombow); Alpha Large Black Foam stickers (EK Success); Glitter Spider stickers (Jolee’s Boutique)


Trendy Tuesday – Chevrons

Trendy Tuesday – Chevrons
By Colleen Harshaw

We are happy to say we have resolved the technical issues we had and can bring you our Trendy Tuesday article today!
We hope you enjoy what Colleen has to share.

Today I want to talk to you about a very popular trend….the chevron.  A chevron is an inverted ‘v’ shape, and it can be found everywhere in papercrafting right now!  It is difficult to browse a blog or a papercrafting magazine without coming upon a chevron.  I was at CKC Cincinnati a week-and-a-half ago, and chevrons were everywhere I turned.

I have found many beautiful samples to share with you….so let’s get started!

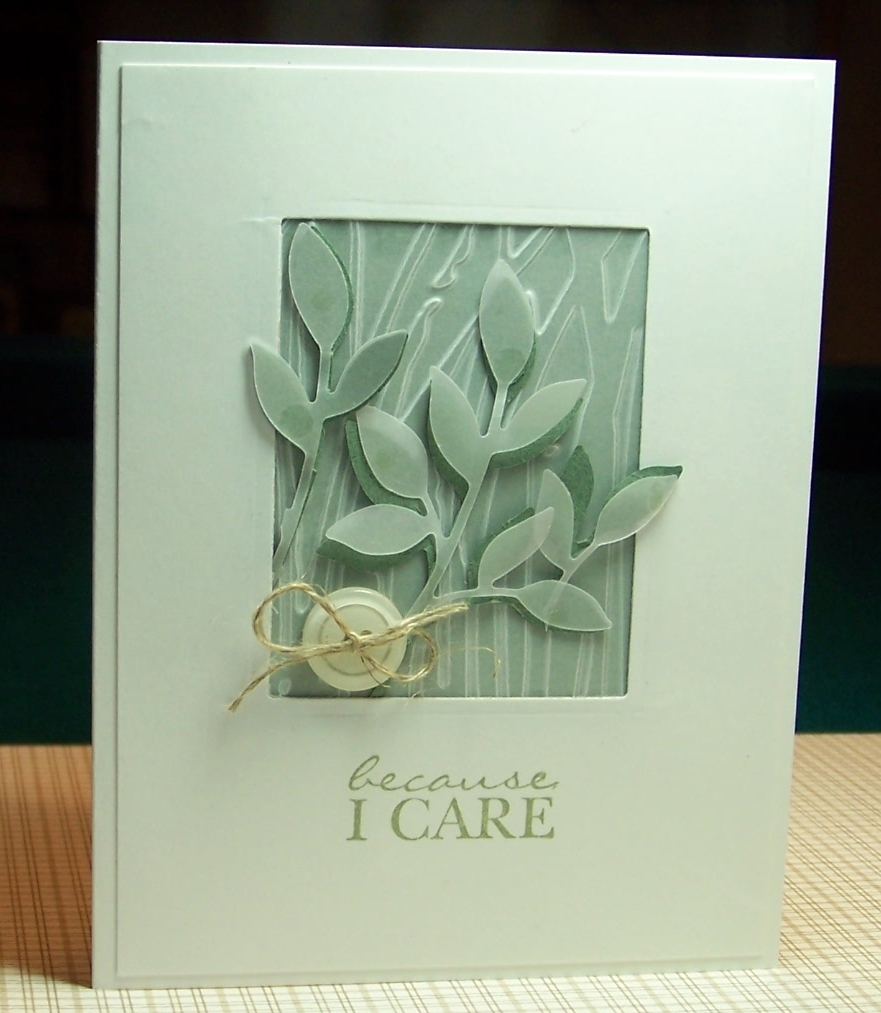
First I have this beautiful card by Karen Giron, creator of the Sweet Sunday Sketch and design team member for My Favorite Things (MFT) Stamps.  Karen chose to finish off the inside of her card too….another popular trend right now.  You will notice chevrons on both the front and on the interior of Karen’s card.  See the second photo below for the inside view.

Card by Karen Giron for www.mftstamps.com

This is the inside of Karen’s card……….

Card by Karen Giron for www.mftstamps.com

 This next card was created by Jen del Muro for Lil’ Inker Designs.  I love the flip flops!  Jen does a great job of mixing patterns on this card.  This is something that can be a bit scary for some of us, but Jen keeps the colour palette the same, which helps to make those mixed patterns work.  The combination of the colours and those cute little flip flops just scream ‘summer’ to me!  Notice the chevron paper in the background as an accent piece.

Card by Jen del Muro for Lil’ Inker Designs

This next card is also by Jen del Muro, but this time it is for her Sketch For You To Try challenge.  Jen chose to mix patterns, colours AND textures on this card, and somehow, she makes it all work!  I don’t think I could pull it off!  I think it helps that the chevron patterned paper used on the background of the card is quite a small pattern.

Card by Jen del Muro for SFYTT

This next card was created by Joanne Basile for MFT Stamps.  Joanne used a chevron patterned paper for the scalloped accent below the main image on her card.  She has done a great job of mixing patterns on her card as well.  How cute is that grass?!

Card by Joanne Basile for www.mftstamps.com

This next card was also created by Joanne Basile.  You will notice the chevron paper band in the center of the card behind the main image.  Joanne has mixed all kinds of patterns and textures on this card….ribbon, lace, stitching….she’s got it all.  Joanne has also done some very detailed paper piecing on this card.  Isn’t it beautiful?!

Card by Joanne Basile for www.mftstamps.com

OK…we have finally made it to the last card!  I know….that felt like a lot of cards, didn’t it?  There were so many beautiful samples that I had a difficult time narrowing it down!  If you would like to explore some more samples yourself, all you have to do is go to www.goolge.com, click on images (at the top) and then type in your search criteria.   You will find many more beautiful samples of papercrafts using this latest trend.  You could also browse on Pinterest….another huge trend right now!  Have you joined yet?!

Back to the card!  This card is another sample by Jen del Muro…this time for The Cat’s Pajamas.  She has a few hot trends wrapped up into this card….she has the chevrons (of course!) along with stars (another popular shape right now) and paper pleating.

Card by Jen del Muro for The Cat’s Pajamas

 Next, we move on to the scrapbook layouts!

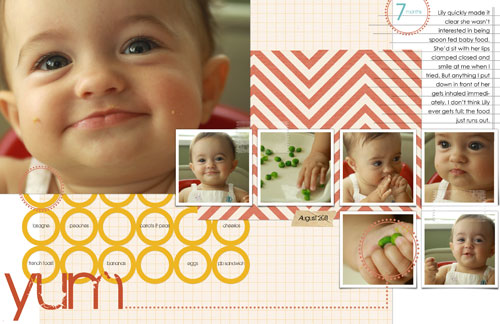
This first layout was created by Tamara for a blog challenge over at My Mind’s Eye.  I love the colours she chose, as well as those cute little fish tail banners on the right side….I’m sure you all know that is another hot trend right now!  You will notice the chevron pattern in two different places on this layout, both above and below the main image.

Layout created by Tamara for www.mymindseye.typepad.com/blog/challenges

This next layout is actually part of a two page spread that I found on the My Mind’s Eye blog as well.  You will notice the chevron pattern in a more subtle way on this layout.  It is above the adorable photo strip section on the right hand side of the page.  Notice the washi tape too!

Layout by Shelly for www.mymindseye.typepad.com/blog/challenges

 This next layout was created by Creating Keepsakes 2012 Dream Team Memeber Autumn Baldwin.  She actually created her chevron pattern digitally.  She also created a video tutorial so that you can learn how to do it too!  You can find the details on the Creating Keepsakes website here:  http://www.creatingkeepsakes.com/articles/How_to_Digitally_Create_Chevron_Patterned_Paper

Layout by Autumn Baldwin for www.creatingkeepsakes.com

This next layout was found via Pinterest (have you joined yet?!).  The photo quality isn’t great, but I wanted to share it with you because I really liked the effect of the large chevron pattern against the white background.  I thought that it packed a lot of punch.  If you happen to be a subscriber to Creating Keepsakes Magazine, there is actually a step-by-step for how to create your own chevron pattern using paper scraps in the September/October 2012 issue.  It can be found on page 119.

As per Pinterest, photo credit goes to www.gcdstudios.blogspot.com

This next layout is one of my favourites.  Even though the elements of the page are colourful, the black and white photos stand out very well and remain the focal point of the layout.  This layout is on target in the trend department too….with both chevrons and hexagons being featured.

As per Pinterest, photo credit goes to www.twopeasinabucket.com

This last layout is fun and vibrant and on trend.  I think we sometimes find it difficult to scrapbook our boy-themed pages (I do anyways) and this is a great example of how to create a boy-themed page while incorporating some current trends.  You will notice some stars and some chevrons on this layout.  Hopefully, you will feel inspired to create some layouts for the men (big and little) in your lives!

As per Pinterest, photo credit goes to www.boysrulescrapbookkits.blogspot.com

As I mentioned earlier, chevrons are everywhere in the industry right now.  I am going to skip posting photo after photo of chevron patterned paper, as I think that would get pretty dry for everyone!  You have a couple of out-of-the-box ideas for creating chevron patterns both digitally and using paper scraps (thank you Creating Keepsakes), so I think I will leave you with a list of manufacturers that I know to have chevron patterned papers available.

American Crafts
Bella Blvd.
My Mind’s Eye
Jillibean Soup
October Afternoon
Fancy Pants Designs

This is by no means a complete list of everything that is available, but it will give you a starting point.  I hope that you are inspired to try this trend, as there is a LOT of inspiration out there!  Have fun creating!


Witches, Goblins & Spooks

Unfortunately we don’t have a Trendy Tuesday post for you today, as we have had some technical difficulties.  However, we do have two really great Halloween cards to share with you that I know you will all love!

Witches Goblins & Spooks

I just love this Witch Emma stamp!  I colored her in using various shades of Copic markers and she became my inspiration for this card. I did not think that the card needed much more than the DP and matted greeting as Witch Emma is a large embellishment on her own!

We have a video for our members here.   (You must be logged in to view the page.)

Supplies:

Stamps: Toxic Treats (Stampin’ Up!); Witch Emma (CC Design)

Ink: Tuxedo Black Memento ink (Tsukineko); V01, V04, V06, V09,  C00, C1, C3, C5, C7, C9, E0000, E00 and E11 Copic markers (Copic)

Paper: Royal Velvet CS, White CS (papertrey ink); Ebony CS (Bazzill); Too Cute To Spook DP (Bella Blvd)

Accessories: bone folder, linen thread, paper snips, Stampin’ Dimensionals, Craft scissors (Stampin’ Up!); Tape Runner XL, medium glue dots (thermo-web); ½” Black Grosgrain/Stitched Edge ribbon (May Arts); Labels Sixteen Nestabilities dies, Grand Calibur (Spellbinders); black rhinestones (Kaisercraft)


Mr Bones

I started off with Papertrey ink’s Mr. Bones stamp set and die to create this card.  I was feeling the halloween spirit and the pumpkin head seemed very fitting.  And what is Halloween without spiders!  EEk!!! Enjoy! 

We have a video for our members here. (You must be logged in to view the page.)

Supplies:

Stamps: Mr. Bones (papertrey ink)

Ink: Tuxedo Black Memento ink (Tsukineko); YR12, YR15, YR18, YG11, YG13 and YG17 Copic markers (Copic)

Paper: Orange Zest CS, White CS (papertrey ink); Ebony CS (Bazzill); Pumpkin Pie CS, Designer Paper Stacks – Neutrals (Stampin’ Up!); Haunted Manor DP (Doodle Bug)

Accessories: bone folder, Stampin’ Dimensionals, mini glue dots, Craft scissors (Stampin’ Up!); Mr. Bones die, Fabulous Frames die, Black buttons (papertrey ink); Big Shot (Sizzix); Tape Runner XL (thermo-web); Tombow multi-purpose liquid glue (Tombow); Charcoal baker’s twine (The Twinery)