Project Ideas Newsletter – Merry Washi Tape

For today’s Project Ideas Newsletter I created this Merry Washi Tape card.   By sticking coordinating pieces of Washi tape on various angles, over the White CS, I was able to create a unique pattern on my card. The angle of the top piece of Washi tape became the angle that I aligned my greeting with.

Newsletter subscribers will have received a link to a private web page, from which they can watch the video tutorial for this Let’s Chill card. Please note that the video tutorial will be available for general viewing for one week only – and then will be moved into our library for our members only. In order to ensure you don’t miss any more of our Project Ideas Newsletter video tutorials, please be sure you sign up for our FREE email newsletter from the top right sidebar of this blog. If you didn’t receive the newsletter then please be sure to email us to confirm your subscription.

Peace and Joy Video Tutorial

With Christmas just around the corner, we were very excited this week to release the Family Heirloom Printer’s Tray along with more Christmas card ideas!   


Peace and Joy

This card is a great example of using stamps that you already have on hand for other purposes. The ornaments on this card were created using a balloon  image stamp. By stamping the balloons in traditional Christmas colors and turning them upside down, they make great ornaments, allowing for your stamps to be used in various or not tradional ways. 

Download the pdf handout here

You can view a video on how I created this Peace and Joy card below.

Part 1

Part 2

Supplies:

Stamps: Heart 2 Heart, Peace, Love & Joy (papertrey ink)

Ink: Riding Hood Red and Wild Wasabi Classic inks (Stampin’ Up!); Tuxedo Black Memento ink (Tsukineko)

Paper: Very Vanilla CS, Riding Hood Red CS, Wild Wasabi CS (Stampin’ Up!); Christmas This & That 6” x 6” paper pad (Echo Park)

Accessories: Heart 2 Heart die, New Leaf Topnotch Twill ribbon (papertrey ink); Big Shot (Sizzix); Open Scallop Edger punch (EK Success); Glossy Accents (Ranger); silver cord (May Arts); Crystal Twinkles (Taylored Expressions); Stamp-a-ma-jig, Stampin’ Dimensionals, bone folder (Stampin’ Up!); pencil and ruler (office supply store); Tape Runner XL (thermo-web); hot glue (Martha Stewart)


Have a great weekend!

Christmas Themed Family Heirloom Printer’s Tray

Can you believe it’s less than two weeks until Christmas?  Which of course means that time is running out to find that perfect gift for those hard-to-shop for people in your life. In our family that’s typically grandparents and great-grand parents.

 Despite the fact that they always say there’s nothing they really want, there is one thing that I know will always bring a smile to their face…and that’s pictures of their family presented in a beautiful way….like our Family Heirloom Printer’s Tray shown above.

We created our project using the 7 Gypsies 12 x 12 Artist Printers tray and embellished it using Stampin’ Up! product.

 We have put together a digital tutorial which includes:

  • a pdf handout with a detailed supple list, step-by-step written directions and close-up photographs;
  • an 8 part video tutorial which visually demonstrates how to create this project from start to finish;
  • a printable “joy” sentiment for those of you that don’t have the stamp set we used.
  • a dove template and SVG cut file for those of you that don’t have the stamp set we used

 We are making the digital tutorial available for purchase in the Sunny Stampin’ Store for $12.95 – OR, read below for how you can receive the tutorial absolutely FREE (US only)…….

 If you are in the US – we are a carrying a limited quantity of this tray (50 in all) on Amazon priced at $25.01 US with FREE Shipping. 

When you purchase this printer’s tray directly from Paper Crafter’s Library on Amazon using this link (also provided below)…you will receive the tutorial absolutely FREE ($12.95 value). 

* In order to receive the free shipping from Amazon when you check out you have to make sure you select Free Super Saver Shipping otherwise, by default, Amazon will charge you for Standard Shipping.

Please read the fine print below for info on how to receive the tutorial once you have purchased your tray.

 http://amzn.to/YXbO8y

 Please note the fine print:

  1. At this point in time, this offer is only valid in the US – due to time constraints before Christmas we are not able to offer this within Canada or outside the US. We are testing out carrying products on Amazon and fulfilling them through Amazon, which at this point in time only allows us to ship within the US.
  2. We only have a LIMITED number of printer’s tray’s available (50 in all) – so this offer is first come first serve.
  3. In order to receive your FREE tutorial you must email us a copy of your receipt after purchase to customerservice@papercrafterslibrary.com.
  4. ONLY Printer’s Tray purchases made through Paper Crafter’s Library on Amazon (using the link above) are eligible for the FREE tutorial – Printer’s tray purchases made from other sellers do not qualify.
  5. This offer is not associated with Amazon in any way – your free tutorial is a bonus gift provided by Paper Crafter’s Library as a thank you for purchasing from our Amazon store.


Trendy Tuesday – Felt

Trendy Tuesday – Felt
by Katherine Elliot

Soft and fuzzy, like a favorite teddy bear, felt can be a wonderful addition to your paper craft projects.  Use your scissors or a favorite die to create felt shapes to embellish a project and you have something beautiful and fun to touch.   Felt can be found at any of your favorite craft stores, as well as at on-line retailers.  Some brands, like Papertrey Ink, offer colors intended to match your other favorite paper craft products.

Papertrey Ink felt shown above, image source

 Felt is made in as wide a variety of colors as your favorite cardstock.  You can combine traditional colors, or non-traditional colors to make some very pretty holiday cards like the one shown below…

Jolly Christmas card by Debbie Olson, complete instructions and image source HGTV.com

 Simply cut, felt is a wonderful soft, textural addition to use with any of your favorite trends.  The felt shown in the next card combines more Trendy Tuesday favorites, banners and baker”s twine.

Joy to the World card by Debbie Olson, image source HGTV.com

Die cut felt shapes make wonderful embellishments.  Cut flowers, frames, shapes, and letters using your favorite dies with felt then adhere the shapes on other traditional paper layers to create a project that can really stand out.

Thank You card by Kalyn Kepner, image source paper is love

Felt frame card by Danielle Flanders, image source Homespun with Heart


Felt letters with felt flower card by Lisa Adessa, image source I”m in Haven

A die cut cloud softly floats above the main image in the card below…

 Felt cloud card by Lori Tecler, image source Inking Aloud

Change it up by using some soft embellishments instead of plastic or metal ones,  like the felt buttons shown in the card below…

Felt Button Grid Thank You Card from Carla Schauer Designs

Felt button card by Carla Schauer, image source Carla Schauer Designs

 You can be very creative making your own shapes with felt.  Remember felt craft projects from elementary school?  Now that you are grown up, you can get a “do-over” and make something you are really proud of!  Felt stitched layers look super cute, like the sweet little owl Kalyn Kepner created for her project shown below…

 Stitched felt card by Kalyn Kepner, image source paper is love

 Popular companies, like Papertrey Ink and My Favorite Things, offer colored felt you can buy to match your project, and other companies, like Stampin” Up!,  Prima and American Crafts offer pre-made felt shapes to add to your projects.


Stampin” Up! stitched felt accent card by Julie Davison, image source Julie”s Stamping Spot


Prima felt flower embellishments, image source Scrapbook.com

American Crafts - Pebbles - New Arrival Collection - Felt Embellishments - Boy

American Crafts felt accents, image source Scrapbook.com

 Whether you are crafting for the holidays or any other occasion, adding felt is a great way to add a soft touch to a card for someone special.  I feel all warm and fuzzy inside just looking at these beautiful projects…

Peace card by Karen Motz, image source

Felt flower birthday card by Judi Collins, image source Stampingalatte

Now I”m ready to try my hand at a few felt things, how about you?
Hope you enjoyed today”s post.  Keep crafting everyone!

Project Ideas Newsletter: Let’s Chill

This Let’s Chill card features the North Pole DP by Doodlebug Designs. I jused my Corner Chomper to round the right hand edges of the two DP’s as well as the card base.  I also used the paper piecing technique to create the snowman image on the card.  The snowman was then colored in using Copic markers. 

Newsletter subscribers will have received a link to a private web page, from which they can watch the video tutorial for this Let’s Chill card. Please note that the video tutorial will be available for general viewing for one week only – and then will be moved into our library for our members only. In order to ensure you don’t miss any more of our Project Ideas Newsletter video tutorials, please be sure you sign up for our FREE email newsletter from the top right sidebar of this blog. If you didn’t receive the newsletter then please be sure to email us to confirm your subscription.

Good Tidings Video Tutorial

Over the past week we have been working on more Christmas projects.  I just love this time of year!  I hope that all of you have enjoyed the posts from this week and have been given inspiration to create your own Christmas projects!


Good Tidings

I loved the tree image in this stamp set and wanted to create a card that had very little embellishments but still conveyed the Christmas feeling.  I love how simple this card is and to me it strips away all of the hustle and bustle of Christmas and just simply says Merry Christmas!  

Download the pdf handout here

You can view a video on how I created this Good Tidings card below.

Supplies:

Stamps: In the Meadow (papertrey ink)

Ink: Early Espresso Classic ink (Stampin’ Up!)

Paper: Early Espresso CS (Stampin’ Up!); Fine Linen CS, Kraft CS (papertrey ink); Postale DP (7gypsies)

Accessories: Brushed Bronze Designer buttons, Natural Cotton ribbon, linen thread, Square Lattice embossing folder, bone folder, mini glue dots, Craft scissors (Stampin’ Up!); Tape Runner XL (thermo-web); hot glue (Martha Stewart); Big Shot (Sizzix)


Have a great weekend!

Triptych House Photo Frame and Winner of Designs by Ryn Stamps

Even though it is December, it felt like Spring here in Southern Ontario for a few days and that has inspired us to create some non-winter projects.  Sophia started with this Triptych House, manufactured by 7 Gypsies.  She covered the elements, using various pieces of DP and attached them together using hinges.  That created the base of the photo frame.  By adding in some shadow box frames and some beautifully sponged die cut tree elements, Sophia has created this Spring like photo frame. 

We have a video for our members here. (You must be logged in to view the video)

Supplies:

Ink: Mowed Lawn, Pine Needles, Vintage Photo, Tea Dye, Walnut Stain, Chipped Sapphire, Fired Brick, Gathered Twigs and Rusty Hinge Distress inks (Ranger); 100, YG13, YG17, YG21 Copic markers (Copic); Brown Pitt pen (Faber-Castell)

Paper: Nutmeg DP (Cosmo Cricket); Hello Luscious DP (Basic Grey); Chocolate Chip CS, Kiwi Kiss CS, Real Red CS, Whisper White CS, unknown DP (Stampin’ Up!); Mat Board (craft store)

Accessories: paper snips, stamping sponges, bone folder, blender pen, Heart 2 Heart punch (retired), Movers and Shapers Curly Label Bigz die (retired), Movers and Shapers 2” Circle die (retired) (Stampin’ Up!); ink blending tool (Ranger); Tombow multi-purpose liquid glue (Tombow); Grass Edge Border punch, hot glue (Martha Stewart); Crop-a-Dile (We R Memory Keepers); two different tree cutting files, leaf cutting file, frame cutting file, Silhouette Cameo (Silhouette America Inc.); Big Shot (Sizzix); red liner tape (Sunny Stampin’ Store); 3D Foam (thermo-web); hitch fastener (Tim Holtz); Ribbon Banners die (Spellbinders); Decorative Wood Letterpress Blocks (Bottle Cap inc.); Triptych House (7 Gypsies); Stardust Stickles (Ranger); bird nest embellishment (Recollections); craft knife, self-healing cutting mat, small hinges, brads, Red Polka-Dot Washi tape, acrylic graph ruler (craft store); empty toilet paper roll


And now, for the winner of the Designs by Ryn blog post from last week.  We know you all loved to see her wonderful images and fabulous samples.  Here is the moment you’ve all been waiting for…the winner of the prize pack below is Pat Taylor.  You can view her comments below:

Pat Taylor says:

I’ve only been into stamping for less than a year and I love it! The story of Ryn is wonderful and she looks as though she has made the right choice for herself. I love the droplets stamp as well as the others, Thank you for the chance of winning the stamps. X

Congratulations Pat, please email us with your mailing information so that we can get you the prize pack above.  We chose the winner by adding the number of entries to random.org.   We appreciate all the comments and look forward to bringing Ryn back to the blog in 2013.  Thank you for all your comments and feedback.


Graphic 45 Spotlight With Designer Betto Cesare

Here is the latest installment of our Graphic 45 Guest Designers. Many of you may remember that back in April we hosted a Graphic 45 Week on the Paper Crafter’s Library Blog. It was week filled with projects and inspiration using Graphic 45’s Tropical Travelogue Collection. We had such a great experience partnering with Graphic 45 and their design team, and such a great response from you, that we’ve decided to partner with them on an ongoing basis. The first and third week of every month one of the Graphic 45 Designers will share a project they’ve created here on the PCL Blog. We started with our monthly designers in June and before I introduce you to our latest Designer, I just wanted to take a minute to re-introduce Graphic 45 for those of you that may not be familiar with the company.

Graphic 45 is an award-winning scrapbook and paper crafting company­— owned and operated by a mother and her two daughters.

Diane Schultz (pictured center)—Designer and CEO (aka mother)

“I’m passionate about being creative and eager to make it possible for others to find their creative voice. My background includes stints as a designer for, McCalls, Simplicity, Vogue/ Butterick, Mattel Toy Company and a host of other jobs that each, in some way, led me to what I do now. At 45 I went back to school and got my degree in graphic design— I named the company to celebrate that achievement.”

Aimee Filimoehala (pictured left) —Director of Operations

“I wear a lot of hats and love it that way. Business, marketing, operations, etc. have made me a pro at multitasking (aka juggling‑figuratively and literally). When we launched Graphic 45 just three years ago we had no idea what was in store, working together as a family has been an amazing journey that we all feel so grateful to be apart of.”

Charee Filimoehala (pictured right)—Director of Customer Service and Design Team Coordinator

“I joined the team a little over three years ago and haven’t looked back…what a life-changing experience this has been. I love working with and around creative people and products (not to mention I like my co-workers quite a bit). I spend my days working with our friendly stores and talented design team…the occasional trip to a workshop or tradeshow pretty nice too.”

Together we create vintage inspired crafting products that capture the flamboyant style of the 1920’s and 30’s – with vibrant color, irresistible texture and imaginative design to create products with decades-old appeal that’s both fresh and familiar. Let our products inspire your next scrapbook layout, card, album or home decor project.

***********

Here’s a picture of their booth at the CHA show which absolutely blows us away every year! The artwork inside is absolutely stunning and totally unique. At the last show as we were speaking with Diane she told us that many of the altered pieces were vintage finds which she and her team transformed with their gorgeous Graphic 45 products. We can’t wait to stop by their booth at the Chicago CHA and see what they’ve got in store this year!

Here’s a picture of the Graphic 45 team – they’re always dressed in period costumes to complement the themes in their collections – every day of the show brings a new set of costumes. The ones shown below were for their Little Darlings collection.

Graphic 45 Designer Betto Cesare

Our next Graphic 45 Guest Designer for this month is Betto  Cesare who is part of the 2012 Graphic 45 Design Team. We are very excited to share his project with you.  It really is a fabulous  project.

You can see Betto’s fabulous project below, but first, here is a little more about Betto:

Scrapbooking when I started doing that I started thinking it would be just another craft or technique I was learning, I always did crafts, scrapbooking never imagined that it would take much space in my life, not only the space of my shelves, but the importance he has for me too!


Today I can dive into this universe and create a new world, I can give color and form to the love I feel for the people dearest, friends, family, through photos, paper and ink too!


There is my addiction .. stamps and ink! ..


Inspiration and Emotion Layout


The proposal of the project was to show various emotions in a single layout.
For this project,  I used different papers to mount a scene!


Tip: Create your own title using acrylic paint pen and a plastic transparency.


Graphic45 Papers Collections:
Renascence Fair
Steampunk Debudante
Courtain Call
Other Products:
clippings chipboard
gold wire
light bulbs
pins
PanPastel
stamps
acrylic ink pen
transparency


We hope you have enjoyed this fun creation from Betto. I would also like to extend a warm thank you to Betto for sharing his fabulous layout with us! Please take a minute to stop by Betto’s Blog and of course the Graphic 45 blog to check out all their amazing creations!

Trendy Tuesday – Flourishes

Trendy Tuesday – Flourishes
By Colleen Harshaw

Hello my fellow paper crafters!  Today I have a fun topic to share with you…..flourishes!  So many times I have admired the work of other crafters who could doodle on their scrapbook pages, all the while making them look cute, trendy, balanced and pleasing to the eye.  I have always envied those people!  It always seemed that when I tried to doodle, it would end up looking squashed, lopsided and messy.  Well, I think of the flourish as an embellishment for the ‘non-doodling’ segment of the crafting population….like me!

Flourishes can be found as ready made embellishments, dies for die cutting machines, designs on paper (that you can fussy cut if you choose!), and in the form of stamps.  Flourishes are abundantly found on the market right now.

As usual, I have found some beautiful samples to share with you to inspire your creative side!  There is so much to be found out there on the web, I can’t imagine what crafters did before its invention!

This first sample is a card with a very large flourish that was created using a die cut from MFT stamps.  I think due to the size of this die cut, it would also be great on a 12×12 scrapbook layout!

Card by Karen Giron for MFT Stamps
Photo courtesy of mftstamps.com

This next sample uses something I have in my very own scraproom….a blingy flourish!  I have never used mine because I was a bit intimidated by it.  Have you ever had one of those products…you love it when you see it used on other’s work, but you just don’t quite know how to go about using it yourself?  I feel that way about large bling elements.  Barbara has done a great job of using her blingy flourish here on this sample.  Maybe I can use her sample as inspiration…..

Card by Barbara Anders for MFT Stamps
Photo courtesy of mftstamps.com

This next sample uses a nice little flourish….much less intimidating for me!  I could handle this cute little flourish, even if it was blingy!

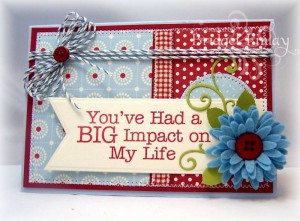
Card by Bridget Finlay
Photo courtesy of splitcoaststampers.com

Moving away from the card samples, I have a beautiful three dimensional project to share with you.  This Christmas wreath incorporates die cut flourishes in the most beautiful way!  This is the reason I love writing these articles for the Paper Crafter’s Library….I learn something new every time I research a topic.  I never would have thought of this creative use of flourishes!

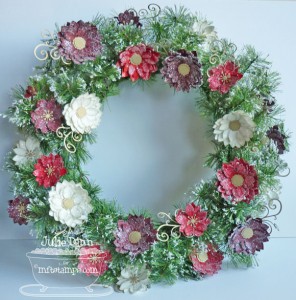
Wreath by Julie Dinn
Photo courtesy of splitcoaststampers.com

Julie also created this decorative Christmas flower pot to go along with her wreath, above.

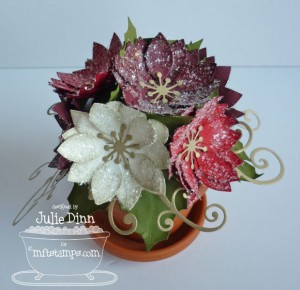
Project by Julie Dinn
Photo courtesy of splitcoaststampers.com

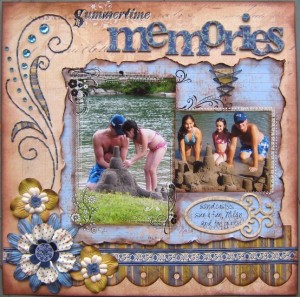
Next I have a scrapbook page to share with you.  This is where I am in my element!  I am a scrapbooker first, and I came to stamping and card making later.  I love browsing the layouts of others in order to get inspired!

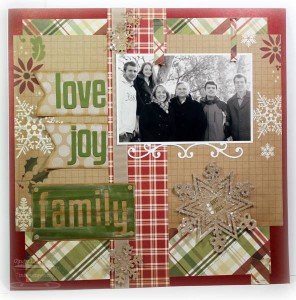
Scrapbook page by Cindy Lawrence
Photo courtesy of splitcoaststampers.com

Here is another way to use flourishes.  So many of us celebrate the holidays with the exchange of gifts, that tags always come in handy!

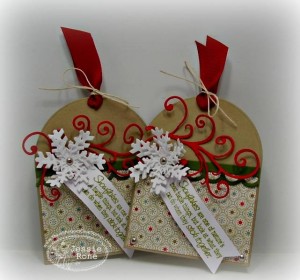
Project by Jessie Knightrone
Photo courtesy of splitcoaststampers.com

This layout contains a flourish above the main image, while the subtle pattern on the background paper has a flourish-like appeal to it too.  It is a simple but beautiful layout!

Scrapbook page by Diane Malcor
Photo courtesy of splitcoaststampers.com

I really love this last layout!  The colours really appeal to me, as well as the balance of embellishments.  The grouping of flowers in the bottom left balances the large title, and the flourish is perfectly placed!

Layout by Danielle Lo
Photo courtesy of pinterest.com

Now, where can you buy some of these lovely tools for making your very own embellishment flourishes, you ask?  MFT Stamps has a selection of dies for those of you with die cutting machines.  They have Fancy Flourish Dies in three different sizes, seen in the photo below.

Fancy Flourish Die Trio from MFT Stamps
Photo courtesy of mftstamps.com

They also offer Framing Flourish Dies in two sizes.  These are ideal for framing your photos on scrapbook layouts.


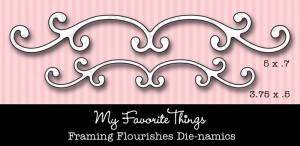
Framing Flourishes Die Set from MFT Stamps
Photo courtesy of mftstamps.com

Lastly, they offer three different sized Leafy Flourish Dies. 

Leafy Flourishes Die Set from MFT Stamps
Photo courtesy of mftstamps.com

Next I would like to show you a Sissix Bigz Die by Tim Holtz.  I like that this set offers a longer flourish die along with a more rounded flourish option.  This set also strikes me as a bit more masculine because it has fewer ‘curly cues’.

Tim Holtz Alterations by Sissix – Elegant Flourishes Bigz Die
Photo by rangerink.com

Although I don’t have a picture to share with you for this next product, there is a SingleKutz Die available for the Quickutz Revolution in a flourish as well.

Next I have a stamp set to share with you.  I love how this set of journaling block stamps from Basic Grey incorporates flourishes as part of the borders.

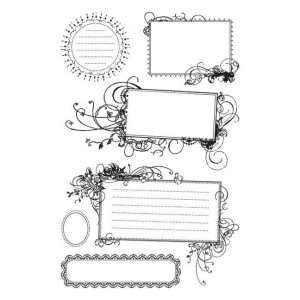
Basic Grey Acrylic Stamp Set – Journal Flourish
Photo courtesy of scrapbookingaddiction.com.au

Now, on to the paper!  Paper is my little addiction.  I tend to hoard it.  It just seems too pretty to cut into sometimes.  I know there are a lot of you out there who can sympathize with my plight!

This is a paper stack from Paper Studio that contains several papers with flourish patterns.  The colours look amazing too.  This is my favourite palette!

Flourish Fusion 12×12 Scrapbooking Paper Pad  by Paper Studio
Photo courtesy of butterflyscrapbooking.com

I wanted to give you a digital paper sample to ponder too.  This one is from a site called VanDenBerge Design.  It contains beautiful neutral colours and floral and flourish design elements.

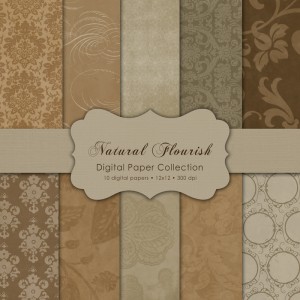
Natural Flourish Digital Paper Collection – 10 papers
Photo courtesy of vandenbergedesign.wordpress.com

That brings us to our conclusion.  I hope these project samples and product suggestions have given you some inspiration.  That is really the purpose of these articles…to inspire you to have fun being creative! 

Until next time…..

One More Chance to Win a One Year Membership to Paper Crafter’s Library and December 1st Winners!

This past January Paper Crafter’s Library celebrated our first year anniversary – and in that time we have established ourselves as the THE all-in-one learning solution for paper crafters with the largest {and best} online library of video tutorials on the internet. From beginner through to advanced, covering product instruction, techniques and project ideas for stamping, card making, scrapbooking and altered art – we have something for everyone! We’re proud of how far we have come, and we’re hoping you can help us spread the word!

That’s why as part of our first anniversary celebrations we have an exciting contest which we are running for a total of 9 months – where we will be giving away a total of 18 ONE YEAR MEMBERSHIPS to the Paper Crafter’s Library – each valued at $200! We will announce 2 winners at the beginning of EACH MONTH – ending in December of 2012.

There’s several ways to enter, and each way gives you 1 entry into our draw – so the more ways you participate the greater your chances of winning:

1. Put our Fan Badge on the sidebar of your blog or website. In the right hand sidebar of our blog, under the heading “Grab Our Fan Badge” you’ll find a box with the html code which you just need to copy and paste into the sidebar of your blog.

2. Create a post on your blog letting everyone know they can win a One Year Subscription to Paper Crafter’s Library and linking back to this post for instructions on how to win.

3. Post about our give-away on your Facebook Page linking back to this post.

Once you have done any or all of these things, leave us a comment here on this post letting us know, with a link back to your blog or FB page and we’ll pop by for a visit. When you leave your name, make sure that if you don’t put your full last name, at the very least you put your last initial.

So how do you enter if you don’t have a blog or FB page? Simple, leave us comments on our daily blog posts. We love hearing back from you, we love your feedback and we read each and every comment. For every comment you leave on one of our blog posts* you get one entry into that month’s draw. * Please note Freebie Friday is separate from this contest – comments left for our Freebie Friday give-aways do NOT count as entries in this contest.

Remember, this is the final month, so be sure to enter to win. The final two winners will be announced at the beginning of January. Please note this contest is open to current Paper Crafter’s Library members – if you are a current member and you win, that time will be added on to the end of your subscription.

Now, the moment you’ve all been waiting for…the December winners.  We chose this months Paper Crafter’s Library Membership winners in a different fashion.  We looked back at all the participants that contributed to our Makeover Monday challenges and noticed that two very special ladies contributed on a week to week basis.  Their hard work has not gone unnoticed and we wanted to let them know that we took notice of their challenge entries.  And these ladies are…

Sara Nell

and

Brenda B

Congratulations Sara Nell and Brenda B! Please email us at customerservice@papercrafterslibrary.com and put “PCL One Year Subscription Winner” in the subject line. We’ll need you to email us all your info – first and last name, your choice of a username and password, your mailing address and phone number.

We’ll be picking our final two winners in January – so if you’ve entered already but weren’t picked, there is still time to win! Make sure the badge is still there on your blog, put up another post or tweet or FB letting people know about our contest and then leave a comment here in this post linking back, or simply keep visiting and leaving us comments.