Featured Company: Faber-Castell Design Memory Craft

DMC_Newlogo_RegMark_2012
I’m so excited to bring you to this week’s Featured Company and a returning company: Faber-Castell Design Memory Craft! In today’s spotlight you’ll learn more about Faber-Castell, see a fantastic project by one of their designers and have the opportunity to win a prize package consisting of two packs of the 3 count Stamper’s Big Brush Pens in the colors of your choice.

fabercastellgiveaway605

About Faber-Castell Design Memory Craft

Founded in 1761, Faber-Castell Design Memory Craft is a leading manufacturer in high quality crafting supplies. count

The 8th generation behind Faber-Castell Design Memory Craft: Count Anton Wolfgang von Faber-Castell.
2011 was a milestone year for Faber-Castell USA as we celebrate the 250th Anniversary of Faber-Castell. We are proud of our longevity and what it represents – consistent delivery of a quality experience in all areas of business. In keeping with Lothar von Faber’s quote, “to rise to the highest rank by making the best that can be made in the whole world” Faber-Castell USA is committed to staying true to this vision of quality, tradition, and innovation now and in the future.

Product: Paper Crafter Crayons are highly pigmented wax crayons that can be used on all types of crafting surfaces such as cardstock, chipboard, canvas, embossed paper and wood. The unique twist-up design also allows you to sharpen the crayons. Available in 24 brilliant colors.


Special Faber-Castell Design Memory Craft Guest Designer

Today we also have a special Faber-Castell Guest Designer. Mou Saha is part of the 2013 Faber-Castell Design Team. You can leave a comment below the post telling us what you like about her project for a chance to win a prize package consisting of their Big Brush Pens (picture above).
You can see Mou’s fabulous project below, but first, here is a little more about Mou:

605mouprofilepicMou Saha Mou won the Creating Keepsakes Hall of Fame in 2007, was a member of their Dream Team in 2009 and you’ve seen her work in numerous craft publications.


She currently collaborates with 7 Gypsies, Anna Griffin, Glitz Design and October Afternoon.


Designer Project:

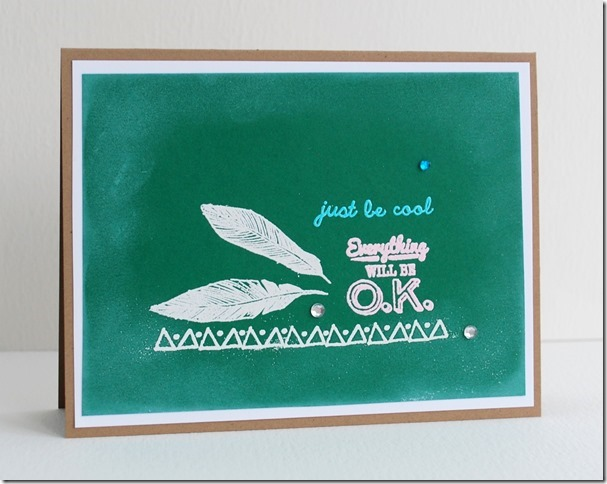
Hi everyone, Mou Saha here on behalf of Faber-Castell Design Memory Craft. Today, I’m going to show you a few things you can do with Stamper’s Big Brush Pens (http://www.fabercastell.com/design-memory-craft/products/categories/stampers-big-brush-pens). Stamper’s Big Brush Pens come in so many beautiful colors and the best part is that they are permanent once dry meaning you can keep adding layers, water, mediums, etc. and the lightfast India ink will not bleed. Here’s a card I made with Stamper’s Big Brush pens.

605FaberCastellPaperCraftersLibraryJune2013Card_MouS_Image1

 Supplies:

Faber-Castell Design Memory Craft Stamper’s Big Brush Pens: Light Blue 154, Cobalt Green 156, May Green 170, Chrome Green 174
Essential PITT Artist Pens: BLACK
Gelatos Designer Colors – Tropical- Snow Cone
Mix & Match Deluxe Water brush

Others: Cardstock: Recollections Flower stamps: Stampin’ Up! Background stamp: The Rubber Cafe Adhesive: Scotch 3M Scissors: Scotch 3M

Instructions: Let me walk you through the steps.

605FaberCastellPaperCraftersLibraryJune2013CardDetail1_MouS_Image2

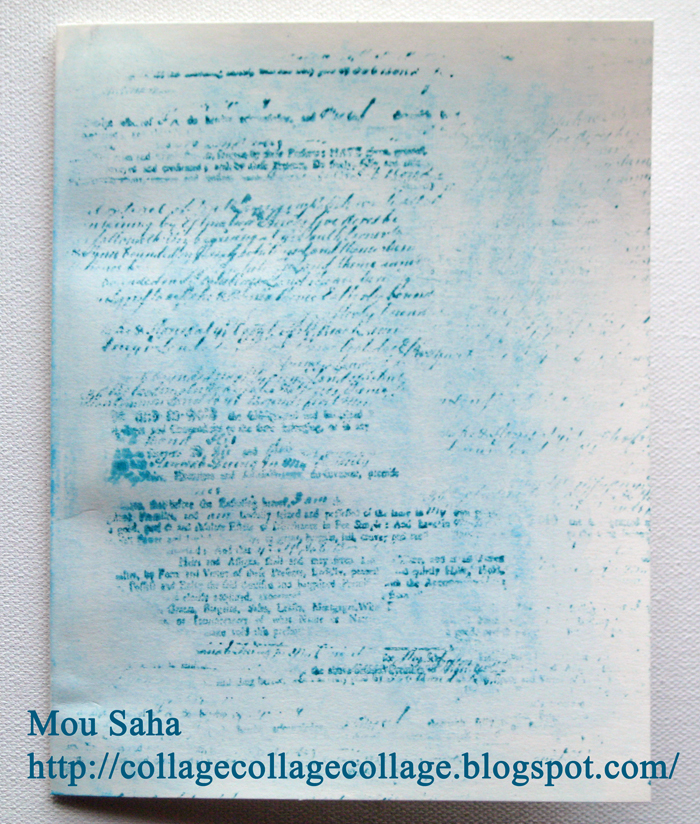
 Color the card with Snow Cone Gelato. Blend with water brush. While the color is still somewhat moist, ink up the background stamp with Cobalt Green Stamper’s Big Brush pen and stamp on the card.  

605FaberCastellPaperCraftersLibraryJune2013CardDetail2_MouS_Image3

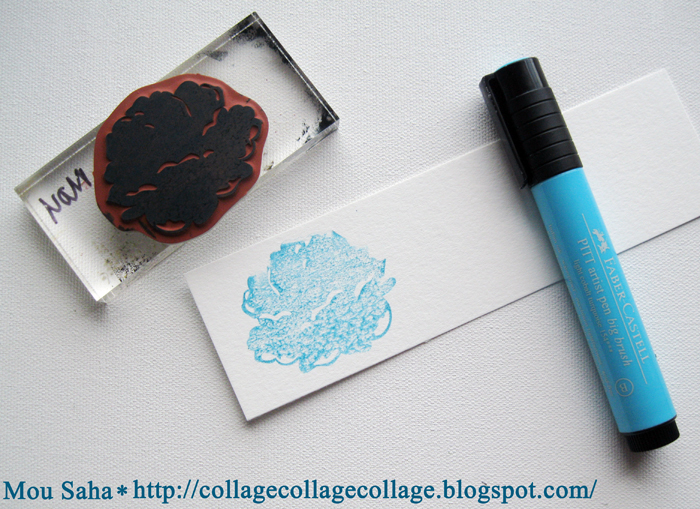
On a small strip of cardstock stamp the silhouette of a flower using Light Blue Stamper’s Big Brush pen .

605FaberCastellPaperCraftersLibraryJune2013CardDetail4_MouS

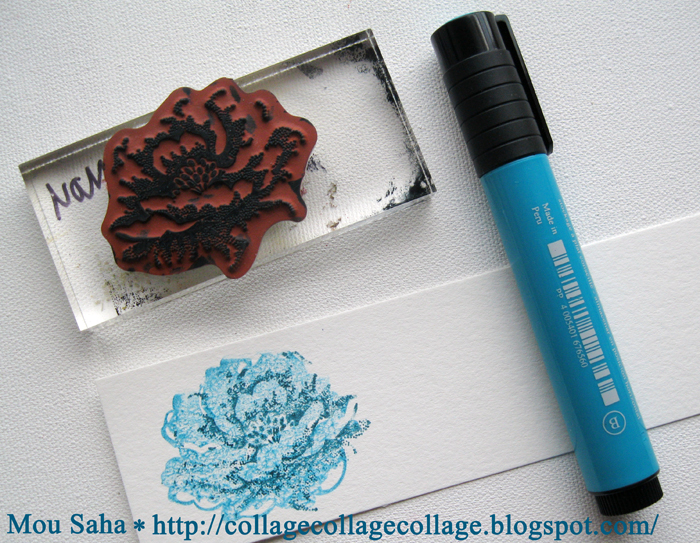
 Ink up the detail stamp with Cobalt Green Stamper’s Big Brush pen and stamp on top of the stamped silhouette image to create a second layer. Stamp as many flowers as you wish to use. Stamp leaf silhouettes with May Green Stamper’s Big Brush pen and details with Chrome Green Stamper’s Big Brush pen. Cut the flowers and leaves out with scissors and arrange them on the card as you like. Use foam tape to add dimension. Use Cobalt Green Stamper’s Big Brush pen to write the sentiment ‘hello’ at the base of the card. Write ‘there’ with a PITT Artist pen to finish.

We hope you enjoyed today’s tutorial and will give Stamper’s Big Brush pens a try on your next project. We want to extend a sincere thank you to Mou Saha for her fabulous project and Faber-Castell Design Memory Craft for sharing their company with us. Be sure to visit Faber-Castell to see more of their great products.

In order to enter the give-away to win the prize package shown above, please leave us a comment in the comments section of this post. Winner will be announced next Wednesday on the Paper Crafter’s Library blog!

Winner of Splash of Color Give-Away

splash of Color Logo
I’d like to extend a HUGE thank you to Splash of Color and their guest designer Marah Johnson for sharing such a wonderful project and for their generous give-away of their prize package shown below.
529splash of color prize

And now, the moment you’ve all been waiting for…….the winner is…… Jonia Smith!
603plashofcolorwinner

Congratulations Jonia!! Be sure to email us at customerservice@papercrafterslibrary.com to claim your prize. Please be sure to put “Splash of Color” in the subject line of the email, and then in the email itself, be sure to include your full mailing address and phone number.

For those of you that didn’t win, each week on PCL we feature a different company, and each of those companies generously sponsors a prize. Join us next week for our next feature.

andreasiggypcl

Trendy Tuesday – Weather Themes

Trendy Tuesday – Weather Themes
by Katherine Elliot

While extreme and stormy weather makes news headlines, our thoughts and prayers go out to those affected by the severe forces of nature.  These are times we feel humbled by the dramatic force of nature rather than awestruck by its beauty.  At least the healing benefits of creative inspiration are not far away, and it”s no surprise that many of the latest paper crafts incorporate weather themes.  Today”s paper craft forecast is partly cloudy, but there are plenty of rays of sunshine in these talented artists” projects to inspire you.  Enjoy new stamp sets, products and embellishments to suit your fancy, too.

Card by Heather Hoffiman, image source Houses Built of Cards

Trendy sequins adorn Heather Hoffman”s beautiful card shown above and includes weather theme dies from Lil” Inker Designs.  You can find many fun shapes in this product line of steel rule dies, including sun, clouds and rainbows.

Image of Sunshine Die - Large

Sunshine die from Lil Inker Designs

Sun and cloud shapes can be paired with many favorite sentiments, like the cheerful card Dawn Easton created below using a new stamp set from a brand new company, Reverse Confetti.

Card by Dawn Easton featuring stamps from Reverse Confetti, image source Treasure Oiler Designz

 Scrapping an every day moment is a fun way to celebrate life, even something as simple as the rainy day puddle play shown in Deb Duty”s scrapbook page. Trendy weather themed wood chip embellishments from Freckled Fawn are featured on this fun loving page.

Puddles scrapbook page and image source from DebDuty.com

 *Freckled Fawn Wood Chips CLOUDS Set of 54 WCCLOUD

Freckled Fawn wood embellishments, image source Simon Says Stamp

Paper Crafts Connection recently featured many more products that have the weather theme in mind. Washi tape, stencils, punches and paper make up just a few more of the weather themed products out there.  Gray skies are gonna clear up when you work with any of these fun paper craft toys.

8682343548 74c091bdbe Groovin with the Go to Gals: I’ve Got My Head In the Clouds

A multitude of cloudy themed products, image source Paper Crafts Connection

Find images suitable for all seasons and all kinds of weather like those found in stamp sets offered by companies like Lawn Fawn and Gina K Designs.

partly cloudy

Card by Mariana Grigsby, image source Lawn Fawn.com

partly cloudyLawn Fawn Partly Cloudy stamp set

Lee Murphy shows off a new stamp set and a great layout with awesome handcut and adhered embellishments in this rainy day card…

Card by Lee Murphy, image source My Reality, It”s All Good

Gina K Designs” new set, Weather or Not, includes more great combinations of sentiments and all the gear you”ll need to shelter your project from a rainy day.

Weather or Not- CLEAR

Weather or Not stamp set from Gina K Designs 

Clouds in particular crop up in many projects as a signature weather theme shape.  Unique texture and patterns of cloud shapes make them particularly attractive in these projects featuring stamps and images from Unity Stamp Company and Stampin” Up!

Card by Jennifer Roach featuring Written in the Clouds stamp set from Unity Stamp Company

Treat bag by Peg Coombes featuring Stampin” Up!”s Cloudy Day embossing folder, and Rain or Shine stamp set, image source Peg Craft a Lot

Love this cloud paper from Simple Stories… Are these clouds cumulus, nimbus or what?  I don”t know which kind they are, but the colors and patterns on this paper could look splendid on many projects.

Feel the Breeze paper from Simple Stories, image source Two Peas in a Bucket

Last but not least, Lisa Johnson shares a wonderful uplifting card using many pretty weather shapes.  The sentiment she used comes from a stamp set she designed for My Favorite Things.  The sentiments coordinate beautifully with any type of project you have in mind to bring cheer to someone who may need a lift of spirits of simply feel under the weather.

IMG_9276

Card by Lisa Johnson, featuring Rainbow Die-namics and sentiment from My Favorite Things, Cheerful Blessings, image source Poppy Paperie

A special thanks to all the creative talent featured on our Trendy Tuesday posts, both today and in past articles.  If you have been inspired by these projects, don”t forget to check out the links included below the images that will take you to any of the blogs and sites where you can share your appreciation, too.

May your day be filled with sunshine.  Happy crafting, everyone!

Featured Artist/Designer: Virginia Lu

Today on the Paper Crafter’s Library blog, we’re continuing our weekly featured artist spotlight whereby each week we spotlight a different artist/designer in the paper crafting & mixed media world and introduce you to their fabulous work.

Today we’re thrilled to welcome – Virginia Lu

Before we show you Virginia’s fabulous projects, let’s get to know her a little bit more…

530VirginiaLubioHello, I am Virginia Lu living in Waterloo, Ontario, Canada. I am an avid stamper, cardmaker/scrapbooker. I’m blessed with two wonderful children and a loving and supportive husband. In my blog (Yes, Virginia...) I share my love of card creations, scrapbooking, food and traveling.

I have been active in on line stamping community since 2008 and I love every minute of it.  I have been fortunate to have a few cards published by Paper Crafts, Cards, Papercraft Inspirations(UK) in the last two years.
I am currently on three design teams: The CAS-ual Fridays Stamps, Runway Inspired Challenge and SRM Sticker.

Card Projects

Today I am going to share three cards with chalkboard  effect. It is trendy and fun. They are really easy to create.

Card #1—Hooray

530virginialu
Supplies:
Paper: Neenah (white), Bazzill Basics  (black)
Stamps: Howl Are you, Wood  Background, It’s All Good by Hero Arts
Inks: Raspberry Jam Mid Tone Shadow  Ink by Hero Arts, Color Box Pigment Ink (white), Versamark (Tsukineko)
Embossing Powder:  Stampendous Embossing Powder (white,  detailed), Green embossing Powder (Zing)
Accessories: 3 D Pop Dots by EK  Success, gems by Hero Arts


Card  #2—Everything will be OK
530virginialu2

Supplies:
Paper: white, Kraft (Recollections),  Green (Bazzill Basics)
Stamps: Sundrifter- Frames and  Feathers by Hero Arts
Inks: Versamark (Tsukineko), Color  Box Pigment Ink (white)
Embossing Powder: Stampendous  Embossing Powder (white, detailed), (pink and blue) Embossing Powder (Zing) by American Crafts
Accessories: 3 D Pop Dots by EK  Success, gems by Hero Arts


Card #3—A Sweet  Note
530virginialu3

Supplies:
Paper: Neenah (white), Bazzill Basics  (green)
Pattern paper: Lucille by Basic Grey
Stamps: Stirring in Lots of Love by  Lil Inkers Designs
Inks: Versamark (Tsukineko), Color  Box Pigment Ink (white), Punch Mid Tone Shadow Ink by Hero Arts
Embossing Powder: Stampendous  Embossing Powder (white, detailed)
Accessories:  Jute from American Crafts, heart pearl  (Hero Arts)
Tool: small hole punch  (Staples)

I hope that my 3 cards inspire you to try  out the chalkboard effect. You can incorporate this technique and make teacher’s  gifts, tags, framed art and any projects.  Big thanks to Paper Crafter’s  Library for this guest feature.

We hope you have enjoyed today’s projects courtesy of Virginia Lu.  Also, be sure to stop by Virginia’s Blog to see even more of her beautiful work (and let her know we sent you).


Featured Company: Splash of Color

 splash of Color Logo

We are happy to bring you this week’s Featured Company: Splash of Color.  We are so excited to be featuring them for the first time on Paper Crafter’s Library.  In today’s spotlight you’ll learn more about Splash of Color, see a fantastic project by one of their designers and have the opportunity to win the prize package shown below (details at the end of this post).

529splash of color prize 

About Splash of Color

We are a mixed media driven company Featuring Luminarte, Viva Colour and various Licensed artists. We have a strong belief in both inspiring and educating our customers. We are constantly striving to develop new and innovative products, as well as searching out new and exciting products to distribute. And we are responsive to our customers. We listen, we make things that work, that are easy to use, and are the highest quality for the best possible price… and that will help make creative dreams come true.


Special Splash of Color Guest Designer

Today we also have a special Splash of Color Guest Designer.  Marah Johnson is part of the 2013 Splash of Color Design Team. We are so excited to have her showcase her work today on Paper Crafter’s Library. You can leave a comment below the post telling us what you like about her project for a chance to win a the prize package.

You can see Marah’s fabulous project below, but first, here is a little more about her:

529marahbioshot“I don’t ever remember not making things; an artist mother and a very creativefather raised me. Being an artist is in my genes and in many ways I feel as if I was predestined to be exactly where I am. I was raised in a truly bohemian hippie lifestyle where making things was how we supported ourselves as we traveled from state to state, coast to coast, selling our wares. I met many artists and artisans along the way, and being the precocious little one that I was, I always asked everyone I met to show me what they were making. Nearly every one of those artists would teach me something. My mother, who is currently a fine artist, taught me more than I can ever give her credit for… from sewing, to creating natural dyes, to plaster casting, candle making, papier maché, knitting,crochet, embroidery, carding wool, spinning wool, weaving, beading, jewelry… the list goes on and on. Suffice it to say she gave me my creative wings and I chose to fly. I have now been in the craft industry for about 14 years! I don’t think I could tell you what part of my creative career I love more – teaching, creating, product development, and marketing all provide a bit of an adrenalinerush for me.
“In addition to being a mixed media artist, versatile designer, product developer, and teacher, she’s wearing yet another hat and title: VP and Brand Manager of Splash of Color. Marah Currently resides in Huntington beach, CA.


Splash of Color Guest Designer Project: Mixed Media Card
529splashofcolor9

Supplies

Silks By Luminarte Twinkling H20’s by Luminarte Iridescent Glitter Paste by Viva Colour Stencil- Quatrefoil by The Crafters Workshop Stickers by Mixed Media 101 for Splash of Color Pallet knife ¾” wide paint brush Adhesive (pictured below)
529splashofcolorselections

Mixed Media Card Instructions

Step 1. Direct to rubber-stamping using Twinkling H2o’s by Luminarte.
• Choose Twinkling H20 colors, I suggest at least three different colors per image to create depth and texture. • Hydrate Twinkling H2O’s with water and let sit until the paint becomes a nice creamy almost honey like consistency
• Use a wide flat paintbrush to paint rubber stamp with a nice even coat of Twinkling H20’s
• Spritz stamp to make sure stamp is hydrated evenly and stamp image.
• Stamp background image directly on to card
• Stamp several butterfly images on an extra piece of card stock
• Let butterflies dry and cut two out for center of card

529splashofcolor1

529splashofcolor2

529splashofcolor3

529splashofcolor4

Step 2. Glitter paste and stencil background
• Using Silks by Luminarte and a sponge applicator put a coat of silks on to stencil and let dry.
• Once silks are dry on the stencil, place stencil on card and using Iridescent Glitter Paste by Viva Colour stencil only on the outside border of card. You will notice that the silks are activated by the Glitter Paste and create an outline around each stencil shape.
• Use a LOW TEMP heat gun to increase dry time of Glitter Paste by Viva Colour

529splashofcolor5
529splashofcolor6
529splashofcolor7
529splashofcolor8

Step 3. Finishing Card
• Layer both butterflies one on top of the other and adhere together only in the center of the bodies leaving the wings to fly free
• Add sentiment
529splashofcolor9

529splashofcolor10
529splashofcolor11
We hope you have enjoyed today’s feature. We want to extend a sincere thank you to Marah Johnson for her fabulous project and Splash of Color for sharing their company with us. Be sure to visit Splash of Color to see more of their great products. You can visit Marah on her facebook page here and Youtube page here.

In order to enter the give-away to win the prize package shown above, please leave us a comment in the comments section of this post. Winner will be announced next Wednesday on the Paper Crafter’s Library blog!

Trendy Tuesday – Something Sketchy

Trendy Tuesday – Something Sketchy
by Katherine Elliot

Today’s trend article was inspired from featured guest artist, Karolyn London, as seen in this post from the PCL blog.  Sketch-like line stamps can be similar to artistically inspired pen or pencil drawings or simple shaped doodles.  These fun images can make your project look hand drawn.  If you are sharing your project with the less crafty-informed types, then Shhh!  Your secret is safe with us!

516karolynlonconOh Snap

Card by Karolyn Loncon, image source Papercrafters Library

Karolyn’s card above features a sketched camera image from the Claudine Hellmuth stamp set So Retro.  Other brands offer some sketchy retro shapes, too, like the ones shown below from Hero Arts and Tim Holtz.

Scrap Time - Ep. 850 - Hero Arts Background Stamps

Cards featuring Hero Arts background stamps, image source Scrap Time

Smile picture

Hero Arts background stamp, Smile

Still in retro mode, Tim Holtz’s line of sketch stamps may leave a younger audience wondering, what in the heck is a rotary dial telephone…?!  Tammy Tutterow’s project below showcases wonderful texture and great coloring added to the phone sketch image.

tammytutterow pink telephone blueprint card

Card by Tammy Tutterow, image source Tutorials for Inky Hands

Phone Sketch Tim Holtz Red Rubber Stamp THRR1180-2091

Phone Sketch stamp from Tim Holtz, image source Stuff 4 Scrapbooking

Tim Holtz Cling Rubber Stamp Set - Industrial Blueprint

Tim Holtz Industrial Blueprint stamp, image source 123 Stitch

Besides blueprint type line drawings, you can create colorful backgrounds that also look hand drawn by using sketch shaped stamps from Papertrey Ink.

Card by Erin Lincoln featuring Sketch Shapes stamp set from Papertrey Ink, card image source Procrastination Station

Card by Maile Belles featuring Sketched Shapes stamp set from Papertrey Ink, image source Simply Stamped

Stampin’ Up! fans will also love to see some new sketch style stamps in the upcoming catalog, including an alphabet set that has that sketchy vibe as well.

FMS #84

Card by Justin Krieger featuring soon to be released stamps from Stampin’ Up!, image source JK Cards

Casually drawn doodle type images and sentiments are also included in this trendy category.   Doodle style images and coordinating phrases look lighthearted and fun to play with.  Check out some of these options from companies such as Alley Way Stamps,  Lawn Fawn and Unity Stamp Company.

Card featuring  Lighter Than Air stamp set from Alley Way Stamps, image source The Alley Way Stamps blog

Happy Pears by Tracy Schultz

Happy Pears card by Tracy Schultz, featuring stamps from Lawn Fawn, image source Who is Tracy

my silly valentine

My Silly Valentine stamp set from Lawn Fawn

Everyday Adorable 1

Everyday Adorable, Unity Stamp Company

Perfect for spring projects, hand drawn doodle-like flowers can also be fun to color in on your next project.

UK-121A-ITS-SPRING

It’s Spring stamp set from Unity Stamp Company

Card by Angie Blom, image source Unity Stamp Company

Inspired this week?  I hope so.  Break out the sketchbook or just ink up one of these stamps and have fun creating.  Happy crafting, everyone!

Featured Artist/Designer: Laurie Willison

Today on the Paper Crafter’s Library blog, we’re continuing our weekly featured artist spotlight whereby each week we spotlight a different artist/designer in the paper crafting & mixed media world and introduce you to their fabulous work.

Today we’re thrilled to welcome – Laurie Willison.

Before we show you Laurie’s fabulous projects, let’s get to know her a little bit more…

523lauriewillisonbiopicMy name is Laurie Willison.  You can usually find me crafting away in my craft room while the kids are in school or when they are sleeping!  🙂  Other than that I am a part time RN and I live in the country with my very own farm boy and our 2 kiddos. 🙂

I have been stamping since 2007, when a sweet friend of mine introduced me and I started scrapbooking in 1998 ish.  (I still try on occasion but it doesn’t happen very often.)  I have had the pleasure and honor of working on several design teams, including my most current, Verve, CAS-ual Fridays and Retro Sketches Challenge Blog.

My style is mostly CAS and I love to follow trends occasionally but I do love lots of white space and fun images.  I am always on the look out for fun fonts too!  I am honored to be a Featured Designer here at Paper Crafters Library!  Thanks so much for having me!


Card Projects

Hello Sunshine

523lauriewillisoncard1
Supplies
Stamps:  Doodled Occasions (Verve), Hello Sunshine (PTI)
Paper:  White and Harvest Gold (PTI)
Ink:  Papaya (Amuse), Versafine Black Onyx
Misc: Circle Punch (EK Success)

For the Hello Sunshine card, I took a yellow card stock and made the card base.  I stamped Hello Sunshine in black ink at the bottom, center of the card.  Next, I took white card stock and stamped the sun rays starting at one point in the middle at the base of the card stock.  Then I took a circle punch and punched out half of a circle.  I rounded the corners of the yellow card base and the corners of the white card stock.  I attached the white card stock to the card base with foam tape for some dimension.


This Hope

 523lauriewillisoncard3

Supplies
Stamps: Strong Anchor (Verve)
Paper: White (PTI)
Ink: Berry Sorbet (PTI)

For this card, I took the rope image and stamped stripes using the reverse side of the stamp.  Then I stamped the scripture sentiment right in the middle using black ink.  Super simple!  🙂

We hope you have enjoyed today’s projects courtesy of Laurie Willison. Also, be sure to stop by Laurie’s Blog  to see even more of her beautiful work (and let her know we sent you).


Winner of Fancy Pants Give-Away

FancypantssquarelogoNEWSMALLI’d like to extend a HUGE thank you to Fancy Pants Designs and their guest designer Jenny Evans  for sharing such a wonderful project and for their generous give-away of their Down by the Shore collection shown below.

515DBTSCollectiongiveaway

And now, the moment you’ve all been waiting for…….the winner is…… Marsha Reed!515giveawaywinner

Congratulations Marsha!! Be sure to email us at customerservice@papercrafterslibrary.com to claim your prize. Please be sure to put “Fancy Pants Designs” in the subject line of the email, and then in the email itself, be sure to include your full mailing address and phone number.

For those of you that didn’t win, each week on PCL we feature a different company, and each of those companies generously sponsors a prize. Join us next week for our next feature.

andreasiggypcl

Trendy Tuesday – Stencils

Trendy Tuesday – Stencils
by Katherine Elliot

  Often a popular tool for DIY home decor crafts, stencils make great tools for colorful and unique backgrounds and textures on paper as well as other craft projects.  Many companies market their stencils in perfect sizes and trendy styles that are well suited for today”s paper crafts.  Let”s take a look at some of the latest examples that show off these fun tools so well…

“Hello There” Card by Tenia Nelson, image source Jazzy Paper Designs

There are several ways for you to use stencils on your projects.  Tenia”s card above shows an ink sponged stencil, Mamma Giraffe pattern from Just a Trace.  Her blog post has more images to show you exactly how she created her card, so as Tenia says, check it!

Sponged ink stencil in progress, image source Jazzy Paper Designs

Using spray ink with your stencils is another method you can use to create a vibrant background.  Linda Beeson”s card featured below used Clearsnap spray ink to create a trendy honeycomb stencil background.

Card by Linda Beeson, image source Papercutting Kind of Day

Single color stencils look great and can be quick to create, but multiple ink colors used with stencils can also be fun and easy to apply.  Unlike a background stamp that you would apply ink, stamp, then see your results, a stencil gives you the instant gratification of showing you results as your colorful creation takes shape.

Fredwear

Multi color stencil card, image source Ellen Hutson.comStudio Paint SuppliesStencil and ink colors, image source Ellen Hutson.com

 Whether you plan to sponge, daub, brayer or spray ink for a stencil background, your first task will be to find the right image or pattern to match your project.  Several popular brands are up to the task of providing you many stencil options.  My Favorite Things just released several new stencils with many on trend patterns, including these large chevron stripes…

Card by Jodi Collins, image source Stamping a Latte

Stencils Large Chevron Stripes

My Favorite Things Large Chevron Stripes Stencil

Hero Arts  offers some thick frosted mylar stencils that are sized to overlay easily on a regular A2 size card front.

*Hero Arts Stencil IRREGULAR CHIPBOARD BACKGROUND 2013 sa004Hero Arts Irregular Checkerboard Stencil, image source Simon Says Stamp

Dreamweaver Stencils offer a very large selection including many popular and frequently used images in several different sizes.  Use multiple stencils with markers or pens to create a patterned image uniquely your own, like the Dreamweaver stenciled butterfly shown here… Card featuring Dreamweaver Stencil, image source Papercraft Planet

Stencil pattern with pen, image source Papercraft Planet

 Stencils or masks, as they can be called, may be offered by many of your favorite brands to coordinate with their unique styles and other products.

Studio Calico mask, image source Two Peas in a Bucket

Scrapbook page by Jill Sprott,featuring Studio Calico mask, image source Two Peas in a Bucket Gallery 

Scrapbook page by Grace Wong, featuring The Crafters Workshop stencil, image source Callibee Scraps

Ronda Palazzari Designs TCW Stencil Release 2013The Crafters Workshop stencils, image source Help Me Ronda

The Crafters Workshop offers stencils featuring unique images as well as trendy patterns.  The Claudine Hellmuth Studio stencils shown below were just released early this year.

Claudine Hellmuth Studio stencils, image source Blue Moon Scrapbooking

CHA Winter 2013 - Day 3Inked paper featuring floral Claudine Hellmuth stencil, image source Scrap Time

Prima Marketing is another brand with several stencil/masks that are perfect for scrapbookers as well as card makers.  Prima offers stencils in 6×6 as well as 12×12 inch sizes.  Check out even more inspiring methods on different ways to use stencils on Prima”s blog post here.

25 feb britScrapbook page featuring Prima Marketing stencil/mask, image source Prima Marketing blog

 Inks are most frequently used with stencils, but they are not the only medium or type of stenciling available.  Up the ante with your stencils by using an embroidery stencil from Amy Tangerine…

Amy Tangerine stencil, image source Two Peas in a Bucket

Scrapbook page featuring embroidery stencil, image source Orange Gearle

 For texture that really stands out or for special crafts or applications, use embossing paste with a stencil.

Embossing paste, image source Stencil with Style


Stencil jewelry using embossing paste, image source Globecraft & Piccolo

Here”s our mixed media project of the day featuring rich texture and stencil patterns…  Canvas by Mona Pendleton featuring fiber paste stencil image source Cupcake”s Creations, Doily stencil featured from My Favorite Things

Inky fingers, rejoice! I”m sure there is a stencil pattern available to keep your crafty fingers happy.

Enjoy and happy crafting, everyone!

Featured Artist/Designer: Karolyn Loncon

Today on the Paper Crafter’s Library blog, we’re continuing our weekly featured artist spotlight whereby each week we spotlight a different artist/designer in the paper crafting & mixed media world and introduce you to their fabulous work.

Today we’re thrilled to welcome – Karolyn Loncon

516karolynlonconbiopicBefore we show you her fabulous projects, let’s get to know her a little bit more…

Hello! My name is Karolyn Loncon.  I’m a retired Legal Assistant, married to Garry since 1980, and mom to Amy and Ashley, who’s married to Blake and the mother to my grandsons, Brecken and Brenner.  I’m blessed to live in Seattle, Washington in the summer, and Chandler, Arizona in the winter.  I love most paper crafts, but especially stamping and card-making.  The name of my blog is Paper Therapy.  I love to laugh, travel and play BINGO (don’t judge – LOL)!

I started paper crafting in 2002 when my older daughter “abandoned” me to go to college.  I started scrapbooking as my therapy.  Shortly thereafter, a friend invited me to a Stampin’ Up! party, and the rest is history.  Once I discovered stamping and card making, my need for instant gratification took over.  I haven’t touched a scrapbook since!  Ha!  I would say that my style is mostly clean and simple, although I throw in some fun and cute every now and then.  I’ve been fortunate to have many of my projects published in paper crafting magazines and thoroughly enjoy that whole publication process.  I also design projects for Paper Smooches Stamps and CAS(E) This Sketch Challenge Blog.

I was thrilled and flattered when I got the email from Andrea asking me to be featured – and am so happy to share a project with you all today!


Card Project

 516karolynlonconOh Snap

I’m really enjoying the “sketchy” or “doodling” trend that I’ve been seeing in a lot of different arenas of art and design.  I also adore images that are retro.  So my project features both of those aspects.  I stamped the camera image multiple times down the right side of the card base in VersaMark ink.  I love the subtle effect of repeating an image in watermark ink, and then having a duplicate of that image pop off the page as the focus.  I stamped the camera twice in black onto a scrap of kraft paper, fussy cut one of them and adhered it to the card base with foam tape over the top of the watermarked image.  To give additional dimension, I fussy cut the lens of the second black image, colored one of the rings with orange marker, and adhered it to the camera with more foam tape.  Doesn’t it look so real?

516karolynlonconOh Snap Close Up

For the sentiment, I die cut a word bubble (another super fun trend that I’m loving these days).  I thought this punny sentiment was the perfect match for the camera image, don’t you think?  I really liked the idea of making the word bubble white – it totally “pops” off the page.  I colored the open letters with orange marker, and then adhered the word bubble to the card with foam tape.  I love the contrast of the monochromatic kraft with the pop of white and orange.  This project came together so quickly, which is exactly why I adore creating clean and simple cards.  Instant gratification!


Supplies

STAMPS:  So Retro (Claudine Hellmuth/Stamper’s Anonymous/Ranger), Snapshot Words (Maya Road)
INK:  VersaMark (Tsukineko), Black Dye (Hero Arts/Memories)
PAPER:  Desert Storm CS and Solar White CS (Neenah Classic Crest)
OTHER:  Talk Bubbles 2 Die (Simon Says Stamp), Orange Marker (Memento)

We hope you have enjoyed today’s projects courtesy of Karolyn Loncon. Also, be sure to stop by Karolyn’s blog to see even more of her beautiful work (and let her know we sent you).