Happy Harvest Pumpkin Basket on the Silhouette

The weather is definitely cooling off, and today’s project is meant to celebrate the change of the seasons.  I love this little rustic basket, and the 3-D pumpkins which inhabit it!  Of course, my trusty Silhouette was part of my project lol.  I simply can’t get enough of this machine, and I know that when you see all the wonderful things that it can do, then you to will agree that it is a machine that you can’t live without! 

 Today’s project was designed to show you how to manipulate templates on your Silhouette so that you can make them larger than the mat size allows.  What a great way to compensate for the smaller size 🙂  Now here is the funny thing, I had made and filmed this project, had set it up in my lightbox with the prettiest pumpkin of the bunch setting off the others in the basket, as it reposed along the side.  Well didn’t my dog sneak in, walk by, and swipe the star pumpkin from under my nose.  She took her little booty upstairs, and proceeded to eat the whole thing minus a few scraps of paper.  Each pumpkin holds four Hershey kisses, so she really thought that she had lucked out.  I on the other hand was rather put out, and not happy that she got hold of chocolate (toxic to dogs).  In the meantime, I feel that my Pumpkin Basket is not half as nice as when my best pumpkin was the star in the front.

For the basket, I employed a faux woodgrain look, to make it more rustic looking.  The pumkins were inked with their complementary colors (thus darkened with blue) as well as a bit of  rust color.  The greeting was generated in Adobe  Photoshop, and was super imposed on the banner.  The whole project was made pretty easily with the help of my digital cutter,  and I can’t wait to make more pumpkins for all my daughter’s friends.

Paper Crafter’s Library members can link to the video HERE (remember, you have to be logged in to do so).  The video is in four parts, and shows you exactly how to manipulate and cut apart the image in the Silhouette Studio Designer Edition Software as well as how to enlarge it.  Not a member of Paper Crafter’s Library, click on the Become a Member tab at the top of the page for a full listing of member benefits.

Supplies:

Ink:  Tea Dye, Vintage Photo, Rusty Hinge, Chipped Saphire, Walnut Stain
Paper:  More mustard, Whisper white, Pumpkin Pie, Tangerine Tango
Die Machines and cuts:  Silhouette SD, 3-D tool box , 3 pumpkins, pumpkin, 6 banner set 
Other:  Stardust Stickles, sponges, multi-purpose glue, glue dots, soft tools wedge, White Pan Pastels, dimensionals, Sticky Strip, Silhouette SD, brown marker, Therm-o-web

Club 52 Week 3 Techniques

Where has this week gone?  Today I wanted to share with you pictures of the Week 3 techniques we introduced in Club 52 (which you can read about here). This week I’m continuing on with Direct To Paper techniques (DTP) featuring dye-based inks.  This is the third week now that we’ve been doing DTP techniques, and I have to say, I’m quite amazed at the possibilities – who knew?  So far, the majority of the techiques are ones that I came up with while fiddling around with my ink pads. The most challenging thing for me has been coming up with names for them LOL.  I’m not very good at that.

This week’s technique is one that I call the “Pulled Background Technique”, and I’ve created three different variations. Here’s a quick snapshot, and then I’ll follow with close-ups:

Here’s the first one, which is the Basic Pulled Background technique:

Here’s the Striped Pattern I created using the Pulled Background Technique:

Here’s the Faux Barn Boards Using the Pulled Background Technique.  Now one thing I do want to add about this one is that this is very similar to the Faux Woodgrain Techique – it’s just got my own little spin on it. 

Now the video tutorials for all three tags above are available to Paper Crafter’s Library members AND Club 52 members, but the step-stepped up version of the striped pattern which I used in the card below, is a project that I created exclusively for Paper Crafter’s Library members.  I should mention for those of you that joined Club 52, you can upgrade to a Paper Crafter’s Library membership at any time by filling out the registration form and then selecting renew as yes.

I have to say, this card is probably one of my all-time favorites.  The colors are just SO vibrant and the background was so fun to create!

Anyways, that’s what’s new today.  Be back tomorrow with another great project!

Product Spotlight: Dr. Ph. Martin’s Radiant Watercolors


For any of you who might know me, you will know that I am an absolute art junkie!!  I love art supplies and colors, papers and pens.  I adore sketching and playing, and most importantly, I LOVE to color!  I think my favorite coloring method is watercolor, followed by pastel, Copic/Color pencils, then everything else. 

Watercolor though, is like a kind of magic.  It flows with a certain unpredictability.  The colors mingle on the page, the pallet is limitless, and everything has the potential to look beautiful, even mistakes.  So when I first came across Radiant Concentrated Water Colors in my University days (translation: long ago), I was enamoured with the bright beautiful hues, and the luminous transparency of this medium.

Radiant Watercolors are a dye-based ink which is watersoluble (unlike India Ink which is permanent). This ink was created with Comic writers, and designers in mind.  Anyone who did work which would not be permanent (used to make prints), would use these inks to add vibrant color to their work. 

 Now of course, with the lines between crafting and art becoming more blurred, I find that these colors would be perfect for anyone  who desires bright punches of color, with beautiful blending of color, and little or no chance of muddying in their work.  These colors are probably some of the brightest on the market, producing vibrant washes and fills.  They are of course meant for the artist, but if you appreciate the significant improvement which artist quality can bring to your work, then you are sure to love these.

Like any dye based ink, they are not lightfast, and will fade under direct sunlight or Fluorescent lights (this includes energy savers).  Under incandescent light though, they will remain true.  Fading is not fast, and under indirect light they will be fine for years (as in the production of cards).  For items which are not exposed to light often (such as art journals, sketchbook journals and Scrapbook pages) the color will remain true indefinitely.  Because of this lack of lightfastness (which all dye based inks share), bottles must be stored in a dark cool place for optimum preservation. 

So why pay more when you can use dye-based ink refills (the kind used to refill stamp pads)?  While I do love my stamp pad inks for coloring, I find that it cannot compare to the vibrance of these colors, and they don’t always mix as well in producing new colors.  I find that Dr. Ph Martin’s Radiant Watercolors  just flow really nicely, and they can easily be mixed with my watercolors to give me clear glazes over heavier colors.  The example above and the one below will show you how beautiful these colors are (and yes, the colors are actually pretty true to the originals in my book). 

For more information on these products, check out the complimentary video on Paper Crafter’s Library which introduces you to what each color looks like, and what it can be used for.  For more information on the manufaturer and their other products, check out this website.


Club 52 Week 2 Techniques and the Winners of the Club 52 Give-away!

Wow! Thank you so much to all of you who entered the Club 52 Technique Club Give-away!  At the end of this post I will be announcing the 5 lucky winners! Before that though, I wanted to give you a quick peek of the Week 2 technique released last Friday – which I call the Blended Background Technique.  Going forward we will be releasing one new technique a week, but I had actually intended to start Club 52 the first week in September, so last week ended up being “catch-up” week, with two techniques posted in one week.  You can see what we have so far in Club 52 by looking on this page – please note though that only members will be able to actually click to the videos themselves.

I actually did two variations of this technique for Club 52 – one which I called the Pressed and Blended Background Technique (the top tag in the picture below) and one which I called the Dragged and Blended Background Technique (the bottom tag).

Today, I posted a card using a third variation of the Blended Background Technique for Paper Crafter’s Library members (those that have signed up for the whole she-bang, which is Club 52 AND everything else the library has to offer). Unfortunately you don’t get the full effect of the card – there is a gorgeous coppery color in the background which the camera just didn’t pick up, and you also don’t quite get the effect of the different colors in the background either.  IRL it’s beautiful!

Okay, and now onto the give-away.  Below I’ve posted the names of the 5 lucky winners.  If your name was drawn, please email me at andrea@sunnystampin.com and put “Club 52 winner” in the subject line.  Within 24-48 hours, you will receive an email with all your log in information to access the class.  If your name wasn’t drawn, you can sign up for the class or for Paper Crafter’s Library membership itself (the online class is free when you are a full-fledged member) HERE.

All winners were drawn using www.random.org


Melanie 
September 13, 2011 at 9:53 pm
Wow! I would love to win this! Sounds like a terrific class 


karen
September 13, 2011 at 9:58 pm
Oh Andrea, pick me! This year has been the worst, seperation, moving back to Canada, starting all over again! I need some positive in my life! I would love to learn the brayered background technique and all you have to teach!


Tammy B
September 13, 2011 at 10:05 pm 
I would love to win this, I love your projects and I am always up for learning new stuff. I don’t have a particular technique. Just new ways to use old things I guess. Like new ways to use dies that are “out of the box” ideas sort of thing.
Thanks for the chance!


Wendy Vest
September 14, 2011 at 8:13 am
I’m new to stampin and would love to learn some of your new techniques, Out of all the sites I have come across ya’ll are the best by far. Would love to win!!!!


Judi Sparks
September 19, 2011 at 12:46 pm
What a wonderful give-a-way! Who couldn’t use more ways to use all their crafting supplies! Thanks for sharing so generously.


Club 52 – A *New* Online 52 Week Technique Club & A Give-Away

Do you love to learn new techniques which you can apply to your stamping, greeting cards, scrapbook pages, altered art or art journals?  Then this club might be just the thing for you!

Club 52 is a brand new technique club we recently launched here on Paper Crafter’s Library – which we are opening up as an online class for non-members.  The cost of the class is $60 CAN (about the same in US funds). Anyone from around the world can sign up.

This class is going to last for 52 weeks – and you are guaranteed to learn at least one new technique each week – so by the end of a one year period, you are guaranteed to learn at least 52 different techniques – many of which will be original techniques created by members of the Paper Crafter’s Library team! Also included in the price of this class is a number of bonus techniques.  You will have access to the classroom for 1 year and 3 months from the date that you join so that you have plenty of time to view all the videos and download the printed instructions.

Here’s how the club is going to work: we are going to explore 1 medium/product at a time – and teach you a number of different techniques using that medium/product. That way, you know that when you buy a particular product or medium you’ll have lots of different options for using it – so you know that you’ll really be getting your money’s worth out of that product.

In many cases the products/mediums used will not be brand-specific – in other words, as long as you have a similar product, even if it’s from a different manufacturer, you’ll be able to substitute it. So for example – for the first four weeks of the club we are going to be exploring techniques using dye-based inks.  ANY brand of dye-ink can be used – whether it’s Stampin’ Up! Classic ink, Adirondack Dye-Inks, Hero Arts shadow inks, Jenni Bowlin Dye inks, Tim Holtz Distress Inks etc.

Each technique (and any variations on that technique) will include a video tutorial. We will also provide you with some brief written instructions for that technique that you can print out.  We are demonstrating all of our techniques on tags that are about 3 1/8″ x 6 1/4″ – all the tags will be finished and decoraged.  The technique will be shown on one side of the tag and the printed instructions can be placed on the back of the tag. That way, as the club progresses, you will essentially be creating your own technique “booklet”. 

If you are a paper crafting instructor or store owner you are welcome to use these techniques and our printed instructions in your own classes. 

We’ve already posted the week 1 techniques, and Week 2’s will be posted on Friday, so as soon as you join, you can launch right in!  In fact, you can see a sneak peek below. 

For Weeks 1 -4 we are going to be exploring background techniques with dye-based inks.  The Week 1 technique is one we came up with which we call the Swiped Background Technique – and we will be showing you three different variations – 1 color, 2 colors, and 3 colors.  So already, week 1 is going to give you three different techniques!

Sound fun?  You can sign up by clicking here.  Make sure that you select the online class option.  I should also mention that this online class, and all future online classes are free to Paper Crafter’s Library members as part of the benefits of their membership.

So, now for information about our give-away!  Leave us a comment in the comments section of this blog and tell us your favourite technique or one you’d like to learn and you’ll be entered to win a free registration for the Club 52 Online Class.  On Monday, Sept. 19th, we’ll be announcing 5 lucky winners! 

Lunchbox Love Notes

Every year the older kids struggle with having to go back to school.  While they are excited to see their friends, they’re not so happy to leave behind the fun and freedom of summer.  For them – and I’m sure just about every child out there – school days, while jam-packed with activities, can seem never-ending.  That’s why this year I decided to create a little project to hopefully interject a little note of cheer and encouragment to each of my children when they are at school.  The nice thing about this concept is that if you don’t have children it can be adapted for adults as well and used as friendship notes, or even love notes for a spouse.

There are many different variations of Lunchbox Love Notes out there in the blogosphere – so many in fact that I have no idea who came up with the idea first.  This project – which I posted yesterday in the Paper Crafter’s Library for members – is my version of Lunchbox Love Notes.  I created two different versions.  In the top right you can see an altoid tin which I altered to fit the notes.  I bought a bunch of these tins years ago, and still have tons left.  I figured that I would gift each of my children with one of these tins so that they can store their love notes from me.   The little note cards were sized to perfectly fit inside the tin – they are 2 1/8″ high x 3 1/2″ wide.  I used a lined patterend paper from Scenic Route which I’ve also had in my stash for at least a year. The tin will hold up to 8 notes.  The adorable apple stamps are a Papertrey Ink stamp set. Since Altoid tins aren’t always readily available to everyone, I also created a cardstock portfolio option which is sized to fit 6 notes.

A cool technique I learned at the summer CHA is to use the glaze only portion of Tattered Angels Glimmer Glaze to give a lustrous finish to the apples.  All you do is ensure that you don’t shake up the bottle so that the glitter stays on the bottom.  You then brush it onto the apples. Unfortunately it doesn’t show up in the picture, but boy is it beautiful! 

Here’s a full supply list of what I used:

Stamps: Just a Note and Teachers Apple (Papertrey)
Ink: Regal Rose Stampin’ Write Marker (Stampin’ Up!); Memento Tuxedo Black ink (Tsukineko), Adirondack Red Pepper ink, Adirondack Citrus ink (Ranger)
Copic Markers:  Copic Sketch E15 (or other brown marker)
Paper: Whisper White CS, Poppy Parade CS, Green Galore CS (Stampin’ Up!); Lined pattern paper (Scenic Route)
Accessories: Modern Label punch, 1 1/4″ Circle punch, 1 3/8″ Circle punch, bone folder, paper snips, SNAIL adhesive, Stampin’ Dimensionals, Sticky Strip, 1/2″ Poppy Parade Poly Stitched ribbon, stamping sponges, Basic Rhinestones (Stampin’ Up!); Icicle Glimmer Glaze (Tattered Angels), Crop-a-dile Corner Chomper (We R Memory Keepers); Tombow multi-purpose liquid glue (Tombow), double sided tape (3M); Matte Accents (Ranger); acrylic graph ruler, altoid tin, pencil, printed greeting sheet (other)

Sweets for the Sweet


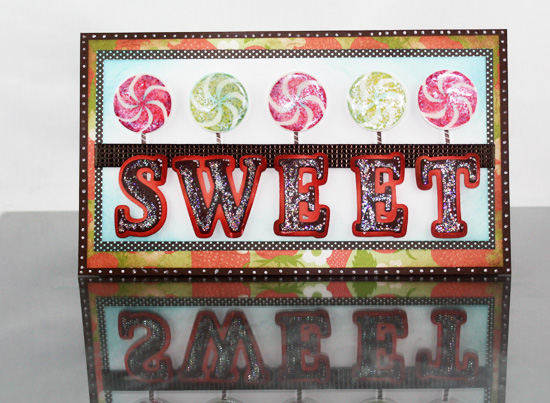
Today’s card was designed with sweet lovers in mind! This card is glossy, and sparkly, and has such a fun pattern to set off this whole design. The candies have a thick glossy coating to simulate the hard candy of the lollipop.  This coating was achieved with lots of layers of UTEE, and this of course after I shaded and colored the candy using a direct to rubber technique. 

The letters come from a retired Quickutz alphabet, and are easily replaced with any die cut, or digital cutting machine.  The stickles on top give a nice sugar coated look.  This card is perfect for anyone on your list, be they young or old!  Paper Crafter’s Library members can access the video from THIS LINK (you have to be logged in to see it).  Not a member?  Click HERE for more information on the benefits of membership.

Supplies:

  • stamps: Sweets for the Sweet (SU)
  • Paper:  white CS (Papertrey), Chocolate Chip CS, Calypso Coral CS, Berry Blossom DP (Stampin’ Up!)
  • Ink:  Chocolate Chip, Tempting Turquoise, Kiwi Kiss (can replace with Lucky Limeade) Classic inks (Stampin’ Up!)
  • Markers:  Wild Wasabi, Poppy Parade, Cherry Cobbler Stampin’ Write markers (Stampin’ Up!)
  • Dies/Punches:  Roxy alphabet and shadows (Quickutz), 1″ Circle punch (Stampin’ Up!)
  • Other:  dimensionals, multi-purpose glue, Stardust Stickles (Ranger), Quilted Satin ribbon (Stampin’ Up!), Heat Tool, UTEE, White gel pen, blender pen, Sponges, tweezers


Keeping Track of Children’s Backpacks with Backpack Tags

It was back to school again for my three older children today. I decided this year to create some backpack tags for ALL my children, to attach to their backpacks.   Last year I created some for the youngest children, and found it was wonderful for helping them find their backpacks in the huge pile that would inevitably get dumped in the school yard at the beginning and ending of the day while the children would play on the playground.  Several times last year my older son ended up with the wrong back pack because someone else accidentally grabbed his.  That’s why this year I made them for all of them.

With 5 children, and a multitude of other Back to School projects I was making, I wanted something quick and easy, yet durable.  I opted to use a patterned paper by Creative Imaginations and some stickers for the actual embellishing.  Now I have to say, I’m not typically a sticker user, but recently I have been falling in love with them because they are so quick and easy to use, and they come in so many gorgeous designs. 

I used trading card sleeves to protect them (which you can buy at pretty much any place that sells any kind of trading cards), and then I bought split rings and key chain clips to turn them into tags.  You can see a full supply list below.  Paper Crafter’s Library members can view the video and download the handout in our Altered Art & Mixed Media Category.  If you are not a member, you can read about the full benefits HERE.

Supplies:

Paper: Studio Basics 101 (Creative Imaginations)
Accessories: Alphadots Black with Silver stickers (Stampendous), School stickers (Mary Engelbreit #8420), Trading Card Sleeves, acrylic graph ruler, tweezers, pencil, Crop-a-dile, split rings (dollar store), key chain clip (dollar store)

Calendar & Note Pad Tin Video Tutorial & PDF Handout

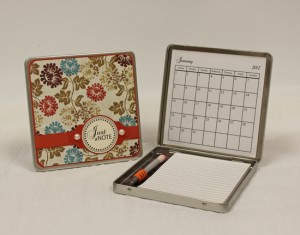
A little late, but finally here!  As promised I’ve put together a free video tutorial on how to create my 2012 Calendar and Note Pad Tin.  

The tin is 5 1/4″ x 5 1/4″ x 3/8″.  I had both the calendars and the note pads custom designed to fit inside the tin. The tin pictured on the left is the original one I am selling as a kit on the Sunny Stampin’ Blog. I’m also selling the calendars, the note pads, and the tins in bundles of 5 for any of you who want to create these tins in bulk (or offer it as a class if you are a retailer or instructor).

In the top picture you can see the tin I re-created using all Stampin’ Up! products.  We have a free video tutorial and pdf handout in the video library, which you access HERE.


Welcome to the *NEW* & Improved Paper Crafter’s Library Website!

After almost a month of work behind the scenes, we’re excited to announce that we’re almost finished completely re-vamping the public “face” of Paper Crafter’s Library (PCL)! 

We decided that rather than keeping two separate sites – the Paper Crafter’s World blog and Paper Crafter’s Library – we’d combine the two, bring the blog over to www.papercrafterslibrary, and make it the public face of PCL. That way, we’ll have EVERYTHING we create all in one place!  We’re pretty excited about the change because it means that instead of worrying about posting in multiple places, we’ll be able to focus on one site, and give it our all – a win, win situation for everyone.

It is our goal for this site to be a place of inspiration and education for everyone.  Some of the features we are planning on incorporating on the Paper Crafter’s Library blog include:

Featured Projects – What would a paper crafting site be without projects?  Every day (Monday to Friday), we’ll feature a variety of different projects – cards, scrapbook pages, mini albums, altered art, gifts and 3D items etc. Several times a month we’ll feature a free video tutorial for our blog readers. For all of these projects, we’ll have video tutorials available to our members showing how the project was made from start to finish (for information about the benefits of membership click here).   

Andrea’s Artwork & Sophia’s Artwork: In addition to being avid paper crafters, both Soph and I enjoy working in a variety of different art mediums, so you’ll also see us share some of our mixed media artwork with you here.  These are projects that we create just for the love of creating, so we won’t have video tutorials for them.

Trend Watch – Each week we’ll spotlight a current trend in the paper crafting industry and we’ll share projects we’ve come across from around the web showcasing these trends.

Artist/Designer Spotlight – there are so many fabulously talented paper crafting and mixed media artists that we admire and want to introduce to you.  Every week/few weeks, we’ll introduce you to a different artist/designer and ask them to share some of their secrets with us.

Product/Company Spotlight – each week we’ll introduce you to some of our new (and old)favourite products/companies, as well as feature free video reviews of those products.  To see all the free video reviews we currently have please check out the Video Library and click on the links that specify that we have complimentary videos in that section. 

Challenges – Challenges are a fantastic way to stretch and develop our creativity.  That’s why within the next few weeks we’re planning on implementing challenges.

Give-Aways -we LOVE to give things away, so one of the features you can expect here are regular give-aways. 

Freebies – As we mentioned above, as a blog reader you can expect a free video tutorial several times a month, as well as some occasional exclusive downloads.

Many of these features that we’ve outlines above are still in the works, and as we work on these things, you will likely notice changes happening on this site from day to day. We will however keep you posted as each new feature is implemented.