Trendy Tuesday – Vintage Office

Trendy Tuesday – Vintage Office 
By Colleen Harshaw

We have been seeing vintage themes in papercrafting for some time now, but the popularity of this theme seems to keep growing!  More specifically, we are now also seeing vintage office themed products.

When it comes to vintage themed products, few can do it like October Afternoon.  I have to say, I am a huge fan of this company.  They always have such fun, bright lines that are so well coordinated!   Just in case you are wondering, I have no affiliation with October Afternoon, I am just a big fan of their products.  🙂

The October Afternoon line that I want to share with you today is called 9 to 5.  Yes, you guessed it….it is office themed!  With papers with names like Dictation, Shorthand, and Coffee Break, this line is a throw back to the ’60’s, when secretaries and assistants were always women, smoking was allowed in the office, and typewriters and carbon paper were the tools of the trade.  Although we have come a long way in terms of progress since that era, it is fun to pay homage to the past through these products.

Here are a few of the products in the 9 to 5 line…..

12 x 12 paper – Shorthand
Photo courtesy of www.octoberafternoon.com

12 x 12 paper – Paid in Full
Photo courtesy of www.octoberafternoon.com

12 x 12 paper – Typing Pool
Photo courtesy of www.octoberafternoon.com

This line contains coordinating journaling cards, stamps, brads, buttons, tin pins and so much more!  See below for a few more of these items…..

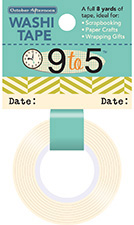
Washi Tape – October Afternoon 9 to 5
Photo courtesy of www.octoberafternoon.com

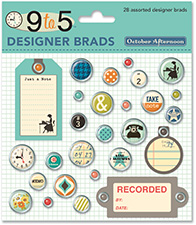
Brads – October Afternoon 9 to 5
Photo courtesy of www.octoberafternoon.com

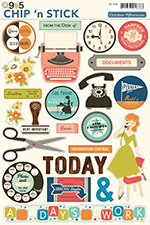
Chipboard Stickers – October Afternoon 9 to 5
Photo courtesy of www.octoberafternoon.com

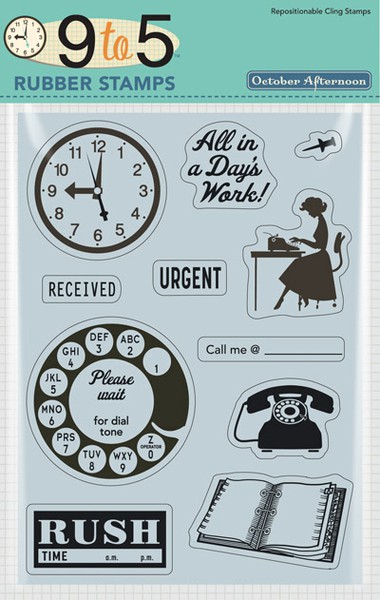
 Rubber Stamps – October Afternoon 9 to 5
Photo courtesy of www.twopeasinabucket.com

OK, now that you have had your fill of all things October Afternoon, let’s move on to some other producers of Vintage Office Products.  There are many companys who are producing these types of products (no pun intended!).  Some such companies include Tim Holtz, Graphic 45, Prima, Heidi Swapp and Basic Grey.   Here are some examples:

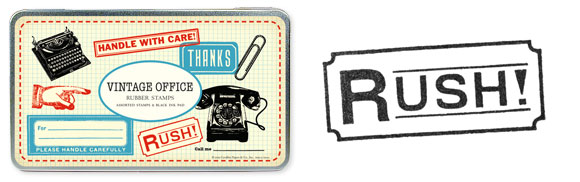
 Vintage Office Rubber Stamps – Cavallini & Co.
Photo courtesy of www.cavallini.com


Heartwarming Vintage Cardstock Stickers
Photo courtesy of www.joann.com

For those of you who are digital scrapbookers, I found this digi stamp option available from the Digital Scrapbook Place.

Playing With Brushes Vintage Office 1
Photo courtesy of www.digitalscrapbookplace.com

This beautiful paper is by Prima……..

12 x 12 double sided paper – Prima – Romance Novel Collection
Photo courtesy of www.scrapbook.com

12 x 12 paper pad – Prima – Ledger 1
Photo courtesy of www.scrapbook.com
For those of you who want a die cutting option, I found this set of dies by Tim Holtz.Sissex Sizzlits Dies – Tim Holtz – Alterations Collection – Typeset
Photo courtesy of www.scrapbook.com

OK, now let’s get to the sample projects!

This first project by Michelle Woerner, for Gina K. Designs, uses the stamp set called Vintage Notes, from Gina K.
Project by Michelle Woerner for Gina K. Designs
Photo courtesy of www.splitcoaststampers.com

This layout by SaraAndrews1 incorporates some of the October Afternoon 9 to 5 line that I shared with you above.
Layout by SaraAndrews1
Photo courtesy of www.octoberafternoon.typepad.com

I love how Amy Heller created the layout below using October Afternoon 9 to 5 products, but yet featured a sports themed photo!  The lesson here is that themed products can be used on projects that are completely independent of that theme!  Translation, office and vintage products need not be used on office or vintage layouts!
Layout by Amy Heller for October Afternoon
Photo courtesy of www.octoberafternoon.typepad.com

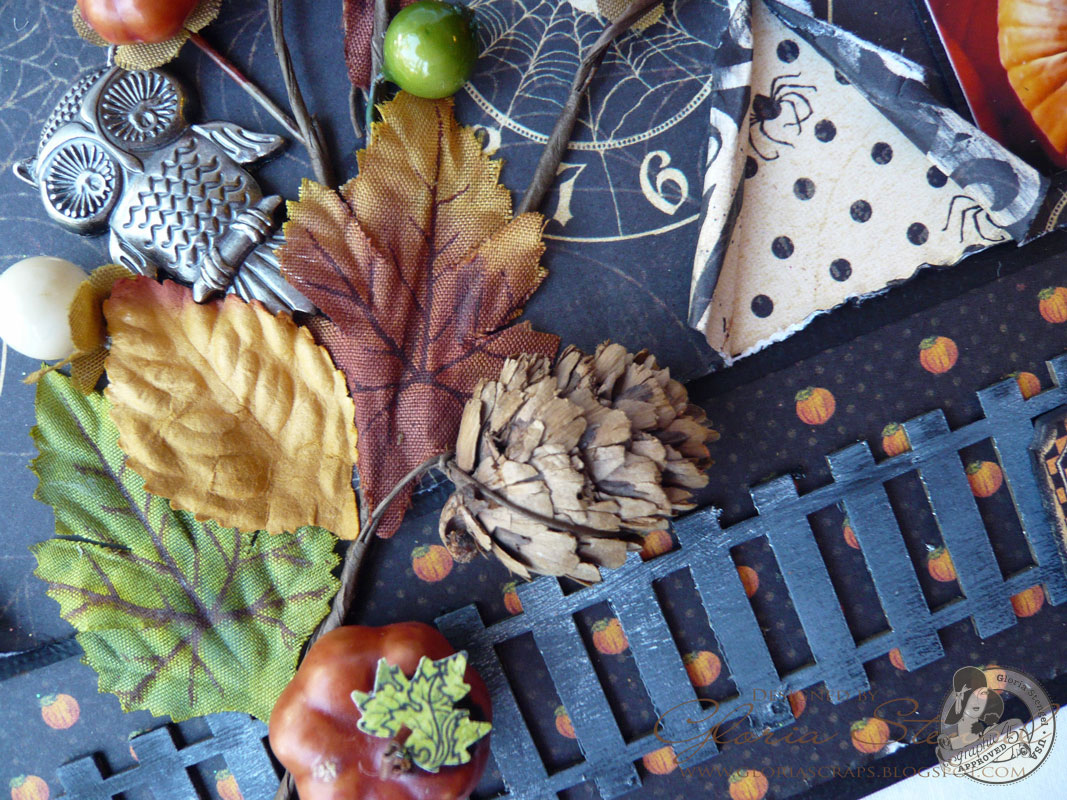
This last layout, by Kim Watson shows us how to incorporate vintage office themed products yet another way.  In this case, Kim worked from a colour palette.  She chose to use the colour palette as her inspiration, instead of the office theme associated with her embellishments.  By making this creative choice, she was able to create a beautiful beach themed layout using vintage office products!  How cleaver is she?!
Layout by Kim Watson
Photo courtesy of www.octoberafternoon.typepad.com

This last project shows how Arlene Cuevas altered a miniature wagon and then created a mini album to go inside it.  How cute is that?!  What a wonderful way to be presented with a gift!

Project by Arlene Cuevas for Graphic 45
Photo courtesy of www.g45papers.com

Well, that was a bit of a marathon post, wasn’t it?  If you are reading this, then it means that you stuck with me…..so, thank you!  I am glad that you made it with me to the end, and hopefully you will take some inspiration away with you!

Until next time, happy crafting!

Project Newsletter Makeover Challenge – Flourishing Butterfly

Welcome to the Makeover Monday challenge. Every Monday, as part of our project ideas newsletter we’re going to make over a card, scrapbook page or 3D project, showing you how easy it is to use existing designs (your own OR someone else’s) as inspiration. This week, Tracy designed this “Flourishing Butterfly” card.

Your challenge – as with our previous Makeover Monday Challenges – is to use our piece as inspiration and make it into a card, scrapbook page, or other project. You can use the layout, the colors, an element you like…it can look like our piece, or nothing at all like our piece. We want to see where YOU take this. This challenge is strictly a “work from your stash” challenge.

As a newsletter subscriber you will have received a link to a private web page, from which you can watch the video tutorial. Please note that the video tutorial will be available for general viewing for one week only – and then will be moved into our library for our members only. In order to ensure you don’t miss any more of our Makeover Monday Challenge video tutorials, please be sure you sign up for our FREE email newsletter from the top right sidebar of this blog. If you didn’t receive the newsletter then please be sure to email us to confirm your subscription.

Every Monday, here on the blog, we’re going to post the original picture, and the made over picture. You will have ONE week to upload your challenge piece. Instead of a weekly prize though, we’re going to award a prize monthly. So for each week you participate and each project you submit – you will get one entry into our monthly draw. On the first Monday of each month – we will announce one challenge winner, who will be featured as a guest designer on the Paper Crafter’s Library blog as well as our Facebook page. As a guest designer, we’ll feature your biography, some of your favorite paper crafting projects and we’ll link to your blog.

Our inspiration piece, shown below, is a card we found on Kerry’s Paper Crafts blog.


Here are the details on how you can participate in the Makeover Monday Challenge:

A new Makeover Monday Challenge video tutorial will be emailed out to newsletter subscribers every Monday (so make sure you are signed up). Then, here on the blog, we will post a picture of our inspiration piece and made-over project along with an Inlinkz button for you to enter your project. Here are the details:

  • Work from your own stash to create a project based on the inspiration project provided – you can use any products you would like, and make any type of project you like – card, scrapbook page, album, 3D item etc.
  • Post your project on your blog, in your gallery or on any other photo-hosting site (such as photobucket or flickr).
  • Click on our inLinkz button below to add a link to your project for our challenge
  • You will have until 7am, Monday, August 20th to add your link to the list to be eligible to win. And you can enter as many times as you like.
  • For each project you submit, your name will be entered into our monthly draw. The winner will be announced on Monday, September 3rd.

Good luck to everyone and we look forward to seeing your projects!


Premier Thanks Tag Video Tutorial

Although it’s already been almost a week since I returned from Disney, I’ve been finding it hard to get back into the groove of things.  For two blissful weeks I didn’t have to think about anything except what we were going to do that day and could focus entirely on enjoying the company of my husband and children.  Now that we’re back, I’m faced with a huge to-do list, I’ve barely seen my husband since he’s been swamped at work, and I’m struggling with feeling disconnected as well as a lack of motivation. *Sigh*  

Premier Thanks Tag

Today’s project is this beautiful tag created by Tracy that could easily be used to adorn a gift, and because it’s so beautiful, could take the place of a card.  Of course if your preference is a card, then the design could very easily be adapted for a card – all you would have to do is switch up the dimensions of the paper. The nice thing about a tag or card design like this one is that it’s very quick and easy to put together. You can watch the video below and download the handout to see how it was created.

072012PremierThanksTag

Download the pdf handout here

Supplies

Paper: Ebony CS (Bazzill); An ABC Primer DP Collection (Graphic 45)

Accessories: #8 Manilla tag (Ranger); Tape Runner XL (thermo-web); 1/8” Black Velvet ribbon (May Arts); Stampin’ Dimensionals, ribbon scissors (Stampin’ Up); Gift Box Thickers chipboard stickers (American Crafts); black rhinestone flourish (Zva Creative); Laraine Candy Apple flowers, Genie Stones – Black Wrap (Prima Marketing); Black Tulle (Bazzill); hot glue (Martha Stewart); black jute (May Arts)


Monochromatic Birthday Card

This card is one that I created for the Sunny Stampin’ Blog – which has recently been re-dedicated to my Stampin’ Up! Creations.  Many of you may know that I used to be a Stampin’ Up! demonstrator – I resigned in January of 2011. The Sunny Stampin’ Blog was the one that I had always used for my Stampin’ Up! business, and since I’ve had so many emails from my former Stampin’ Up! customers and blog followers missing what I used to share – I decided to use that blog for that purpose.

For the card you see below, I opted for a monochromatic color scheme. My greeting was stamped using the Family Reunion stamp set, but I stamped it AFTER I added my ribbon across my DP. The bow is another style of faux bow – I created two loops and held them in place using mini glue dots. The center of my bow is one of Stampin’ Up!’s antique brads which I wrapped around the ribbon center to hold it in place (rather than piercing and inserting it through the ribbon and DP). 

072012SUOMonochromaticBirthday

A video and pdf handout is available to our members here. (You must be logged in to see the page)

Supplies

Stamps: Field Flowers, Family Reunion (Stampin’ Up!)

Ink: Basic Black Classic ink, Old Olive Stampin’ Write marker (Stampin’ Up!)

Paper: Old Olive CS, Basic Black CS, Twitterpated DP (Stampin’ Up!)

Accessories: bone folder, paper snips, Stamp-a-ma-jig, Basic Black Scalloped Dots ribbon, SNAIL adhesive, mini glue dots, Antique brads, basic pearls (Stampin’ Up!); Black Sharpie marker (Office Supply Store)

 Have a wonderful weekend!

Technique Thursday: Glitter Window Technique

Club52Week49GroupPhoto

This week on Paper Crafter’s Library’s Technique Thursday, Tracy introduces us to the Glitter Window technique. On the Reach For The Highest tag, Tracy created multiple windows and filled them with Glass Glitter.  For the Kindred Spirits tag, Tracy created one large window, filled it with Dazzling Diamonds glitter, allowing a stamped image behind to show through.   

For those of you unfamiliar with Technique Thursday , this is where we create and feature projects for our Club 52 online class (our year-long technique club), which our Paper Crafter’s Library members also access as a free benefit of their membership.

If you’re interested in checking out what we’ve covered so far, you can look at our Club 52 page. If you’re a technique junkie and would like to learn new techniques (as many of them are ones we have created), or revisit old ones – you can still sign up from this page – you’ll be able to access all 49 weeks we’ve done so far, plus the remaining weeks, and your access to the classroom will last for 15 months.

If you are not already receiving our weekly email newsletter, make sure you take a minute to sign up from the top right sidebar of our blog. Every Monday we create an exclusive project with a video tutorial for all of our newsletter subscribers and Paper Crafter’s Library members. So make sure that you sign up now, so that you don’t miss out!

Graphic 45 Spotlight With Designer Gloria Stengel

Here is the latest installment of our Grahpi 45 Guest Designers. Many of you may remember that back in April we hosted a Graphic 45 Week on the Paper Crafter’s Library Blog. It was week filled with projects and inspiration using Graphic 45’s Tropical Travelogue Collection. We had such a great experience partnering with Graphic 45 and their design team, and such a great response from you, that we’ve decided to partner with them on an ongoing basis. The first and third week of every month one of the Graphic 45 Designers will share a project they’ve created here on the PCL Blog. We started with our monthly designers in June and before I introduce you to our latest Designer, I just wanted to take a minute to re-introduce Graphic 45 for those of you that may not be familiar with the company.

Graphic 45 is an award-winning scrapbook and paper crafting company­— owned and operated by a mother and her two daughters.

Diane Schultz (pictured center)—Designer and CEO (aka mother)

“I’m passionate about being creative and eager to make it possible for others to find their creative voice. My background includes stints as a designer for, McCalls, Simplicity, Vogue/ Butterick, Mattel Toy Company and a host of other jobs that each, in some way, led me to what I do now. At 45 I went back to school and got my degree in graphic design— I named the company to celebrate that achievement.”

Aimee Filimoehala (pictured left) —Director of Operations

“I wear a lot of hats and love it that way. Business, marketing, operations, etc. have made me a pro at multitasking (aka juggling‑figuratively and literally). When we launched Graphic 45 just three years ago we had no idea what was in store, working together as a family has been an amazing journey that we all feel so grateful to be apart of.”

Charee Filimoehala (pictured right)—Director of Customer Service and Design Team Coordinator

“I joined the team a little over three years ago and haven’t looked back…what a life-changing experience this has been. I love working with and around creative people and products (not to mention I like my co-workers quite a bit). I spend my days working with our friendly stores and talented design team…the occasional trip to a workshop or tradeshow pretty nice too.”

Together we create vintage inspired crafting products that capture the flamboyant style of the 1920’s and 30’s – with vibrant color, irresistible texture and imaginative design to create products with decades-old appeal that’s both fresh and familiar. Let our products inspire your next scrapbook layout, card, album or home decor project.

***********

Here’s a picture of their booth at the CHA show which absolutely blows us away every year! The artwork inside is absolutely stunning and totally unique. At the last show as we were speaking with Diane she told us that many of the altered pieces were vintage finds which she and her team transformed with their gorgeous Graphic 45 products. We can’t wait to stop by their booth at the Chicago CHA and see what they’ve got in store this year!

Here’s a picture of the Graphic 45 team – they’re always dressed in period costumes to complement the themes in their collections – every day of the show brings a new set of costumes. The ones shown below were for their Little Darlings collection.

Graphic 45 Designer Gloria Stengel

Our next Graphic 45 Guest Designer for this month is Gloria Stengel who is part of the 2012 Graphic 45 Design Team.  Gloria was part of the design team that we showcased during Graphic 45 week back in April, which you can view here: https://blog.papercrafterslibrary.com/graphic-45-week-day-2.  She does amazing work and we are so exicted she has come back.

Gloria StengalYou can see Gloria’s fabulous project below, but first, here is a little more about Gloria:

My name is Gloria Stengel and I live in Oceanside, CA with my husband Matt, and our three children, Nathan (20), Laura (16), and Jonah (11). Besides being “queen of the craft women,” I am also active in my church and I homeschool my two youngest children. (My oldest son has graduated and now attends college full-time.)

I live for exploring and creating with all sorts of mediums and products, thus I am always on the hunt for new ways to “make a mess.” My motto is “seek out new crafts that you have never done before.” I love the thrill of mixing product lines into my projects, and I guess my style is quite eclectic. I enjoy the creative process, the discovery, and the “happy accidents” that sometimes arise during crafting time. However, the biggest thrill of this business is teaching and instructing others. When another crafter holds up a finished project and says, “Look what I made!” I get the biggest kick out of it, especially if I had a small part in helping them learn a new technique.

I’ve been on a number of design teams over the past few years, including Spellbinders (2011) and Graphic 45 (2010, 2011, 2012), Hampton Art Stamps (2011, 2012). I also create sample art for various companies and online stores. I’ve been published in magazines and catalogs, and I have a blog called Scraps of Life, that is my creative link to the world  (www.gloriascraps.blogspot.com).


Pumpkins Galore Layout

 Gloria layout 1

The NEW Graphic 45 Happy Haunting Collection is perfect for highlighting this photo of my youngest son, taken several years ago at the pumpkin patch. He had climbed onto a huge pile of pumpkins and made himself comfortable! The tiny pumpkins on the Happy Haunting paper make a prefect backdrop for the bright orange photo.

 August 8 Gloria

I used some chipboard and metal embellishments, altered with paint and glitter, plus I added some fall foliage to bring the layout all together.

 August 8 Gloria 2

 August 8 Gloria

Techniques:

1. Paint chipboard with one coat of gesso and one coat of black paint. Allow to dry. Rub over paint with white fluid chalk ink. Buff off excess ink with a paper towel.

2. Paint chipboard alphas with one coat of gesso. Mix sunflower and monarch paint and paint over gesso coat.  Allow to dry. Use a foam brush to apply a thin layer of glue to the alphas and sprinkle with glitter. Allow to dry.

Supply List:

Designer paper: Graphic 45: Happy Haunting: Happy Haunting, Enchanted Garden, Midnight Magic, Jeeper’s Creeper’s Tags: Graphic 45: Happy Haunting Tags 2

Imaginarium Designs Chipboard: Alphabet (IDA0005, IDACC0001), Fence/rail track (IDS0021), James border (IDB0009)

Cardstock: American Crafts Black Metal Embellishments: Momenta Ink: Clearsnap Colorbox Fluid Chalk Blackbird, Popcorn Paint: Delta Ceramcoat Gesso; Making Memories Acrylic Asphalt, Sunflower, Monarch Glitter: Art Glitter Lion’s Mane Transparent Ultrafine Floral: Craft supply Adhesive: Art Glitter Designer Dries Clear Glue; Scotch 3M tape runner

We hope you have enjoyed this beautiful creation from Gloria. I would also like to extend a warm thank you to Gloria for sharing yet another fabulous project with us! Please take a minute to stop by Gloria’s Blog  and of course the Graphic 45 blog to check out all their amazing creations!

Trendy Tuesday – Storage Ideas

Trendy Tuesday – Storage & Organization Tools

by Katherine Elliot

 Most crafting trends we share on Trendy Tuesdays are all about the designs, creations and hot products posted on the web and showcased in stores.  Today we”re focusing on a spin off industry catering to craft furniture and storage accessories.  These trendy products are designed to perfectly organize the many supplies we collect.  From a range of specialty furniture to simple storage solutions from the companies that sell your favorite supplies, here”s a glimpse and many links to finding some of the coolest ways to organize and beautify your craft space.

The Original Scrap Box company has a variety of storage furniture pieces that “store your stuff in style.”  You can close the box and hide your things away, then open the box and access all your supplies at the storage center”s work station.craftbox_bb_vanilla

The Craft Box from The Original Scrapbox, image source Original Scrapbox.com

 Martha Stewart Living has a line of craft furniture and accessories available on-line, and some things available through your local store.  There are desks, paper organizers and cubbies that you can arrange to create that perfect craft space.

Martha Stewart Living Craft Space

Martha Stewart Living Craft Space craft furniture image source Home Decorators.com

 If you don”t have the space for a large piece of craft furniture, there are many other tools to help you organize your space.  Simply Renee specializes in popular and versatile ways to store your clear stamps, stickers, ribbons, papers, and other tools, as seen in the Clip it Up systems below.

image

Clip It Up All-in-One organization system, image source Simply Renee Inc  

Clip it Up! Jumbo, image source flickr.com

One of my favorite storage tools, found in a variety of styles from different companies, are these amazing custom ink pad organizers.  Often you can find them in your choice of basic colors, or even unfinished so you can customize to match your craft space.  Most organizers hold a variety of ink pad brands (just check the dimensions and details).  Some include special features like the one shown below that hold coordinating markers and matching re-inker bottles.  You can find large ones (with a larger price tag, of course) or small ones that may better fit a smaller budget.

 wallunitplus_mainpic

Wall Unit Plus for stampers, stamp pads, reinkers & markers storage, image source Storage Units Ink and More

12_Combo_Full

12 Combo ink storage unit, image source Stamp-n Storage

Many of the same companies that make the inkpad organizers, offer similar storage devices for paper punches as well.

Punch_Full

Punch holder, image from Stamp-n Storage

 Not to be forgotten are the accessories that are sold directly from the same manufacturers where you buy your favorite supplies.  Stampin” Up fans are probably familiar with SU!”s own line of stamp pad and embellishment organizers.  These look great on your desk at home, or displayed at your stamp club or party events.

Color Caddy - by Stampin

Spinning Color Caddy from Stampin” Up! , image source Stampin” Up!

  Stack & Store Caddy - by Stampin

Stack & Store Caddy, image source Stampin” Up!

 Many brands have their own specialty storage caddies to help you organize your growing collection of their products (who can blame them, you know you”ll want to buy more than ONE stamp pad, cartridge or die, right?).Cricut Cartridge Storage Case

 Cricut Storage container, image source the Scrap Rack

Sizzix Sizzlits Accessory Plastic Storage case for Sizzlets, image source Sizzix.com

 Looking for the perfect solution to storing and accessing your expanding collection of steel rule dies?  Two easy ways to store them include the magnetic binder from Lifestyle Crafts and the new magnetic storage case from ArtBin (magnetic sheets for the ArtBin case are sold individually as well, so you can store a LOT of dies).

Magnetic Storage Book - Black
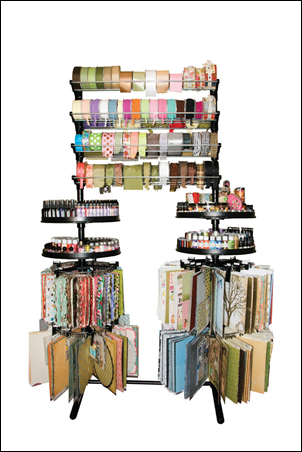
Magnetic die storage book from Lifestyle Crafts 

  ArtBin Magnetic Die Storage Case

Art Bin Magnetic Storage case, image source ellenhutson.com

 Cropper Hopper has very functional tools to help store paper and items, and many of their products are also designed to help you travel with your supplies to crops and events.  Some of their newer products also have a decorative flair.  Don”t forget to embellish your craft space!

Cropper Hopper Designer storage, image source Cropper Hopper

 Stumped on how you could re-organize or re-design your craft space?  I am always on the look out for home decoration ideas, and I LOVE how many of our fellow paper crafters share the views of their work spaces.  I wish I could say my space looked as beautiful or as organized as these spaces, but check these out!

Nichole Heady Stamp Studio

 Nichole Heady”s craft space, image source Creating Keepsakes

 Deb M 2

Featured craft space from Best Craft Organizer, image source Best Scrapbook Shelf.com 

 Don”t get discouraged if you think some of the furniture or systems shown are not available near you, or not in your budget.  There are creative ways to organize and store your supplies with many different, and less expensive kitchen or closet organization accessories found at your local big box home improvement centers. 

Punch & ribbon storage featuring Bygel rail system from IKEA.

image source Kerry”s Craft Blog 

 Jars, boxes, & some plain, open book shelves can help you create your own custom storage space.


Kim Assaly”s craft space, image source Riverfront Stampin.com

 The crafter below used her craftiness, with the help of some strong velcro,  to create her own Stickles Storage right above her work space!

 Stickles Storage using velcro, image source Two Peas in a Bucket project gallery

 Find more tips for organizing your craft space using every day closet organizers and accessories at Everything Etsy.

p_100236044

image source Everything Etsy.com

 Okay, after sharing these craft space images, I”m just turning green with envy.  I”ve got a few of the simple storage tools shown, and if I could clear off the pile of “works in progress” on my desk, maybe I could find room for something new.  My shoe holder in my closet does a nice job of holding my paper punches… but maybe it”s time to tidy up and try my hand at more storage beautification.  What”s your favorite storage tool? 

Hope you are inspired this week.  Happy organizing everyone!


Project Newsletter Makeover Challenge – Sincere Heartfelt Thanks

Welcome to the Makeover Monday challenge. Every Monday, as part of our project ideas newsletter we’re going to make over a card, scrapbook page or 3D project, showing you how easy it is to use existing designs (your own OR someone else’s) as inspiration. This week, I designed this “Sincere Heartfelt Thanks” card.

Your challenge – as with our previous Makeover Monday Challenges – is to use our piece as inspiration and make it into a card, scrapbook page, or other project. You can use the layout, the colors, an element you like…it can look like our piece, or nothing at all like our piece. We want to see where YOU take this. This challenge is strictly a “work from your stash” challenge.

As a newsletter subscriber you will have received a link to a private web page, from which you can watch the video tutorial. Please note that the video tutorial will be available for general viewing for one week only – and then will be moved into our library for our members only.  In order to ensure you don’t miss any more of our Makeover Monday Challenge video tutorials, please be sure you sign up for our FREE email newsletter from the top right sidebar of this blog. If you didn’t receive the newsletter then please be sure to email us to confirm your subscription. 

Every Monday, here on the blog, we’re going to post the original picture, and the made over picture. You will have ONE week to upload your challenge piece. Instead of a weekly prize though, we’re going to award a prize monthly. So for each week you participate and each project you submit – you will get one entry into our monthly draw. On the first Monday of each month – we will announce one challenge winner, who will be featured as a guest designer on the Paper Crafter’s Library blog as well as our Facebook page. As a guest designer, we’ll feature your biography, some of your favorite paper crafting projects and we’ll link to your blog.

Our inspiration piece, shown below, is a card we found on Julie Ebersole’s blog Paper Trufflez.

Here are the details on how you can participate in the Makeover Monday Challenge:

A new Makeover Monday Challenge video tutorial will be emailed out to newsletter subscribers every Monday (so make sure you are signed up). Then, here on the blog, we will post a picture of our inspiration piece and made-over project along with an Inlinkz button for you to enter your project. Here are the details:

  • Work from your own stash to create a project based on the inspiration project provided – you can use any products you would like, and make any type of project you like – card, scrapbook page, album, 3D item etc.
  • Post your project on your blog, in your gallery or on any other photo-hosting site (such as photobucket or flickr).
  • Click on our inLinkz button below to add a link to your project for our challenge
  • You will have until 7am, Monday, August 13th to add your link to the list to be eligible to win. And you can enter as many times as you like.
  • For each project you submit, your name will be entered into our monthly draw. The winner will be announced on Monday, September 3rd.

Good luck to everyone and we look forward to seeing your projects!

Before I announce the Makeover Monday winner for July, I would encourage you to check out all this months entries. You can click on the links below to be taken to the direct posts.

Makeover Monday July 2

Makeover Monday July 9

Makeover Monday July 16

Makeover Monday July 23

Makeover Monday July 30

And now it’s time to announce our Makeover Monday winner…

Congratulations Suzanne Spokus. Please email us at customerservice@papercrafterslibrary.com and put “Makeover Monday Winner” in the subject line.


Polka Dot Smile Card Video Tutorial

While Andrea is away at Dinsey enjoying some family time, I was sitting here in the stamping studio dreaming of all the fun that they were having! I was in a mood to create something bright and colorful, this is what I came up with. I hope that you enjoy the tutorial!


Polka Dot Smile Card

For this card, I created a background from brightly colored strips of designer paper.  I cut each end of the strips on different angles creating a fun background. I painted the center portion of the chipboard frame then stamped the greeting onto the frame center. I inked and embossed the outer section of the chipboard frame with Basic Black Craft ink and Clear Gloss Super Fine embossing powder from WOW! embossing.The fun flower embellishments finish off the card!

Download the pdf handout here

Supplies

Stamps: Signature Greetings (papertrey ink)

Ink: Basic Black Craft ink (Stampin’ up!); White acrylic paint (Craft Store)

Paper: Orange Zest CS (papertrey ink); Ebony CS (Bazzill); Lime Ricky Collection (Basic Grey)

Accessories: Lucky Limeade Ruffled ribbon, bone folder, Stampin’ Dimensionals, paper snips, ribbon scissors (Stampin’ Up!); Orange Zest ⅜” Top Notch Twill ribbon (papertrey ink); Sticky Puffs stickers (Darice); Ornate Tags chipboard set (Maya Road); Clear Gloss Super Fine embossing powder (WOW! Embossing); Heat It! tool, Claudine Hellmuth paint brushes (Ranger); Tape Runner XL (thermo-web); Tombow multi-purpose liquid adhesive (Tombow)


Thanks A Million Card

Have you noticed what a HUGE trend hexagons are right now? Although Stampin’ Up! doesn’t have any hexagon dies, or stamps, Andrea noticed that one of the patterns of paper in the Twitterpated collection had hexagons. That’s when she had an “aha” moment – why not cut the hexagons apart?  Once the hexagons were all cut out, Andrea positioned them on her card, spacing them slightly apart so she could see some of the Pink Pirouette CS in between them.

A video and pdf handout is available to our members here. (You must be logged in to see the page)

Supplies

Stamps: Word Play (Stampin’ Up!)

Ink: Basic Black Craft ink (Stampin’ Up!)

Paper: Pink Pirouette CS, Twitterpated DP (Stampin’ Up!)

Accessories: bone folder, paper snips, embossing buddy, Stamp-a-ma-jig (optional), black emboss powder, heat tool, Stampin’ Dimensionals, Tombow multi-purpose liquid adhesive, mini glue dots, Basic Black ⅜” Taffeta ribbon, SNAIL adhesive, basic pearls (Stampin’ Up!); acrylic graph ruler (optional)(Craft Store); Black Sharpie marker (Office Supply Store)


Have a wonderful weekend!

Technique Thursday: Distressed Glue Background Technique

This week on Paper Crafter’s Library’s Technique Thursday Sophia shows us how to create a Distressed Glue Background. On the Oh Snap tag, Sophia applies the glue to a white cardstock, using a paint brush, for a nice smooth look.  For the tag with the clock, Sophia applies the glue to a piece of designer paper, using a texture tool, resulting in a distressed, rough background.  

For those of you unfamiliar with Technique Thursday , this is where we create and feature projects for our Club 52 online class (our year-long technique club), which our Paper Crafter’s Library members also access as a free benefit of their membership.

If you’re interested in checking out what we’ve covered so far, you can look at our Club 52 page. If you’re a technique junkie and would like to learn new techniques (as many of them are ones we have created), or revisit old ones – you can still sign up from this page – you’ll be able to access all 48 weeks we’ve done so far, plus the remaining weeks, and your access to the classroom will last for 15 months.

If you are not already receiving our weekly email newsletter, make sure you take a minute to sign up from the top right sidebar of our blog. Every Monday we create an exclusive project with a video tutorial for all of our newsletter subscribers and Paper Crafter’s Library members. So make sure that you sign up now, so that you don’t miss out!

2013 Calendar and Note Pads Tin – Stampin’ Up! Version

Over the last several months I’ve been getting a lot of emails asking when the 2013 Calendar and Note Pad Tins and the refills will be back, as well as the new Stampin’ Up! version of the tin. Due to the fact that we could not release the Stampin’ Up! version at the same time as the 2013 Calendar and Note Pad tin, we are excited to announce that we are extending the pre-order by one week, ending on Tueday August 7th, 2012 to enable anyone wanting to make the Stampin’ Up! version time to order their supplies.

*For Stampin’ Up! Demonstrators wanting to offer this as a class: as we do every year, we have re-designed the tin using all Stampin’ Up! products and have put together a cost analysis sheet and suggested pricing if you want to offer this as a class to your customers. If you have purchased any of the supplies through the Sunny Stampin’ Store to create this tin, you can email us to let us know you are a demonstrator, then we will send out the cost analysis sheet and suggested pricing to you. The suggested pricing will be assuming that the tins are being made using all SU product of course. I’d love it someone could do me a favour. There are a number of demos that have bought the calendar and note pad bundles every year. I can no longer announce it or let them know on the demo-only boards like Sudsol, and other yahoo groups, so if one of you could let those that might be interested know, I would appreciate it!

Download the pdf handout here

Download the Just A Note labels here

You can view a video on how Tracy created this calendar and note pad tin below.

I had the calendar that you see on the inside front cover of the tin (also shown below) custom-made so that it perfectly fit the inside of the tin. The calendars are 4 7/8″ x 4 7/8″. The font used for the months and the date match the font used for the “just a note” on the front of the tin.

calendar and tin

As you can see from the picture of the tin at the beginning of this post, and the picture below, I also had some note-pads custom designed to fit insite the tin. The notepads are 3 3/4″ x 4 3/4″. There’s 50 sheets on the notepad and the lines are black so they match with any color scheme.

calendars and tins

As we did last year, we offering this in several options. Please note that these are ALL pre-orders – we have extended the pre-order date until Tuesday August 7th.  Orders will start to ship at the end of August 2012 , in the order in which they were received. Because everything is custom-designed and manufactured, I don’t want to order too many and end up with hoards left over, or too little, and then run out. So make sure you have your order in by Tuesday August 7th, 2012.


There is a lot of info in this post, so please be sure you read it all!

One of the things I do have to give you a heads up about is shipping. As we are located in Canada, the most “cost-effective” option for shipping is Canada Post. I use that term loosly because it’s still not cheap. The only methods of shipping we offer are small packet air (which I don’t really recommend because it is not trackable) and expedited – which is trackable, and the fastest method. We used to offer a small packet surface option, but ran into too many problems with it being waaaaaaay too slow (as in at least 4 weeks to the US), and not trackable.

I do want to assure you that we only charge you what we are charged. We do not mark up shipping. Because we are a small company with small volumes of shipping we don’t qualify for some of those great shipping volume discounts that bigger stores get. If perchance you are overcharged (which we will only know when we start shipping the packages out), we will re-imburse you the difference. Shipping in Canada is based on weight and package size. Because of the weight in particular, for most of you, shipping is probably going to start at about $12 – $15. What I have found though is that the more you get, the better the deal. So if you only want one of’s I would recommend ordering as a group (with a friend or a few friends). So please be prepared.


So here’s what we have:

Calendar & Note Pad Tin Kit Pre-order – $17.95 CAN These kits include all the supplies needed to make the project shown in the picture below (pencil/pen colors will vary). You’ll receive a pdf handout with the kit and a link to page from which you can view a video on how it’s made. (This supplies for this kit are non-Stampin’ Up! supplies)

note pad and tins


Calendar Bundle Pre-order – $7 Each bundle has 5 calendars

calendar and tin


Note Pad Bundle Pre-order – $7 Each bundle has 5 note pads

calendars and tins


Bundle of 5 tins Pre-order – $25 Each bundle includs five 5 1/4″ x 5 1/4″ tins

calendar tins

Once again, just a reminder, these are ALL pre-orders – we have extended our pre-order date until August 7th, due to the release of the Stampin’ Up! version.  The orders will start to ship at the end of August 2012, in the order in which they were received.