Vintage tag with Kristin Wilson

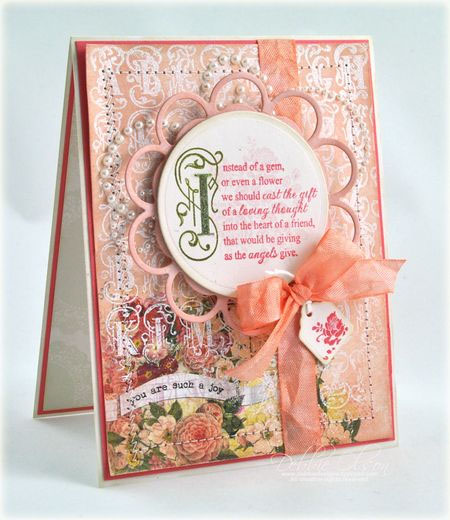
Hello everyone! I have a super fun project to share with you today. It’s a vintage inspired tag and it can be used on cards, layouts, or stand alone. The soft pastel colors are so sweet. Have you ever had a hard time working with pom pom trim? Come and check out a few tips in the members area. I have a video and PDF just waiting for you on how to create this adorable tag.

Hope you all have a wonderful week. I will see you all here next month for another fun project! In the mean time to see more projects, photos, and supply lists just visit my blog: Kristin Wilson


Faux Mosaic Technique

Hi everyone!

Today I’ve a really different technique to share with you- one that makes use of leftover rubber! You know all those extra bits once you’ve removed your rubber stamps from their surrounds- well this makes great use of them. I’ve kept the card pretty simple to help accentuate the mosaic effect.

It’s called the Faux Mosaic technique and you’ll need to cut up your pieces of rubber, put them on an acrylic block and then… well you’ll have to watch the video to find out!!

Members can view the video and download the pdf handout here.  (You will need to be logged in to access the page)

It’s a great technique to add to your repertoire and will have your friends and card recipients wondering exactly how you created it. On the plus side, you’re being environmentally friendly by re-using too. Give it a go and post your results in the gallery- we’d love to see what you come up with.

I hope you enjoyed this project.  Be sure to stop by my blog, http://kerenbaker.wordpress.com/ to see more of my creations.


Trendy Tuesday – Fabric Paper

Trendy Tuesday – Fabric Paper
By Colleen Harshaw

I first learned of this trend after CHA winter 2012.   I had read about fabric paper online, and then shortly afterwards I saw some in my local Michaels, and I had to buy some!  Fabric paper has an adhesive backing, which allows you to cut shapes from it without having to apply adhesive to fasten those cut outs to your projects.  The paper can be used with electronic die cutting machines, as well as with non-electronic die cutting machines.  The trick is to find the right ‘sandwich’ combination to get a clean cut with the non-electronic die cutting machines.  This combination is different with each type of die and machine.  This type of paper is also great for covering books, mini albums and three dimensional projects.

First, I would like to share with you some of the varieties of fabric paper that are available on the market, and then I will show you some of the ways in which you can use this product.

DCWV (Die Cuts With a View) offers adhesive backed fabric paper stacks.  These stacks are available in both Pink Floral and Blue Floral patterns, with 12 sheets in each stack.  As with other fabric papers, you peel off a backing from the paper in order to adhere it to your project.  When using the paper with a die cutting machine, you leave the backing on, then cut your shapes, and then remove the backing from your cut out shapes individually (you probably already figured that out…but just in case….).

DCWV Fabric Paper Stack – Pink Floral
Photo courtesy of www.joann.com

DCWV Fabric Paper Stack – Blue Floral
Photo courtesy of www.joann.com

The fabric papers show below are from American Crafts Dear Lizzy Collection.  They are sold by the sheet rather than as part of a paper stack.

American Crafts – Dear Lizzy Collection – Morning Melody 12 x 12
Photo courtesy of www.joann.com

American Crafts – Dear Lizzy Collection – Busy Beetle 12 x 12
Photo courtesy of www.joann.com

Next I have some papers from EK Success to share.  It seems that many of the large manufacturers are getting in on the fabric paper trend!  I found that each manufacturer seemed to have one or two varieties of fabric paper available, but few had more than that.  American Crafts had the largest selection, with several different patterns available as part of their Dear Lizzy Collection.


EK Success – Jolee’s Boutique – French General Collection 12 x 12
Photo courtesy of www.scrapbook.com

This next product is an interesting selection by K&Company.  They have chosen to include a sheet of fabric paper as part of a paper pad, along with other specialty papers.  This Engraved Garden Collection Specialty Paper Pad includes 1 fabric sheet, 1 acetate sheet, 2 shimmer sheets, 2 sheets of vellum, 2 silhouette sheets and 18 flat sheets.  This is a nice way to try out these different types of specialty papers.

K&Company Engraved Garden Collection Specialty Paper Pad 12 x 12
Photo courtesy of www.kandcompany.com

This next next fabric paper sample is an individual sheet from the K&Company Engraved Garden Collection, which is available as an individual sheet over at www.scrapbook.com.

K&Company Engraved Garden Collection – Toile 12 x 12
Photo courtesy of www.scrapbook.com

In addition to fabric paper, I also came across plenty of fabric canvas as well.  Fabric canvas is great for altering or stamping upon.  Ranger Ink offers fabric canvas as part of their Studio by Claudine Hellmuth Collection, in both 8 1/2 x 11 and 12 x 12 sizes, and in white or natural.

Ranger Ink – Studio by Claudine Hellmuth Collection – Stick Back Canvas Sheets
Photo courtesy of www.rangerink.com

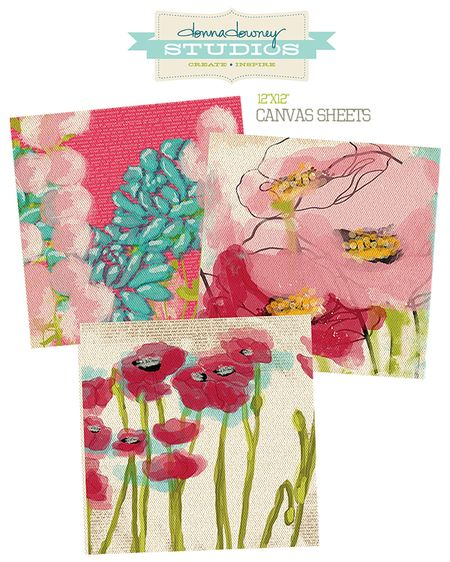
Next I have some Donna Downey canvas sheets to share.  These canvas sheets are patterned, have a sticky back and are manufactured by Prima.  There are several different patterns available, some of which include Bird Cage, Single Butterfly, Swirls and Poppy.

Prima – Donna Downey Collection – 12 x 12 canvas sheets
Photo courtesy of www.donnadowney.typepad.com

Now for the projects!  I actually had a bit of a problem finding project samples using these fabric papers…at first.  The samples just weren’t posted in the usual places that I look!  After much digging….I think I found some really cute samples that you all are really going to like!

The first project is a card, created with fabric canvas and other Ranger Ink supplies.

Card by Tara Nixon
Photo courtesy of www.rangerink.com

 This next project is a portfolio cover, created using fabric paper from the French General line from EK Success.

Project by Marie L. of www.stitchintime.typepad.com

This next project is a mini album that was created using the DCWV Fabric Paper Stack (Blue Floral) that I shared with you above.  This album is really gorgeous!  If you would like to see photos of the inside of the album in more detail, you can visit Carolyn over at her blog at www.cccscraproom.blogspot.com and look up her post from Sunday, February 5, 2012.

These next two projects are scrapbook layouts using the DCWV fabric papers from the Pink Floral stack and the Blue Floral stack, respectively.

Layout by Jenifer Cowles
Photo courtesy of www.mayarts.com

Layout by Jenifer Cowles
Photo courtesy of www.mayarts.com

This next project is an altered frame.  I found this to be a very clever use of this fabric paper medium!  The end result is adorable.

Project by Lidiya
Photo courtesy of www.the-paperfairy.blogspot.com

This next project is one that I never would have thought of doing.  May used the fabric paper to create appliques on a t-shirt for this little cutie!  This is a great example of how seeing the projects of others can open our minds to so many more things creatively!  I love it when that happens to me!

Project by May Flaum
Photo courtesy of www.mayflaum.com

Before I wrap this up, I just want to mention two quick things.  In doing my research, I came across a web site called www.bluebrit.com.  On this site, the author was testing the fabric paper manufactured by DCWV (as part of the floral stacks….apparently there are some solid coloured sheets in there too!) to see if it could be stamped upon, or printed upon.  In this experiment, the author used an HP Inkjet printer, like many of us have in our home offices.  The photos of the results are below.

Image stamped with Stazon ink
Photo courtesy of www.bluebrit.com

Image printed using HP inkjet printer
Photo courtesy of www.bluebrit.com

As you can see from the images, the results from both of the experiments were quite good.  So, it looks as though fabric paper can be stamped upon, printed upon, sewn onto clothing, used to cover three dimensional objects (the photo frame), and used in scrapbooking and in card making.

I am sure there are many more uses for this versatile product…..how are you going to use it?  Why don’t you leave us a comment, and tell us what your ideas are?  We would love to hear them!


Project Newsletter Makeover Challenge – Flourished Thank You & Bonus Back To School Project

Welcome to the Makeover Monday challenge. Every Monday, as part of our project ideas newsletter we’re going to make over a card, scrapbook page or 3D project, showing you how easy it is to use existing designs (your own OR someone else’s) as inspiration. This week, Tracy designed this “Flourished Thank You” card.

Your challenge – as with our previous Makeover Monday Challenges – is to use our piece as inspiration and make it into a card, scrapbook page, or other project. You can use the layout, the colors, an element you like…it can look like our piece, or nothing at all like our piece. We want to see where YOU take this. This challenge is strictly a “work from your stash” challenge.

As a newsletter subscriber you will have received a link to a private web page, from which you can watch the video tutorial. Please note that the video tutorial will be available for general viewing for one week only – and then will be moved into our library for our members only. In order to ensure you don’t miss any more of our Makeover Monday Challenge video tutorials, please be sure you sign up for our FREE email newsletter from the top right sidebar of this blog. If you didn’t receive the newsletter then please be sure to email us to confirm your subscription.

Every Monday, here on the blog, we’re going to post the original picture, and the made over picture. You will have ONE week to upload your challenge piece. Instead of a weekly prize though, we’re going to award a prize monthly.

So for each week you participate and each project you submit – you will get one entry into our monthly draw. On the first Monday of each month – we will announce one challenge winner, who will be featured as a guest designer on the Paper Crafter’s Library blog as well as our Facebook page. As a guest designer, we’ll feature your biography, some of your favorite paper crafting projects and we’ll link to your blog.

Our inspiration piece, shown below, is a card we found on Debbie Olson’s blog.

Here are the details on how you can participate in the Makeover Monday Challenge:

A new Makeover Monday Challenge video tutorial will be emailed out to newsletter subscribers every Monday (so make sure you are signed up). Then, here on the blog, we will post a picture of our inspiration piece and made-over project along with an Inlinkz button for you to enter your project. Here are the details:

Work from your own stash to create a project based on the inspiration project provided – you can use any products you would like, and make any type of project you like – card, scrapbook page, album, 3D item etc. 

  • Post your project on your blog, in your gallery or on any other photo-hosting site (such as photobucket or flickr).
  • Click on our inLinkz button below to add a link to your project for our challenge
  • You will have until 7am, Monday, September 3rd to add your link to the list to be eligible to win. And you can enter as many times as you like.
  • For each project you submit, your name will be entered into our monthly draw. The winner will be announced on Monday, September 3rd.

Good luck to everyone and we look forward to seeing your projects!

Back To School Gift Card Holder

Other than the usual back to school supplies…pens, pencils, paper, etc…our kids usually want new clothes (or need new clothes) for going back to school. We thought that a back to school gift card holder would be the perfect way to be guaranteed to buy back to school clothes that your kids like. Are your kids going off to University or College? Insert a gift card for groceries so that you know they are eating while they are off at school.

Download the pdf handout here

Part 1

Part 2

Supplies

Stamps: School Time (papertrey ink)

Ink: Basic Black Craft ink, Cherry Cobbler, Marina Mist, Basic Black and Crumb Cake Stampin’ Write markers (Stampin’ Up!)

Paper: Cherry Cobbler CS, So Saffron CS, Brushed Silver CS (Stampin’ Up!); Ebony CS, Smooth White CS (Bazzill); Little Boy Collection DP (Echo Park)

Accessories: paper trimmer and scoring blade, bone folder, paper snips, Cherry Cobbler Quilted Satin ribbon, Word Window punch, Stampin’ Dimensionals (Stampin’ Up!); Primary Ebony Super Fine embossing powder (WOW! Embossing); Heat It! tool (Ranger); Tape Runner XL (thermo-web); 1/2″ Corner Rounder (Zutter); Tombow multi-purpose liquid glue (Tombow); ruler (Office Supply Store); Vintage Tiny Ruler wooden embellishment (Maya Road); 1/8″ hole punch (Craft Store)

ETA: We had a problem with the InLinkz code for this post.  We had 4 people upload projects.  You can view their projects below.

Brenda

Joyce

Sara

Marcia

Technique Thursday & Winner of May Arts Ribbon

This week on Paper Crafter’s Library’s Technique Thursday, Tracy introduces us to the Spritzed Paper Towel Embellishments technique. This technique is a great way to add texture to your projects while re-using paper towels that you may have used to clean up your work station with.  It’s a win-win technique!

For those of you unfamiliar with Technique Thursday , this is where we create and feature projects for our Club 52 online class (our year-long technique club), which our Paper Crafter’s Library members also access as a free benefit of their membership.

If you’re interested in checking out what we’ve covered so far, you can look at our Club 52 page. If you’re a technique junkie and would like to learn new techniques (as many of them are ones we have created), or revisit old ones – you can still sign up from this page – you’ll be able to access all 51 weeks we’ve done so far, plus the remaining weeks, and your access to the classroom will last for 15 months.

And now, we’d like to announce the winner of the May Arts ribbon shown below: 

May Arts PCL giveaway 817

…and the winner is Natasha Poteraj!  Here is what Natasha wrote:

May Arts Winner

Congratulations Natasha!  Please email us at customerservice@papercrafterslibrary.com and put “May Arts Winner” in the subject line so that we can get your prize to you.

Be sure to stop by May Arts blog to find out who the winner of this gorgeous ribbon is!

may arts giveaway 817

Finally, if you are not already receiving our weekly email newsletter, make sure you take a minute to sign up from the top right sidebar of our blog. Every Monday we create an exclusive project with a video tutorial for all of our newsletter subscribers and Paper Crafter’s Library members. So make sure that you sign up now, so that you don’t miss out!

Graphic 45 Spotlight With Designer Jane Tregenza

Here is the latest installment of our Grahpi 45 Guest Designers. Many of you may remember that back in April we hosted a Graphic 45 Week on the Paper Crafter’s Library Blog. It was week filled with projects and inspiration using Graphic 45’s Tropical Travelogue Collection. We had such a great experience partnering with Graphic 45 and their design team, and such a great response from you, that we’ve decided to partner with them on an ongoing basis. The first and third week of every month one of the Graphic 45 Designers will share a project they’ve created here on the PCL Blog. We started with our monthly designers in June and before I introduce you to our latest Designer, I just wanted to take a minute to re-introduce Graphic 45 for those of you that may not be familiar with the company.

Graphic 45 is an award-winning scrapbook and paper crafting company­— owned and operated by a mother and her two daughters.

Diane Schultz (pictured center)—Designer and CEO (aka mother)

“I’m passionate about being creative and eager to make it possible for others to find their creative voice. My background includes stints as a designer for, McCalls, Simplicity, Vogue/ Butterick, Mattel Toy Company and a host of other jobs that each, in some way, led me to what I do now. At 45 I went back to school and got my degree in graphic design— I named the company to celebrate that achievement.”

Aimee Filimoehala (pictured left) —Director of Operations

“I wear a lot of hats and love it that way. Business, marketing, operations, etc. have made me a pro at multitasking (aka juggling‑figuratively and literally). When we launched Graphic 45 just three years ago we had no idea what was in store, working together as a family has been an amazing journey that we all feel so grateful to be apart of.”

Charee Filimoehala (pictured right)—Director of Customer Service and Design Team Coordinator

“I joined the team a little over three years ago and haven’t looked back…what a life-changing experience this has been. I love working with and around creative people and products (not to mention I like my co-workers quite a bit). I spend my days working with our friendly stores and talented design team…the occasional trip to a workshop or tradeshow pretty nice too.”

Together we create vintage inspired crafting products that capture the flamboyant style of the 1920’s and 30’s – with vibrant color, irresistible texture and imaginative design to create products with decades-old appeal that’s both fresh and familiar. Let our products inspire your next scrapbook layout, card, album or home decor project.

***********

Here’s a picture of their booth at the CHA show which absolutely blows us away every year! The artwork inside is absolutely stunning and totally unique. At the last show as we were speaking with Diane she told us that many of the altered pieces were vintage finds which she and her team transformed with their gorgeous Graphic 45 products. We can’t wait to stop by their booth at the Chicago CHA and see what they’ve got in store this year!

Here’s a picture of the Graphic 45 team – they’re always dressed in period costumes to complement the themes in their collections – every day of the show brings a new set of costumes. The ones shown below were for their Little Darlings collection.

Graphic 45 Designer Jane Tregenza

Our next Graphic 45 Guest Designer for this month is Jane Tregenza who is part of the 2012 Graphic 45 Design Team. Jane was part of the design team that we showcased during Graphic 45 week back in April, which you can view here:  https://blog.papercrafterslibrary.com/graphic-45-week-day-5/.  She does such fabulous work and we love having her back.

You can see Jane’s fabulous project below, but first, here is a little more about Jane:

Jane 8/22I have been making, selling and teaching crafts for over 25 years. Whatever the latest craft trend has been, I have done it. I came to scrapbooking when my first daughter was turning 21. My mum suggested that I do her an album, so I found my local scrapbooking store and booked into free beginners. I did my first page and went back to the store to check if I had the right idea,  I brought some more supplies and did my second page, which when I showed them, they asked me if I wanted to teach.  It all went from there; I was teaching scrapbooking and off the page projects in my two local stores.

When my second daughter finished school, she needed to find employment with support (she has down’s syndrome). I found I was providing the support and doing all kinds of jobs. The idea came to me to open my own store and employ my daughter. That was how Seriously Scrapbooking came to be. My store is now in its 6 year and I teach 15 classes a month. I love doing all forms of scrapbooking, whether it is off the page projects or layouts. Mini Books or even big books, it doesn’t matter, I love it all. The great thing about my jobs is that  I get to share my passion for this wonderful paper craft with so many people. I get to hear so many people’s stories and share in their lives. I am honoured to be on the  Graphic 45 Design team for my 3 rd years. Through Scrapbooking, I have now have friends all over the world. My work has been published in USA magazines as well as in Australia. I regularly get to teach master classes for store owners and teacher which I enjoy so much. Teaching at Scrapbooking and Papercrafts expo in Brisbane last year and again this year has been one of the many high lights. I was also honoured to be asked to demonstrate at CHA for Graphic 45 this year which was amazing and so much fun.  You can visit my blog here: http://www.janetregenza.blogspot.com.au/

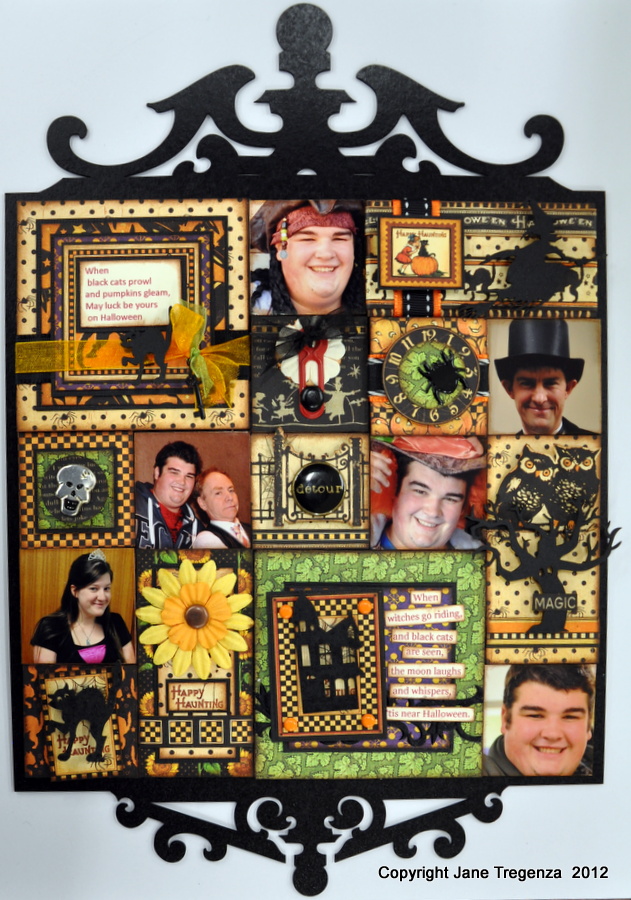
I have been wanting to do a set of Halloween Patchwork pieces for a while, but we don’t really do Halloween in Australia. So when Graphic 45 and Paper Crafters Library asked me to do a project using the new  Happy Haunting collection, I knew exactly what I wanted to create.  I love this form of scrapbooking, it is highly addictive and so much fun.  I have made over 400 of these squares, each one is different and all are made with Graphic 45’s amazing print papers. For my Paper Crafters Library project, I  have used one of Graphic 45’s 8×8 Happy Haunting paper pads.  I used the 8×8 paper pad because the prints are smaller and perfect for a mini project like this one. This would make the perfect Halloween gift for someone special, or a perfect memento of many special Halloween celebrations. Thanks to graphic 45 and Paper Crafters Library for giving me this chance to share my work with you all.


Halloween Patchwork pieces By Jane Tregenza 

I have been making hundreds of these squares over the past 4 years. I have enough for 6 large frames, where each one is made up of over 100 squares and 40 photos. I have been wanting to make a set of these squares on a Halloween Theme for a while, but we don’t really do Halloween in Australia.  I was asked to make a project for Paper Crafters’ Library and using Graphic 45’s Happy Haunting Collection and I knew right away what project I want to make.  I used one of Graphic 45’s Happy Hunting 8×8 paper pads. This meant the prints were smaller and perfect for my squares.
Jane 8/22 final

When making your patchwork squares, there are a few things to remember. You need to adhere all your print papers to your chipboard squares before you do anything. Once they are stuck down, you need to ink the edges of your paper/chipboard with a dark brown ink pad. All your ribbons are taped down across the front of your squares and wrapped around to the back of the squares and adhered. All brads go through the squares to the back.  Please note you need to ink the edges of every bit of paper, chipboard squares and quotes before sticking them down. I always make my own quotes. I choose my favourite quotes or words and print them on cardstock. I then trim them to fit my squares.

For this set you need 5 x 1 ½ inch x 1 ½ inches of chipboard and print papers. 3 x 1 ½ inch x 3 inches of chipboard and print papers. 2 x 3 inch x 3 inches of chipboard and print papers. Colorbox – Dark brown ink pad. Glue  3L foam squares, 3L E-Z tape runner Assorted Quotes printed on cream cardstock. Black Bazzill Assorted Chipboard from Imaginarium Designs Imaginarium Designs Paris Backing Board sprayed Black. Assorted Ribbons Green Tara Paper flowers Assorted metal brads and charms Graphic 45 8×8 Paper Pad- I used one sheet of the following  prints from the pad. Jeepers Creepers Man in the Moon Enchanted Garden Bewitched Midnight Magic Pumpkin Time Halloween Greetings Fright Night Happy Haunting Trick or Treat

 8/22 Jane Black Cats

Square 1: “When Black cats Prowl”

Glue/Adhere a piece of Jeepers Creepers print paper to a 3 x 3 inch chipboard square. Cut a square of black cardstock to 2 ½ x 2 ½ inches, cut a square of Bewitched to 2 3/8 x 2 3/8 inches and adhere it to the black cardstock. Add it to your Jeepers Creepers square.  Wrap a piece of black ribbon across your square with the ends wrapped around to the back. Cut another square of black cardstock to 2 1/8 x 2 1/8 inches, cut a square of Man in the Moon Print Paper to 2×2 inches and adhere it to your black cardstock square.  Add to the middle of your Bewitched Print Paper and over the black ribbon.  From your sheet of Halloween Greetings cut a square and add it to the middle of your Man in the Moon Print Paper.  Choose an organza ribbon and wrap it around your square, tie with a knot on the front. Choose another piece of organza ribbon, thread a key onto the ribbon and tie it with a knot over the top of your other knot. Add a chipboard black cat with foam tape, over the top of your ribbon. Add a quote and your square is finished.

 8/22 Jane Witch

Square 2: “Witch

Glue/Adhere a piece of Fright Night print paper to a 1 ½ x 3 inch chipboard square. Cut a piece of Jeepers Creepers print paper to 1 x 2 7/8 inches and add it to your square in the middle, with the same amount of space, top and bottom. From your sheet of Halloween Greetings cut a strip of black cats and add it to your square. From your sheet of Midnight Magic cut a strip of the Halloween words and add it to your square near the top. Wrap a piece of orange ribbon around your square and near the left edge. Add another stitched black ribbon over the top of the orange one. Cut a square stamp from your sheet of Happy Haunting and mat it onto a piece of black cardstock. Add it to your square over the ribbon using foam tape. Ink an Imaginarium Designs chipboard witch black and add it to your square with foam tape.
8/22 Jane Owls

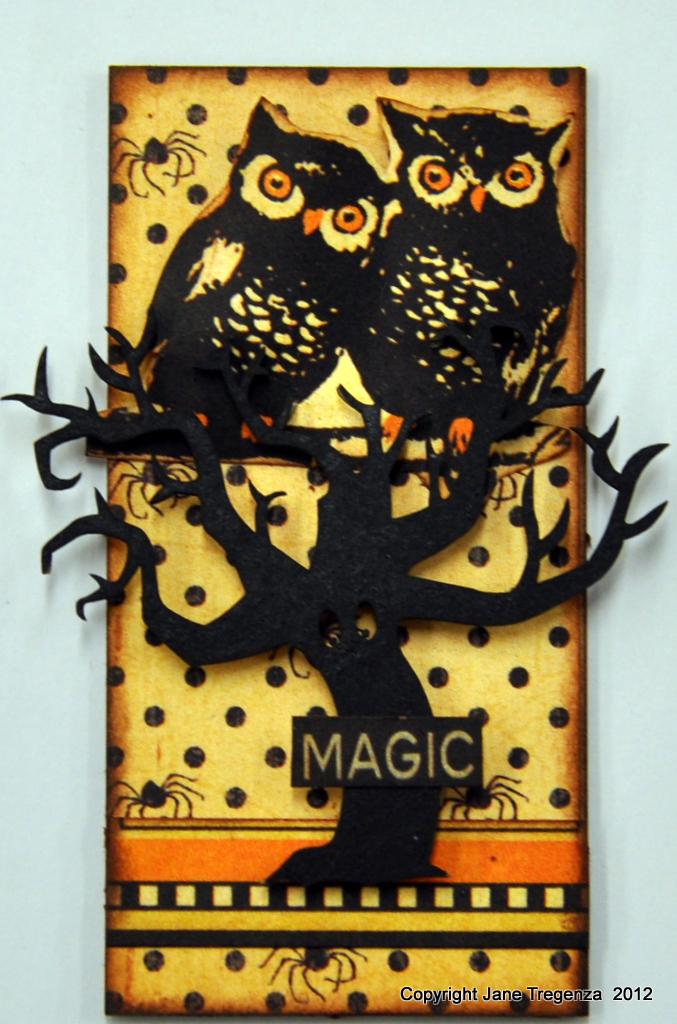
Square 3: “Owls in a Tree”

Glue/Adhere a piece of Jeepers Creepers Print Paper to a 1 ½ x 3 inch chipboard square. Cut two Owls out of your Halloween Greeting Print Paper and add them to your square with foam tape. Cut a border from Halloween Greetings and add it to your square near the bottom. Ink an Imaginarium Designs chipboard Haunted Tree shape and add it to your square with foam tape. Add the word magic from your sheet of Bewitched Print Paper.

8/22 Bewitched

Square 4:  “Bewitched”

Glue/Adhere a piece of Bewitched print paper to a 1 ½ x 1 ½ inch chipboard square. I cut my piece from the sheet, so I had the piece with the images of the scarecrow and children.  Cut a piece of check border from your sheet of Halloween Greetings and add it to your square near the top. Punch a circle from your sheet of Jeepers Creepers and add it to your square near the top and over the border piece. Glue a flower to the middle of your circle. Place a large photo turn over the middle of the flower. Make a large hole in the middle of your photo turn right the way through the chipboard square.  Use a black organza ribbon to tie the photo turn onto your square. Add a black brad through the photo turn near the bottom to stop your photo turn from swinging around.
8/22 Skull

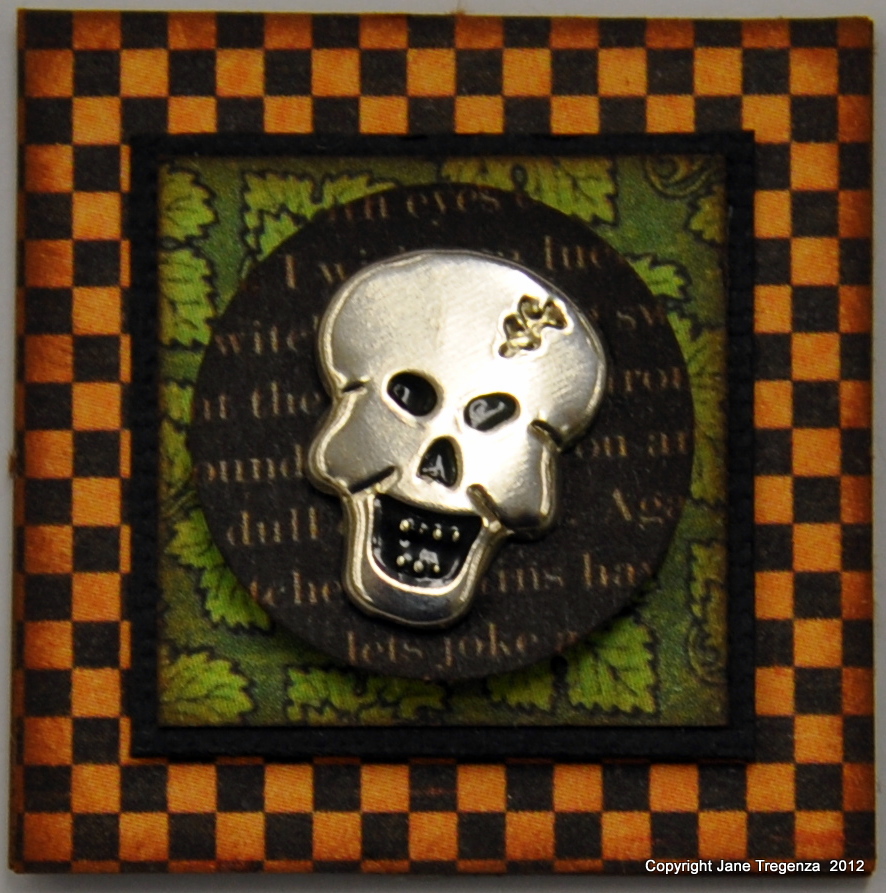
Square 5: “Scull

Glue/Adhere a piece of Trick or Treat print paper to a 1 ½ x 1 ½ inch chipboard square. Cut a square of black cardstock to 1 1/16 x 1 1/16, cut a square of Enchanted Garden to 1 x 1 inch. Adhere your Enchanted Garden square to your black cardstock square. Add it to your Trick or Treat square in the middle. Punch a 1 1/8 inch circle, push a scull brad through it and add it to your Enchanted Garden square with foam tape.
8/22 Detour

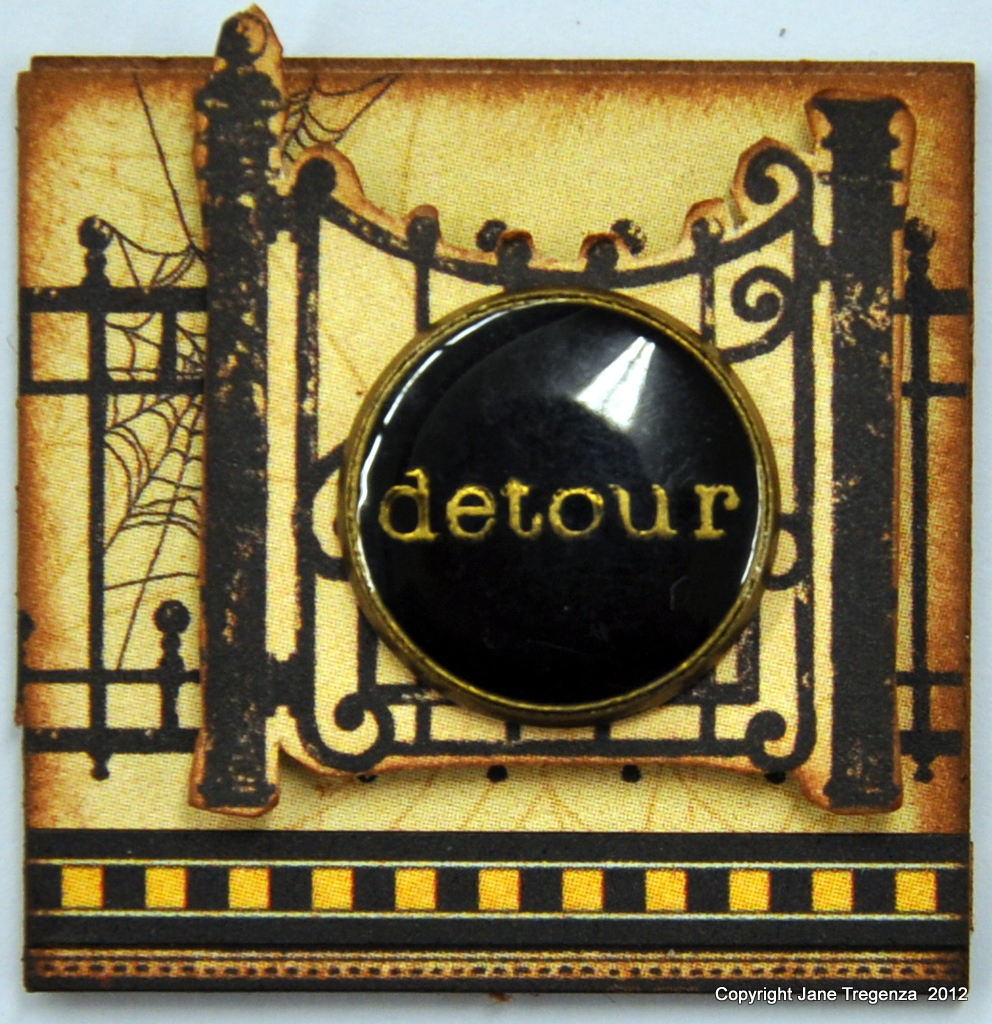
Square 6: “Detour”

Glue/Adhere a piece of Midnight Magic to a 1 ½ x 1 ½ inch chipboard square. I used a piece that had a small fence on it. I cut a gate out and mounted it onto my square with foam tape. Cut a small check strip from Jeepers Creepers and add it to your square under the gate and near the bottom of our square.   Glue a 7 gypsy disk word onto your gate to finish your square.

8/22 Scared Cat

Square 7: “Scared Cat”

Glue/Adhere a piece of Halloween Greeting Print Paper to a 1 ½ x 1 ½ inch chipboard square. Cut a square from your Jeepers Creepers Print Paper.  Use one that has a small check edge around it. Add it to your square with foam tape. Ink an Imaginarium Scared Cat and add it to your square with foam tape.

 8/22 Spider

Square 8: “Spider”

Glue/Adhere a piece of Pumpkin Time Print Paper to a 1 ½ x 1 ½ inch chipboard square. Add a piece of orange ribbon across your square and in the middle. Add a piece of black ribbon over the top of the orange ribbon. Cut a clock from your Midnight Magic Print Paper. Punch a circle from your Enchanted Garden Print Paper and add it to the middle of your clock. Add a spider brad through the clock and add the finished circle onto your square with foam tape.
8/22

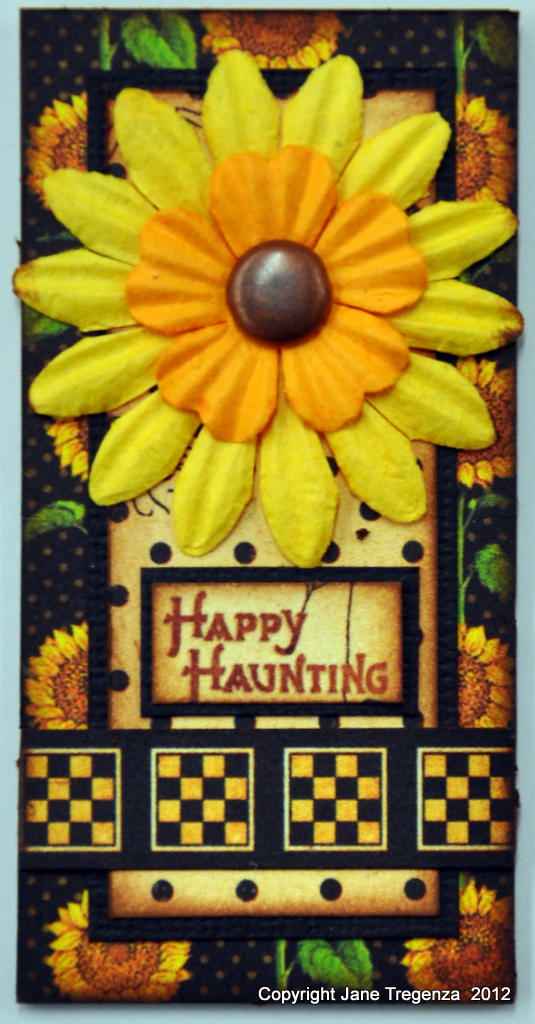
Square 9: “Happy Haunting”

Glue/Adhere a piece of Enchanted Garden Print Paper to a 1 ½ x 3 inch chipboard square. Cut a rectangle  1 1/8 x 2 5/8 inch from your black cardstock. Cut a 1 x 2 ½ inch rectangle from your Jeepers Creepers Print Paper. Add it to your Enchanted Garden square.  Cut a check strip from Jeepers Creepers Print Paper and add it to your square just up from the bottom of your Jeepers Creepers Print Paper.  Choose two flowers and layer them up and add them to your square with a metal brad. Cut the words Happy Haunting from one of your Jeepers Creepers squares and mat it onto a piece of black cardstock. Add it to your square just above your check strip.

 8/22 Happy Haunting

Square 10: “When Witches go riding”

Glue/Adhere a piece of Enchanted Garden Print Paper to a 3 x 3 inch chipboard square. Cut a piece of black cardstock to 2 ¼ x 2 ¼ inch. Cut a 2 1/8 x 2 1/8 inch square from your Man in the Moon and mat it onto your black square. Add it to the middle of your Enchanted Garden square. Add a piece of cut ribbon across your square. Cut a square from your Jeepers Creepers square and mat it onto a piece of black cardstock. Add four brads in the corners and add it to your square with foam tape only at the top and glue it at the bottom. Add an Imaginarium Designs chipboard Haunted House to the middle of your Jeepers Creepers square. Add a quote to finish your square.

Once you have all your squares made, choose your photos and cut them to be 1 ½ x 1 ½ inches and mount them onto chipboard squares. I have mounted all my decorated squares and photo squares onto an Imaginarium Designs backing board, which I sprayed black. This lets me hang  the finished piece on the wall or stand it in a easel stand on a desk.


We hope you have enjoyed this beautiful creation from Jane. I would also like to extend a warm thank you to Gloria for sharing yet another fabulous project with us! Please take a minute to stop by Jane’s Blog and of course the Graphic 45 blog to check out all their amazing creations!

Trendy Tuesday – Paper Tearing

Trendy Tuesday – Tear it up!
by Katherine Elliot

 Ready to relieve some stress while you are papercrafting?  Maybe that”s not exactly what inspires everyone to try this, but paper tearing is a trendy technique that has been around a long time and remains very popular.  Judging from the works I found from an array of talented, international paper crafters, it is one trend that is appreciated globally, too!   Now get ready to tear it up!

Torn & distressed edge card featuring stamps from Stampin” Up! by Trina Kuriger

Paper tearing is the perfect technique for vintage styles or shabby chic projects.  Tear edges of paper delicately or with gusto to create a perfect vintage look.  Sponging a bit of ink to the torn edges is a distress technique that is fashionable as well.

Scrapbook page by Helena Johansson, image source Willeasscrap

Scrapbook page and shabby edges tutorial from Helena Johansson, image source and info at Willeas Scrap

Of course many of us love to cut a perfect shape around our stamped images using dies or punches, but just tearing the paper around your stamped image adds an artistic flair as seen in this stylish card by Julie Gearinger.


Card with torn, distressed edge elements featuring stamps from Stampin” Up! ,  image source Stamping with Julie Geringer

 You don”t have to distress your paper much (or at all) to achieve a very attractive look.  The next two cards show some torn paper layers on a fairly simple card and a more highly embellished card.

Card by Toni Storie, image source Splitcoast Stampers

 Eternally

Torn edge layer card, image source Petaloo blog

 Patterned paper is also easy to tear and layer for a unique layout.  A bit of white edge showing along the tear line adds a bit of flair, too.  Janneke de Jong demonstrates a clean look to her torn paper projects with no additional sponging or distressing, just simple paper tearing.

Torn layered paper card by Janneke de Jong,  image source  Elphine House

Recipe book/journal cover by Janneke de Jong, image source from Janneke”s Creations

This simple patterned paper tearing technique is also great for scrapbook layouts.

 Torn layered paper scrapbook page by Jana Eubank , image source My Mind”s Eye Blog

 Torn paper layers also make perfect beach, sand, water and snow scenes!  Check out these examples of creative faux landscapes…

Beach scene card, image source and card by Neva McMullen at Neva”s Crafty Cave

Card by Joan Ervin, image source Stamping with a Passion  

White torn paper snow scenes are a personal favorite.  Crisp, white paper torn in curving shapes creating snowy drifts and hills with a bit of flocking or glitter make stunning winter scenes.

Pink Sky Snow Scene card by Kittie Caracchiolo, image source Kittie Kraft

Snow scene card by Colette Smith, image source Digi-re-doo-dah

Of course there are products available to help unleash even more torn paper creativity,  such as Core”dinations ColorCore cardstock papers.   Core”dinations cardstock have a variety of choices,  some with a matching color core or a surprising color core that is shown when you tear, distress, emboss and/or sand the cardstock.


Core”dinations color core cardstock, image Simon Says Stamp.com

Tim Holtz Core”dinations Distress Color Core Cardstock , image source Simon Says Stamp.com

Paper tearing can also lead to some fun embellishment making! Torn circles of cardstock or strips of torn patterned paper can be made into different types of rustic style flowers, as seen in the card and scrapbook page featured below.


Torn paper flower card & instructions for making flower at Little Birdie Secrets

Instructions on how to make torn paper flower from paper scraps, & image source at Club Creating Keepsakes

 Even if you aren”t using a torn paper layer on your project, there are many ways that paper tearing is useful in the creative papercrafting process.  Michelle Zindorf, well known for her beautiful brayer techniques and cards, demonstrates using a torn piece of paper or Post-It note as a guide for the inking process to create this lovely mirrored lake landscape…

dsc02577.jpg

dsc02571.JPG

Still Winter Card (and tutorial) by Michelle Zindorf.  Find tutorial and image source at Freedom in Creating

 Here”s a clean & simple card that used a very similar paper tearing technique to create an interesting sponged edge on the one layer project.

One layer card using torn edge sponging technique by Susan Goetter,  image source  Keeping in Touch

Want some more information on paper tearing?   Check out the simple instructions on easy tearing techiques found at Scrapbook 101 .   If you struggle with tearing stiffer cardstock to achieve the look you want, try and mist the paper with a little water then let your stress dissolve as you rip away.  There”s no wrong way to tear paper, so try your own technique and let your creativity be your guide.

scrapbook project Go ahead, tear it up!  image source Scrapbook 101

There are a lot of ways to incorporate paper tearing in your projects.  The technique is super simple.  Anyone can do it!  From simple to elaborate projects, it”s a fun way to paper craft.  If you are not yet inspired to try it, maybe sharing this amazing piece of torn paper art will do it…  All I can say about this art project is, wow!

Annawilihighfield

Torn paper Owl Sculpture by Australian artist, Anna-Wili Highfield, image source It”s Nice That

 Now I”m sure you” re ready to start tearing it up!  Get at it and have fun.

As always, happy crafting!


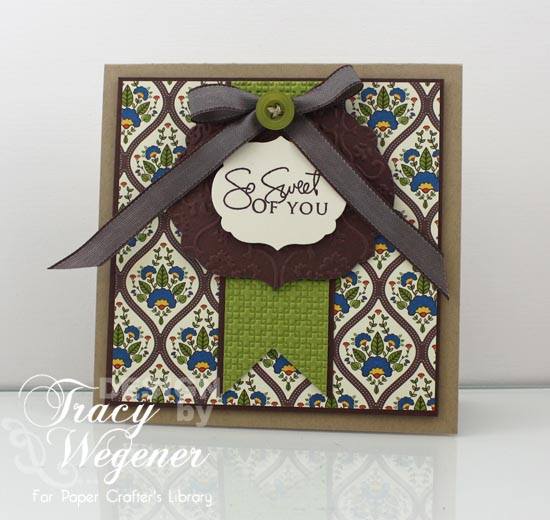
Project Newsletter Makeover Challenge – So Sweet Of You

Welcome to the Makeover Monday challenge. Every Monday, as part of our project ideas newsletter we’re going to make over a card, scrapbook page or 3D project, showing you how easy it is to use existing designs (your own OR someone else’s) as inspiration. This week, Tracy has designed this “So Sweet Of You” card.

Your challenge – as with our previous Makeover Monday Challenges – is to use our piece as inspiration and make it into a card, scrapbook page, or other project. You can use the layout, the colors, an element you like…it can look like our piece, or nothing at all like our piece. We want to see where YOU take this. This challenge is strictly a “work from your stash” challenge.

As a newsletter subscriber you will have received a link to a private web page, from which you can watch the video tutorial. Please note that the video tutorial will be available for general viewing for one week only – and then will be moved into our library for our members only. In order to ensure you don’t miss any more of our Makeover Monday Challenge video tutorials, please be sure you sign up for our FREE email newsletter from the top right sidebar of this blog. If you didn’t receive the newsletter then please be sure to email us to confirm your subscription.

Every Monday, here on the blog, we’re going to post the original picture, and the made over picture. You will have ONE week to upload your challenge piece. Instead of a weekly prize though, we’re going to award a prize monthly. So for each week you participate and each project you submit – you will get one entry into our monthly draw. On the first Monday of each month – we will announce one challenge winner, who will be featured as a guest designer on the Paper Crafter’s Library blog as well as our Facebook page. As a guest designer, we’ll feature your biography, some of your favorite paper crafting projects and we’ll link to your blog.

Our inspiration piece, shown below, is a card we found on Betsy Veldman’s blog Paper, Scissors and Superheroes.

Here are the details on how you can participate in the Makeover Monday Challenge:

A new Makeover Monday Challenge video tutorial will be emailed out to newsletter subscribers every Monday (so make sure you are signed up). Then, here on the blog, we will post a picture of our inspiration piece and made-over project along with an Inlinkz button for you to enter your project. Here are the details:

  • Work from your own stash to create a project based on the inspiration project provided – you can use any products you would like, and make any type of project you like – card, scrapbook page, album, 3D item etc.
  • Post your project on your blog, in your gallery or on any other photo-hosting site (such as photobucket or flickr).
  • Click on our inLinkz button below to add a link to your project for our challenge
  • You will have until 7am, Monday, August 27th to add your link to the list to be eligible to win. And you can enter as many times as you like.
  • For each project you submit, your name will be entered into our monthly draw. The winner will be announced on Monday, September 3rd.

Good luck to everyone and we look forward to seeing your projects!


May Arts Guest Designer Nicole Martel

May Arts Logo

We have a special treat today!  After our successful May Arts week back in May, we asked them to come back with another Guest Designer for you today.  So, we’re so excited to have Nicole Martel from May Arts with us today.  

Here at Paper Crafter’s Library we’re ribbon lovers – you’ll find ribbon on almost all of our projects – which is why we’re so thrilled to have Nicole bring you another fabulous project.  You haven’t seen ribbon until you’ve seen May Arts Ribbon – they offer a multitude of different colors and styles of ribbon to suit any preference and taste – and all of it, top quality!

And, we also have a give-a-way today!!  Two lucky winners will receive a special select pack of Ribbon from May Arts. One winner will be drawn from all the comments left here on the Paper Crafter’s Library blog to win the following Ribbon pack: 

May Arts PCL giveaway 817

AND one winner will be drawn from all the comments left on the May Arts Blog to win the following Ribbon pack:

may arts giveaway 817 

Remember, each comment you leave is one entry, so be sure to visit today not only for the great project idea, but also to enter your name into our give-aways.

About May Arts

May Arts Ribbon was founded in the early 1980’s in Riverside, Connecticut. The original products were high-end silk flowers imported from Taiwan, which were decorated using quality ribbons. The decorative ribbons proved so popular among customers that the business gradually evolved into a dedicated ribbon wholesaler.

As a family-owned and operated business, May Arts began a long-standing tradition of quality, affordability and exceptional customer service. We are dedicated to carrying on this same tradition by offering high quality products at competitive prices. Our friendly, knowledgeable staff is always happy to answer your questions or to assist you in placing your order.

May Arts carries a wide selection of quality ribbons to choose from; such as grosgrain, silk, satin, burlap and a variety of prints and patterns. All inventory is held in stock, so we can ship orders out right away—typically the same day.

Where to Buy May Arts Ribbons

The May Arts website is their wholesale site for online and brink and mortar retailers. We’ve linked to it so that you can easily view their entire product line in one place. There are numerous places where you can purchase May Arts Ribbons including many local scrapbook stores as well as online stores. Two of the online stores that carry the biggest selections that we are aware of include Amazon, who carry the complete May Arts Ribbon Line (plus you can qualify for free shipping). Click on the link we provided and it will take you to our May Arts Ribbon Search Results. To find a particular ribbon, go to the May Arts website, find the name of the ribbon and color and then enter that into your Amazon search results. Please note that through Amazon you’re buying by the roll. Most other online and local scrapbook stores sell May Arts Ribbon by the yard. One of the online stores that carries a great selection is Ribbon Carousel.

May Arts Design Team Project

Today we have with us May Arts Designer Nicole Martel.  You will find her project below, but first here is a little bit about Nicole:

Nicole 817My name is Nicole Martel.  Currently, I live in Crownsville, MD with my husband of 8 years. We have been together for 13 years! We have a beautiful son named Edward Zane who we love to pieces. We have a dog named Daisy, 2 crabbies and some fishies. We love to spend time as a family at the beach or hiking; we love being outdoors J

I began scrapping in January 2002, but I didn’t get really serious or discover the online scrapping forums until August 2006. I remember when mom asked me to go to a Creative Memories party with her. I laughed telling her no way, I’m not creative enough! By the time I left that party, I had my first album, cardstock, pens, trimmer, scissors and lots of stickers and templates. Little did I know that I’d be addicted! I totally love this hobby. It makes me happy to create layouts for my friends and family and to inspire others to scrap. My friends call me the Paparazzi. (laughs) My camera is always with me! I love taking photos and when my friends get annoyed with me, I tell them that one day, we will be old and we’ll appreciate the goofy photos that we took. After all, scrapping is all about keeping the “Memories alive!” I may be a simple scrapper but I’m far from being a boring scrapper.

My main style is simple and journalistic with a bit of an eclectic feel to my work. Not only do I enjoy creating layouts but I also enjoy creating mini albums. I love using paint and ink on my layouts to make them stand out. I do not like cluttered pages because I believe that with the right photos, design and fewer embellishments, one can still create a beautiful piece of art.

Some tips for when you’ve lost your mojo:

  1. Stop scrapping for a few days. I find that when I take a break from scrapping, I have fresh ideas when I return to the scrap table.
  2. Lift yourself! Every now and then, I will create a layout that I love based on the design and I will lift myself over and over again.
  3. Scrap the pictures that inspire you the most! Don’t worry about scrapping in order. Just focus on the special moments that you hold dear to your heart.
  4. I often find that keeping things simple, and applying the principle “less is more” saves me from lots of headache and time.
  5. Try not to let other scrappers discourage you. Do what you love, and have fun!

A Day at the Lake Scrapbook Layout

Just recently, my family and I spent a day at the lake. We had such a great time. While Edward and I were in the water playing, my mother snapped a photo of us that I just love! I wanted to create something fun, so I decided to try using my heart epoxy stickers by Epiphany Crafts to see if I could come up with an embellishment of my own and I must say I love how my little heart embellishment turned out. When I look at this layout, I can totally feel the love.

 May Arts Nicole 817

 Instructions:

  1. Place three ¾” pieces of ribbon below one another in an even line.
  2. Cover ribbon with an Epoxy heart.
  3. Carefully use your scissors to cut away the unwanted ribbon hanging from the sides.
  4. Place another epoxy heart on the other side.
  5. Place a few glue dots on the edges of the heart, to ensure that everything holds strong.
  6. Gently tie a bow using Baker’s Twine around the heart.

 may arts nicole 817

Supplies:
Patterned paper: G.C.D. Studios, Jillibean Soup, Echo Park
Transparancy: Hambly
Heart epoxy stickers: Epiphany Crafts
Baker’s Twine: May Arts
Ribbon: May Arts
Sticker alphas: Creative Memories
Corner rounder: Creative Memories
Adhesives: Tombow, Glue Dots


We hope you have enjoyed today’s layout.  To enter to win one of the great ribbon give-a-ways from May Arts, please leave your comment below. Also, be sure to stop by the May Arts Blog when you see the Paper Crafter’s Library post published for another chance to win, and tell them Paper Crafter’s Library sent you! Winner will be announced next week!

Artist & Designer Spotlight: Nancy Wethington

Guest Designer: Nancy Wethington

Our special Guest Designer today is Nancy Wethington who has been featured here before during Grahpic 45 week.  She has also been part of many different Design Teams.  Nancy brings her love of the craft and enormous talent to all her creations.  She does amazing work and we are so exicted she has come back.

You can see the details of Nancy’s fabulous project below, but first, here is a little more about Nancy:

Nancy WethingtonHi everyone! My name is Nancy Wethington and I live in St. Louis MO with my husband and our dog, Buck. We have one son, Will (Beau) who just got engaged last weekend to his adorable girlfriend Lindsey. (Let the wedding planning begin!). I can’t ever remember not crafting with one thing or another. Now that retire-ment age is here, thankfully there is more time to pursue my favorite hobby, paper arts. Although I do a lot of card making and have vigorously scrapbooked 12×12 pages in the past, my true passion is mini-books. I’ve had the privilege of serving on several design teams including Simon Says Stamp & Show, Graphic 45 and Oxford Impressions. Currently, I teach classes at Missouri’s largest independently owned scrapbook store, For Keeps Sake Scrapbook. It’s 5000 square feet of goodness with classes almost every day. Pure heaven! My work has appeared in several Stampington publications, Paper Crafts and Paper Creations magazines, Just Steampunk publication and The St. Louis Post-Dispatch newspaper as well as product development for Mary Engelbreit. If you have a chance, please visit my blog and see my current designs. You can find me at http://art-from-the-heart.typepad.com

Project: Mini-Book from Farmhouse Creations
 Wethington Farmhouse 2

So very happy to introduce this new product to Paper Crafters Library. Farm-house Paper Company celebrated its debut at CHA-S. Many of you know the genius behind this paper line, Angela Moen whose original company is known as The Button Farm. The Button Farm is a kit club with Ange-la designing one new mini-book kit each month. They are dreamy. Enter Angela’s 2nd company, Farmhouse Paper Company. Angela has taken her vision to the next level by designing Fair Skies, Market Square and Sugar Hill. Each of these new lines include 12×12 papers, 6×6 paper pads, adhesive chipboard elements and sticker sheets. These can be used as stand-alone items or use them in any of her newly designed chipboard albums.

The mini-book I put together today is from the Fair Skies Dream On mini-book collection. It’s a kit that includes an amazing amount of supplies: a super-cute Dry Goods mini-chipboard envelope album; a 6×6 pa-per pad (2 each of 20 designs); a package of adhesive chipboard (47 pieces); a package of sticker sheets (6 – 4×6 sheets). Using the Dream On mini kit, the book comes together in just a few hours with the use of the included written and easy-to-understand directions and accompanying colored photos.

Wethington Farmhouse 5

Fair Skies Dream On mini-book would be perfect to showcase photos from summer picnics, family get to-gethers or a backyard barbecues. I’m using mine for a trip to wine country this fall! It’s easily done in a couple of hours and has all the good things we love in mini-books including lots of layering and places for photos and journaling. With envelopes interspersed throughout the book, there’s even places to tuck in collectibles.

Wethington Farmhouse 3

Wethington Farmhouse 4

You can find the Fair Skies Dream On mini-book kit – For Keeps Sake Scrapbook on-line store: http://forkeepssake.typepad.com.

Wethingtonfarmhouse6

Begin the kit project by altering the Dry Goods Mini Envelope Album. The album measures 4” x 6 3/4”. Untie the cover and, using a craft knife, cut off the flap. After that, it’s a matter of layering all the adorable chipboard designs on the cover as well as the remaining pages. With instructions included in each kit, it’s super easy to follow along and finish the Dream On mini-book.

We hope you have enjoyed this beautiful creation from Nancy. I would also like to extend a warm thank you to Nancy for sharing yet another fabulous project with us! Please take a minute to stop by Nancy’s Blog to check out all her amazing creations!