
Here is the latest installment of our Grahpi 45 Guest Designers. Many of you may remember that back in April we hosted a Graphic 45 Week on the Paper Crafter’s Library Blog. It was week filled with projects and inspiration using Graphic 45’s Tropical Travelogue Collection. We had such a great experience partnering with Graphic 45 and their design team, and such a great response from you, that we’ve decided to partner with them on an ongoing basis. The first and third week of every month one of the Graphic 45 Designers will share a project they’ve created here on the PCL Blog. We started with our monthly designers in June and before I introduce you to our latest Designer, I just wanted to take a minute to re-introduce Graphic 45 for those of you that may not be familiar with the company.

Graphic 45 is an award-winning scrapbook and paper crafting company— owned and operated by a mother and her two daughters.
Diane Schultz (pictured center)—Designer and CEO (aka mother)
“I’m passionate about being creative and eager to make it possible for others to find their creative voice. My background includes stints as a designer for, McCalls, Simplicity, Vogue/ Butterick, Mattel Toy Company and a host of other jobs that each, in some way, led me to what I do now. At 45 I went back to school and got my degree in graphic design— I named the company to celebrate that achievement.”
Aimee Filimoehala (pictured left) —Director of Operations
“I wear a lot of hats and love it that way. Business, marketing, operations, etc. have made me a pro at multitasking (aka juggling‑figuratively and literally). When we launched Graphic 45 just three years ago we had no idea what was in store, working together as a family has been an amazing journey that we all feel so grateful to be apart of.”
Charee Filimoehala (pictured right)—Director of Customer Service and Design Team Coordinator
“I joined the team a little over three years ago and haven’t looked back…what a life-changing experience this has been. I love working with and around creative people and products (not to mention I like my co-workers quite a bit). I spend my days working with our friendly stores and talented design team…the occasional trip to a workshop or tradeshow pretty nice too.”
Together we create vintage inspired crafting products that capture the flamboyant style of the 1920’s and 30’s – with vibrant color, irresistible texture and imaginative design to create products with decades-old appeal that’s both fresh and familiar. Let our products inspire your next scrapbook layout, card, album or home decor project.
***********
Here’s a picture of their booth at the CHA show which absolutely blows us away every year! The artwork inside is absolutely stunning and totally unique. At the last show as we were speaking with Diane she told us that many of the altered pieces were vintage finds which she and her team transformed with their gorgeous Graphic 45 products. We can’t wait to stop by their booth at the Chicago CHA and see what they’ve got in store this year!

Here’s a picture of the Graphic 45 team – they’re always dressed in period costumes to complement the themes in their collections – every day of the show brings a new set of costumes. The ones shown below were for their Little Darlings collection.

Graphic 45 Designer Jane Tregenza
Our next Graphic 45 Guest Designer for this month is Jane Tregenza who is part of the 2012 Graphic 45 Design Team. Jane was part of the design team that we showcased during Graphic 45 week back in April, which you can view here: https://blog.papercrafterslibrary.com/graphic-45-week-day-5/. She does such fabulous work and we love having her back.
You can see Jane’s fabulous project below, but first, here is a little more about Jane:
 I have been making, selling and teaching crafts for over 25 years. Whatever the latest craft trend has been, I have done it. I came to scrapbooking when my first daughter was turning 21. My mum suggested that I do her an album, so I found my local scrapbooking store and booked into free beginners. I did my first page and went back to the store to check if I had the right idea, I brought some more supplies and did my second page, which when I showed them, they asked me if I wanted to teach. It all went from there; I was teaching scrapbooking and off the page projects in my two local stores.
When my second daughter finished school, she needed to find employment with support (she has down’s syndrome). I found I was providing the support and doing all kinds of jobs. The idea came to me to open my own store and employ my daughter. That was how Seriously Scrapbooking came to be. My store is now in its 6 year and I teach 15 classes a month. I love doing all forms of scrapbooking, whether it is off the page projects or layouts. Mini Books or even big books, it doesn’t matter, I love it all. The great thing about my jobs is that I get to share my passion for this wonderful paper craft with so many people. I get to hear so many people’s stories and share in their lives. I am honoured to be on the Graphic 45 Design team for my 3 rd years. Through Scrapbooking, I have now have friends all over the world. My work has been published in USA magazines as well as in Australia. I regularly get to teach master classes for store owners and teacher which I enjoy so much. Teaching at Scrapbooking and Papercrafts expo in Brisbane last year and again this year has been one of the many high lights. I was also honoured to be asked to demonstrate at CHA for Graphic 45 this year which was amazing and so much fun. You can visit my blog here: http://www.janetregenza.blogspot.com.au/
I have been wanting to do a set of Halloween Patchwork pieces for a while, but we don’t really do Halloween in Australia. So when Graphic 45 and Paper Crafters Library asked me to do a project using the new Happy Haunting collection, I knew exactly what I wanted to create. I love this form of scrapbooking, it is highly addictive and so much fun. I have made over 400 of these squares, each one is different and all are made with Graphic 45’s amazing print papers. For my Paper Crafters Library project, I have used one of Graphic 45’s 8×8 Happy Haunting paper pads. I used the 8×8 paper pad because the prints are smaller and perfect for a mini project like this one. This would make the perfect Halloween gift for someone special, or a perfect memento of many special Halloween celebrations. Thanks to graphic 45 and Paper Crafters Library for giving me this chance to share my work with you all.
Halloween Patchwork pieces By Jane Tregenza
I have been making hundreds of these squares over the past 4 years. I have enough for 6 large frames, where each one is made up of over 100 squares and 40 photos. I have been wanting to make a set of these squares on a Halloween Theme for a while, but we don’t really do Halloween in Australia. I was asked to make a project for Paper Crafters’ Library and using Graphic 45’s Happy Haunting Collection and I knew right away what project I want to make. I used one of Graphic 45’s Happy Hunting 8×8 paper pads. This meant the prints were smaller and perfect for my squares.

When making your patchwork squares, there are a few things to remember. You need to adhere all your print papers to your chipboard squares before you do anything. Once they are stuck down, you need to ink the edges of your paper/chipboard with a dark brown ink pad. All your ribbons are taped down across the front of your squares and wrapped around to the back of the squares and adhered. All brads go through the squares to the back. Please note you need to ink the edges of every bit of paper, chipboard squares and quotes before sticking them down. I always make my own quotes. I choose my favourite quotes or words and print them on cardstock. I then trim them to fit my squares.
For this set you need 5 x 1 ½ inch x 1 ½ inches of chipboard and print papers. 3 x 1 ½ inch x 3 inches of chipboard and print papers. 2 x 3 inch x 3 inches of chipboard and print papers. Colorbox – Dark brown ink pad. Glue 3L foam squares, 3L E-Z tape runner Assorted Quotes printed on cream cardstock. Black Bazzill Assorted Chipboard from Imaginarium Designs Imaginarium Designs Paris Backing Board sprayed Black. Assorted Ribbons Green Tara Paper flowers Assorted metal brads and charms Graphic 45 8×8 Paper Pad- I used one sheet of the following prints from the pad. Jeepers Creepers Man in the Moon Enchanted Garden Bewitched Midnight Magic Pumpkin Time Halloween Greetings Fright Night Happy Haunting Trick or Treat

Square 1: “When Black cats Prowl”
Glue/Adhere a piece of Jeepers Creepers print paper to a 3 x 3 inch chipboard square. Cut a square of black cardstock to 2 ½ x 2 ½ inches, cut a square of Bewitched to 2 3/8 x 2 3/8 inches and adhere it to the black cardstock. Add it to your Jeepers Creepers square. Wrap a piece of black ribbon across your square with the ends wrapped around to the back. Cut another square of black cardstock to 2 1/8 x 2 1/8 inches, cut a square of Man in the Moon Print Paper to 2×2 inches and adhere it to your black cardstock square. Add to the middle of your Bewitched Print Paper and over the black ribbon. From your sheet of Halloween Greetings cut a square and add it to the middle of your Man in the Moon Print Paper. Choose an organza ribbon and wrap it around your square, tie with a knot on the front. Choose another piece of organza ribbon, thread a key onto the ribbon and tie it with a knot over the top of your other knot. Add a chipboard black cat with foam tape, over the top of your ribbon. Add a quote and your square is finished.

Square 2: “Witch”
Glue/Adhere a piece of Fright Night print paper to a 1 ½ x 3 inch chipboard square. Cut a piece of Jeepers Creepers print paper to 1 x 2 7/8 inches and add it to your square in the middle, with the same amount of space, top and bottom. From your sheet of Halloween Greetings cut a strip of black cats and add it to your square. From your sheet of Midnight Magic cut a strip of the Halloween words and add it to your square near the top. Wrap a piece of orange ribbon around your square and near the left edge. Add another stitched black ribbon over the top of the orange one. Cut a square stamp from your sheet of Happy Haunting and mat it onto a piece of black cardstock. Add it to your square over the ribbon using foam tape. Ink an Imaginarium Designs chipboard witch black and add it to your square with foam tape.
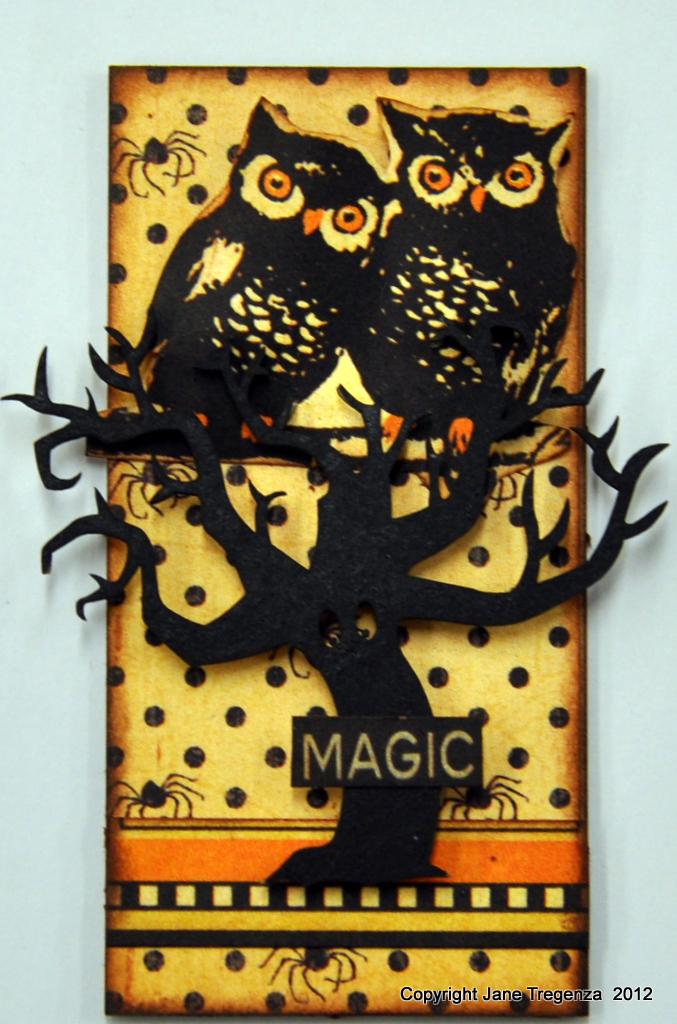
Square 3: “Owls in a Tree”
Glue/Adhere a piece of Jeepers Creepers Print Paper to a 1 ½ x 3 inch chipboard square. Cut two Owls out of your Halloween Greeting Print Paper and add them to your square with foam tape. Cut a border from Halloween Greetings and add it to your square near the bottom. Ink an Imaginarium Designs chipboard Haunted Tree shape and add it to your square with foam tape. Add the word magic from your sheet of Bewitched Print Paper.

Square 4: “Bewitched”
Glue/Adhere a piece of Bewitched print paper to a 1 ½ x 1 ½ inch chipboard square. I cut my piece from the sheet, so I had the piece with the images of the scarecrow and children. Cut a piece of check border from your sheet of Halloween Greetings and add it to your square near the top. Punch a circle from your sheet of Jeepers Creepers and add it to your square near the top and over the border piece. Glue a flower to the middle of your circle. Place a large photo turn over the middle of the flower. Make a large hole in the middle of your photo turn right the way through the chipboard square. Use a black organza ribbon to tie the photo turn onto your square. Add a black brad through the photo turn near the bottom to stop your photo turn from swinging around.
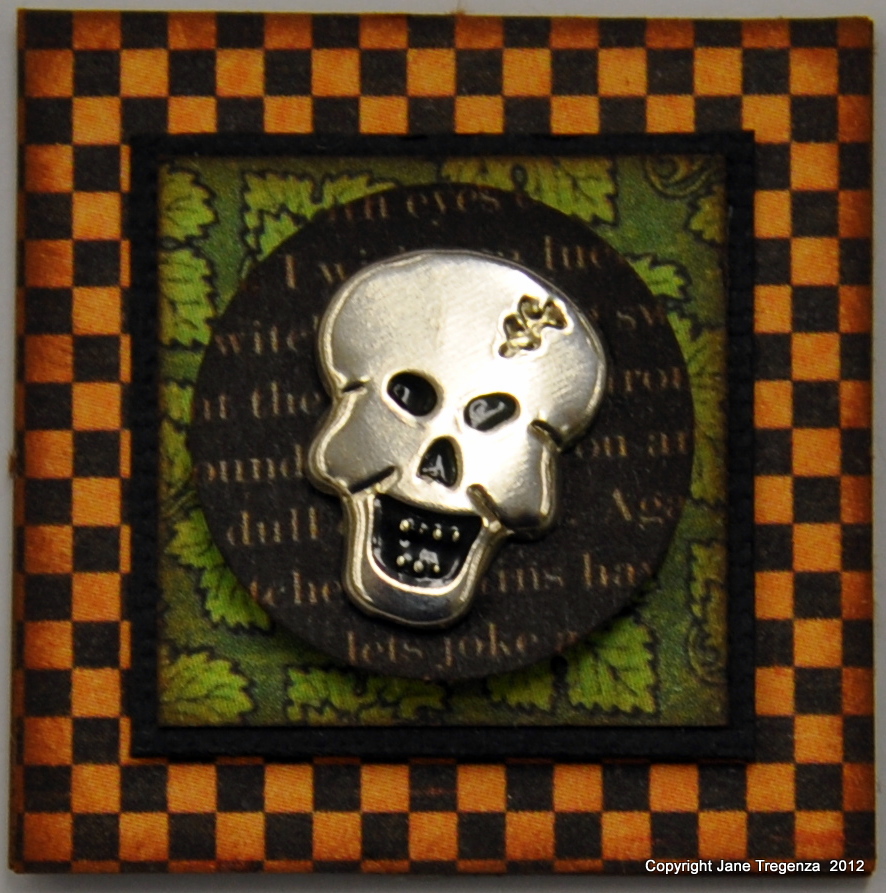
Square 5: “Scull”
Glue/Adhere a piece of Trick or Treat print paper to a 1 ½ x 1 ½ inch chipboard square. Cut a square of black cardstock to 1 1/16 x 1 1/16, cut a square of Enchanted Garden to 1 x 1 inch. Adhere your Enchanted Garden square to your black cardstock square. Add it to your Trick or Treat square in the middle. Punch a 1 1/8 inch circle, push a scull brad through it and add it to your Enchanted Garden square with foam tape.
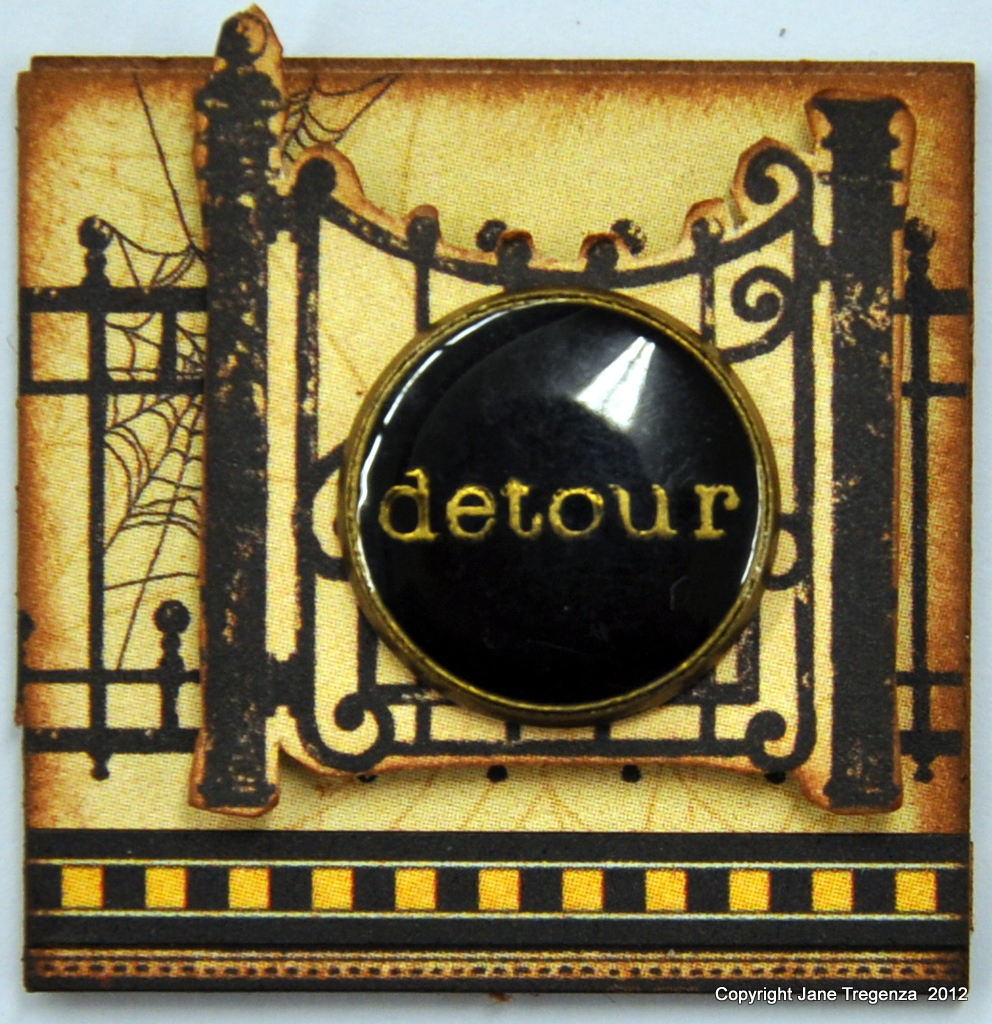
Square 6: “Detour”
Glue/Adhere a piece of Midnight Magic to a 1 ½ x 1 ½ inch chipboard square. I used a piece that had a small fence on it. I cut a gate out and mounted it onto my square with foam tape. Cut a small check strip from Jeepers Creepers and add it to your square under the gate and near the bottom of our square. Glue a 7 gypsy disk word onto your gate to finish your square.

Square 7: “Scared Cat”
Glue/Adhere a piece of Halloween Greeting Print Paper to a 1 ½ x 1 ½ inch chipboard square. Cut a square from your Jeepers Creepers Print Paper. Use one that has a small check edge around it. Add it to your square with foam tape. Ink an Imaginarium Scared Cat and add it to your square with foam tape.

Square 8: “Spider”
Glue/Adhere a piece of Pumpkin Time Print Paper to a 1 ½ x 1 ½ inch chipboard square. Add a piece of orange ribbon across your square and in the middle. Add a piece of black ribbon over the top of the orange ribbon. Cut a clock from your Midnight Magic Print Paper. Punch a circle from your Enchanted Garden Print Paper and add it to the middle of your clock. Add a spider brad through the clock and add the finished circle onto your square with foam tape.
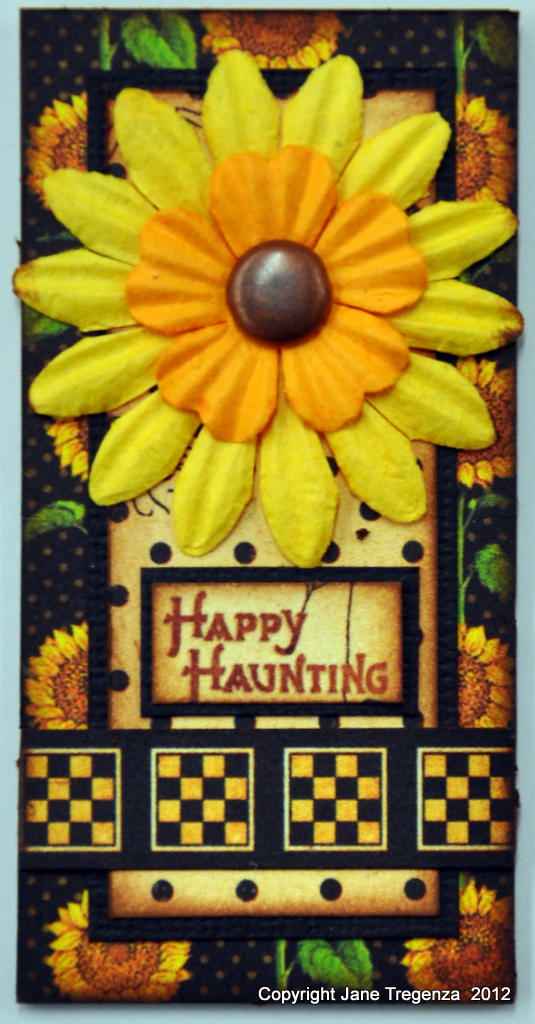
Square 9: “Happy Haunting”
Glue/Adhere a piece of Enchanted Garden Print Paper to a 1 ½ x 3 inch chipboard square. Cut a rectangle 1 1/8 x 2 5/8 inch from your black cardstock. Cut a 1 x 2 ½ inch rectangle from your Jeepers Creepers Print Paper. Add it to your Enchanted Garden square. Cut a check strip from Jeepers Creepers Print Paper and add it to your square just up from the bottom of your Jeepers Creepers Print Paper. Choose two flowers and layer them up and add them to your square with a metal brad. Cut the words Happy Haunting from one of your Jeepers Creepers squares and mat it onto a piece of black cardstock. Add it to your square just above your check strip.

Square 10: “When Witches go riding”
Glue/Adhere a piece of Enchanted Garden Print Paper to a 3 x 3 inch chipboard square. Cut a piece of black cardstock to 2 ¼ x 2 ¼ inch. Cut a 2 1/8 x 2 1/8 inch square from your Man in the Moon and mat it onto your black square. Add it to the middle of your Enchanted Garden square. Add a piece of cut ribbon across your square. Cut a square from your Jeepers Creepers square and mat it onto a piece of black cardstock. Add four brads in the corners and add it to your square with foam tape only at the top and glue it at the bottom. Add an Imaginarium Designs chipboard Haunted House to the middle of your Jeepers Creepers square. Add a quote to finish your square.
Once you have all your squares made, choose your photos and cut them to be 1 ½ x 1 ½ inches and mount them onto chipboard squares. I have mounted all my decorated squares and photo squares onto an Imaginarium Designs backing board, which I sprayed black. This lets me hang the finished piece on the wall or stand it in a easel stand on a desk.
We hope you have enjoyed this beautiful creation from Jane. I would also like to extend a warm thank you to Gloria for sharing yet another fabulous project with us! Please take a minute to stop by Jane’s Blog and of course the Graphic 45 blog to check out all their amazing creations!

Jane, these are tremendously creative projects. I have been following your work for a while now and you never cease to amaze me with your artist talents!
I don’t think it is any secret that Graphic 45 is my favorite paper, and these projects by Jane are simply amazing. These papers in the hands of someone so talented made magic! I kept thinking as I looked at each one, “This is my favorite”, and then I would see the next one and be blown away! Thanks to Jane, Graphic 45 and of course PCL for bringing us such wonderful Halloween inspiration!
Wow, these creations are amazing. I love the layers and the attention to detail which add so much.
Wow! Jane is so talented. That patchwork square is just amazing. It really is in the details.
The layering and composition are truly amazing. Such an imagination and talent. It sounds like Jane always had it; it just took the right moment (that 1st scrapbook) to bring it out. Sometimes it’s all about timing. How nice, too, that Jane was able to open her own store and employ her daughter. A win-win story for everyone. I’ll be checking out Jane’s blog. Thanks for the introduction, and so glad to have the G45 series continue.
Fabulous Halloween squares!