Trendy Tuesday – Honeycombs and Hexagons

Trendy Tuesday – Honeycombs and Hexagons
By Colleen Harshaw

Unless you are someone who lives under a rock, or someone who does not follow blogs, websites or magazines from the crafting world, you have seen or heard about this trend.  Hexagons (sometimes referred to as honeycombs) are EVERYWHERE.  I have many beautiful projects to share with you today, to give you some ideas how this very interesting shape can be used in your creations.

A hexagon, in geometry, is a polygon with six edges and six vertices.  The total of the internal angles of any hexagon is 720 degrees. (Thank you Wikipedia!)

In crafting, a hexagon is an interesting shape that is not a square and not a circle, and can therefore mix things up a bit and give us some visual interest!

The first project sample that I have for you today is a card created by the lady behind SFYTT (otherwise known as Sketch For You To Try) over at www.iheart2stamp.com.  I love the colours of this card, I love the textures, I love the trees, and of course Jen included some hexagons too!

Project by Jen Del Muro @ www.iheart2stamp.com

The second card sample that I have for you is by our very own Andrea Walford from The Paper Crafter’s Library!  Instead of using a piece of patterned paper on her card, Andrea decided to cut the hexagon shapes from a sheet of patterned paper and adhere them to her card base individually.  The paper that Andrea used is from the Stampin’ Up! Twitterpated Collection.  The end result is a clean, beautiful card!

Project by Andrea Walford @ www.papercrafterslibrary.com

This next project is a 12 x 12 scrapbook layout that shows us both the use of a hexagon and stitching.  It is a fun, colourful layout that can’t help but catch the eye!

Layout by Jennifer Schmidt.  Photo credit to www.about.com

The second layout that I want to share with you today is a two page spread (12 x 24) in which the artist employed a similar technique as Andrea did above.  In this case, the hexagons were individually cut out using a punch, and then they were adhered to the layout one at a time.  It would certainly take a bit of time on a layout this large, but the the end result is fun, and effective in drawing the viewer’s eye towards the photos.

Layout by Lisa Dickinson.  Photo credit to www.creativememories.com

This last layout employs the use of hexagon paper in a creative way to make flower embellishments.  This struck me a simple but very clever.  I must admit, I probably wouldn’t have thought of it myself!  🙂

Layout by Shaina Longstreet @ www.shadylaneblog.com

Now, let’s get away from papercrafting (I think that may be the only time in my life I have ever said that!).  This trend is so popular that is is not just in the papercrafting industry, but also in quilting, cake making, photography, and design.

Let’s take a look at this next fun project……

This is a hexagon covered monogram.  It is bright, fun and three dimensional….all good things, right?  The artist who created this project hand cut all of the hexagons from scraps of paper (talk about patience!).  I love the end result.

Project by Mareth @ www.limeriot.blogspot.com

Now I have a treat for all you quilters and seamstresses out there!  This next project is adorable.  If you are handy with a needle and thread, you can pull this off.  My daughter would love this!  I pulled this project from a really cute site called www.sewmamasew.com although the credit for the project on that site directed us to a blog, as listed below.

Project by Melissa @ www.allbuttonedup.typepad.com

I found this next three dimensional project (yes, I am back to paper again!) via Spellbinders.  I love Spellbinders!  It is a hexagon basket that was created using the Hexagon Petal Envelope die, which is meant to be used with the Spellbinders Grand Calibur die cutting machine.  Although I haven’t personally used any of the Grand Calibur dies, I would venture a guess that the die would work with other machines as well, as many others on the market can be used with multiple machines.

Project by Julie Overby @ www.spellbinderspaperarts.com

OK, my last project for you today is a cake!  A gorgeous cake!  I love how the hexagon shaped cakes look in this three tiered confection.  It looks good enought to eat!

Photo credit to www.theknot.com

Now on to the shopping!  I am going to spare you dozens and dozens of photos of paper after paper.  It is safe to say, hexagons are everywhere, and you can find them in just about any line these days.  If you need a bit more of a starting point, two specific lines where you will find a lot of hexagons in particular are Jenni Bowlin Studios and My Mind’s Eye.

Here are just a few samples of products that are out there……

This first photo is of a Sissix hexagon die cut.  As mentioned above, Spellbinders also has a hexagon die cut.  I am sure there are many others out there as well.  I also stumbled upon a photo of a Quickutz hexagon die online while doing my research.

Photo credit to www.fabric.com
For those of you who may be interested, there are coupons for this store here.

Next I have a hexagon mask from Studio Calico to share with you……

Photo credit to www.studiocalico.com

On to a few paper selections…….

Echo Park Everyday Eclectic Hexagon Paper – 12 x 12
Photo credit to www.bluemoonscrapbooking.com

More paper samples…these ones are from My Mind’s Eye…..

Photo credit to www.shimelle.com

I know that the digital scrapbooking movement is growing, so I didn’t want to leave you out of this conversation!  I came across several digital paper options featuring hexagons.  Here is one such sample below…..

Linda Tieu Design Digital Paper Pack
Photo credit to www.backtopaper.com

These hexagon shaped, nesting, three dimensional boxes are found on www.etsy.com

Photo credit to www.etsy.com

This hexagon punch is from Creative Memories…..

Photo credit to www.lisasworkshop.blogspot.com

These hexagon shaped stickers have a fun retro or vintage feel to them……

Sand Dollar Stickers
Photo credit to www.prettylittlestudio.com

These last two items are both free templates that you can find online.  You have a couple of options to use them.  You can print them out directly onto your patterned paper and then cut them out, or you can print them out on a heavy paper and then cut them out and use them as tracing templates.  Have fun playing with them!

Free Shaped Journaling Boxes With Writing Lines – hexagon
Courtesy of www.about.com

Rounded Hexagon Free Pattern
Courtesy of www.about.com

I really hope you have some fun exploring this recent trend.  It never ceases to amaze me how many creative people there are in the world!  See you next time!

2nd Preorder for Bundles of Calendars and Bundles of Notepads

note pad and tins

Over the last few weeks I’ve been getting a lot of emails asking about the bundles of calendars and notepads. I’m excited to announce that we will be doing a second preorder for the bundles of Note Pads and Calendars.

For those of you unfamiliar with the Calendar and Note Pad tins let me tell you a bit about them. Back in 2009, I found that I was always scrambling to find something to write on and write with – whether it was when I was at home on the phone trying to take a message, or out and about trying to make a note to myself or wanting to check my calendar. Inevitably when that would happen I never seemed to have a calendar or note pad handy!

That’s when I came up with a solution to my problem – a custom-designed Calendar & Note Pad Tin. I wanted something portable, durable, small and of course pretty. I couldn’t find anything like that…so I made it! I started with a 5 1/4″ x 5 1/4″ hinged CD tin and integrated some customized elements to make it a one-of-a-kind gift. Because I didn’t have a “Just a Note” stamp, I designed the ”Just a Note” greeting that you see on the front of the tin, on my computer.

I had the calendar that you see on the inside front cover of the tin (also shown below) custom-made so that it perfectly fit the inside of the tin. The calendars are 4 7/8″ x 4 7/8″. The font used for the months and the date match the font used for the “just a note” on the front of the tin.

calendar and tin

As you can see from the picture of the tin at the beginning of this post, and the picture below, I also had some note-pads custom designed to fit insite the tin. The notepads are 3 3/4″ x 4 3/4″. There’s 50 sheets on the notepad and the lines are black so they match with any color scheme.

calendars and tins

Please note that these are ALL pre-orders – we will be taking pre-orders until Monday October 1st at 11:59 EST.  The orders will start to ship the week of October 22nd.  Please note that International orders are not guaranteed to arrive before Christmas. Because everything is custom-designed and manufactured, I don’t want to order too many and end up with hoards left over, or too little, and then run out.

There is a lot of info in this post, so please be sure you read it all!  There is also an UPDATE below just added.

One of the things I do have to give you a heads up about is shipping. As we are located in Canada, the most “cost-effective” option for shipping is Canada Post. I use that term loosly because it’s still not cheap. The only methods of shipping we offer are small packet air (which I don’t really recommend because it is not trackable) and expedited – which is trackable, and the fastest method. We used to offer a small packet surface option, but ran into too many problems with it being waaaaaaay too slow (as in at least 4 weeks to the US), and not trackable.

I do want to assure you that we only charge you what we are charged. We do not mark up shipping. Because we are a small company with small volumes of shipping we don’t qualify for some of those great shipping volume discounts that bigger stores get. If perchance you are overcharged (which we will only know when we start shipping the packages out), we will re-imburse you the difference. Shipping in Canada is based on weight and package size. Because of the weight in particular, for most of you, shipping is probably going to start at about $12 – $15. What I have found though is that the more you get, the better the deal. So if you only want one of’s I would recommend ordering as a group (with a friend or a few friends). So please be prepared.

*For Stampin’ Up! Demonstrators wanting to offer this as a class: as we do every year, we also have a tin using the Stampin’ Up! products and we have a cost analysis sheet and suggested pricing for anyone who purchases the calendars or notepads.  Simply email us after placing your order and let us know you are a demonstrator, then we will send it to you. The suggested pricing will be assuming that the tins are being made using all SU product of course. I’d love it someone could do me a favour. There are a number of demos that have bought the calendar and note pad bundles every year. I can no longer announce it or let them know on the demo-only boards like Sudsol, and other yahoo groups, so if one of you could let those that might be interested know, I would appreciate it!

Here is the link to the SU version of the Tins (email us for the cost anyalysis sheet after placing your order):
https://blog.papercrafterslibrary.com/2013-calendar-and-note-pads-tin-stampin-up-version/

Here is the link to the regular version of the Tins:
https://blog.papercrafterslibrary.com/wp-admin/post.php?post=7540&action=edit

So here’s what we have:

Calendar Bundle Pre-order – $7 Each bundle has 5 calendars

calendar and tin

Note Pad Bundle Pre-order – $7 Each bundle has 5 note pads

calendars and tins


***********UPDATE***********

The calendar tins are SOLD OUT. We are sorry for any inconvenience, however, our regular supplier is sold out and we are trying to find an alternate solution.   If you have any questions, please fee free to email us at:  andrea@sunnystampin.com.


Once again, just a reminder, these are ALL pre-orders – we will be taking pre-orders until the end of Monday October 1st EST and then the orders will start to ship the week of October 22nd.

Project Ideas Newsletter Challenge: Fall Thank You

Welcome to the Project Ideas Newsletter Challenge. Every Monday, we will design a card, scrapbook page or 3D item. Your challenge – is to use our piece as inspiration and make it into a card, scrapbook page, or other project. You can use the layout, the colors, an element you like…it can look like our piece, or nothing at all like our piece. We want to see where YOU take this. This challenge is strictly a “work from your stash” challenge. This week, Tracy designed this Fall Thank You card.

As a newsletter subscriber you will have received a link to a private web page, from which you can watch the video tutorial. Please note that the video tutorial will be available for general viewing for one week only – and then will be moved into our library for our members only. In order to ensure you don’t miss any more of our Project Ideas Newsletter Challenge video tutorials, please be sure you sign up for our FREE email newsletter from the top right sidebar of this blog. If you didn’t receive the newsletter then please be sure to email us to confirm your subscription.

Every Monday, here on the blog, we’re going to post a picture of our project. You will have ONE week to upload your challenge piece. Instead of a weekly prize though, we’re going to award a prize monthly. So for each week you participate and each project you submit – you will get one entry into our monthly draw. On the first Monday of each month – we will announce one challenge winner, who will be featured as a guest designer on the Paper Crafter’s Library blog as well as our Facebook page. As a guest designer, we’ll feature your biography, some of your favorite paper crafting projects and we’ll link to your blog.

Here are the details on how you can participate in the Project Ideas Newsletter Challenge:

A new Project Ideas Newsletter video tutorial will be emailed out to newsletter subscribers every Monday (so make sure you are signed up). Then, here on the blog, we will post a picture of our project along with an Inlinkz button for you to enter your project. Here are the details:

•Work from your own stash to create a project based on the inspiration project provided – you can use any products you would like, and make any type of project you like – card, scrapbook page, album, 3D item etc.
•Post your project on your blog, in your gallery or on any other photo-hosting site (such as photobucket or flickr).
•Click on our inLinkz button below to add a link to your project for our challenge
•You will have until 7am, Monday, October 1st to add your link to the list to be eligible to win. You can enter as many times as you like.
•For each project you submit, your name will be entered into our monthly draw. The winner will be announced on Monday, October 1st.

Good luck to everyone and we look forward to seeing your projects!


May Arts Spotlight With Designer Jennifer Ingle

May Arts Logo

Today we have our monthly May Arts Designer!  After our successful May Arts week back in May, we asked them to come back with another Guest Designer each month for you. So, we’re so excited to have another designer from May Arts with us today.

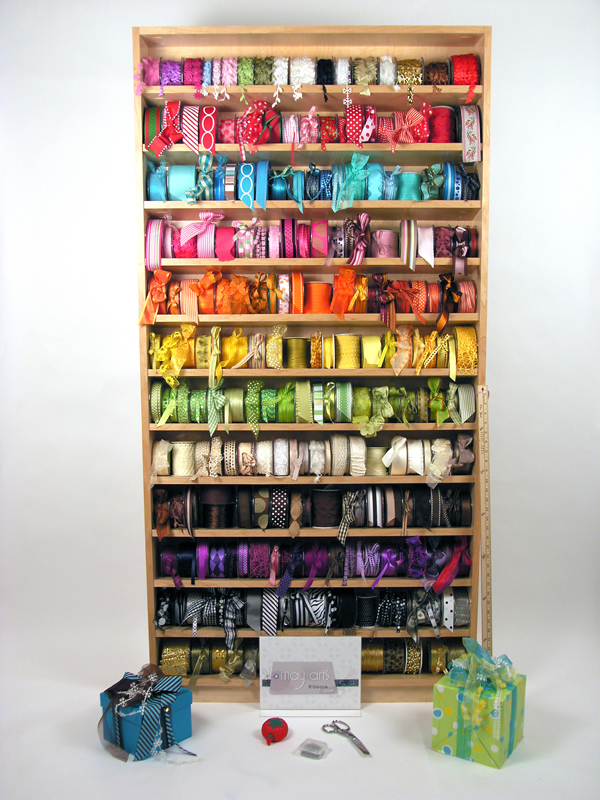
Here at Paper Crafter’s Library we’re ribbon lovers – you’ll find ribbon on almost all of our projects – which is why we’re so thrilled to bring you another fabulous May Arts project. You haven’t seen ribbon until you’ve seen May Arts Ribbon – they offer a multitude of different colors and styles of ribbon to suit any preference and taste – and all of it, top quality!

And, we also have a give-a-way for you!! Two lucky winners will receive a “winners choice” of 3 spools of Ribbon from May Arts. One winner will be drawn from all the comments left here on the Paper Crafter’s Library blog to win AND one winner will be drawn from all the comments left on the May Arts Blog to win.  You certainly have a lot to choose from:

May Arts Ribbon

Remember, each comment you leave is one entry, so be sure to visit today not only for the great project idea, but also to enter your name into our give-aways.

About May Arts

May Arts Ribbon was founded in the early 1980’s in Riverside, Connecticut. The original products were high-end silk flowers imported from Taiwan, which were decorated using quality ribbons. The decorative ribbons proved so popular among customers that the business gradually evolved into a dedicated ribbon wholesaler.

As a family-owned and operated business, May Arts began a long-standing tradition of quality, affordability and exceptional customer service. We are dedicated to carrying on this same tradition by offering high quality products at competitive prices. Our friendly, knowledgeable staff is always happy to answer your questions or to assist you in placing your order.

May Arts carries a wide selection of quality ribbons to choose from; such as grosgrain, silk, satin, burlap and a variety of prints and patterns. All inventory is held in stock, so we can ship orders out right away—typically the same day.


Where to Buy May Arts Ribbons

The May Arts website is their wholesale site for online and brink and mortar retailers. We’ve linked to it so that you can easily view their entire product line in one place. There are numerous places where you can purchase May Arts Ribbons including many local scrapbook stores as well as online stores. Two of the online stores that carry the biggest selections that we are aware of include Amazon, who carry the complete May Arts Ribbon Line (plus you can qualify for free shipping). Click on the link we provided and it will take you to our May Arts Ribbon Search Results. To find a particular ribbon, go to the May Arts website, find the name of the ribbon and color and then enter that into your Amazon search results. Please note that through Amazon you’re buying by the roll. Most other online and local scrapbook stores sell May Arts Ribbon by the yard. One of the online stores that carries a great selection is Ribbon Carousel.

May Arts Design Team Project

Today we have with us May Arts Designer Jennifer Ingle. You will find her project below, but first here is a little bit about Jennifer:

My name is Jennifer Ingle aka…. Jingle.  I am me.  I am a wife.  I am a daughter. I am a sister.  I am a friend.  I am an artist.  I am a crafter.  I laugh.  A lot.

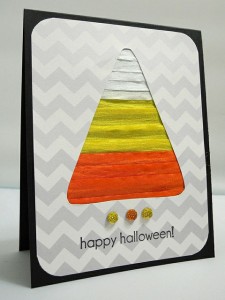
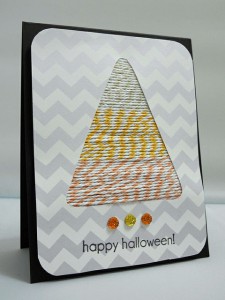
For the projects below, I love how the two looks are so different and yet both use the exact same basic technique with just a twist in supplies!  There are so many possibilities!  To see more of my work, feel free to visit me at my blog, Just Jingle!

Enjoy!

Halloween Candy Corn Cards


Supplies Used:

May Arts Bakers Twine – 412-27, 412-28, 412-02

May Arts Solid/Wrinkled Ribbon – EA27, EA28, EA01

Lawn Fawn Bright Side 6×6 pad

Gem Accents by Queen and Company

Tombow Power Bond

Tombow Foam Tabs

Black cardstock

Happy Halloween Stamp by Gourmet Rubber Stamps


Instructions:

It’s always fun to find new twists on great ideas!  Today I’m showing you two ways to make the same basic card design using wonderful twine and ribbon from May Arts!

To create the cards, begin by creating two card bases from black cardstock.  Trim a patterned paper panel to layer on top of the cards.  Use a pencil to sketch out a candy corn shape on the back of the patterned paper panels and then cut out.  You will use the negative for this, so be sure to leave it in tact.  Using Tombow Power Bond adhesive, run tape along the edges of the candy corn shape on the back of the patterned paper.  Place strips of ribbon from one side to the other over the adhesive for the ribbon card.

For the twine card, start the twine at the bottom and work on LONG piece back and forth until you are done with that color.  Move from Orange to yellow and then to white on each card.  Stamp the Happy Halloween sentiment on the bottom of each panel and then adhere them to the card bases with foam tabs.  Add the gem stones for a bit of sparkle!

We hope you have enjoyed today’s projects.  We want to extend a sincere thank you to Jennifer Ingle for sharing her creations with us.  And don’t forget to enter to win one of the great ribbon give-a-ways from May Arts.  Please leave your comment below. Also, be sure to stop by the May Arts Blog when you see the Paper Crafter’s Library post published for another chance to win, and tell them Paper Crafter’s Library sent you! Winner will be announced next week!

Fall Blessings Video Tutorial

This week has been a very trying week in the stamping studio.  Some of you may know that Karen (our computer girl/office manager) was having surgery. What we did not expect was that it could be bumped up 6 weeks early.  Karen is doing well and we are surviving without her for now….Here are a few of the projects that Andrea and I came up with this week. 


Fall Blessings

Last week I resurrected an older technique – the spotlighting technique.  I had so much fun creating that card, that I decided to re-visit another technique I hadn’t done in a while…the kissing technique was an old favorite of mine.  The leaf images for this card were first kissed with a script background stamp and then stamped onto Vanilla CS.  This is a great technique for adding more texture to your solid image stamps. 

Download the pdf handout here

Supplies:

Stamps: Leaf Prints, Fall Elegance (papertrey ink); Reflections (Tim Holtz)

Ink: More Mustard, Pumpkin Pie, Cherry Cobbler, Old Olive and Early Espresso Classic inks (Stampin’ Up!); E79 Copic marker (Copic)

Paper: More Mustard CS, Crumb Cake CS, Very Vanilla CS (Stampin’ Up!); Java CS (Bazzill)

Accessories: bone folder, paper snips, Stampin’ Dimensionals, basic rhinestones (Stampin’ Up!); Latte Metallic Maya Mist (Maya Road); Tape Runner XL (thermo-web)


Owl Thanks

Last week Andrea mentioned that she had been having fun coloring with her Copic markers.  This Owl Thanks card is one of the cards she created.  The owl image was stamped onto White CS, colored in with various shades of brown and yellow copic markers, cut out and placed on the card. 

We have a video tutorial and pdf for our members here. (You must be logged in to view the page)

Supplies:

Stamps: Chit Chat, Chubby Chums (Paper Smooches);

Ink: Tuxedo Black Memento ink (Tsukineko); E31, E35, E37, E47, Y11, Y13 and Y18 Copic markers (Copic)

Paper: Crumb Cake CS, Early Espresso CS (Stampin’ Up!); Take Note 6” x 6” paper pack (Studio Calico)

Accessories: bone folder, Stampin’ Dimensionals, Craft scissors (Stampin’ Up!); Chocolate baker’s twine, button (papertrey ink); Tape Runner XL, medium glue dots (thermo-web); tape (Scotch)


Have a great weekend!

Technique Thursday: Fall Fun Pumpkin Mini Album

The weather in our area is starting to turn a little cooler and that means fall is coming soon.  With the onset of fall there are so many things our family does together.  One thing we like to do in the fall is go apple picking.  Since I have a bunch of pictures of our apple picking excursions, I decided to create a mini album that I could put those photos into. This super cute Fall Fun Pumpkin mini album, featuring an exclusive printable pumpkin template is what I came up with.  This album has been designed to hold  up to 15 photos and several journaling pieces.  What a great way to preserve your memories from any fall activities: apple picking, corn mazes, wagon rides, thanksgiving and halloween just to name a few.

We have a video and pdf handout available for our members here. (You must be logged in to view the page)


Graphic 45 Spotlight With Designer Jim Hankins

Here is the latest installment of our Grahpi 45 Guest Designers. Many of you may remember that back in April we hosted a Graphic 45 Week on the Paper Crafter’s Library Blog. It was week filled with projects and inspiration using Graphic 45’s Tropical Travelogue Collection. We had such a great experience partnering with Graphic 45 and their design team, and such a great response from you, that we’ve decided to partner with them on an ongoing basis. The first and third week of every month one of the Graphic 45 Designers will share a project they’ve created here on the PCL Blog. We started with our monthly designers in June and before I introduce you to our latest Designer, I just wanted to take a minute to re-introduce Graphic 45 for those of you that may not be familiar with the company.

Graphic 45 is an award-winning scrapbook and paper crafting company­— owned and operated by a mother and her two daughters.

Diane Schultz (pictured center)—Designer and CEO (aka mother)

“I’m passionate about being creative and eager to make it possible for others to find their creative voice. My background includes stints as a designer for, McCalls, Simplicity, Vogue/ Butterick, Mattel Toy Company and a host of other jobs that each, in some way, led me to what I do now. At 45 I went back to school and got my degree in graphic design— I named the company to celebrate that achievement.”

Aimee Filimoehala (pictured left) —Director of Operations

“I wear a lot of hats and love it that way. Business, marketing, operations, etc. have made me a pro at multitasking (aka juggling‑figuratively and literally). When we launched Graphic 45 just three years ago we had no idea what was in store, working together as a family has been an amazing journey that we all feel so grateful to be apart of.”

Charee Filimoehala (pictured right)—Director of Customer Service and Design Team Coordinator

“I joined the team a little over three years ago and haven’t looked back…what a life-changing experience this has been. I love working with and around creative people and products (not to mention I like my co-workers quite a bit). I spend my days working with our friendly stores and talented design team…the occasional trip to a workshop or tradeshow pretty nice too.”

Together we create vintage inspired crafting products that capture the flamboyant style of the 1920’s and 30’s – with vibrant color, irresistible texture and imaginative design to create products with decades-old appeal that’s both fresh and familiar. Let our products inspire your next scrapbook layout, card, album or home decor project.

***********

Here’s a picture of their booth at the CHA show which absolutely blows us away every year! The artwork inside is absolutely stunning and totally unique. At the last show as we were speaking with Diane she told us that many of the altered pieces were vintage finds which she and her team transformed with their gorgeous Graphic 45 products. We can’t wait to stop by their booth at the Chicago CHA and see what they’ve got in store this year!

Here’s a picture of the Graphic 45 team – they’re always dressed in period costumes to complement the themes in their collections – every day of the show brings a new set of costumes. The ones shown below were for their Little Darlings collection.

Graphic 45 Designer Jim Hankins

Our next Graphic 45 Guest Designer for this month is Jim Hankins who is part of the 2012 Graphic 45 Design Team. Jim is a new guest designer for Paper Crafter’s Library.  You can view his blog here: http://thegentlemancrafter.blogspot.com/.  His project is just fabulous and we are so excited to share his project with you today.

You can see Jim’s fabulous project below, but first, here is a little more about Jim:

Jim, The Gentleman Crafter.  Father to many dogs and ducks and a cat named Buzzy out on a farm in  Granger, Texas.

I love to use my hands and mind to create anything!   Mainly 3 dimensional art!! There is nothing I love better than sitting down with a fresh roll of Scor-tape and some chipboard!

You never know what will happen!


Fast and Easy Graphic 45 Happy Haunting Bat Treat Box by Jim Hankins

This is a fast and easy project made from the Graphic 45 Happy Haunting Collection, an oval paper mache box, some paint and glue.  In less than 30 minutes you can have a treat for your special Halloween Trick or Treaters.

To help make this project a bit easier, I’ve included a template for the wings and head.  Simply Click Here.

Supplies Used:
Graphic 45 Happy Haunting 12 x 12 Paper Collection
Graphic 45 Happy Haunting Die-Cut Tag
(2) Graphic 45 Stamped Metal Brads
3 inch oval paper mache box from the craft store
(1) Decorative Halloween Brad
Black Craft Paint
White Craft Paint
Barn Red Ditress Marker
Black Distress Marker
Glossy Accents

Preparing The Pieces-
Step 1: Prepare the oval paper mache box by painting it with black paint.

Step 2: Print out the template for the bat wings and headpiece.  Next, use the template as a guide and trace around the wings and head onto your patterned paper.  The next thing is to cut the pieces out.  Distress edges if desired.

Step 3: Trace around the outside shape of the box with a pencil onto patterned paper and cut out.  Using this cut piece as a template cut out another piece the same size.  These two pieces will be for the inside of the box and will need to be trimmed slightly to fit inside.   As you did above, trace around the lid of the box and cut this piece out.  It will go on the top of the lid.  Note:  These cut oval pieces will be two different sizes as the lid is a bit larger.  Distress edges if desired.

Step 4: From patterned paper cut out two strips of patterned paper to 1-1/4 x 9-inches .  Next, cut a smaller strip to 3/8 x 10 -inches.  The larger strips cover the outside and inside sides of the box.  The smaller strip covers the outside rim of the lid.

Step 5: Preparing the spooky bat eyes…Using two of Graphic 45’s metal stamped brads, try to use the brads with raised center that are not stamped with the floral design.  These look more like spooky eyeballs!  

First, with a needle nose plier, remove the brad legs from the brad.  Next, paint the brad with white craft paint.  Allow to dry.  Next use you’re a red distress marker or similar and color in the recessed portion of the brad.  Using your black distress marker or similar, color on the top portion of the brad forming the pupil.  Allow to dry.  Last, apply glossy accents to the top surface of the brad for a more realistic spooky eye.  Allow to dry.  Don’t worry if the surface and inks looks mottled, it makes it more fun!

Putting It Together-

It’s time to put the bat together…

Step 1: Apply adhesive to the backsides of the smaller oval pieces and place on the inside of the box.  Next, apply adhesive to the side strips and adhere to the inside and outside sides of the box.  The ends with overlap slightly which is OK.  Last, adhere the small 3/8-inch strip to the outside rim of the box.  Set aside the larger oval piece for latter in the tutorial….

Step 2: Apply wet glue to the bottom center of the box and adhere to middle of the precut wings.

Step 3: Apply wet glue to the backside of both the brad eyes and adhere to bat headpiece.  This is where you can give the bat more character.  It’s fun to see how the simple placement of the eyes can make the bats face either whimsical or spooky!

Step 4: Place adhesive to the backside lower half of the bat head and adhere to front side of lid.

Step 5: Adhere the reserved larger oval piece on top of the lower portion of the bat head and the top of the oval box lid.


Step 6: With a piercing tool, pierce a hole through the box lid ½-inch in and a ½-inch up from the bottom left side of the box.

Step 7: Insert a decorative brad through the Graphic 45 Chipboard die-cut tag and down into the newly formed hole in the lid.  Fold the brad legs back against the inside of the lid.

Bend the wings one on top of the other and around to the top of the lid.  Slide the tag up to hold the wings in place.

This step is optional.  I took the brad legs that were taken of the metal stamped brads and bent them around with a round nose plier and adhered them as feet to the bottom of the box.

Place sweet treats inside the container, write a special message on the inside of the wings and you’ve done it!!!!

We hope you have enjoyed this Halloween creation from Jim. I would also like to extend a warm thank you to Gloria for sharing yet another fabulous project with us! Please take a minute to stop by Jim’s blog and of course the Graphic 45 blog to check out all their amazing creations!

Trendy Tuesday – Chunky Glitter

Trendy Tuesday – All that Glitters…
by Katherine Elliot

 “All that glitters is not gold, ” is a true statement in the papercraft world.
And what glitters may not even be glitter…
but today we”ll focus on some chic stuff that can turn your
basic project into something truly lustrous. 

True glass glitter is made up of tiny, thin shards of glass (careful, these bits can be sharp!).  Vintage glass glitters can tarnish or fade over time to add additional charm.  Other forms of chunky glitter are made of plastic or other synthetic materials, or mica, a mined flaky mineral.    Whatever type you prefer, glitter comes in a large variety of colors and grit.  With lots of options, you”ll surely find that glitter is not just for Christmas any more.  Take for instance these sparkling Halloween theme projects… 

Pumpkin Fence card with a mix of Stampendous glitter, mica flakes, etc. by Jan Garber, image source  Scrap”n Surprise

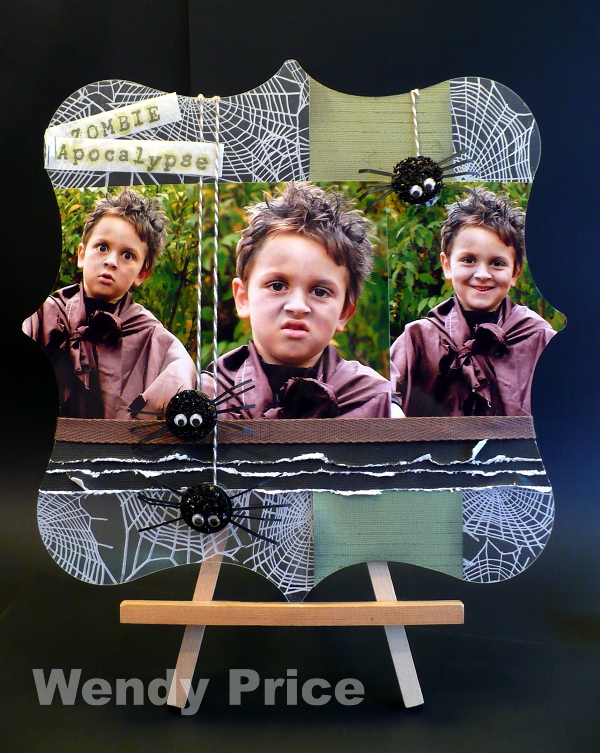
Black chunky glitter (along with twine & googly eyes) sure make the spiders
on this page seem a lot cuter than the real ones
!

Zombie Apocalypse scrapbook page by Wendy Price with Stampendous black glass glitter,  image source Paper, Ink and Smiles

There are many color options in the Stampendous line of Fran”tage crushed glass glitter and chunky mica flakes called Fragments.  The flakes make great additions to a variety of projects including cards, scrapbook pages, home decorations, and handcrafted jewelry. 


Stampendous glass  glitter and mica fragments , image source Stampendous.com 

Pendant with Fran”tage Fragments by Tenia Nelson, image source Jazzy Paper Designs 

A traditional glass glitter from Stampin” Up! was used below for a
beautiful addition to this very elegant birthday card. 

Birthday card by Andrea Ewen, image source Ewen Style

 Champagne Glass Glitter - by Stampin

Stampin” Up Champagne glass glitter, image source Stampin” Up!.com

Several other brands of chunky glitter are available.
Most brands have a variety of  grit as well as a variety of traditional metallic,
bright or pastel colors.
The glitter may be sold in sets and/or available in individual selections of a single color.

*Doodlebug CHUNKY SUGAR COATING GLITTER 12 Colors Sparkle Embellishment

Doodlebug Chunky Sugar Coating glitter, image source Simon Says Stamp

German Glass Glitter & image source from Kristal Arts Studio

Wonderfall Card (1 of 1)

Card by Melissa Samuels, image source Art of Scrapbooking

 Chunky glitter can be used to cover an element in its entirety for beautiful texture and glitz.  For coating an element with glitter, use a liquid glue that dries clear, then sprinkle the glitter on, lightly press it in, then tap off any excess.  Don”t forget to leave plenty of dry time.

Dream Tag by Lisa Pace,  image source It”s in the Details

Cherished Friend card, image source Stephinka

Glitter can also easily highlight a feature or precise line on a project.  A line of sticky adhesive or tape helps you press the glitter onto the precise area you desire.

GD Happiness

 Watermelon card by Laurie Schmidlin, image source Just Give Me Stamps

*Art Institute Glass Glitter 3 OZ SHARDS KRYSTALLOS 901 Clear White Vintage

Barbara Trombley”s Clear White Vintage glass glitter, image source SimonSaysStamp.com

  Of course, vintage glass glitter also looks great on vintage style projects.


 For Baby card by Melissa Phillips, image source Emma”s Paperie

Melissa Frances Glass Glitter, Pure Silver

Melissa Frances glass glitter, image source Ellen Hutson.com

Try hard as I might, I cannot stop myself from adding an example of a lovely chunky glitter Christmas card…

Ornament card by Joanne Travis, image source Sleepy in Seattle

 Go ahead, try a little or a lot.  Save the leftovers to create your own custom blend of sparkles and have fun with it.  Hope you get a chance to add a little sparkle to a project you are working on… Happy Crafting!

Project Ideas Newsletter Challenge: Sweet Pea Card

Welcome to the Project Ideas Newsletter Challenge. Every Monday, we will design a card, scrapbook page or 3D item. Your challenge – is to use our piece as inspiration and make it into a card, scrapbook page, or other project. You can use the layout, the colors, an element you like…it can look like our piece, or nothing at all like our piece. We want to see where YOU take this. This challenge is strictly a “work from your stash” challenge. This week, Soph designed this Sweet Pea card.

As a newsletter subscriber you will have received a link to a private web page, from which you can watch the video tutorial. Please note that the video tutorial will be available for general viewing for one week only – and then will be moved into our library for our members only. In order to ensure you don’t miss any more of our Project Ideas Newsletter Challenge video tutorials, please be sure you sign up for our FREE email newsletter from the top right sidebar of this blog. If you didn’t receive the newsletter then please be sure to email us to confirm your subscription.

Every Monday, here on the blog, we’re going to post a picture of our project. You will have ONE week to upload your challenge piece. Instead of a weekly prize though, we’re going to award a prize monthly. So for each week you participate and each project you submit – you will get one entry into our monthly draw. On the first Monday of each month – we will announce one challenge winner, who will be featured as a guest designer on the Paper Crafter’s Library blog as well as our Facebook page. As a guest designer, we’ll feature your biography, some of your favorite paper crafting projects and we’ll link to your blog.

Here are the details on how you can participate in the Project Ideas Newsletter Challenge:

A new Project Ideas Newsletter video tutorial will be emailed out to newsletter subscribers every Monday (so make sure you are signed up). Then, here on the blog, we will post a picture of our project along with an Inlinkz button for you to enter your project. Here are the details:

•Work from your own stash to create a project based on the inspiration project provided – you can use any products you would like, and make any type of project you like – card, scrapbook page, album, 3D item etc.
•Post your project on your blog, in your gallery or on any other photo-hosting site (such as photobucket or flickr).
•Click on our inLinkz button below to add a link to your project for our challenge
•You will have until 7am, Monday, September 24th to add your link to the list to be eligible to win. You can enter as many times as you like.
•For each project you submit, your name will be entered into our monthly draw. The winner will be announced on Monday, October 1st.

Good luck to everyone and we look forward to seeing your projects!


Nature’s Discovery Video Tutorial

My family and I are finally starting to settle into our school rountines.  The kids are just loving school and with all five kids in school this year, it gives me a lot more time in my studio! I have been having so much fun coloring and experimenting with my Copic markers this week.  Make sure to check back for more projects and techniques, using Copic markers, coming soon!


Nature’s Discovery

Resurrecting old techniques in your paper crafting usually helps when keeping things simple or helping you out of a creative slump. Tracy uses the Spot lighting technique in the creation of this card.  Just take a your favorite stamped image and add a punched out highlight of one small area of the image and voila you have this simple and beautiful card.

Download the pdf handout here

Supplies:

Stamps: Nature’s Discoveries (Tim Holtz – Stamper’s Anonymous); Through the Trees (papertrey ink)

Ink: Early Espresso Classic ink, Daffodil Delight Classic ink (Stampin’ Up!);

Paper: Crumb Cake CS (Stampin’ Up!); Java CS, Smooth Ivory CS (Bazzill)

Accessories: bone folder, paper snips, 1 ½” Circle punch, 1 ¾” Circle punch, Stampin’ Dimensionals (Stampin’ Up!); Tape Runner XL (thermo-web)


Thank You From The Bottom Of My Heart

I absolutley love May Arts ribbons! And what is not to love. They have created gorgeous ribbons with fabulous patterns in the most amazing colors!  I drew inspiration for the creation of this card from my ribbon colors which reminded me that Fall is just around the corner.  I added a simple greeting label and coordinating leaf embellsihments, which in my opinion adds a softened look to this card, letting the ribbons shine through!  I hope that you find inspiration in this piece!

We have a video tutorial and pdf for our members here.  (You must be logged in to view the page)

Supplies:

Stamps: From My Heart, Day of Gratitude (Stampin’ Up!); Leaf Prints (papertrey ink)

Ink: Early Espresso Classic ink, Pumpkin Pie Classic ink, Cherry Cobbler Classic ink, Summer Starfruit Classic ink (Stampin’ Up!)

Paper: Crumb Cake CS, Early Espresso CS (Stampin’ Up!)

Accessories: bone folder, Woodgrain embossing folder, Framelits – Window Frames, paper snips (Stampin’ Up!); Big Shot (Sizzix); Yellow ⅝” Grosgrain/Dots ribbon, Orange ⅝” Grosgrain/Dots ribbon, Red ⅝” Grosgrain/Dots ribbon (May Arts); Tape Runner XL, 3D Foam (thermo-web); Tombow multi-purpose liquid adhesive (Tombow); Removable Tape Matte (Scotch)


Have a great weekend!