Technique Thursday: Make A Wish Paper Piecing Card

Now that Club 52 is officially over, we’ve decided to dedicated Thursdays to a variety of different things – things like techniques, 3D items, scrapbook pages, the occasional mini album, maybe even an altered art, art journaling or mixed media piece!

Make A Wish

The bright colors in this projuect just lifted my mood while creating this card. I love the technique with the paper peicing of the die cut image. The Designer Paper makes the perfect background for any simple greeting with minimal embellishments! I hope that you have just as much fun paper peicing with this technique as I did!

We have a video and pdf handout available for our members here.  (You must be logged in to view the page)


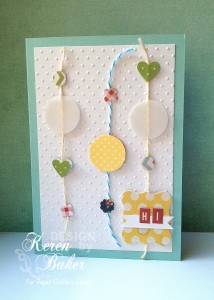
September Design Team Project: Garland Card by Keren Baker

 Hi Everybody!

Today’s my day at the Paper Crafters Library and my project  is based on a trend that seems to be gaining popularity. The bunting craze which has swept the crafting world off its feet looks like it might have some competition. I guess you could say that its simply bunting but vertical ! It’s another way of using up little scraps of all your favourite patterned papers and when combined with twine, makes a quick and easy card useful for most occasions.

If you want to see the video to check out how to make it, go to the video section of the website where you’ll see this weeks other projects too.

If you’re not a member, don’t worry, there are some great freebie video tutorials that’ll give you a tiny taster of the 100’s and 100’s of videos to view as a member. Check out here to see why its worth joining our fantastic community.

Hope you get time to be creative today! Check out my blog for more inspiration! See you next month.


Celebrating STAMPtember with Simon Says Stamp

It’s STAMPtember at Simon Says Stamp – and if you haven’t already stopped by their blog to check out all the fantastic project ideas and tutorials, I encourage you to do so.  I’m honored to have been invited to participate their STAMPtember event, and wanted to share with you a bit about Simon Says Stamp and STAMPtember, as well as the projects I created for their blog (video tutorials for those projects will be coming soon for Paper Crafter’s Library members. 

Simon Says Stamp was founded in 2002 with an interest in exclusively selling rubber stamps. It didn’t take long until we realized we couldn’t stop there. Over the past 10 years we celebrate rubber stamping in its full glory by giving access to people around the world to a one stop shop. Rubber stamps still remain the heart of our business and we are celebrating by hosting a “STAMPtember” ™ event intended to inspire, educate, and celebrate the greatness of rubber stamping. Part of the enticement of rubber stamping is that stamps can be used in creating or complementing ANYTHING! From stamping dates on bank documents and postage parcels in the early 18th century, rubber stamping has dramatically expanded to include card making, scrapbooking, mixed media and many forms of altering and expressing art.

For my projects I decided to focus on a Back To School theme and incorporate coloring with Copic Markers.  I created three projects in all:

Thanks So Much Card

Supplies:

Stamps:  Caterpillar (11025MC – Inky Antics); Chit Chat (OCS041 – Paper Smooches)
Ink: Tuxedo Black Memento (Tsukineko)
Copic Markers: YG11, YG13, YG17, R11, R14, R17, R37, E13, E15, E18
Paper: White 110 lb CS (Papertrey Ink); Ebony CS (Bazzill)
Accessories: Red Baker’s Twine (Twinery), Red Button (9 to 5 Buttons, October Afternoon)

Teacher We Appreciate You Card

Supplies:

Stamps: Caterpillar (11025MC – Inky Antics); Teacher’s Apple (Papertrey Ink)
Ink: Tuxedo Black Memento (Tsukineko)
Copic Markers: YG11, YG13, YG17, R11, R14, R17, R37, E13, E15, E18, C0, C1
Paper: Cardinal CS (Bazzill); White CS (Papertrey Ink), Vanilla CS (Stampin’ Up!); Take Note 6″ x 6″ Paper Pack (Studio Calico)
Accessories: Red Baker’s Twine (Twinery), Red Button (9 to 5 Buttons, October Afternoon)

Thanks Ever So Much Card

Supplies:

Stamps:  Caterpillar (11025MC – Inky Antics); Pretty Phrases (FBS003 Paper Smooches)
Ink: Tuxedo Black Memento (Tsukineko)
Copic Markers: YG11, YG13, YG17, BG000, BG01, BG05
Paper: White 110 lb CS (Papertrey Ink)
Accessories: Red Baker’s Twine (Twinery)

You can buy most of the supplies I used for these cards from the links at the bottom of THIS post.  Don’t forget to check out all the other great projects while you’re there!

Project Ideas Newsletter Challenge: Happy Fall Tree Card

Welcome to the Project Ideas Newsletter Challenge. Every Monday, we will design a card, scrapbook page or 3D item.  Your challenge – is to use our piece as inspiration and make it into a card, scrapbook page, or other project. You can use the layout, the colors, an element you like…it can look like our piece, or nothing at all like our piece. We want to see where YOU take this. This challenge is strictly a “work from your stash” challenge.  This week, I designed this Happy Fall Tree card.

As a newsletter subscriber you will have received a link to a private web page, from which you can watch the video tutorial. Please note that the video tutorial will be available for general viewing for one week only – and then will be moved into our library for our members only. In order to ensure you don’t miss any more of our Project Ideas Newsletter Challenge video tutorials, please be sure you sign up for our FREE email newsletter from the top right sidebar of this blog. If you didn’t receive the newsletter then please be sure to email us to confirm your subscription.

Every Monday, here on the blog, we’re going to post a picture of our project. You will have ONE week to upload your challenge piece. Instead of a weekly prize though, we’re going to award a prize monthly. So for each week you participate and each project you submit – you will get one entry into our monthly draw. On the first Monday of each month – we will announce one challenge winner, who will be featured as a guest designer on the Paper Crafter’s Library blog as well as our Facebook page. As a guest designer, we’ll feature your biography, some of your favorite paper crafting projects and we’ll link to your blog.

Here are the details on how you can participate in the Project Ideas Newsletter Challenge:

A new Project Ideas Newsletter video tutorial will be emailed out to newsletter subscribers every Monday (so make sure you are signed up). Then, here on the blog, we will post a picture of our project along with an Inlinkz button for you to enter your project. Here are the details:

•Work from your own stash to create a project based on the inspiration project provided – you can use any products you would like, and make any type of project you like – card, scrapbook page, album, 3D item etc.
•Post your project on your blog, in your gallery or on any other photo-hosting site (such as photobucket or flickr).
•Click on our inLinkz button below to add a link to your project for our challenge
•You will have until 7am, Monday, September 17th to add your link to the list to be eligible to win. You can enter as many times as you like.
•For each project you submit, your name will be entered into our monthly draw. The winner will be announced on Monday, October 1st.

Good luck to everyone and we look forward to seeing your projects!


Just Because Buttons Video Tutorial

Wow this week has been a bit crazy! My children are all back to school. We thrive with a somewhat flexable routine. The mornings are a bit busier than summertime mornings but everyone seems to be reajusting to school again.  This makes me very happy!

Just Because Buttons 

This card is a simple card that uses a few scrap peices of designer paper. I absolutely love creating cards and scrap pages that use up all the bits and pieces of designer papers or ribbons that I just can not part with.  With the additon of a simple greeting the card just came together. I hope that you enjoy ths creation.

Download the pdf handout here

Supplies

Stamps: This Is Big (Hero Arts)

Ink: Jet Black Archival ink (Ranger)

Paper: River Rock CS, Old Olive CS, Island Indigo CS (Stampin’ Up!); Ebony CS (Bazzill); Memoir Collection DP (Studio Calico)

Accessories: bone folder, mini glue dots, craft scissors, Stampin’ Dimensionals (Stampin’ Up!); Tape Runner XL (thermo-web); Black Zipper trim (Maya Road); red liner tape (Simon Says Stamp); 9 to 5 buttons (October Afternoon); Black Jute (May Arts)


Fancy Friend

This card uses a few of my favorite colors of Tim Holtz Distress inks. The mixture of color adds a softened background for a simple dimensional greeting.  This is a great technique to use with your favorite color combinations!

FancyFriendCard

Members can view the video and download the pdf handout here. (You must be logged in to access the page)

Supplies

Stamps: Mat Stack 2 (papertrey ink)

Ink: VersaMark ink (Tsukineko); Tumbled Glass, Worn Lipstick, Mustard Seed and Peeled Paint Distress inks (Ranger)

Paper: Aqua Mist CS (papertrey ink); Ebony CS, Smooth Vanilla CS (Bazzill); First Edition DP (Stampin’ Up!)

Accessories: 1 ¼” Circle punch, Curly Label punch, embossing buddy, Stampin’ Dimensionals (Stampin’ Up!); ink blending tool, Heat It! tool (Ranger); Primary Ebony Superfine embossing powder (WOW! Embossing); black gems (Hero Arts); Black ⅛” Velvet ribbon (May Arts); Tape Runner XL (thermo-web); Mini Fancy Frames template (Crafter’s Workshop); Removable Tape Matte (Scotch)


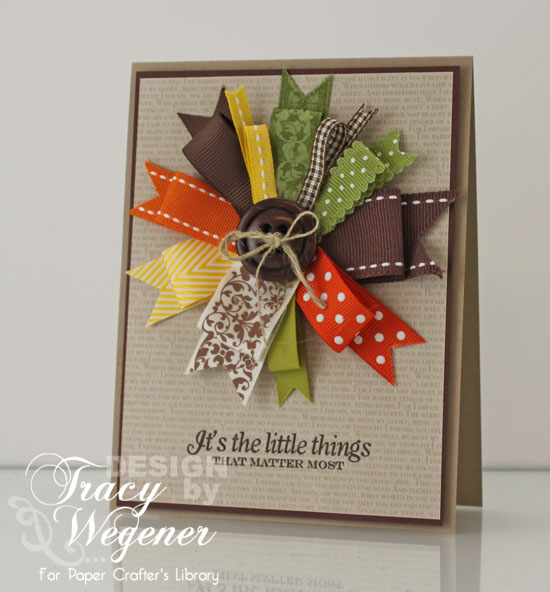
Technique Thursday: Ribbon Bow Embellishment

Now that Club 52 is officially over, we’ve decided to dedicated Thursdays to a variety of different things – things like techniques, 3D items, scrapbook pages, the occasional mini album, maybe even an altered art, art journaling or mixed media piece!

Today’s card is one that I created using all of those left-over bits and pieces of ribbon that I just couldn’t bear to part with.  I used a combination of different colors, widths and patterns of ribbons from a variety of different manuacturers including May Arts, Stampin’ Up! and Papertrey Ink.  The inspiraton for this card and the ribbon technique I used came from one of the special card making issues that Paper Crafts Magazine puts out every month – I look at so many, that off the top of my head, I don’t remember which issue.

We have a video and pdf handout available for our Paper Crafter’s Library members here. (You must be logged in to view the page)

Supplies:

Stamps: Gratitude Journal (Stampin’ Up!)

Ink: Early Espresso Craft ink (Stampin’ Up!)

Paper: Crumb Cake CS, Chocolate Chip CS, Stack – Neutrals Collection DP (Stampin’ Up!)

Accessories: bone folder, Craft scissors, mini glue dots, Daffodil Delight ¼” Grosgrain Stitched ribbon, Chocolate Chip ⅝” Grosgrain ribbon, Chocolate Chip 1” Double Stitched ribbon, Old Olive ½” Scallop Dots ribbon, Masterpiece Originals ribbon, 1 ½” Circle punch, ¾” Circle punch, Sweet Stitches Big Designer Buttons, linen thread, Stampin’ Dimensionals (Stampin’ Up!); Simply Chartreuse Top Notch Twill Tape, Orange Zest ⅝” Saddle Stitched ribbon (Papertrey ink); Orange ⅝” Grosgrain/Dots ribbon, Yellow ¾” Twill/Stripes ribbon, Brown ¼” Solid Check ribbon (May Arts); Fabulous ribbon collection (Chatterbox); hot glue (Martha Stewart); Tape Runner XL (thermo-web); Clear Gloss embossing powder (WOW Embossing); Heat It! tool (Ranger)


Trendy Tuesday – Mustaches

Trendy Tuesday – Silly Mustaches
by Katherine Elliot

I “mustache,” have you seen these images lately? 

 Now, I know it”s not a new trend, just one of those trends not yet going away.  Searching for the origins of  the “mustache on a stick” craze, very popular at party photo booths, hasn”t given me any more insight, but I have to admit these easily can bring a smile to your face.

Mustache cards make great “man cards”.  Even if your husband or dad doesn”t look like Magnum P.I. (that”s showing my age, I know), they”ll probably still enjoy a happy, hairy greeting.

Father”s Day Card from Kerry”s Craft Shop, image source:  Kerry”s Craft Blog

 If you are not familiar with a “mustache on a stick,” then take a look at these… These make fun party pic props.  I can see lots of  fun, silly photos & a joyful scrapbook layout using these, can”t you?

6875635578 2b123a47d7 A Mustache Baby Bash!

See more mustache party theme pics and this image at Paper Crafts Connection  

 It”s super easy to make your own party mustache props with paper, sticks and glue.  The site I found below has easy instructions and some mustaches ready to print and cut out.

Instructions, more mustache crafts & image source from Kimberly Farris 

If you”re not planning on donning a fake soup strainer any time soon, then you may just enjoy a few more mustache cards.   A mustache can be added to any existing stamped image you have, like the little fuzzy felt added on the bear below.  He sure looks cute with that extra bit of lip fuzz, doesn”t he? 

Fuzzy Felt Mustache bear card by Julie Masse, image source from Stampin with Julie

In Julie”s card above, she used a die for the “stache.  Yep, that”s right.
The images are popular enough The Cats Pajamas company even has mustache dies
(Julie”s card also uses The Cats Pajamas Honey Bear stamp set).

Mustaches

Cut Ups dies image source  The Cats Pajamas

A variety of stamp sets with the mustache theme are relatively easy to find.

What”s Growing On stamp set by My Creative Time featured above, image source

 Oh my,  there”s even mustache patterned paper!  Check out this card and the products Angie Blom used to create it…

Pinned Image

Mustache card using Echo Park paper and Unity Stamp images, image source UnityStampCo.blogspot.com


Spiffy Mustache Paper - Times & Seasons By Echo Park

Spiffy Mustache paper by Echo Park , image source A Cherry on Top

Picture of Favorite Mustache {Echo Park Itty Bitty}
Unity Stamps-Itty Bitty Echo Park Favorite Mustache image source:  Unity Stamp Co.
 I cannot forget to include a near-local favorite of mine, Riley the Moose.  This year, Kansas based Riley & Co. introduced a  Riley Moose stamp with that stylish, perfectly coifed “stache. 
 
 Moosetache Riley card by Laurie Clout, image source On the Bright Side!

Moosestash Riley stamp, image source

 . recently introduced a new line of sentiment stamps with a bunch of fun puns.
The stamps are called Funny Bones.  Here”s one of the mustache themed stamps
(go ahead, groan or giggle, I cannot hear you).


Funny Bones sentiment stamp, image source

Looking for a few more choices in classy “staches for your collection?
This Jillian Vance Design set has a lot of options.

Mr. & Mrs. Moustache stamp set, image source AJillianVanceDesign.com

How about  another stamp set with more fun phrases, like this one from The Craft”s Meow?

Fun{tache}tic Stamp Set

 Fun{tache}tic Stamp Set featured above from The Craft”s Meow

Mustache on a stick card by Lindsay Amrhein, image source Note to Self

 Now, go throw a party, put on your best mustache on a stick smiles, and say “Cheese!”  You have to admit, “stache sticks will look a lot cuter in the photos than just holding your finger under your nose!  Plus, who doesn”t love another reason to craft?  Enjoy!


Project Ideas Newsletter Challenge – Sunday Picnic You’re One Of A Kind

082012SundayPicnicYou'reOneOfAKind

Welcome to the Project Ideas Newsletter Challenge. Every Monday, we will design a card, scrapbook page or 3D item.  Your challenge – is to use our piece as inspiration and make it into a card, scrapbook page, or other project. You can use the layout, the colors, an element you like…it can look like our piece, or nothing at all like our piece. We want to see where YOU take this. This challenge is strictly a “work from your stash” challenge.  This week, I designed this “Sunday Picnic You’re One Of A Kind” card.

As a newsletter subscriber you will have received a link to a private web page, from which you can watch the video tutorial. Please note that the video tutorial will be available for general viewing for one week only – and then will be moved into our library for our members only. In order to ensure you don’t miss any more of our Project Ideas Newsletter Challenge video tutorials, please be sure you sign up for our FREE email newsletter from the top right sidebar of this blog. If you didn’t receive the newsletter then please be sure to email us to confirm your subscription.

Every Monday, here on the blog, we’re going to post a picture of our project. You will have ONE week to upload your challenge piece. Instead of a weekly prize though, we’re going to award a prize monthly. So for each week you participate and each project you submit – you will get one entry into our monthly draw. On the first Monday of each month – we will announce one challenge winner, who will be featured as a guest designer on the Paper Crafter’s Library blog as well as our Facebook page. As a guest designer, we’ll feature your biography, some of your favorite paper crafting projects and we’ll link to your blog.

Here are the details on how you can participate in the Project Ideas Newsletter Challenge:

A new Project Ideas Newsletter video tutorial will be emailed out to newsletter subscribers every Monday (so make sure you are signed up). Then, here on the blog, we will post a picture of our project along with an Inlinkz button for you to enter your project. Here are the details:

  • Work from your own stash to create a project based on the inspiration project provided – you can use any products you would like, and make any type of project you like – card, scrapbook page, album, 3D item etc.
  • Post your project on your blog, in your gallery or on any other photo-hosting site (such as photobucket or flickr).
  • Click on our inLinkz button below to add a link to your project for our challenge
  • You will have until 7am, Monday, September 10th to add your link to the list to be eligible to win. And you can enter as many times as you like.
  • For each project you submit, your name will be entered into our monthly draw. The winner will be announced on Monday, October 1st.

Good luck to everyone and we look forward to seeing your projects!

Before I announce the Makeover Monday winner for August, I would encourage you to check out all this months entries. You can click on the links below to be taken to the direct posts.

Makeover Monday August 6

Makeover Monday August 13

Makeover Monday August 20

Makeover Monday August 27

And now it’s time to announce our Makeover Monday winner…


Congratulations Joyce. Please email us at customerservice@papercrafterslibrary.com and put “Makeover Monday Winner” in the subject line.


Perfect Plum Petunias Video Tutorial

I am feeling some mixed emotions with summer coming to an end.  I will be happy (and believe that my chldren will be too!)  to get back to some sort of routine with the kids going back to school next week, but will miss the carfree days of summer that we have had over the last few months!  This does mean that I can spend a bit more time in the studio creating more great and inspirational projects for the Paper Crafter’s Library!

Perfect Plum Petunias

Have you ever found the perfect greeting for your card, but it turns out to be too long?  The greeting Tracy used on the front of this card was one long greeting.  Tracy inked up each word, one at a time and stamped it onto her card to balance out the flowers that she added to the front of her card.  This is a great technique to use a greeting stamp in a more versitle way.

082012PerfectPlumPetunias

Download the pdf handout here

Supplies

Stamps: Think Big Favorites #7 (papertrey ink)

Ink: Jet Black Archival ink (Ranger)

Paper: Perfect Plum CS, Lucky Limeade CS, Subtles Patterns Pack DP (Stampin’ Up!); Ebony CS (Bazzill)

Accessories: bone folder, Stamp-a-ma-jig, Stampin’ Dimensionals (Stampin’ Up!); Removable Tape Matte (Scotch); Tape Runner XL (thermo-web); hot glue (Martha Stewart); Petunia Chopin flowers (Prima Marketing)


Walford Family Shadow Box

I purchased these shadow boxes with just such a project in mind. Tracy saw these and had a fun day with my kids taking their pictures in order to create this shadow box. I just loved the finished project and think that any parent or grandparent would love to receive a gift like this!

072012WalfordFamilyShadowBox

Members can view the video and download the pdf handout here.  (You must be logged in to access the page)

Supplies

Paper: ABC Premier Collection (Graphic 45)

Accessories: Trinket Shadow Box, mini wooden spools, vintage wooden tiny rulers ( Maya Road); black jute (May Arts); Tombow multi-purpose liquid adhesive (Tombow); Stampin’ Dimensionals, paper snips, mini glue dots (Stampin’ Up!); red liner tape (Simon Says Stamp); hot glue (Martha Stewart); Antique Brass Display Trim Corners, Antique Brass Printer Tray Label Holders (7 Gypsies); Antique Brass Mini Paper Clips (Tim Holtz – Ideaology); Avon Rose Printery flowers (Prima Marketing); paper cutter (Fiskars)


Technique Thursday: Tape Lifting Transfer Technique

Club52Week52GroupPhoto

This week on Paper Crafter’s Library’s Technique Thursday, Sophia introduces us to the Tape Lifting Transfer Technique. This technique is a great way to add a unique newsprint background to your projects.

For those of you unfamiliar with Technique Thursday, this is where we create and feature projects for our Club 52 online class (our year-long technique club), which our Paper Crafter’s Library members also access as a free benefit of their membership.

If you’re interested in checking out what we’ve covered this year, you can look at our Club 52 page. If you’re a technique junkie and would like to learn new techniques (as many of them are ones we have created), or revisit old ones – you can still sign up from this page – you’ll be able to access all 52 weeks and your access to the classroom will last for 15 months.

Finally, if you are not already receiving our weekly email newsletter, make sure you take a minute to sign up from the top right sidebar of our blog. Every Monday we create an exclusive project with a video tutorial for all of our newsletter subscribers and Paper Crafter’s Library members. So make sure that you sign up now, so that you don’t miss out!