Christmas Jingle Tri-Shutter Album Revamped

Many of you are probably familiar with the concept of the tri-shutter album as it’s found pretty widely on the internet now-adays, but what what many of you may not know is that we were actually the original creators of the tri-shutter mini scrapbook album way back in 2009.  At that time there were tri-shutter cards aplenty, and we thought it would be awesome to take the concept and turn it into a mini album.  So with a little fiddling, we designed an album that was 6″ x 8″ and fit 5 pictures.

Fast forward 2 years, we decided it’s time to revamp the album. Although we used the same patterned paper for it, that’s pretty much all we kept the same.  The die cut elements are from Echo Park’s Season’s Greetings collection, the rhinestones are from My Mind’s Eye, and the ribbon is from Papertrey.  We also changed the design a little so that there is now an extra insert in the middle that allows for 3 extra pictures, and then used the long side panels for pictures instead of embellishments so that this little album now holds 9 pictures in all.

We have put together a kit for this project which you can see in the Sunny Stampin’ Store HERE, we are releasing it as a digital tutorial tomorrow, and of course, as I mentioned in our last post, Paper Crafter’s Library members receive the tutorial as a benefit of their membership.


FREE Digitial Tutorials of ALL our Sunny Stampin’ Store Project Kits?

There’s a ton of reasons our Paper Crafter’s Library members rave about their memberships.   Here’s what a few of them have to say:

Thank you for this opportunity to use the Club 52 as being a member of the Papercrafters Library.  This is the best tutorial site I have ever seen.  Your clear pronunciation of each word and production of the whole videos is received very thankfully. Ilove being part of the Paper Crafter’s Library ~ Kay~

What a FABULOUS site! I love it! You and your sister are so talented! Thanks for sharing and all your hard work and time you put into it! . ~Linda~

Thank you for your fabulous site!  I love it, and it’s my “go to” site of all time!! ~Gloria~

 Not only do we have TONS of videos (almost 700!),  not only do we add new videos 4-5 days a week, not only do members get to enjoy our current and future online classes for free (i.e. Club 52 – our year long technique club), but now……

As a Paper Crafter’s Library member you will ALSO receive, the digital tutorial version of ALL of the project kits we currently have in the Sunny Stampin’ Store!  Yep, you heard that right. 

And today, we’ve posted the first one – Blitzen Holiday Planner in a DVD Tin tutorial! 

Here’s a picture of the front of the DVD tin:

The picture below shows you what the inside of the tin looks like.  On the inside cover there are three decorated envelopes which you can use to store your receipts, as well as a little pencil.  On the right side of the tin, an accordion insert pulls out with 5 pockets in all – three on the front (which you see below) and two at the back which you see in the third picture.  The tin is decorated with products from the Bo Bunny Blitzen Collection,

The pockets are perfectly sized to hold our holiday planner inserts.  The inserts themselves are sold in a bundle of 5 for $5 and include the following:

  • a 15 month calendar from Oct. 2011 until December 2012 – allowing you to plan this year’s AND next year’s holiday
  • A Gift buying list, where you can put the person’s name, your gift idea, the budgeted $ amount and a check-mark box
  • A Stocking Stuffer list – where you can write the person’s name and the stocking stuffer ideas you have
  • a Christmas Card list – where you can put the person’s name, address and a little “sent” check-mark box
  • a Menu planner – where you can write down your menu ideas for any holiday gatherings

So there you have it, one more reason to become a member!

Spellbinder Apple Box, creating boxes from shape dies

I realize, that we are technically, no longer in apple picking season (a few weeks late), but I could not resist pulling out my Spellbinder Nested Apples!  For me, apples are synonymous with Fall.  It’s that crisp rich color, and shiny skin, framed by that cooler steel grey sky that  just makes the perfect eye candy.  So I decided to create a beautiful box from these beautiful dies,  I mean really, they are just to pretty to leave flat on a page!  So today’s tutorial which will be in the library tonight, shows how to create boxes, using simple die shapes.  The super fun thing with this technique, is that you can use it on any shape (I see Spellbinder Pear boxes in my futur lol).  Now when you pair these super cute boxes, with some realistic leaves (Spellbinder Nested leaves), and some super sparkly chunky crystal glitter, then let me tell you…….. you have the perfect gift for any person who loves recieving candy in a refillable, ultra cute box.

Supplies:

  • Dies:  Spellbinder: Nested Apples, Nested Leaves
  • Paper:  Real Red CS, Lucky Limeade CS (Stampin’Up!), Poison Ivory Shimmer CS
  • Ink:  Fired Brick, Forest Moss, Tea Dye Distress ink (Ranger)
  • Other:  Glue, Glossy Accents ( Ranger), brown marker, brown color pencil, Chunky Crystal Glitter ( Martha Stewart), Sponges, scissors, Big Shot die cut machine


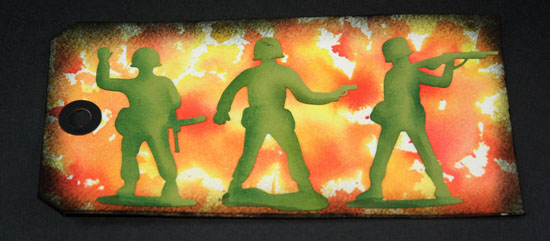
Club 52 week 6: Splattering Techniques with Watercolors and Die based Re-inkers and Inks.

Today I wanted to share with you all the techniques we did for week 6 (last week) of Club 52 (which you can read about here) and Paper Crafter’s Library members. This week I’m working on  splattering techniques  featuring dye-based re-inkers or watercolor paints.  This technique is based on watercolor painting techniques and is a fun way to create interesting backgrounds, foliage, stone look and much more.

This technique is easy to do with a few simple supplies.  Heavy weight watercolor paper, a natural hair brush, and whichever brand of re-inker, ink or watercolor which you desire.  The technique is easy to do, and creates some really fun unique looks.

So here is a snapshot of this week’s techniques:

 I have a close up picture of the splattered tag using forced air to create stems technique:

 And then here is a close up of the tag I created using the Splatter and Blotting Background Technique:

The third tag I created, features the large splatter color mingling technique:

I hope you enjoy these techinques, as these are probably some of my favorite for watercoloring.


3 Pumpkin Halloween Card

Today’s project  is a take on a cute Halloween card vs the spookier looks which I have been making lately.  I wanted my pumpkins to be both goofy and cute, and I am quite happy with how they turned out!  It was made on my Silhouette SD, but can easily be reproduced using a large circle punch to replace the Pumpkins, and any leaf punch can do for their leaves.  The glitter along the edges is my new favorite, which is the Martha Stewart Coarse Crystal Glitter. 

Supplies:

  • Silhouette Files:  Speech Bubbles, Pumpkins, Leaves
  • Ink:  Vintage Photo, Shabby Shutter, Broken China Distress ink (Ranger)
  • Paper:  Ambrosia yellow solid DP (Basic Grey CS), It’s the Little Things: Headed South (Fancy Pants), Chocolate Chip CS, Basic Black CS, Soft Sky DP, Old Olive DP, Kiwi Kiss CS (Stampin’Up!)
  • Accessories: stamping sponges, Silhouette SD, multi-purpose glue,  Black Marker pen, Crystal Coarse glitter (Martha Stewart), Glossy Accents (Ranger), Dimensionals
  • Punches: Grass Punch (Martha Stewart), ¼” Circle punch, 3/8” Circle punch, ½” Circle punch 


Halloween Candy Box Dispenser Featuring The Silhouette SD

Today’s cool treat dispenser is a new favorite of mine!  Perfect for any occasion, but fitted out for Halloween, I created this using my Silhouette Studio Designer Edition Software.  For Papercrafters Library members, you will recieve both my Silhouette files so that you can cut it out on your Silhouette machine, or if you do not have the Silhouette machine, a template will soon be provided, which you can use to trace your pieces.  Please note that no Silhouette purchasable files are included (spiders, toxic treats and Beware sign), and the treat box is made without using any purchasable files.  PCL members can access the videos HERE (make sure you are logged in first).

Now I have to say that I love how this turned out, and I love the fact that my machine was used to cut out every single layer!  I did not have to hand cut a single scrap of paper lol.  Assembly was fairly simple, and unlike the Tea box which was made a while ago, this lid is a folded lid which can easily be opened to refill your container.

Supplies:

  • Silhouette purchased cut files: Toxic Treats Halloween Phrase, Spider, Haunted Beware Label
  • Paper:  Basic Black CS, Really Rust CS (Stampin’Up!), Avalanche (Bazzill), Designer paper
  • Ink:  Rusty Hinge, Chipped Sapphire Distress ink (Ranger)
  • Other:  Tombow multi-purpose glue, mini glue dots, Sticky Strip, Sponges, Basic Rhinestones (Stampin’ Up!),   Silhouette SD, white Pan Pastel, Soft tool, Fake spider Web, Dimensionals, Eyeball chocolates


Happy Halloween Spider Card

I don’t know about you all, but I just love Halloween.  We’re not one of those families that go all out and decorate our house for Halloween or throw Halloween parties, but we enjoy taking the kids out trick or Treating, and I enjoy creating all sorts of nifty Halloween projects.  We’ve got a whole bunch of them planned over the next few weeks.  Today’s card is a quick and easy one using the following supplies:

Stamps: 2009 Halloween Tags (Papertrey Ink)
Ink: Memento Tuxedo Black ink (Tsukineko)
Paper: Rich Razzleberry CS, Cajun Craze CS, Basic Black CS, Whisper White CS;  Frightful Sight DP (Stampin’ Up!)
Accessories: Limitless Layers 1 ¾” Circles die set (Papertrey Ink); Glitter Spiders (Jolees boutique); 1 ¾” circle punch (Stampin’ Up!); Craft Thread (Michael’s)

Halloween Themed Decorated Lunch Bag, Featuring Gorjuss Girl Image & The Paper Tole Technique


I love stamping, and I love coloring.  Sometimes though, you just don’t have time for either.  In this case, I wanted to feature some of the Beautiful Artwork of Suzanne Woolcott who does the Beautiful Gorjuss Girl Stamps.  While it is not always easy for me to get ahold of her stamps (shipping from UK), I can easily get hold of her digital images which she sells in her store HERE

She is first and formost a talented artist, who sells her artwork.  She offers (to my great delight) many of her images in digital format.  They go under the name “tubes” and are offered individually or in sets.  I love the fact that I can use her gorgeous art work in all my personal crafting.  One of my favorite things to do with these is print them multiple times, and do paper tole with them.  As part of my paper-tole technique, I also make a point of personalizing the images with the use of glitter, glimmer mist, sponging, crystal effects and whatever other product takes my fancy.

For this project, I decided to do a fun halloween themed gift bag.  It is so fun and simple to make, and totally dresses up any gift you happen to give.  The great thing of course, is that you can dress it up for whatever occassion you need.  The girl is toled from one of the Gorjuss Girle tube sets which I purchased, and can be found HERE.  I of course added some personal touches, then added her on to the bag which I created using some cool skull and crossbone paper by Karen Foster.  A little bling, and a little flowers, and it was all ready to go!  All Paper Crafters Library Members will be able to access the Halloween-Themed Decorated Gift Bag video HERE, and the Paper Tole Technique video HERE – please note that you do have to be logged in to be able to view the videos.  If you are not a Paper Crafter’s Library member, be sure to click on the “Become a Member” link at the top of the page for more information.

Silhouette :

  • Paper:  Skull and Crossbone DP (Karen Foster), Rich Razzleberry and Elegant Eggplant, Whisper White for printing (Stampin’Up!)
  • Cuts: Gorjuss Girl tube pack 38, Silhouette, Canon Pixma Printer
  • Ink:Fired Brick, Concord Grape, Black Soot Distress ink (Ranger)
  • Other:  Tombow multi-purpose adhesive, Diamond Glimmer mist (Tattered Angel), Glossy dimensional glaze, Black Diamond stickles (Ranger), Sakura Stardust pen, Roses (Prima), Adhesive backed Rhinestones (Stampin’Up!), dimensionals, Cream colored satin ribbon (Stampin’Up!), Sponges


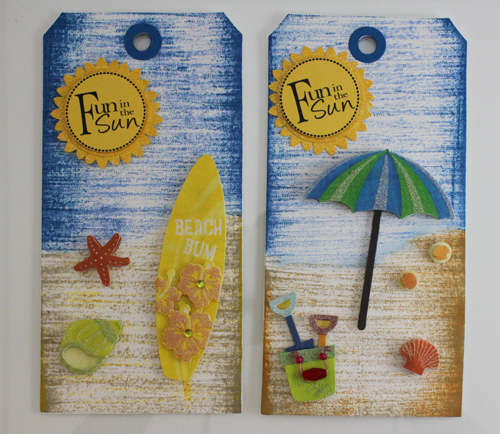
Club 52 Week 4: Striated Background Technique

Today I wanted to share with you all the techniques we are doing this week for Club 52 (which you can read about here) and Paper Crafter’s Library members. This week I’m finishing off our four weeks with Direct To Paper techniques (DTP) featuring dye-based inks, and then for the next number of weeks we are going to be exploring a bunch of awesome techniques using dye ink refills. 

This week’s technique is one that I call the Striated Background Technique.  Although you can use pretty much any brand of ink pad (as with the other DTP techniques we’ve explred so far) I did find that for this particular technique, my favorite was Stampin’ Up!’s ink pads, simply because of their size. They are the largest ink pads on the market and provided me with more surface area to work with.

So here is a snapshot of this week’s techniques:

I have a close up picture of both tags I created using the Basic Striated Technique:

And then here is a close up of the tags I created using the Surf and Sand Striated Background Technique:

As part of the videos for this week I also included a free bonus greeting download of the Fun in the Sun Greetings which I created, and in a video I show you how to create the sun embellishment.

I have to say, I am having so much fun creating for Club 52.  I’ve always loved techniques, but I find that these days, I’m becoming a real technique junkie!

Silhouette Cauldron Card


Today’s card perfectly highlights the wonderful versatility of the Silhouette machine!

For this card, I purchased and imported this adorable graphic from the Lettering Delights Spooky Soiree set.  Using the Print and Cut features of the Silhouette Studio Software, I was able to make layers for my image and then create a welded card which matched the shape.  Now how fun is that!  I am thrilled with how the whole thing turned out. 

 Along with all the fun elements, there is a really cute pull tab, attached to a bubble which reveals the message you want to send.  In my case, it was a You’re Invited, using the Lettering Delight’s Frightmare Font which can be found HERE

Not personalized enough for you?  Well its really easy to stamp our cut out a few bones and eyeballs, to float around in your brew.  There are lots of fun things you can do to add an extra chill to your cauldron.  So what are you waiting for?  Try out the Silhouette SD if you love to indulge in spontaneous creativity!

Supplies:

  • Lettering Delights:  Spooky Soiree, Frightmares Font
  • Cardstock:  Whisper White, Basic Black (Stampin’Up!)
  • Ink:  Shabby Shutter, Pine Needle, Broken China, Tea Dye, Vintage Photo Distress ink (Ranger)
  • Other: mini glue dots, Tombow multi-purpose glue, dimensionals, sponges, soft tools, white Pan Pastel, Lime green and Lagoon