Trendy Tuesday: Baker’s Twine

 Here at the Paper Crafter’s Library, one of our missions is to keep our finger on the pulse of the Paper Crafting industry and to help keep YOU up-to-date on all the hottest trends. 

That’s why we’ve decided to launch a new feature on our blog which we are calling “Trendy Tuesday”.  Every week we’ll explore a current trend and I’ll show you a variety of different projects from talented crafters/artists that incorporate that trendy item.

This week we are exploring one of my favorite products….Baker’s Twine!

Originally used in food preparating and packaging, about 3 years ago it started to find it’s way into the paper crafting market until it eventually became very main stream.

From packaging:


To cards…….

"Stitching With Twine" Card by Teri Anderson

To scrapbook pages….

Scrapbook Page by Katrina Hunt

To ornaments…..

Ornament by Jenny Suchin

 …the crisp white twisted with a splash of color brings to mind the striped candy sticks I loved as a child – the red and white in particular also fills me with nostalgia for the sugary goodness my grandmother used to bring home from the local bakery.

While Baker’s twine can be purchased in massive spools at Bakery and Restaurant supply stores, we have started to see many scrapbook and crafting companies produce it in smaller quantities, in a rainbow of different colors.

There are even some online stores that have popped up that sell nothing but twine! Here’s a few of the current Baker’s Twine products I’ve found on the market:

The Twinery has 14 different colors, and sells their twine either in the 240 yard spools you see picture below or in smaller 15 yard skeins.

"Utlimate Bundle" from the Twinery

Divine twine is another online store that sells Baker’s Twine exclusively, however they only sell it in 240 yard spools.  They offer 12 colors in all – 11 of them are the traditional white with a color, the 12th is an “air mail” variety with red, white and blue.

Divine Twine

 At the Summer CHA in Chicago, Doodlebug introduced their own version of Baker’s Twine which they call “Doodle Twine”.  It’s an extra-colorful twine because they include two strands of the color for every one strand of white, rather than the typical 1:1 ratio. You can find it on 20 yard spools in 9 different colors + a Halloween Mix (white, orange and black) and a Christmas mix (white, red and green)

"Doodle Twine" from Doodlebug

 They also have an assortment of twine cards: 

Doodle Twine on a Card

You can find a variety of different color sets in Jillibean Soup’s product line, which coordinates with their current and older product releases.

Jillibean Soup Twine

 When My Mind’s Eye released their mid-season Lime Twist collection, they also released 12 shades of coordinating Baker’s Twine which is sold on 20 yard cards. 

Photo Credit: Archiver’s Blog

Pink Paislee also introduced baker’s twine into the House of 3 branded lines: Soiree and Daily Junque.   When you look closely at the colors, you see that there are both white/color twists as well as color/color twists. 

Pink Paislee Twine
And that doesn’t even begin to scratch the surface…..We R Memory Keepers has twine as part of their Sew Easy Fancy Floss Line, Theresa Collins, Crate Paper and October Afternoon have also jumped on the Baker’s Twine bandwagon and added it into some their trim packs.
 
And if you are a digital scrapbooker – you’re certainly not left out! Many digital scrapbooking kits now include baker’s twine in their embellishment packs. Splendid Fiins (found at JessicaSprague.com) has three element sets (Baker’s Twine Photo Mega Pack, Baker’s Twine Cards, and Baker’s Twine) which feature exclusively baker’s twine inspired embellishments!
 So there you have it…if you a looking for a fun, bright, colorful AND inexpensive addition to your projects….why not try a little Baker’s Twine?
 
 
* I would like to credit the site Scrapbook Update for some of the content in this article – in particular the research on different companies that sell Baker’s Twine.  You can see their full post HERE.

Makeover Monday Challenge #2: Snowflake Card…& a Winner

Welcome to our *NEW* Make Over Monday Challenge – a weekly challenge brought to you by the Paper Crafter’s Library and Sunny Stampin’ Studios.  The purpose of Makeover Monday is to help you learn how to take the ideas and inspiration you find on the internet, and make it your own. This challenge is strictly a “work from your stash” challenge. 

Over the last 7 years of teaching in the paper crafting industry, I’ve noticed that many of my students feel like they have to run out and buy the exact same products I used, rather than looking to their own stash to see if they having something that might work instead.

Now  I’ll be the first to admit, shopping for paper crafting supplies is fun, and I certainly do my share of it, but why spend your money on a product that may be similar to what you already have?………………and that’s where the concept for Makeover Monday was born.

Every Monday I’m going to take a project I found on the internet, and show you my process for recreating it and making it my own, using supplies from my own stash. This week’s inspiration for the project shown above, comes from the card you see below, made by the talented Lisa Johnson – you can see the original post HERE.

Watch the video below to see my take on Lisa’s Card:

 
 Here are the details on how you can participate in the Makeover Monday Challenge: 

  • A new Makeover Monday Challenge & video will go up every Monday
  • Work from your own stash to create a project based on the inspiration project provided (so for this week, Sharon’s wine bottle tag) – you can use any products you would like.
  • Ppost your project on your blog, in your gallery or on any other photo-hosting site (such as photobucket or flickr).
  • Click on our inLinkz button below to add a link to your project for our challenge
  • You will have until 7am, Monday, November 14h, to add your link to the list to be eligible to win.  And you can enter as many times as you like.
  • We will be tweeting and posting on our Facebook page highlighting some of your projects.  These tweets/Facebook postings will just be a shout-out regarding projects that caught our eye and do not have any special merit regarding the actual contest.
  • One randomly selected winner will be chosen from ALL the entries on Monday, November 14th, in the afternoon. 
  • The winner will be posted here on this blog post, on Twitter and Facebook.  The randomly selected winner will win the Christmas Advent Calendar kit (supplies and instructions) shown HERE (value $35). 

 Good luck to everyone and we look forward to seeing your projects!

Before I sign off, I’d also like to announce the winner of the Makeover Monday Challenge #1 and thank everyone who participated. The winner was randomly drawn, and it is…….Nancy Dawson.  You can see her entry below.  Congratulations Nancy – you have one the Christmas Jingle Tri-Shutter Album kit. To claim your prize please email me and andrea@sunnystampin.com and be sure to put “Makover Monday Challenge #1 Winner” in the subject line of your email.  I’ll also need your full name, shipping address, email and phone number.  Congrats!


Product Review: Spellbinders Grand Calibur & Freebie Friday…Enter To Win Spellbinders Nestabilities!

*This give-away is now closed –winner was announced HERE.*

As long time fans of Spellbinders Paper Arts, we were absolutely thrilled when Spellbinders sent us the Grand Calibur, some Grand Nestabilities, as well as a box filled with other Spellbinders goodies to test drive and review.  For today, we’re going to review the Grand Calibur in a video, and show you exactly how it’s used.  We’re also going to share with you a free video tutorial with PDF handout on how to make the adorable project shown at the bottom of this post featuring the Grand Labels 4 Grand Nestabilities die (cut using the Grand Calibur)…… 

AND we are giving away two of the regular Spellbinder’s dies (valued at $50 US) – the standard circles and classic scalloped rectangles large – which can be used either in the Grand Calibur OR the Wizard, OR the Big Shot, OR the Cuttlebug…etc!

 In A Nutshell…….

 Pros: 
The Spellbinders Grand Calibur is a large format die cutting and embossing machine designed for the home user. It is a very affordable system – retailing at $139.99 US. We found it to be easy to use, allows for a variety of applications, and is relatively compact making it easy to store. And weighing in at 10 lbs, it’s also fairly portable. 

Although designed to work with the Grand Nestabilities – the largest dies of their kind on the market – it is compatible with ALL the Spellbinder’s dies. It features a large platform – 8 1/4″ x 11 3/4″ – with color coded plates for cutting and embossing – allowing you to fit a whole lot of dies on the cutting platform at once. Personally, we are HUGE fans of the large cutting platform and large dies because it opens up a whole new world of project possibilities. It also has a stability base to keep the machine in place during use. 

 Cons:
The only con we really came across is that the stability base will only engage on a smooth surface.  It won’t grip the grainy or pebbly surfaces found on many of the portable plastic folding tables. Without the stability mechanism in place the machine is fairly wobbly, and required you to hold it in place with one hand. 
 

For our full review – to see it’s features and exactly how it’s used, please watch the video below.

 As we mentioned above, we’ve put together a free video tutorial with pdf handout on how we used the Spellbinders Grand Calibur and Grand Nestabilities dies to create these adorable card purses.  You can watch the video and download the handout from HERE.

Okay, so now, details on how to enter our Freebie Friday Giveaway…..simple, all you have to do is enter a comment in the comment’s section of this post – tell us which die cutting machine you own/use/love (if any), and what your favorite types of projects using dies are.  The winner will be announced on Friday, November 11th.  Whoever that lucky person is, will only have 24 hours to email us to claim their prize, if we don’t hear from you, then someone else’s name will be selected!


Club 52: Week 9 – Creating a Flat Wash and Creating layers using a Flat Wash

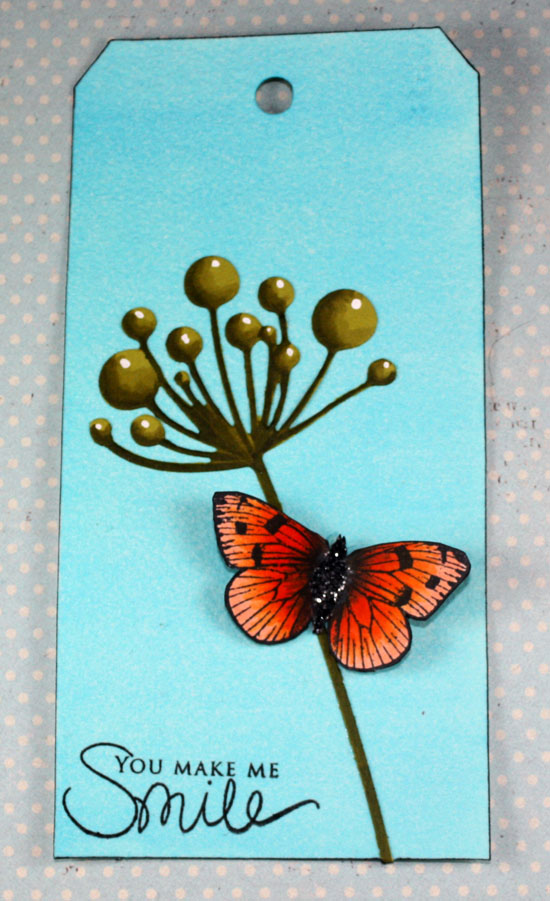
Today I wanted to share with you all the techniques we are doing this week for Club 52 (which you can read about here) and Paper Crafter’s Library members. This week’s Club 52 features the technique of creating a flat wash.  This is a beautiful and versatile technique, and is designed to create a perfectly smooth (no lines) background.  This is an often tricky technique, which requires practice to master.  That being said, the end effect is well worth the effort.  Use these as backgrounds for stamped and cut images, as backgrounds for die cuts, or use this technique with sihouette stamping.  Either way, it is a usefull technique to know, and the foundation for several other wash techniques which will be explored in the coming weeks. 

The tag above features the simple flat wash technique.  Don’t be fooled by the one layer of color into thinking that this is easy to do.  Most often I see looks of unmastered washes.  Streaks, pools, cauliflowers and lines are not a natural part of this look lol.  That being said, when you follow a few simple guidlines, and practice, you will find mastery, just a few steps away!

This is the next great step to go to after mastering this technique.  Think Sunsets on mountains, or rolling green hills.  Upon mastering the flat wash, you will find it easy to move into doing simple variations that produce stunning results.  The video will give you (on top of its solid instruction) some fantastic tips for creating propper depth in your hills.  Once mastered, you will see yourself reaching for this technique on a regular basis.

12 Weeks of Christmas 2010 Revisited

Every year we host a free 12 Weeks of Christmas event for our newsletter subscribers – this year being our third year.  The way 12 Weeks of Christmas works is that each week we release a new project – for four weeks we focus on cards, for four weeks we focus on gifts and four four weeks we focus on tags and gift packaging.  For each project we create a video tutorial and put together a downloadable pdf handout. The projects are exclusive and available for a limited time only. So every week that we put out a new project, the project from the week before gets taken down. 

This year, we’re doing something a little different – once we take the projects down from general public viewing we are placing them in the Paper Crafter’s Library for members.  In addition to that, we’ve decided to do something extra for our members, as a thank you for their loyalty – we’re bringing back all of our videos from 2009 and 2010 and placing them in Paper Crafter’s Library for members to access. 

Here’s a snapshot of what we’ve uploaded so far:

12 Weeks of Christmas 2010 Week 1

12 Weeks of Christmas 2010 Week 1

12 Weeks of Christmas 2010 Week 2 

12 Weeks of Christmas 2010 Week 2

12 Weeks of Christmas 2010 Week 3

12 Weeks of Christmas 2010 Week 3

12 Weeks of Christmas 2010 Week 4

12 Weeks of Christmas 2010 Week 4

12 Weeks of Christmas 2010 Week 5: Tags on a Ring

12 Weeks of Christmas 2010 Week 5

12 Weeks of Christmas 2010 Week 6: Glittered Ornament

12 Weeks of Christmas 2010 Week 6

12 Weeks of Christmas 2010 Week 7: Gift Card Holder Ornament

12 Weeks of Christmas 2010 Week 7

12 Weeks of Christmas 2010 Week 8: CD Holder

12 Weeks of Christmas 2010 Week 8

12 Weeks of Christmas 2010 Week 9: Decorated Votive Holders & Gift Box

12 Weeks of Christmas 2010 Week 9 

New Winner of the My Mind’s Eye Mischevious Collection from Freebie Friday!

Well, I’m very sad to say that we never heard from Mary to claim her prize, so, as mentioned on Monday, we’ve drawn a new winner for the My Mind’s Eye Mischievous collection.  Once again, we’d like to thank you so much to everyone who left comments and shared their Halloween traditions with us in this week’s Freebie Friday event. 

And the new winner is Phyllis Walker!

Phyllis, you have 24 hours to claim your prize by emailing us at andrea@sunnystampin.com.  Please put “Freebie Friday Winner” in the subject line of the email.  Be sure to include your full shipping address and phone number.

If we don’t hear from you by midnight Nov. 4th (EST) then on Monday, Nov. 7th we will announce a new winner. 

.

Makeover Monday Challenge #1: Wine Bottle Tag


Welcome to our brand *NEW* Make Over Monday Challenge – a weekly challenge brought to you by the Paper Crafter’s Library and Sunny Stampin’ Studios.  The purpose of Makeover Monday is to help you learn how to take the ideas and inspiration you find on the internet, and make it your own. This challenge is strictly a “work from your stash” challenge. 

Over the last 7 years of teaching in the paper crafting industry, I’ve noticed that many of my students feel like they have to run out and buy the exact same products I used, rather than looking to their own stash to see if they having something that might work instead.

Now  I’ll be the first to admit, shopping for paper crafting supplies is fun, and I certainly do my share of it, but why spend your money on a product that may be similar to what you already have?………………and that’s where the concept for Makeover Monday was born.

Every Monday I’m going to take a project I found on the internet, and show you my process for recreating it and making it my own, using supplies from my own stash. This week’s inspiration for the project shown above is the wine bottle tag you see below, created by Sharon Harnist for Ellen Hutson’s The CLASSroom blog.


Watch the video below to see the process I followed to create my own wine bottle tag using Sharon’s as my starting point.

Here are the details on how you can participate in the Makeover Monday Challenge:

  • A new Makeover Monday Challenge & video will go up every Monday
  • Work from your own stash to create a project based on the inspiration project provided (so for this week, Sharon’s wine bottle tag) – you can use any products you would like.
  • Ppost your project on your blog, in your gallery or on any other photo-hosting site (such as photobucket or flickr).
  • Click on our inLinkz button below to add a link to your project for our challenge
  • You will have until 7am, Monday, November 7th, to add your link to the list to be eligible to win.  And you can enter as many times as you like.
  • We will be tweeting and posting on our Facebook page highlighting some of your projects.  These tweets/Facebook postings will just be a shout-out regarding projects that caught our eye and do not have any special merit regarding the actual contest.
  • One randomly selected winner will be chosen from ALL the entries on Monday, November 7th, in the afternoon. 
  • The winner will be posted here on this blog post, on Twitter and Facebook.  The randomly selected winner will win the Christmas Jingle Tri-Shutter Mini Scrapbook Album kit (supplies and instructions) shown HERE (value $30).

 Good luck to everyone and we look forward to seeing your projects!


Have a Cricut? Up For a Challenge?

If you own a Cricut and you love to participate in challenges, then hop on over to the Fantabulous Cricut blog – every Monday they host a different challenge, and of course, each challenge comes with a prize.  This week’s prize?  A 3 month membership to the Paper Crafter’s Library! valued at $60.00!  Yep, we’re proud to be the sponsors of this week’s prize.

All you have to do to enter the challenge is to create a project that incorporates something related to birds  – a bird image, bird cage, etc., go the the Fantabulous Cricut blog by clicking on the link above, and then adding a link to your project at the bottom of that post. Have fun…oh and if you do enter the challenge, please leave us a comment here and a link to your project in the comments section of this post ’cause we’d love to see it!

Winner of the My Mind’s Eye Mischevious Collection from Freebie Friday!

Thank you so much to everyone who left comments and shared their Halloween traditions with us in this week’s Freebie Friday event.  Our give-away for Freebie Friday was this product pack from the My Mind’s Eye Mischievous Collection shown below:

And the winner is Mary S:

Mary, you have 24 hours to claim your prize by emailing us at andrea@sunnystampin.com.  Please put “Freebie Friday Winner” in the subject line of the email.  Be sure to include your full shipping address and phone number.

If we don’t hear from you by midnight Nov. 1st (EST) then on Wednesday Nov. 2nd we will announce a new winner. 

Product Spotlight & Freebie Friday: My Mind’s Eye Mischievous Collection….Enter to Win!


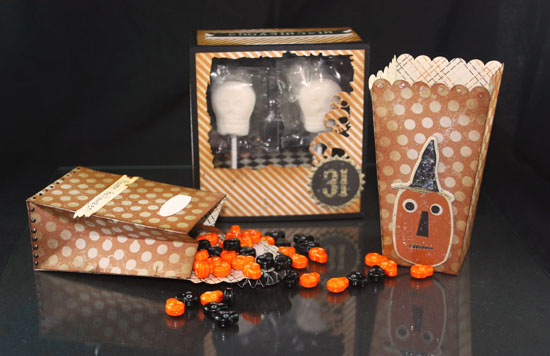
The Mischievous Collection by My Mind’s Eye is one of those paper lines that you have got to love!  With a nice vintage feel, perfect for Halloween, Thanksgiving or even a variety of other themes (although some of the elements are good only for Halloween), you will find it to be the perfect choice for your projects. 


Today we have created a series of projects to highlight the beauty of this collection. We have put together a free video tutorial and pdf handout for BOTH the small popcorn box, and the scalloped treat bag. The Lollypop box is a Paper Crafter’s Library exclusive available as a Silhouette cut file, or as a downloadable PDF to Paper Crafter’s Library members only.  All the projects are simple yet elegant, and can easily be adapted to other holidays.

We are also giving away the My Mind’s Eye Mischievous Collection pack you see pictured above to ONE lucky winner…..more details on how to enter at the end of this post!

 This cute simple popcorn box uses a silhouette cut file.  You can find it under the search for “Mini Popcorn Box“.  Paired with the Mischievous Chipboard element pumpkin and paper,  a little Pearl Glimmer Mist, Rock Candy Stickles and Stardust Stickles, you have the perfect recipe for a fast and beautiful halloween/thanksgiving favor box. You can watch the free video and download the handout from HERE. There are two parts to the video – the first shows you how to manipulate the file in your Silhouette Studio Software and then sent it to the printer, the second part shows the assembly and decoration of the box.

If dies are more your thing, then you will love pairing this little Scalloped bag with the My Mind’s Eye Mischievous paper line.  With one pass of your die machine, and half a piece of the patterned paper, you will have the pieces for this adorable bag.  Add with that the Tim Holtz Tattered Banners and Mini Rosette die, and you have everything you need for your next get-together.  Other things used:  Distress ink in Walnut Stain, Ripe Persimmon and Seedless Preserves (last two part of the Tim Holtz seasonal limited edition), Chipboard Mischievous elements, Dimensionals Pearls in Espresso and Gold Pearl, Glimmer Mist in Pinecone and Raven, and some Hook and Loop closures by Tombow.  You can watch the free video and download the pdf handout here.

This lollipop box is perfect for showing off some spooky skull treats.  Whether you want to use it for halloween, or whether you want to use it for any other holiday to show off some gourmet lollipops, you will find this box to be well recieved by any lucky recipient.  This box was designed on my Silhouette.  The skulll  opening must be purchased throught Silhouette, and added to the template design.  All instructions are given on the accompanying PDF.  If you do not own the Silhouette, then you will be able to print out the design for your personal use.  This design is a Papercrafter Library Exclusive, and only members will be able to access the video, instructions and cut files.

 Supplies:

  • Silhouette: Halloween Skull Frame (if you do not own the silhouette, then follow the provided option in the downloadable template)
  • Ink:  Vintage Photo Distress ink
  • Paper:  Mischievous paper, Basic Black CS, acetate
  • Other:  Silhouette machine (optional), Tombow  multi-purpose adhesive, Fabri-tac, 1/8″ hole punch, Mischievous Chipboard elements, Lollypops


Okay, so now, details on how to enter or Freebie Friday Giveaway…..simple, all you have to do is enter a comment in the comment’s section of this post – tell us whether you celebrate Halloween, and if you do, share with us what some of your favorite Halloween projects are to create.  The winner will be announced on Monday.  Whoever that lucky person is, will only have 24 hours to email us to claim their prize, if we don’t hear from you, then someone else’s name will be selected!

&