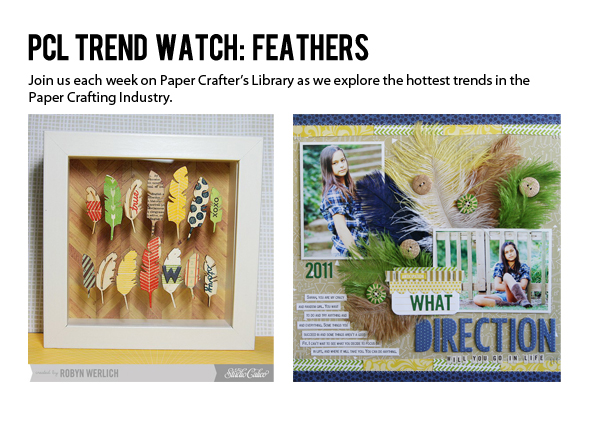
When Andrea returned from the winter Craft & Hobby Association trade show, she alerted me to a paper craft trend in feathers. I wasn”t too familiar with this at first, but in no time, with a bit of determined on-line hunting, I found some truly unique projects and products that I hope you”ll find inspiring in order to play with this fun feather trend.
It may not be easy to find the wood veneer feathers used for the shadow box frame project featured above (they were from a fall kit Studio Calico offered last year), but the company has some fabric sticker feather shapes that could be used in similar projects.
Studio Calico Mistables Feathers, image source Studio Calico
Jenni Bowlin Studio also offers vintage fabric feathers that I think look fantastic on this tag/card design…
Scrappers, you are not forgotten! Leafy feathered shapes you can hand cut in a variety of patterned papers offer an embellishment that could coordinate with many themes on your pages.
Perhaps a more trendy application of feathers is the next style of fluffy beauties added to your project. Feathers, like the ones featured below from Bella Blvd., come in a wide variety of bright & pastel colors.
Check out the whimsical addition of a Bella feather added to the card featured below…
Bachelorette Party Card featuring Bella Blvd feather by Shellye McDaniel, image source a Bucket
Feathers from Bella Blvd, other colors & image source found at Bella Blvd.com
Clean and simple cards and projects can embrace the feather trend on a more subtle level. Several companies, including Stampendous, Hero Arts, and Stampin” Up!, offer stamps with a feather theme.
Sarah Jay and Tenia Nelson”s cards shown above used the same bold peacock feather stamp from Stampendous .
Feathers look great in vintage or rustic theme projects, too. A masculine card with a feather embellishment is a unique alternative to other decorations, and can help you avoid adding a bow that often detracts from an otherwise macho vibe. Julie Gearinger demonstrates a great masculine theme with this trend in her card shown below…
Card featuring Stampin” Up Fine Feathers set by Dawn Yeager, image sourceAdirondack Impressions
Are you dabbling in mixed media projects? You may be inspired by this piece. I”m not sure if it is a real feather attached to the canvas, but it sure looks like one. Few of my feather examples were actually “bird themed” I realize. So the “Fly” sentiment, bird and butterfly imagery on this project is a great conclusion. Check it out…
Mixed media project featuring feather, image source Get It Scrapped
I have to admit I”m also intrigued by the use of a cardboard coffee sleeve on this project, hmmm…. So many inspiring projects, so little time!
Feathered friends, don”t worry, no birds were harmed in the preparation of this post!
Paper Crafter’s Library was launched in January 2011 with the goal of becoming an all-in-one learning solution for paper crafters. With over 1000 videos in our library to date, and over 50 videos being added each month – we are the largest and most comprehensive online learning resource for paper crafter’s worldwide.
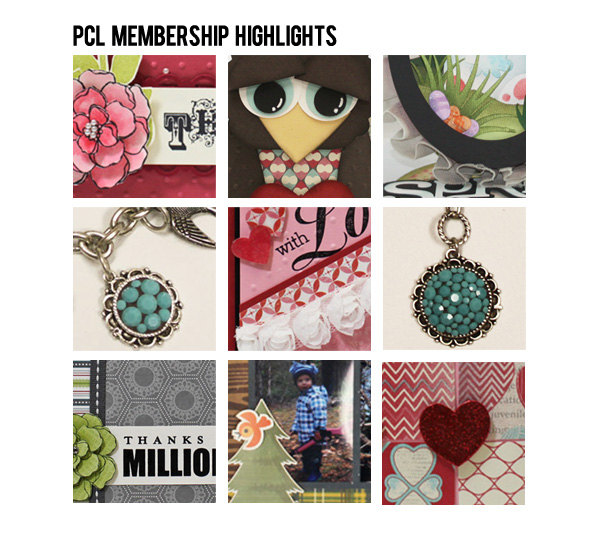
Each Monday we provide you with a behind-the-scenes sneak peek of the projects that were released to our members the previous week. So the sneak peek you see above is a snapshot of the video tutorials & pdf handouts our members received for the week of February 4th to February 8th
Each week at Paper Crafter’s Library our full monthly members can expect to receive access to a minimum of 8 exclusive projects – totalling around 50 videos each month. In planning for our projects we ensure that we cover a range of project types so that there is something for everyone whatever their interest or preference – whether it be card making, stamping, scrapbooking, altered art, mixed media, 3D items, templates, techniques etc. Projects range in difficulty level – so there will always be projects in library for whatever your paper crafting “level” whether you are a beginning paper crafter, or a more advanced paper crafter.
This week Sophia continued on with our Shadow Box Easel Card series – this time with a beautiful oval-shaped shadow box in an Easter theme. You can see the other Shadow Boxes created so far by clicking HERE and HERE and HERE. Each shadow box has it’s own exclusive template designed by Sophia – and two versions are provided to Paper Crafter’s Library members – a printable template and a studio cut file that you can cut out on your Silhouette Cameo or Portrait machine. So far five different shapes have been released to members – a square, a rectangle, a circle, a heart and now an Oval. Sophia will be completing this series with a hexagon shaped Shadow Boxes which will be released this week.
Paper Crafter’s Library newsletter subscribers were treated to this adorable Valentine’s project. Signing up to the newsletter is free and each week subscribers receive a fun project idea with video tutorial and pdf handout. Projects are accessible for one week and then moved to our library for members only. If you haven’t already subscribed to our newsletter you can do so from the top right sidebar.
Last week we featured Nunn Designs and their fantastic jewelry findings on the Paper Crafter’s Library blog. If you didn’t see that post or enter the give-away you can do so HERE. In conjunction with that feature we launched a new series of videos on working with metal and jewelry findings. As part of that series we talked about the basic tools needed for getting started, how to properly open and close jump rings. For the projects we showed how to create a charm or pendant using Crystal Clay and Chatons (see the turquoise charm below), we also showed how to create this charm bracelet (using the turquoise charm), as well as how to create a simple pendant necklace (shown in the sneak peek photo above).
Other highlights this week:
An out-doorsy scrapbook layout perfect for scrapping all those camping or cottage trips
A cute Valentine Owl treat pouch featuring a punch and die art owl
A layering technique for creating dimensional flowers
watercoloring with aquapainters and die inks
adding dimension to a stamped and layered image with sponging
creating scenes with die cut images
To see a sample of our teaching style you can check out our Free Project of the Week – which is released every Friday. You can see this week’s project HERE.
Read about all the perks of being a Paper Crafter’s Library member you can visit our Benefits of Membership page HERE.
Are you happy it’s Friday? I sure am although we’re having a crazy snowstorm here. All the buses have been cancelled and the schools are closed so all five of my kids are home today. Thankfully at the moment they’re pretty occupied by playing with each other. I’m hoping that keeps up as it’s still a regular work day for me here in the studio. Inevitably though I’m sure that as the day progresses they’ll get more and more restless and the running and wrestling and yelling will gain momentum…how can it not with four boys? LOL I guess that’s when it’s time to kick them outside to play in the snow right?
I love today’s project – first off because the colors make me happy. It’s white, drab and windy outside but the yellow and orange colors of the card remind me of summer and really warm me up. The other reason I love this card is because it’s a great way to use up all those pre-printed, pre-decorated cards you get when you buy those 12 x 12 collection kits. I always seem to have so many of them left over. This card shows you how easy it is to use them as a focal point for your card, as well as how you can adapt them if the sentiments aren’t suitable for a card.
Today we are very pleased to introduce you to Nunn Designs a company created by designer Becky Nunn which offers gorgeous handcrafted jewellery findings.
We came across Nunn Designs at CHA earlier this month and were very impressed with their creations. Although all the pieces were displayed in the form of jewellery, what struck us was how easily the products could cross over into our paper crafting, hand crafted home decor and mixed media work. While the projects that Becky and designer Cheryl Spector created are in the form of jewellery, they can easily be adapted for other uses as well – attaching them to altered journals and books, embedding them in mixed media canvases, using them as charms in altered art etc.
What we really loved about the Nunn Design projects is that there were so many different levels of difficulty. Personally I have been considering trying my hand at jewellery making for awhile now, but always felt quite intimidated. In visiting the Nunn Design booth, Becky made it seem so approachable and so do-able. You’ll see that in the projects being featured today, as well as in the video tutorial. We specifically asked Becky to showcase projects that would be great starter projects for those of you wanting to dip your feet into this fun new world.
The Nunn Design website is their wholesale site for online retailers. We’ve linked to it so that you can easily view their entire product line in one place. There are numerous places where you can purchase Nunn Design products including Etsy and many other online stores. Click on the link HERE and it will take you to the Nunn Designs product locater page on their site.
The website also includes videos on each of their collections. Click HERE to view each collection.
And, we also have a special give-a-way for you!! Please leave a comment below this blog post about Nunn Designs and you enter to win a chance to win the fabulous give-a-way pictured below. A few samples of Nunn Design products.
Remember, each comment you leave is one entry, so be sure to visit today not only for the great project idea, but also to enter your name into our give-aways.
About Nunn Designs
It began in the expansive wilds of Alaska. There, in the land of the midnight sun, Rebecca Nunn first discovered her budding sensibilities as an artist, and entrepreneur. Shaped by the unhurried passage of time and breathtaking natural beauty around her, Rebecca developed a deep love for the road less traveled — the unrushed exploration of hidden byways, beckoning with undiscovered treasures. This, coupled with a burning desire to craft and create became the foundation for what would one day be Nunn Design® . Drawn into the wider world at age 17, Rebecca received a scholarship that brought her to the north of Italy where she lived for 12 months as a foreign exchange student. There, she was surrounded by brand new forms of beauty, and a sensory richness she’d never before experienced: the enchantment of Renaissance iconography, gilt metal hooks, skeleton keys, gold leaf frames, antique clocks, and the moment-to-moment flow of artistic exploration. It was a year that changed Rebecca’s life, and fueled her full immersion into graphic design, art, and entrepreneurship. Adventures to Australia, Bali, and other parts of Europe followed over the ensuing years, each trip yielding new inspirations. Ultimately, Rebecca returned to the Pacific Northwest filled with the passion to create a special kind of company — one that would foster connection, build community, and facilitate the creation of beauty.
Today, Nunn Design® is the realization of that dream: a small company, producing findings of the highest quality, with generational artisans based in the United States. Our vibrant, extended family produces uniquely classic, handcrafted pieces, each individually inspected down to the detail. And all of this is driven by Nunn Design® brand’s commitment to supporting the individuality and creative vision of each of you, our esteemed customers and enthusiasts. We are devoted to fostering the inspired expression of your distinctive voice. And we are honored and delighted to help you follow your art.
Nunn Design Creations
Today we have with us Nunn Design Designer Becky Nunn and design team member Cheryl Spector. You will find their projects below, but first here is a little bit about each of them:
Becky Nunn’s mission as the founder and owner of Nunn Design is; “Through collaborative relationships, Nunn Design inspires and nurtures creativity”. Becky believes that everyone is creative and that we are born with natural abilities and a desire to express ourselves in some creative form or another.
Cheryl lives on the Olympic Peninsula with her partner (now fiancé) and their toy poodle, LuCee.
She is a member of the Nunn Design Team and has been a life-long crafter. Cheryl enjoys creative expression in many forms – cooking, decorating, making stuff, and now jewelry making – the process of creating brings her happiness and joy.
Nunn Designs Jewelry
There are three pieces below. This first piece from Becky is a ball chain necklace.
I love the Antique Copper and all the darling little charms.
Becky’s Piece 1 Supply list for Ball Chain Necklace
bcs-cb Ball Chain Small – Antique Copper
oftt-cb Ornate Flat Tag Tablet – Antique Copper
mdr-cb Medallion Reconciler – Antique Copper
ylpcc-b Young Lily Petal Charm – Antique Copper
fccc-b Flower Crystal Charm – Antique Copper
flcc-b Fleur Charm– Antique Copper
jr9tc-cb Jumpring 9mm Textured Circle – Antique Copper
tsdw- Transfer Sheet Decorative Word
gel du soleil
How it was Created:
A transfer sheet was affixed to the ornate flat tag and then a bit of gel du soleil was used on top for a waterproof finish. All pieces were attached to the ball chain using jumprings.
The next piece from Cheryl is a lovely Bangle Bracelet. It’s so elegant and would dress up any outfit!
Cheryl’s Piece 2 Supply List for Bangles Bracelets
bbfs-sb – Bangle Bracelet Flat Small – Antique Silver
jr9tc-sb – jumpring 9mm textured circle – Antique Silver
ctc-sb- Crest Tag Circle no hole – Antique Silver
lower case letter stamping set
sharpie marker
ompcs-sb – Ornate mini pendant circle single loop – Antique Silver
cryclay-white
tangerine metal paint from Christi Friesen line
gel du soleil
How it was Created:
This is piece has multiple techniques. First I made a mold from a vintage button using silicone-molding compound. Then using white crystal clay, I filled the ornate mini pendant with the mixed crystal clay. Then I used my mold to make the impression in the clay. Once the clay had cured for a while (probably about 4 hours) I used a bit of the tangerine dye-oxide from Christi Friesen to colorize the clay. Then I let that dry for about and hour or so. Once it was dry I applied a layer of the UV resin, gel du soleil and allowed it to cure under the UV lamp. Then I took the crest tag circles and metal stamped the letters (my nephews’ initials) on each tag. I used a sharpie to darken the letter and wiped off the excess with a baby wipe. After that, I attached each charm to the bangles using a textured jumpring.
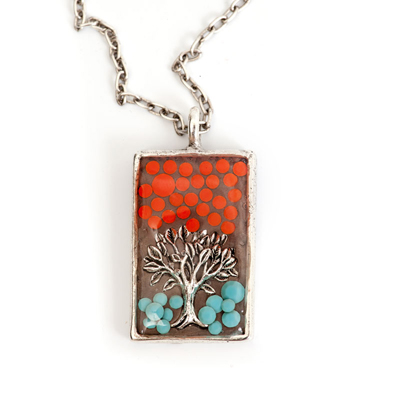
Now we have Cheryls other. It really catches your eye, the colors are wonderful.
Cheryl’s Pieces Supply List for Tree Pendant
lpr-sb – Large Pendant Rectangle in Antique Silver
crystal clay – latte
turquoise Chatons
coral Chatons
sfcc-sb – Small Fine Cable Chain – Antique Silver
gel du soleil
Non – Nunn Item – Tree Charm with bail trimmed off
How it was Created:
How I made: I used ball of mixed crystal clay and pressed it into the large pendant rectangle. Then I placed the trimmed charm into the clay and embedded the Chatons. When the piece had cured for a while (about 3 – 4 hours) I applied a layer of our UV Resin – Gel du Soleil.
Bezels with Epoxy Clay & Chaton Crystals Video Tutorial
Take a look a this short video tutorial below filmed by Becky showing you how to create some these gorgeous bezels using her Epoxy Clay & Chaton Crystals.
Check out a great video tutorial on Beaducation showing you how to make jewelry using UV resin (the piece shown below) by clicking HERE. The UV resin is what Cheryl used in making her pendant.
How to Enter the Give-Away
As mentioned at the beginning of this post, Nunn Designs is graciously giving away this set of jewellery findings which contains 58 individual pieces valued at over $40. To enter the give-away please post your comment in the comments section of this post. We’d love to hear about whether or not you have done any jewellery making of your own, or whether you’ve incorporated these types of pieces into your cards, scrapbook layouts, home decor pieces, altered art, art journals, mixed media pieces etc.
This give-away is open for one week – the winner will be announced next Wednesday. Please ensure that when you leave your comment you include your email address (it is kept private) because we will need that to contact you if you are the winner.
We also encourage you to take a minute to visit the Nunn Designs Blog – please leave them a comment letting them know that we sent you , and then we encourage you to look around as they have LOTS of fantastic project ideas as well additional video tutorials. It is only through the generosity and kindness of sponsors like Nunn Designs that we are able to offer YOU – our fantastic audience – these give-aways so we appreciate you showing your support here and on their blog.
Three dimensional paper crafts can open up a whole other world of paper crafting for those who have previously only done stamping or scrapbooking. Shadow boxes, gift packaging, home decor, and stationary holders are just a few of the things that you can find samples of online. Different techniques are employed than those you typically use in other forms of paper crafting. When creating 3D projects you will do a lot of scoring and red line tape will become your trusted friend! It gives you the strong bond that is required for 3D projects to remain stable.
Lately, I have noticed that crafters are crossing over into using more fabrics and felts as well. Many die cutting machines will successfully cut felt or other fabric, giving you many more options for your crafty creations! I have one such sample below.
This is a home decor project. A simple pillow cover was made to cover a standard pillow form. A rolled rose die was used to cut felt, which was then used to create the roses that were hot glued to the front of the pillow. The frame was also cut out using a scalloped frame die and then a simple bow was added. Overall, this project was fairly simple to create, but the finished product looks very sophisticated!
Project created by Joanne Basile for stampedbyhand.blogspot.com
If you take the time to search online, you can even find some free tutorials for 3D projects. Our very own Andrea has some projects posted that go back to the time before The Paper Crafter’s Library came to be! This next project is one of Andrea’s ‘oldie but goodies’. The tutorial can be found at andreawalford.com/tutorials.
Another great resource for tutorials is splitcoaststampers.com. You can register for free, and a wealth of information is available on that site!
Project created by Andrea Walford for andreawalford.com
In addition to online tutorials, there are sometimes templates available for download too. Some templates are free, some are available for purchase, and there are still others that can be purchased as ‘cut files’ to be used with certain electronic die cutting machines. If you want to know more about cut files or how to manipulate, size, or use them, I am NOT your girl! I simply want to make you aware that they exist! I am afraid that that is all a bit too ‘techie’ for me. I really like the feel of the paper in my hands, and (for me) the cutting and glueing process is all part of the paper crafting experience! For that reason, I have not jumped to try digital scrapbooking either. Maybe some day I will get there, but I am not there yet!
This next project was also created by Andrea. She calls it the Circle Easter Treat Box Tutorial and it can also be found at andreawalford.com/tutorials. There is no reason that this has to remain an Easter Treat Box; use your imagination! Go wild and make it a Christmas Treat Box, or if you are feeling really daring, you could make it into a party favour treat box! *wink*
Project created by Andrea Walford for andreawalford.com
This next project was created by a woman named Lauren Meader. Many of you may already know of her. She is the 3D packaging queen! She loves creating pretty packaging so much that she has created a whole business out of the hobby. She has many items for sale, and you simply have to google her name to find out more. Back before Lauren built her packaging business, she did create and post some free tutorials. One of the very first tutorials she posted was this Purse and Wallet Gift Set. The tutorial can be found at laurenm.blogs.splitcoaststampers.com/category/tutorials.
Project created by Lauren Meader
This next project is another created by Lauren Meader. She calls it the Boxed Bag Holder. You could use it for many different purposes by simply switching out your patterned paper and changing the focal image. You can also find this tutorial posted online at laurenm.blogs.splitcoaststampers.com/category/tutorials.
Project created by Lauren Meader
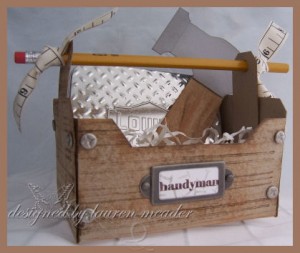
These next two photos are of another Lauren Meader project. Masculine themed gifts can be SO difficult to make! I know many of you feel the same way because it is such a common discussion! This project is a small 3D toolbox. The handle of the toolbox is made by a pencil, and the box itself is large enough to fit a giftcard or other small gift inside. Isn’t it adorable?
Project created by Lauren Meader
Project created by Lauren Meader
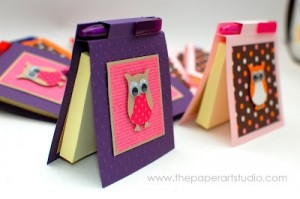
Next I have an adorable little post-it note holder to share with you. There are various different ways to make post-it note holders, many of which are available online. With a few minutes of research, you will be surprised with what you can come up with! These make cute little favours for birthday parties or showers.
Photo credit to the paperartstudio.com
These fun little owl candy holders are a first for me. I hadn’t seen them before, but they really are adorable! With the popularity of birds and owls in papercrafting over the last several seasons, these little cuties come in right on trend! Although I can’t say for certain, it looks like the head of the owls could have been created using the Stampin’ Up! Top Note Bigz Die. The wings are made from scalloped circles and the eyes are regular circles. All in all, not too difficult to replicate!
Photo credit to dabblewithdawn.blogspot.com
OK, I am not going to lie; I think this next 3D paper creation is awesome! It looks just like a real picnic basket! I have no idea how it was made, as I found the photo on Pinterest, but I would love to learn.
Photo credit to cantstamptherain.blogspot.com
I have a large binder full of tutorials that I have printed off from various stamping and scrapbooking sites on the internet. I tell myself that someday I am going to have the time to create each and every one of them! I don’t know how soon that time will come, but I think I will have a lot of fun with the exercise once I begin! I encourage you all to give some of these tutorials a try too. Hand made packaging makes a gift that much more special, so why not give it a try?
Paper Crafter’s Library was launched in January 2011 with the goal of becoming an all-in-one learning solution for paper crafters. With over 1000 videos in our library to date, and over 50 videos being added each month – we are the largest and most comprehensive online learning resource for paper crafter’s worldwide.
Each Monday we provide you with a behind-the-scenes sneak peek of the projects that were released to our members the previous week. So the sneak peek you see above is a snapshot of the video tutorials & pdf handouts our members received for the week of January 28th – Feb 1st.
Each week at Paper Crafter’s Library our full monthly members can expect to receive access to a minimum of 8 exclusive projects – totalling around 50 videos each month. In planning for our projects we ensure that we cover a range of project types so that there is something for everyone whatever their interest or preference – whether it be card making, stamping, scrapbooking, altered art, mixed media, 3D items, templates, techniques etc. Projects range in difficulty level – so there will always be projects in library for whatever your paper crafting “level” whether you are a beginning paper crafter, or a more advanced paper crafter.
This week Sophia continued on with our Shadow Box Easel Card series – this time with a classy heart-shaped shadow box – just in time for Valentine’s Day. You can see the other Shadow Boxes created so far by clicking HERE and by scrolling down on THIS page. Each shadow box has it’s own exclusive template designed by Sophia – and two versions are provided to Paper Crafter’s Library members – a printable template and a studio cut file that you can cut out on your Silhouette Cameo or Portrait machine. So far four different shapes have been released to members – a square, a rectangle, a circle and a heart. Sophia will be adding to this series with an oval and hexagon shaped Shadow Boxes which will be released one this week and one next week.
We also revisited an oldie but goldie – the “sour cream container” – a fun, quick and easy 3D item you can use for Valentine’s treats or other little gifts.
One of the benefits to Paper Crafter’s Library members is their access to exclusive templates created by PCL for our members. This past week we had this fun shaped card – a baby onesie. Members were provided with a printable template as well as a .studio file they could cut in the Silhouette.
Other highlights this week:
2 different scrapbook pages – one featuring a love theme, and one that showed another fun blocking technique using patterned papers
Using your alphabet stamps to create a title
how to create a punch art baby rattle
covering chipboard shapes with washi tape
incorporating mixed media techniques into your cards
embossing chipboard letters with glitter.
To see a sample of our teaching style you can check out our Free Project of the Week – which is released every Friday. You can see this week’s project HERE.
Read about all the perks of being a Paper Crafter’s Library member you can visit our Benefits of Membership page HERE.
Stampin’ Up! is running their Sale-A-Bration event right now! I absolutely loved the Sycamore Street Designer Paper and the Sycamore Street Ribbons and Buttons Collection! The colors in the designer paper inspired me to create this card! I pulled out the In Colors Collection with this pattern of designer paper. I really loved the funky pattern, added in the greeting from Sassy Salutations and the buttons just helped to add the finishing touch! I loved creating this card.
You can view a video on how I created this Congratulations card below.
Supplies:
Stamps: Sassy Salutations (Stampin’ Up!)
Ink: Jet Black StazOn ink (Tsukineko)
Paper: Pool Party CS, Island Indigo CS, Whisper White CS; Sycamore Street Designer Series Paper (Stampin’ Up!)
Accessories: bone folder, paper snips, SNAIL adhesive, Stampin’ Dimensionals, glue dots, Island Indigo baker’s twine, Sycamore Street buttons, Sycamore Street – Island Indigo 1/4″ Satin ribbon (Stampin’ Up)
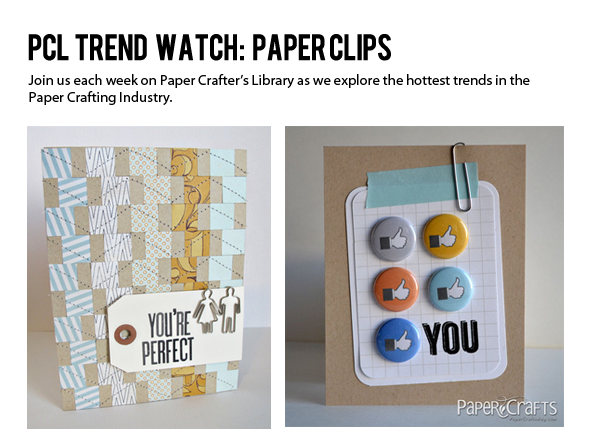
I”m trapped in an office for five days a week, but that doesn”t mean crafty inspiration is very far away. I”m not just talking about my computer”s internet connection this time. I”m talking paper clips. The perfect utilitarian, metal embellishment for crafts as well as office papers. Even a basic paper clip can look very chic, but new products are popping up that are showing off paper clips on a whole new level.
Easy to attach, even at the last minute on one of your projects, a clip can be part of your design, or simply hold something special in place on a scrapbook page or card. Steppin” it up a notch, the basic paper clip is dressed up with an attached classy, vintage embellishment in the new clips designed by K & Company.
Brenda Walton Scribe Metal Art by K & Company, image source eksuccessbrands.com
What makes the latest paper clip creations trendy are the wide selections of uniquely shaped paper clips available today. People, animals, geometric and directional elements, are just some of the options you can find. You have to admit, sending someone a card with a fun little item they could actually re-use is pretty cool, too. Studio Calico is one trend setting company that offers clips in several unique shapes.
Some of the most unique people shaped clips I found are Sun Star Pictome Paper Clips. Standing, falling or in fighting stance, the people clips can easily bring a smile to the office cubicle prisoner in your life.
Sun Star Pictome Paper Clips, image source jetpens.com
Maya Road Shaped Metal embellishments are stylish clips, too, even if they are not called clips. The unique shape of the Our Home embellishments are the perfect touch for a gift or card for that loved one away from home.
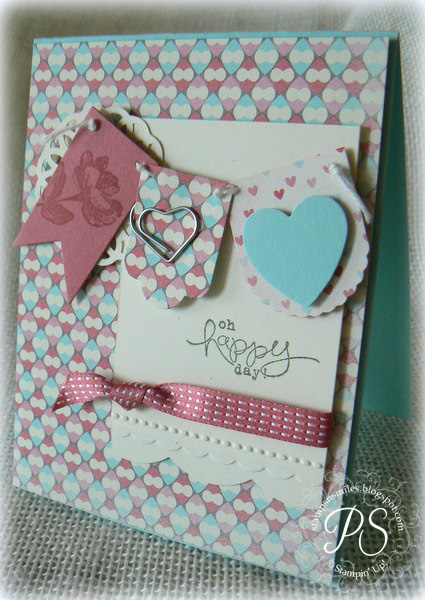
Stampin” Up! has a couple new variety packs of shaped clips, called Cute Clips, that give you several options in one package.
Stampin” Up Elements Cute Clips, image source Stampin” Up!
Oh Happy Day card featuring a Cute Clip by Penny Smiley, image source Splitcoast Stampers
If you aren”t using them on a project, the clips themselves can make a great gift to a friend. What could be a more perfect gift from a paper crafter than a hand crafted package with these fun little tools attached?
Thank You note with Cute Clips by Shelly Godby, image source Stamping Smiles
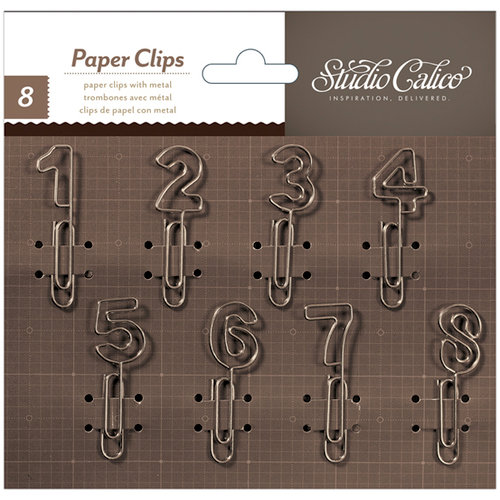
The new number clips from Studio Calico also have many uses in scrapbook pages, as well as birthday invitations and cards.
Studio Calico Number Paper Clips, image source Scrapbook.com
A clothes hanger paper clip, like the one shown below from Tim Holtz, is another fun shape. Keep watch over your supply of these. A child could think it”s fun to use them to hang up small doll clothes, too (what”s wrong with another use for them though, right?).
Kikkerland Designs is a different company I found that makes fun paper clip shapes. Many of their clips are sold in fairly large quantities, so you shouldn”t feel a need to hoard them. Paper clips have utility going for them as well as design qualities, so that can help you justify keeping a few of these on hand anyway, right?
The spiral clip has been around awhile, but it still looks great with a little ribbon tied to an edge like the one shown on the card below . Find clips like these, such as Paper Studio Spare Parts, at Hobby Lobby or Clippiola or other circular clips on-line or at office supply stores.
Now as I sit in my cubicle, daydreaming of the next craft project, I”ll give my little supply drawer a second glance. You never know what could inspire the next great paper craft trend, right? Enjoy and happy crafting!
Paper Crafter’s Library was launched in January 2011 with the goal of becoming an all-in-one learning solution for paper crafters. With over 1000 videos in our library to date, and over 50 videos being added each month – we are the largest and most comprehensive online learning resource for paper crafter’s worldwide.
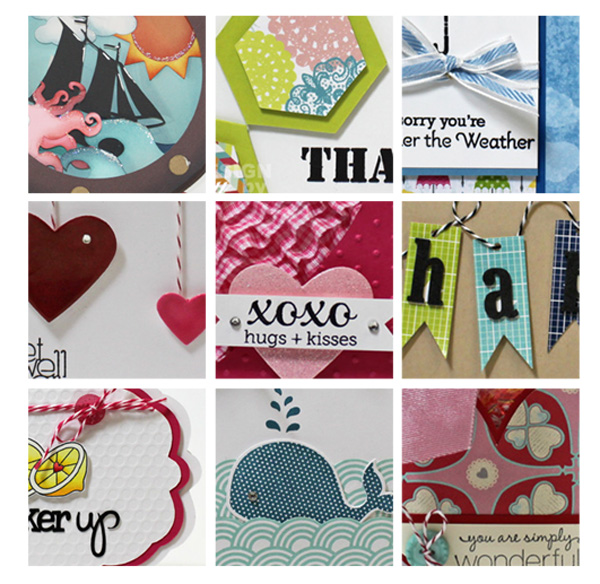
Each Monday we provide you with a behind-the-scenes sneak peek of the projects that were released to our members the previous week. So the sneak peek you see above is a snapshot of the video tutorials & pdf handouts our members received for the week of January 21st – 25th.
Each week at Paper Crafter’s Library our full monthly members can expect to receive access to a minimum of 8 exclusive projects – totalling around 50 different projects each month. In planning for our projects we ensure that we cover a range of project types so that there is something for everyone whatever their interest or preference – whether it be card making, stamping, scrapbooking, altered art, mixed media, 3D items, templates, techniques etc. Projects range in difficulty level – so there will always be projects in library for whatever your paper crafting “level” whether you are a beginning paper crafter, or a more advanced paper crafter.
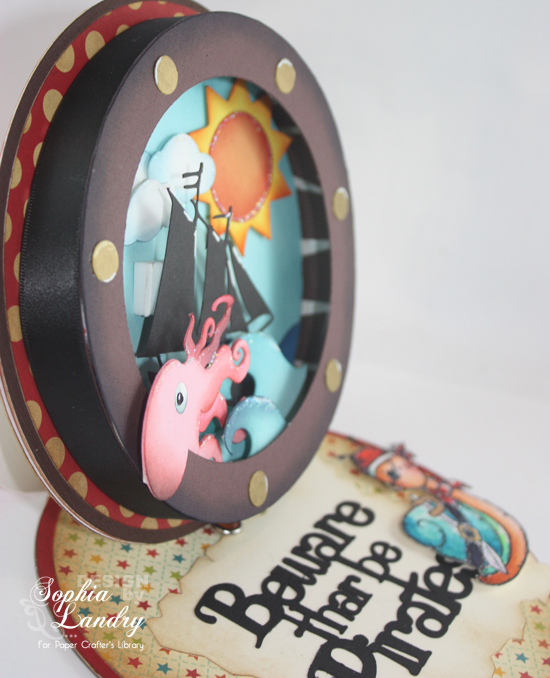
This week Sophia continues on with our Shadow Box Easel Card series – this time with an adorable shadow box designed to look like a porthole on a ship. You can see the other Shadow Boxes created so far by clicking HERE. Each shadow box has it’s own exclusive template designed by Sophia – and two versions are provided to Paper Crafter’s Library members – a printable template and a studio cut file that you can cut out on your Silhouette Cameo or Portrait machine. So far three different shapes have been released to members – a square, a rectangle and a circle. Sophia will be adding to this series with a heart, oval and hexagon shaped Shadow Boxes which will be released one a week.
We also have another exclusive template designed by yours truly (Andrea) – this Heart shaped treat pouch you can see below:
Of course, in addition to these projects we have a bunch more pictured in the sneak peek above.
Some of the techniques/products included in this weeks projects include:
triple heat embossing of chipboard shapes
using your left-over stickers to create the entire focal point of your card
coloring with copic markers
creating a shaped card
creating a shaped window on your card filled with layered ribbon
using coordinating stamps and dies
To see a sample of our teaching style you can check out our Free Project of the Week – which is released every Friday. You can see this week’s project HERE.
Read about all the perks of being a Paper Crafter’s Library member you can visit our Benefits of Membership page HERE.
I have created several cards using Washi tape for Paper Crafter’s Library in the last little while. I find that Washi tape is a nice easy way to dress up your paper crafting projects. While I used various colors and patterns of Washi tape, you can always substitute patterned paper or ribbon for the Wahsi tape to complete this card.
You can view a video on how I created this Thanks Washi Tape card below.
Supplies:
Paper: Stamper’s Select White CS (papertrey ink)
Accessories: bone folder, paper snips, Rhinestone Basic Jewels (Stampin’ Up!); Scene Thickers alphabet stickers (Amy Tangerine – American Crafts); 3D Foam (thermo-web); assorted washi or tissue tape (craft store)