Free Project of The Week: What’s Up? Card – 02 22 2013

This week on the Paper Crafter’s Library card we’ve created a clean and simple card which showcases Paper Smooches stamps, Studio Calico’s Speech Bubbles Wood Veneer shapes and coloring with Copic Markers.

What'sUp-02222013-550W

ETA: the pdf handout download is now working – I apologize for the inconvenience!

Download the PDF handout HERE.

You can watch the video below:

Supplies:

Stamps: Perky Plants (Paper Smooches)

Ink:  Memento Tuxedo Black (Tsukineko), Y11, Y15, Y38, R20, R22, R24, BG01, BG05, BG09, YG11, YG13, YG17 Copic Markers (Copic);

Paper: Stamper’s Select White CS (Papertrey Ink); Daffodil Delight CS (Stampin’ Up!)

Accessories: mini glue dots (Stampin’ Up!); Speech Bubbles Wood Veneer Pieces (Studio Calico); Tape Runner XL (thermo-web), Tiny Twinkles (Taylored Expressions), Glossy Accents (Ranger)

andreasiggypcl

Featured Artist: Ronda Palazzari

Today on the Paper Crafter’s Library blog, we’re continuing our all new weekly featured artist whereby each week spotlight a different artist/designer in the paper crafting & mixed media world and introducing you to their fabulous work.

Today we’re thrilled to welcome – Ronda Palazzari!! I have been a long time fan of Ronda’s work and was thrilled to have been able to meet her in person at the Maya Road booth at CHA 2012 in Anaheim.  I just love the bright, vibrant colors she incorporates into her work…and her style?  Amazing! I’m sure when you see the projects that she is sharing today you’ll agree!  To add to the excitement, Ronda is sponsoring a give-away of her book Art of Layers – I own it, and LOVE it!

Before we show you her fabulous project, let’s get to know her a little bit more…

Ronda Palazzari is an Author, mixed media Artist, Scrapbook Designer, and an Instructor living in the burbs of Denver.  She has been into art since early childhood.  One of her most memorable Christmas presents was a Crayola Caddy that inspired her to create.  She took many art classes throughout her secondary and college schooling.  Ronda was also an editor on her high school newspaper.  She loved photos, stories, and white space so layouts became her specialty.  After the birth of her children she began scrapbooking as it brought art & storytelling together. 

In 2009, Ronda became a Memory Maker Master for Memory Makers Magazine.  She started doing contract design for many manufactures including Fancy Pants Designs, Lily Bee Designs, Crate Paper, Purple Onion Designs, as well as Guest Designing for many other leading manufactures.  Her first book Art of Layers with North Light Publishing/F&W Media was released in March 2012. She has published in several magazines and idea books including Artful Blogging, Creating Keepsakes, Memory Makers, Scrapbook Trends, and Somerset Magazines. 

Ronda is currently a license designer for The Crafter’s Workshop releasing 8 new stencils in January 2013.  She is currently contract designing for Maya Road, Sizzix, and My Mind’s Eye.  She’s best known for combining her mixed-media techniques with bold bright colors.  Ronda is one to follow because you never know if she will be art journaling, scrapbooking, sewing or getting messy with paints; her art changes day-to-day.  She continues to teach worldwide as well as providing inspiration and telling her dorky stories on her blog HelpMeRonda.

Ronda Palazzari Art of Layers

Ronda Palazzari Designs TCW Stencil Release 2013

This tiny canvas trio is made up of three 3” canvases that could be displayed on their own or as a set.  I used lots of techniques found in my book, Art of layers.  I started the canvases with some gesso and old text.  I used my 6×6 kaleidoscope stencil and heavy gesso to create texture on the background on one of the canvases.  I then worked on each canvas individually.  One the Pink Bloom canvas, I added layers of acrylic paint to create a warm background of pinks & oranges with touches of yellow.  Next using my 6×6 quatrefoil stencil and distress ink, I rubbed the ink onto the canvas creating another layer of color.  In my book I talk about repetition of stamped images.  On this mini canvas I repeated the postal stamp images.  I made the flower by stacking three layers of fabric circles and stitching through the layers with black thread.  I added the brad to the center and painted a black stem.

Ronda Palazzari Little Things Canvas 1 Bloom details

Ronda Palazzari Little Things Canvas 1 Bloom

Ronda Palazzari Little Things Canvas 1 Bloom details 2

The Yellow Quote Canvas is the one that started with heavy gesso & stencil as a textured background.  I used acrylic paints to color the background and then stamped images in black around the background.  I also doodle some images around the edges.  Once these layers dried, I used my splattered paint techniques found in my book Art of Layers.   I added the strips of the quote to the center of the canvas.

 Ronda Palazzari Little Things Canvas 2 Quote details

Ronda Palazzari Little Things Mini Canvases beginning

On the Blue Butterfly canvas, I used vintage maps on the background.  I painted the background with acrylic paints in aqua, white, and grey colors.  I then sprayed turquoise mist through my honeycomb stencil to add another layer of color.  I added the leaf stamped images and splatters of paint to the background along with drips of spray ink.  I also added splats & the heart on the background using my 6×6 confetti stencil.  The stamped butterflies are another technique found in my book.  They added the finishing touches to this canvas.

 Ronda Palazzari Little Things Mini Canvases side details 2

Ronda Palazzari Little Things Mini Canvases side details

I like the sides of my canvases to look as good as the tops so I added stamped images along with hand written words.  It’s a nice finishing touch.  Lastly I attached all the canvases together using tiny eye screws to create this adorable trio.

Ronda Palazzari Little Things Mini Canvas Trio


Supply list for your project

Three 3” Canvas
Old Text and maps
Acrylic paints (Liquitex basic)
Gesso
Heavy body gesso
6×6 Kaleidoscope stencil
6×6 Quatrefoil Stencil
6×6 Honeycomb Stencil
6×6 Confetti Stencil
Distress inks: Wild Honey, Mustard Seed, Aged Mahogany
Ranger Archival Ink
Uniball Vision Roller Black Pen
Hero Arts Stamps, Cocoa Daisy Stamps, Purple Onion Stamps, Antiquated Collection Stamps, Glitz Stamps
Maya Road Turquoise, Lime Metallic, Sunflower Yellow, Fig Magenta Maya Mist,
My Mind’s Eye Brad
Ranger Inkssentials Enamel Accents


We hope you have enjoyed today’s projects courtesy of Ronda Palazzari. We also want to extend a sincere thank you to Ronda for sharing her creation with us.  You can get a copy of her book here.  Also, be sure to stop by Ronda’s blog to see even more of her beautiful work (and let her know we sent you).

Be sure to leave a comment here for  your chance to win a signed copy of Ronda’s Book Art of Layers!


Winner of May Arts Give-away from Wednesday, February 13th!

mayartslogo

I’d like to extend a HUGE thank you to May Arts and to designer Karen Baker for sharing such a wonderful project and for their generous give-away of two spools of May Arts ribbons – winner’s choice!

SAMSUNG DIGITAL CAMERA

And now, the moment you’ve all been waiting for…….the winner is……Tanya Eckstrom!

Screen Shot 2013-02-20 at 11.36.32 AM

Congratulations Tanya.  Check out the May Arts Shop to choose your two ribbon rolls and then email us your selection along with your phone number and shipping address to customerservice@papercrafterslibrary.com to claim your prize.  Please be sure to put “May Arts Winner” in the subject line of the email, and then in the email itself, be sure to include your full mailing address and phone number.

For those of you that didn’t win, each week on PCL we feature a different company, and each of those companies generously sponsors a prize – so be sure to check out this week’s spotlight – Ribbon Roll Control!

andreasiggypcl

Featured Company: Ribbon Roll Control Plus Giveaway

RRC Logo

Today we are featuring a new company called Ribbon Roll Control! Here at Paper Crafter’s Library we’re ribbon lovers – you’ll find ribbon on almost all of our projects – which is why we’re so thrilled to bring you this feature.  I don’t know about you, but we’ve certainly found that keeping all our ribbon in one place can be challenging.  That’s why we’re excited about featuring Ribbon Roll Control and about being able to offer you their fabulous give-away! 


RRC8

And, we also have a give-a-way for you!! Three lucky winners will receive a “winners choice” of one Ribbon Roll Control.  You can choose from the Original or the Petite.  The winners will be chosen from the comments left at the bottom of this blog post.  Simply leave a comment about the Ribbon Roll Control here on the Paper Crafter’s Library blog to win.  The winners will be chosen randomly and announced next week.

RRC7 RRC9

Remember, each comment you leave is one entry, so be sure to visit today not only for the great feature, but also to enter your name into our give-a-ways.

About Ribbon Roll Control

As the ultimate ribbon roll holder, the Ribbon Roll Control allows you to organize your ribbon the way you want – by color, size, style or use! If you have rolls out of control, this is the answer!

Unlike typical ribbon holders, the Ribbon Roll Control doesn’t use a dowel – which means you don’t have the inconvenience of removing all your ribbon rolls just to get to a specific one. The Ribbon Roll Control is also made of clear acrylic, so unlike wooden holders, you can easily see the style and quantity of all your ribbon at once. There’s even a built-in ruler for easy measuring!

RRC5

The Ribbon Roll Control comes in two different styles – Original and Petite. The Original can accommodate crafting ribbon rolls up to 5 inches in diameter, while the Petite can accommodate rolls up to 3.5 inches. Both models fit up to (16) 3/8” ribbon rolls in one holder, and can be stacked up to three holders high or mounted to the wall – freeing up valuable table or desk space.

RRC3

You can take a look at this video below and see how it all comes together.

We hope you have enjoyed today’s feature. We want to extend a sincere thank you to Trish from Ribbon Roll Control for sharing her product with us. Be sure to visit Ribbon Roll Control to get yours today and make sure to post below for your chance at our Ribbon Roll Control give-a-ways.

Trendy Tuesday – Robots

Trendy Tuesday – Robots
by Katherine Elliot

 Easy to be inspired checking out all the very pretty Valentine cards that were featured on blogs and magazines this month.  Many were fancy & frilly with pink, red, and a variety of other colors and trends we”ve featured on Trendy Tuesday.  But some less frilly cards drew my attention this year, and I have to say, they were a fresh surprise.  Many of these cards featured robots.  A robot theme revives my inner geek, and just makes me smile.  I hope you”ll smile, too.

Sending Bots of Love card by Taylor Van Bruggen, image source Taylored Expressions

Robots are fun images for a boy or girl, and for any age.  Several companies are featuring some really cute robot theme sets, so here are some inspiring ones for you to browse.  The Taylored Expressions set, Far Out, features a variety of bots and sayings offering plenty of ways to use these cute stamps for different occasions.

Card by Jen Shults, image source Deconstructing Jen

Get Well Soon Robot card by Charmaine Ikach, image source Oodabug Alley

Far Out

Taylored Expressions stamp set, Far Out

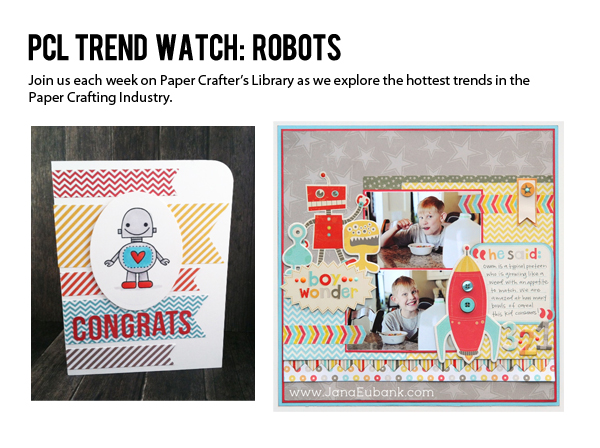
My Minds Eye has a new set of papers, stickers, embellishments and stamps in their line, Boy Crazy.  The line includes a cute robot, of course, but also some other images and patterns that are great for your project featuring a casual, laid back style.

Boy Crazy stickers and stamps from My Minds Eye, image source Two Peas in a Bucket

JanaEubank_MyMindsEye_BoyWonder_600Blog

Scrapbook page featuring Boy Crazy images, image source from Jana Eubank

Pink Cat Studio is another brand of stamps that offers both rubber stamps, as well as a variety of digital stamps. Several of Pink Cat Studio digital robots have a unique style of their own.

Pink Cat Studio Robot stamp, image source Class Act Inc

 Card featuring Pink Cat Studios Robot  

Robot love card, image source Pink Cat Studio

 Tracy Stanisich has an “80s groove going on with her Domo Arigato card.  Too young to know what I mean?  Check out her post!

 Mr. Roboto card by Tracy Stanisich, image source Present Scraps

The digital world is a perfect place to find a robot.  Hero Arts is another company that offers both digital stamps and traditional wood mounted rubber stamps.  And, yes, more cute robots can be found in both types of creative tools.

 Hero Arts Digital stamps, image source Two Peas in a Bucket

Hero Arts Robot trio wood block stamps, image source Hero Arts

Lunchbox Cards featuring Hero Arts robot by Jennifer McQuire, image source Hero Arts


Card featuring Hero Arts robot by Lucy Abrams, image source Two Peas in a Bucket

 Peachy Keen Stamps also has a new robot stamp set release.  Jeanne Streiff”s card below shows off what looks like whimsical steampunk robots to me.

 Card featuring Peachy Keen stamps by Jeanne Streiff, image source Inky Paws

Great Vibes Robots from Peachy Keen Stamps

Back to the digital world for a moment, Birdie Brown also offers some really sweet digital stamp robot images.  The simple styles of the cards below showcase these images well.

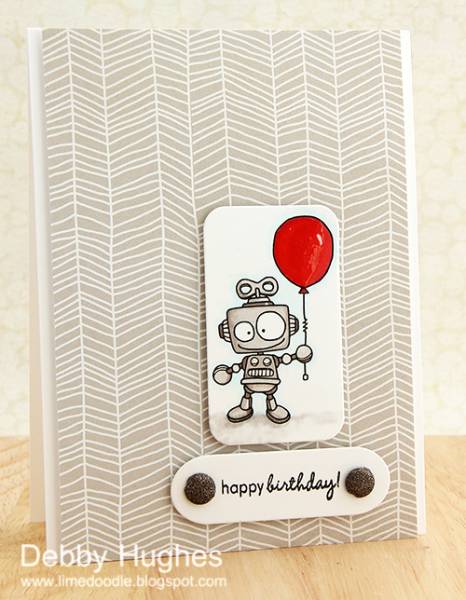
BirdieBrown digital stamp robot card by Debby Hughes, image source lime doodle

Card featuring another BirdieBrown digital stamp, card and image source by Doni High at Lime Green Giggles

 I know by the time you read this post Valentines Day has come and gone, but the loved ones in your life will of course give you more occasions to share your love, so you never know when you”ll need a few more love theme cards around.  There She Goes Stamps also has some cute “bots in love theme images to share.

Bursting with Love card by Kim O”Connell featuring Love Bots stamp from There She Goes Clear Stamps

Some other robot theme papers out there may also come in handy, especially if you”re interested in creating some robot theme decorations.  Kaisercraft has both a line of papers and DIY robot theme decorations that could really spruce up a child”s room.

Technologic - 12x12 Scrapbook Paper - Gigabyte

Technologic scrapbook paper from Kaisercraft

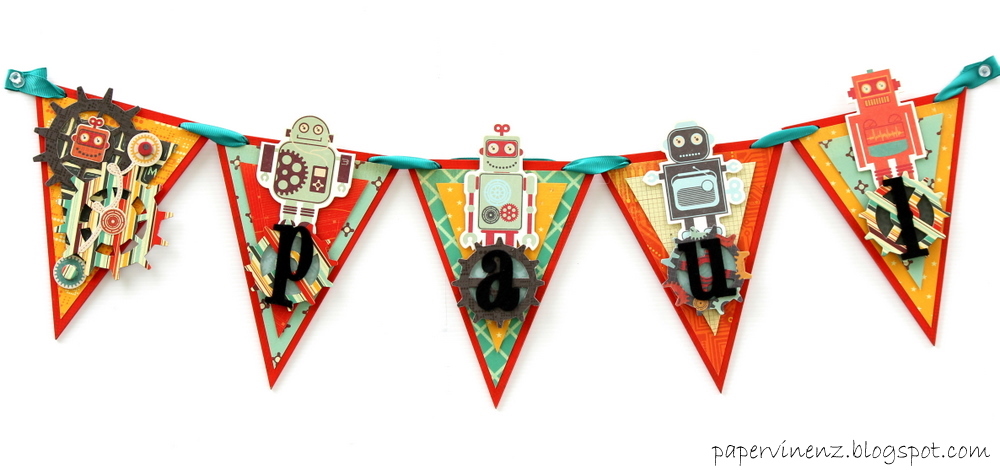
Robot banner featuring Kaisercraft papers, image source papervinenz.blogspot.com

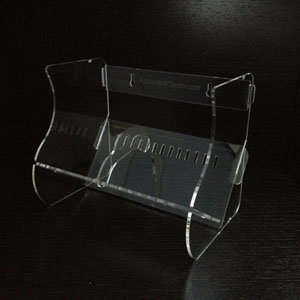
Robot photo card holder (undecorated) from Kaisercraft image source Scrapbook.com

Robot Photo Display

Completed robot photo display, image source Kaisercraft.com

 Propelling your paper crafting style into the future, you know you”ll find use for these fun images some day.  Now I”m ready to go rent the Hugh Jackman movie “Real Steel” again and play with my robot stamps.  Happy crafting, everyone!
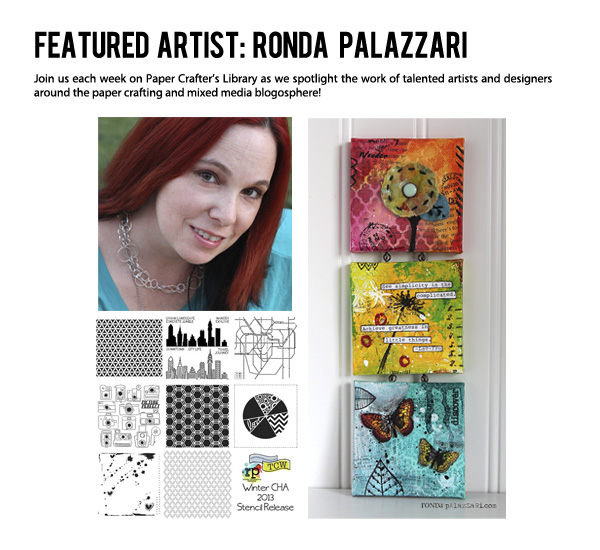
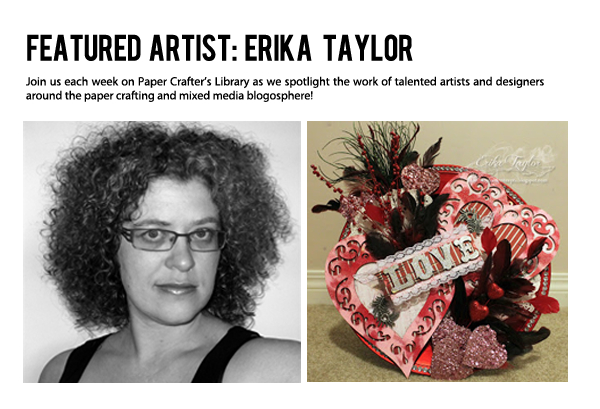
PCL Membership Highlights Feb. 11th – Feb. 15th

PCLWeekltHighlightfeb11-feb15


Paper Crafter’s Library was launched in January 2011 with the goal of becoming an all-in-one learning solution for paper crafters. With over 1000 videos in our library to date, and over 50 videos being added each month – we are the largest and most comprehensive online learning resource for paper crafter’s worldwide.

Each Monday we provide you with a behind-the-scenes sneak peek of the projects that were released to our members the previous week.  So the sneak peek you see above is a snapshot of the video tutorials & pdf handouts our members received for the week of February 11th to February 15th

Each week at Paper Crafter’s Library our full monthly members can expect to receive access to a minimum of 8 exclusive projects – totalling around 50 videos each month.  In planning for our projects we ensure that we cover a range of project types so that there is something for everyone whatever their interest or preference – whether it be card making, stamping, scrapbooking, altered art, mixed media, 3D items, templates, techniques etc.  Projects range in difficulty level – so there will always be projects in library for whatever your paper crafting “level” whether you are a beginning paper crafter, or a more advanced paper crafter.

This week Sophia finished off our Shadow Box Easel Card series – this time with a gorgeous hexagon shaped shadow box.  You can see the other Shadow Boxes created so far by clicking HERE and  HERE and HERE and HERE.  Each shadow box has it’s own exclusive template designed by Sophia – and two versions are provided to Paper Crafter’s Library members – a printable template and a studio cut file that you can cut out on your Silhouette Cameo or Portrait machine.  As part of the series, 6 different shapes in all were released  – a square, a rectangle, a circle, a heart, an oval and finally, a hexagon.

HexagonShadowBoxEaselCardSideView-02122013

Check out this adorable three dimensional carrot that Tracy created – just perfect for Easter.  Wouldn’t your kids love finding these during their Easter Egg hunt?  Or, how about as a nice co-worker surprise?

CarrotSourCreamContainerForAndrea

This week on PCL we also took another dive into mixed media with this art journal page I created called “Comparison is the thief of Joy”. The video tutorial shows the entire process from start to finish.

ComparisonForAndrea

Other highlights this week:

  • A scrapbook layout featuring American Crafts & Studio Calico
  • Using a monochromatic sponging technique
  • An out-of the box way to use your stamps
  • Using honeypop paper to add dimension to your projects
  • Using the stamping off technique to achieve a tone on tone effect

To see a sample of our teaching style you can check out our Free Project of the Week – which is released every Friday.  You can see this week’s project HERE.

Read about all the perks of being a Paper Crafter’s Library member you can visit our Benefits of Membership page HERE.

andreasiggypcl


Free Project of The Week: Washi Tape Birthday Card – 02 15 2013

This week for our Free Project of the Week we’ve got another quick and easy Washi Tape card for you.  Washi tape is one of those products that’s incredibly versatile as well as fun to use.  It comes in a multitude of colors, it’s not very expensive and it’s super easy to use.  In order to create this card I simply chose some complimentary colors of Washi tape in a variety of different patterns and then overlapped and layered them in differing lengths. If you don’t own any washi tape you can substitute with ribbon or patterned paper strips – they’ll just be a little more bulky.  Also, if you do substitute one of these items you’ll need to stamp your greeting differently as it won’t stamp cleanly over top multiple layers of ribbon or patterned paper.

WashiTapeBirthday-02152013-550W

Download the pdf handout here

You can view a video on how I created this Washi Tape Birthday Card here

Supplies

Stamps: Think Big Favorites #14 (papertrey ink)

Ink:  Jet Black Archival ink (Ranger)

Paper: Whisper White CS, Marina Mist CS (Stampin’ Up!); Java CS (Bazzill)

Accessories: Washi tape (Craft Store); Stampin’ Dimensionals , bone folder (Stampin’ Up!); Black Rhinestones (Kaiser Craft); Tape Runner XL (thermo-web)


Have a great weekend!

pctracysiggy

Featured Artist: Erika Taylor

This week on the Paper Crafter’s Library blog we’re excited to announce the launch of an all new weekly feature.  Each week we’re going to be spotlighting a different  artist/designer in the paper crafting & mixed media world and introducing you to their fabulous work.

Today we’re thrilled to welcome – Erika Taylor!!  I first “met” Erika as part of our Wow! Embossing Powder Week on Paper Crafter’s Library last year, and immediately fell in love with her work.  In fact, we loved it so much that we invited Erika back to be our very first Featured Designer!  Erika is also giving away a special Valentine’s basket so be sure to leave a comment here on our blog and Erika’s blog for a chance to win.

Before we show you her fabulous project, let’s get to know her a little bit more…

VLUU L100, M100  / Samsung L100, M100

Cutting rings of paper to create garland, making ghost gum from glue, and adding a little too much glitter to any heart I drew. The creative bug bit me at a very early age since my mom is such an amazing artist, and I’ve never looked back. Hi everyone, I’m Erika Taylor and I’m a Craftaholic!!! In 2008, I decided to start paper crafting and one thing led to another. I’m blessed to have been on numerous design teams over the past few years and I’m expanding my own creative muse to include so much more than just cards and scrapbook layouts.
I love getting inked up to create mixed media projects and if I can alter something, I will.

I live in Southern Alberta with my loving and supportive husband Mark and our 2 boisterous children age 5 and 8. Anything to do with Vampires and the Fantasy Realm gets my attention, and yes that includes Twilight! I love Italian Sweet Cream in my coffee and there is nothing better than Tiramisu. I’m moved by the colors around me, emotions and the media. Creatively, I embrace change and love to try new things and I’m super excited about being a part of this amazing adventure.

Grab your favorite beverage and stop by my blog for a visit http://taylordconcepts.blogspot.com

And now, on to Erica’s project:

Hello everyone, Erika Taylor here today. Recently I received a wonderful email from Andrea and I am so over the moon excited to be the Featured Artist today on Paper Crafters Library. Being Valentines Day, I wanted to create a DIY project for you using a Charger Plate as the backdrop.

The Charger Plate gives a sturdy foundation for this piece and I adore how it turned out and hope you do to.

First a little supply list for you.

Charger Plate
Feathers
Valentines Sprigs
2 Wooden Hearts
Wood Letters
Heart Garland
Paper Doilies
Wow Embossing Powder
May Arts Lace Trim
FabScraps Pattern Paper
Helmar Adhesive
Scissors

Now that I have all of my supplies, the gluing begins. I created some texture to the wood by embossing it with Wow Embossing Powders in Platinum, Pastel Pink, Cable Car Red and Whirly Pop.

Here are some close ups of the finished project for you

The papers are a combination of FabScraps Summer and Marie Antoinette collections and are perfect for those Valentines projects.

Here is the final project. Would you have guessed that I used a charger plate? I mounted a hook on the back so it can hang at the entrance-way of our home. This one was super fun to create and cost less than $10 to make.

Here are the steps I followed to create this project:

1) accordion fold doilies and adhere to charger plate
2) adhere feathers to charger plate
3) Apply Versamark onto wooden hearts. Sprinkle first color onto hearts sporadically. Place excess embossing powders back into jar. Repeat with second and third colors. Heat with heat tool
4) Trace interior and exterior heart of wooden heart onto patterned paper. Cut out and adhere to wooden hearts. Apply finished hearts onto charger plate
5) Adhere cut garland hearts onto charger plate.
6) Cut out large banner shaped piece of patterned paper and dove tail ends. Fold ends to create 3 dimension banner. Spray with Glimmer Mist.
7) Cut out smaller banner shape from contrasting patterned paper and dove tail ends. Add May Arts lace to backside edges, then adhere to larger banner.
8) Adhere banner onto front of charger plate.
9) Heat emboss wooden letters by applying Versamark then sprinkling with Glitter Platinum embossing powder. Adhere to banner.
10) Finish piece by adding additional glitter hearts, feathers and hook on back.

Thank you so much for the opportunity to share my work with you. If you would like to follow my little journey, please subscribe to my blog Ink Cut and Fold. I will be giving away a little gift for any of you that hop on over to my blog and leave a comment on my Sneak Peek Paper Crafters Library Post.

Thank you again,  Erika Taylor

Give-Away Compliments of Erika!
Make sure to leave a comment on our blog and on Erika’s blog because she is giving away a special Valentine’s basket to one lucky winner.  Happy Valentine’s Day!

We hope you have enjoyed today’s project courtesy of Erika Taylor. We also want to extend a sincere thank you to Erika  for sharing her creation with us.  Also, be sure to stop by Erika’s blog to see even more of her beautiful work (and let her know we sent you).


Featured Company: May Arts

May Arts Logo

Today we are excited to welcome back May Arts and to share a beautiful creation from one of their designers using some gorgeous May Arts Ribbon. 

Here at Paper Crafter’s Library we’re ribbon lovers – you’ll find ribbon on almost all of our projects – which is why we’re so thrilled to bring you another fabulous May Arts project. You haven’t seen ribbon until you’ve seen May Arts Ribbon – they offer a multitude of different colors and styles of ribbon to suit any preference and taste – and all of it, top quality!

And, we also have a give-a-way for you!! Two lucky winners will receive a “winners choice” of 2 spools of Ribbon from May Arts. One winner will be drawn from all the comments left here on the Paper Crafter’s Library blog to win AND one winner will be drawn from all the comments left on the May Arts Blog to win. You certainly have a lot to choose from:

May Arts Ribbon

Remember, each comment you leave is one entry, so be sure to visit today not only for the great project idea, but also to enter your name into our give-aways.

About May Arts

May Arts Ribbon was founded in the early 1980’s in Riverside, Connecticut. The original products were high-end silk flowers imported from Taiwan, which were decorated using quality ribbons. The decorative ribbons proved so popular among customers that the business gradually evolved into a dedicated ribbon wholesaler.

As a family-owned and operated business, May Arts began a long-standing tradition of quality, affordability and exceptional customer service. We are dedicated to carrying on this same tradition by offering high quality products at competitive prices. Our friendly, knowledgeable staff is always happy to answer your questions or to assist you in placing your order.

May Arts carries a wide selection of quality ribbons to choose from; such as grosgrain, silk, satin, burlap and a variety of prints and patterns. All inventory is held in stock, so we can ship orders out right away—typically the same day.


Where to Buy May Arts Ribbons

The May Arts website is their wholesale site for online and brink and mortar retailers. We’ve linked to it so that you can easily view their entire product line in one place. There are numerous places where you can purchase May Arts Ribbons including many local scrapbook stores as well as online stores. Two of the online stores that carry the biggest selections that we are aware of include Amazon, who carry the complete May Arts Ribbon Line (plus you can qualify for free shipping). Click on the link we provided and it will take you to our May Arts Ribbon Search Results. To find a particular ribbon, go to the May Arts website, find the name of the ribbon and color and then enter that into your Amazon search results. Please note that through Amazon you’re buying by the roll. Most other online and local scrapbook stores sell May Arts Ribbon by the yard. One of the online stores that carries a great selection is Ribbon Carousel.

May Arts Design Team Project

Today we have with us May Arts Designer Karen Baker.  You will find her project below, but first here is a little bit about Karen:

karenbakerprofilepicture

I’m a graphic designer by trade, wife, and mama of two energetic boys who spends weekdays at work and late evenings crafting. I’m drawn to clean and simple style, yet like to dabble in shabby and chic, elegant and fun and cute too!

I really enjoy card making, stamp illustrating and interior design. Anything that will stretch my boundaries, challenge me and make me a better designer is what I strive for! You can find my creations on my blog, The Bald Dragonfly!


Thinking of You Card

feb142013FinalCard

Ombre is still a hot trend! Today I’ve got a quick tutorial on creating an sleek and sophisticated card using the ombre look with May Arts Silk Ribbon! Try this technique with the yellow/gold, blue and green hues that are offered in this line. (The fringed flower is also created with this same ribbon!)

feb1420131

feb1420132

feb1420133

Supplies:
May Arts 1.25″ Silk Ribbon (SK25, SK26, SK19, SK17)
White Cardstock

Market Street Stamps Great Big Greetings
Onyx Black Versafine Ink
Papertrey Ink Coaster
Spray Adhesive

 Enter the May Arts Give-Away

We hope you have enjoyed today’s projects. We want to extend a sincere thank you to Karen Baker for sharing her creations with us. And don’t forget to enter to win one of the great ribbon give-a-ways from May Arts. Please leave your comment below. Also, be sure to stop by the May Arts Blog when you see the Paper Crafter’s Library post published for another chance to win, and tell them Paper Crafter’s Library sent you! Winners will be announced next week!

Winner of Nunn Designs Give-Away!

NunnDesignsLogo

I’d like to extend a HUGE thank you to Nunn Designs, to owner and designer Becky Nunn as well as designer Cheryl Spector for sharing such wonderful project ideas as well for their generous give-away shown below.

JunnFall 2012 Giveaway

And now, the moment you’ve all been waiting for…….the winner is……Carla Spradling!

Screen Shot 2013-02-12 at 7.39.36 PM

Congratulations Carla.  Please email us at customerservice@papercrafterslibrary.com to claim your prize.  Please be sure to put “Nunn Designs Winner” in the subject line of the email, and then in the email itself, be sure to include your full mailing address and phone number.

For those of you that didn’t win, each week on PCL we feature a different company, and each of those companies generously sponsors a prize – so be sure to check out this week’s spotlight – May Arts!

andreasiggypcl