Winner of Graphic 45 Give-Away

I’d like to extend a HUGE thank you to Graphic 45 and their guest designer Rhea Freitag for sharing such a wonderful project and for their generous give-away of their collection shown below.

1120mothergoosegiveaway

And now, the moment you’ve all been waiting for…….the winner is……Dusty Weber!

G45WinnerNov27Post

Congratulations Dusty!! Be sure to email us at customerservice@papercrafterslibrary.com to claim your prize. Please be sure to put “Graphic 45 Winner” in the subject line of the email, and then in the email itself, be sure to include your full mailing address and phone number.

For those of you that didn’t win, each week on PCL we feature a different company, and each of those companies generously sponsors a prize. Join us next week when we feature another great company.

andreasiggypcl

Trendy Tuesday – #Hashtags

Trendy Tuesday – #Hashtags
by Katherine Elliot 

Most days, seeking trends in the paper craft world is pretty easy in the social media crazy world we live in.  Blending internet culture and paper crafts is quite a hobby for me now, so why not embrace the two by sharing projects that do the same – showcasing the popular hashtag on cards and scrapbook pages!  The “Twitter-verse” is where many uses of this symbolic search tool have been popularized.  The hashtag, which is also the symbol many recognize as the pound or number sign on our keyboards, is now used to create hyperlinks and organize posts with certain themes through many different social media outlets (read more about hashtags at this link from All About).  With the popularity of hashtags, this was a challenging trend to locate projects to share with you.  Since a hashtag is used to link topics and posts, the mention of “hashtag” sent my search engine all over the place while I went to visit all my favorite on-line crafty places.  Luckily, I already spotted several great projects, take a look…

Card by Maria Fischer, image source Riesling Mama blog

#Today CardCard by Daniela Dobson, featuring Notebook Card steel die, image source Technique Tuesday

First day of school scrapbook page by Adrienne Alvis, image source Paper Fab

 Adding a hashtag to a word or phrase is easy with a die cut hashtag symbol adhered in front.  Aliya White showcased many great phrases in last week’s Trendy Tuesday Expression Die Cuts post.  Many die cuts could easily be enhanced by a modern touch with one of these die cut tools from Taylored Expressions, Technique Tuesday, or Kelly Purkey.

From the Desk of...Taylored Expressions From the Desk of… Dies

Steel Die - Notebook Card

 Notebook Card steel die from Technique Tuesday

TT #hackedScrapbook page by Summer Fullerton, image source So There I Was

*Kelly Purkey Wafer Thin Dies PHONE SET SMNS-011Kelly Purkey Phone Set dies, image source Simon Says Stamp

 Some trend-setting companies also offer some hashtag ready stamp set options for your crafting needs.  Check out these trendy sets from Mama Elephant, Freshly Squeezed Stamps, Reverse Confetti, and My Minds Eye.

Card featuring Hustle stamp set, image source Mama Elephant blog

HUSTLE

Hustle stamp set from Mama Elephant

Christmas hashtag card by Heather Campbell, image source Freshly Squeezed Stamps

Hello December  Hello December stamp set from Freshly Squeezed Stamps

Card by Amy Sheffer, image source Splitcoast Stampers Gallery

 ANE1Arrows ‘n Elements stamp set from Reverse Confetti

Flair Snapshots Decorative stamp set from My Minds Eye, image source Two Peas in a Bucket

 I’m guessing many crafters that want to incorporate a hashtag or two in their projects will not shy away from a few digital stamp options that also feature hashtag words and phrases.

Hybrid tag by Kate Christensen featuring digital stamps from Deena Rutter, image source Two Peas in a Bucket Gallery

Print some phrases for your hybrid projects or add the stamps to your digital designs to capture this moment in time when hashtags are hot.  Deena Rutter and CZ Design have some great options for everyday and holiday use.

A Kind Word- #summer hashtag brushesDeena Rutter A Kind Word Summer Hashtags digital brush set, image source Pixels and Company

CZ_HashtagsNo03ThankfulPREVDigital scrapbook brush sets from CZ Design

Looking for another way to incorporate this digitally inspired trend?  What may possibly be considered the polar opposite of a digital image, are very trendy wood veneer alphabet die cuts, like these from Studio Calico.  Surprise, surprise, this set includes some hashtags!

*Studio Calico ALPHABET Wood Veneer Shapes Darling Dear 331220Studio Calico Darling Dear Alphabet wood veneer shapes, image source Simon Says Stamp

 The wood embellishments on the hashtag phrase shown on Bethany’s card give the hand crafted greeting a warm and friendly feeling, something one couldn’t detect as well if it was just a tweet.  Love the old school rotary phone, too…remember those?  No texting back then, but we still survived…Card by Hip Kit Club DT member, Bethany Crowell,  featuring July 2013 Hip Kit and Add-Ons from HipKitClub where you can find lots of trendsetting kits, Coupon Code for 10% off membership HIPKITCLUB10, contact info kimberly@hipkitclub.com, image source Two Peas in a Bucket Gallery

So, will any of you tweet a link to this post today?  Maybe quickly tweet your friends and followers to put the smart phone down for a bit and make a card!  😆   Happy crafting, everyone!

Mixed Media Monday: “She Designed a Life She Loved” Video Tutorial

ArtJournalExpressLogoHappy Monday everyone! Welcome to another edition of Art Journal Express brought to you by Andrea from her personal blog The Art of Simple.

Art Journal Express is a weekly video tutorial series she created for her personal blog The Art of Simple. Each week on Monday she posts a video tutorial on how she created one of her art journal pages from start to finish. Because a typical art journal page takes between 20 minutes to an hour for her to create – which makes for a super long video to upload to You Tube, and for you to watch – the video clips are sped up, rather than having you watch what she’s doing in real time – hence the word “express” in Art Journal Express. However, what makes these video tutorials different from most of the “sped up” art journaling video tutorials out there is that Andrea narrated for you exactly what she’s doing and what she’s using – that way, even though you’re watching a “fast forward” version, you don’t miss a single detail.

The videos are hosted on a You Tube Channel that is separate from the Paper Crafter’s Library You Tube Channel, so if you don’t want to miss a single edition of Art Journal Express please subscribe to that You Tube Channel (you can do so from the video tutorial page from today’s post).

Today’s page is called “She Designed a Life She Loved” – shown below. You can watch a video tutorial HERE.

SheDesignedALifeSheLovedCloseUpBlog-550W

Featured Artist/Designer: Laurie Willison

Today on the Paper Crafter’s Library blog, we’re continuing our weekly featured artist spotlight whereby each week we spotlight a different artist/designer in the paper crafting & mixed media world and introduce you to their fabulous work.

Today we’re thrilled to welcome back – Laurie Willison.

Before we show you Laurie’s fabulous projects, let’s get to know her a little bit more…

1121lauriewillsonbiopicMy name is Laurie Willison. You can usually find me crafting away in my craft room while the kids are in school or when they are sleeping! 🙂 Other than that I am a part time RN and I live in the country with my very own farm boy and our 2 kiddos. 🙂

I have been stamping since 2007, when a sweet friend of mine introduced me and I started scrapbooking in 1998 ish. (I still try on occasion but it doesn’t happen very often.) I have had the pleasure and honor of working on several design teams, including Verve Stamps, Curtain Call Challenge Blog, Retro Sketches, Reverse Confetti Challenge Team and Muse Card Club.

My style is mostly CAS and I love to follow trends occasionally but I do love lots of white space and fun images. I am always on the look out for fun fonts too! I am honored to be a Featured Designer here at Paper Crafter’s Library! Thanks so much for having me!

Card Projects

1121laurie1

Peace Love and Sparkly Stuff

The idea of this card can be used for any occasion simply by changing the image or sentiment.  It’s a great layout.

1. Fold white card stock for card base.
2. Score 3 lines across the middle at 1/2″ apart. 
3. Die cut 2 tags, one white, one kraft and layer together. 
4. Decorate outer edge with Wink of Stella brush or other glitter.
5. Hand cut holly leaves and attach to top of tag.
6. Die cut banner and stamp stripes and sentiment.
7. Attach banner to tag and attach tag to card front.
 
Supplies:
Stamps: Reverse Confetti So Stripey and Tinsel and Trim
Paper: Neenah Solar White, PTI Kraft and Simply Chartreuse
Ink: Strawberry Fresh Ink, Versafine Black Onyx
Misc: Wink of Stella Glitter pin, Scor-pal

We hope you have enjoyed today’s projects courtesy of Laurie Willison. Also, be sure to stop by Laurie’s Blog to see even more of her beautiful work (and let her know we sent you).


Winner of May Arts Give-Away

mayartslogoI’d like to extend a HUGE thank you to May Arts and their guest designer Christina Colón for sharing such a wonderful project and for their generous give-away of 2 rolls of ribbon from their collection shown below.

SAMSUNG DIGITAL CAMERA

And now, the moment you’ve all been waiting for…….the winner is……Ronda A!

MayArtsWinner

Congratulations Ronda! Be sure to email us at customerservice@papercrafterslibrary.com to claim your prize. Please be sure to put “May Arts Winner” in the subject line of the email, and then in the email itself, be sure to include your full mailing address and phone number.

Join us next week when we feature another great company.

andreasiggypcl

Featured Company: Graphic 45


We are happy to bring you this week’s Featured Company: Graphic 45. We are so excited to be featuring them regularly on Paper Crafter’s Library. And this week we have a Mother Goose collection prize package give-away.
1120mothergoosegiveaway

For those of you unfamiliar with Graphic 45 , we’d like to take a minute to re-introduce them to you.

Graphic 45 is an award-winning scrapbook and paper crafting company­— owned and operated by a mother and her two daughters.

Diane Schultz—Designer and CEO (aka mother)

“I’m passionate about being creative and eager to make it possible for others to find their creative voice. My background includes stints as a designer for, McCalls, Simplicity, Vogue/ Butterick, Mattel Toy Company and a host of other jobs that each, in some way, led me to what I do now. At 45 I went back to school and got my degree in graphic design— I named the company to celebrate that achievement.”

Aimee Filimoehala —Director of Operations

“I wear a lot of hats and love it that way. Business, marketing, operations, etc. have made me a pro at multitasking (aka juggling‑figuratively and literally). When we launched Graphic 45 just three years ago we had no idea what was in store, working together as a family has been an amazing journey that we all feel so grateful to be apart of.”

Charee Filimoehala —Director of Customer Service and Design Team Coordinator

“I joined the team a little over three years ago and haven’t looked back…what a life-changing experience this has been. I love working with and around creative people and products (not to mention I like my co-workers quite a bit). I spend my days working with our friendly stores and talented design team…the occasional trip to a workshop or tradeshow pretty nice too.”

Together we create vintage inspired crafting products that capture the flamboyant style of the 1920’s and 30’s – with vibrant color, irresistible texture and imaginative design to create products with decades-old appeal that’s both fresh and familiar. Let our products inspire your next scrapbook layout, card, album or home decor project.

Graphic 45 Designer Rhea Freitag

Our Graphic 45 Guest Designer for this week is Rhea Freitag who is part of the 2013 Graphic 45 Design Team. You can see Rhea’s fabulous project below, but first, here is a little more about Rhea:

1106Rhea FreitagbiopicI have always been identified as a creative person, but within the last three years my inner artist has really emerged.  Assemblage work, jewelry construction, art journaling and book making are all genres of mixed media art that I employ.   I strive to make art that tells a story, has a soul and engages the viewer through interaction, movement, memory and story.

Another aspect of the creation process that I adore is the adventure of searching for unique art supplies at estate sales, flea markets and antique shops.  Taking classes, blogging and gathering with my artsy pals are additional facets of the art world that bring me great pleasure and inspiration.   For me, my art expression also provides a welcome escape from my challenging career as a regional Director for Family Preservation Services serving several counties in Michigan.

I am so very pleased to be able to work with Graphic 45.  It really is a dream come true.

Graphic 45 Designer Project

1106Typography_Letterbox_Tray_Rhea_Freitag_1_of_10

Assemblage is probably my most favorite way to work when it comes to creating art.  I love how I am able to take found objects that I have on hand to create a piece that is all my own. 

1106Typography_Letterbox_Tray_Rhea_Freitag_2_of_10

The Typography paper line from Graphic 45 was the perfect vehicle to show off a few old bits and bobs that I have been hanging on to for ages. 

1106Typography_Letterbox_Tray_Rhea_Freitag_3_of_10

Often I find it hard to use my treasured objects, like my typewriter bits for example.  When this happens I just have to push on through and glue it on.  Typically I am pleased with the outcome and I forget all about the agony of using my favorite stuff!

1106Typography_Letterbox_Tray_Rhea_Freitag_4_of_10

I start out by planning out my piece.  When I am doing this, my intent is to make sure that my colors and patterns are well balanced, making for a good composition.  For example, you would not want to have the same back ground paper on boxes that are touching each other.

1106Typography_Letterbox_Tray_Rhea_Freitag_5_of_10

Another one of my favorite ways to add dimension is with the use of gilders paste.  I used a copper color and added this to all the edges of the tray. 

1106Typography_Letterbox_Tray_Rhea_Freitag_6_of_10

When creating an assemblage also look at the piece from different angles.  This will help you to identify spots that need just another element, again with the intent of creating a solid composition. 

1106Typography_Letterbox_Tray_Rhea_Freitag_7_of_10

Try to follow the “odd rule” too.  Place embellishments and objects in odd numbers to create interest in your assemblage. Don’t you just love the rich color palate and uplifting spirit of this fabulous paper?  I sure do!

1106Typography_Letterbox_Tray_Rhea_Freitag_8_of_10

1106Typography_Letterbox_Tray_Rhea_Freitag_9_of_10

Thank you so much for stopping by to see my feature today.  The entire experience of being on a well-known design team still humbles me every day!


1106Typography_Letterbox_Tray_Rhea_Freitag_10_of_10

Supplies:

Typography Letterbox Tray
Typography 8×8 paper
Typography 12×12 Paper
Typography Chipboard
Typography Stickers
Ornate Metal Label Holder
Ornate Metal Key Holes
Ornate Metal Keys
Ornate Brads
May Arts Ribbon
Petaloo Flowers
Copper Gilders Paste
E6000
Scor-tape
Found Objects (old typewriter parts, vintage jacks, pen nibs)
Bottle Cap Numbers Set


We hope you have enjoyed this fun creation from Rhea. I would also like to extend a warm thank you to Rhea for sharing her fabulous project with us! Please take a minute to stop by Rhea’s Blog and of course the Graphic 45 blog to check out all their amazing creations! And don’t forget to leave a comment below to enter to win the Graphic 45 collection listed above.

Trendy Tuesday – Expression Die Cuts

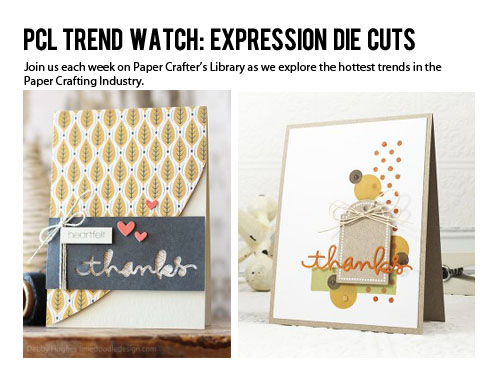
Paper Crafting with Die Cuts
By Aliya White

Hello and welcome to my first article as a Paper Crafter’s Library Trend Reporter.  In future blog posts, you will get to know more about me.  One little tidbit about me is that I have questionable handwriting.  It has looked the same since the third grade when teachers still gave out Cs for penmanship.  That might be why I love expression stamps so much.  But sometimes I want to include curvy fancy “handwriting” style words on the front of my paper projects.  I was thrilled when browsing online to see how many expressions I could use that are ready made.  

Now we all can, with awesome die cut words and expressions.   This first lovely card is from the Simon Says Stamp blog.  I love the way it seems to float above the card and the elements she used.  The trickiest part I have found is how to adhere it to your project.  I have tried glue pens which are great if you are neat (which I am not).  I have also tried sticker sheets that work better, but are kind of messy to remove from the page (by marcy).  My old reliable Xyron machine seems to work the best and produce a perfect sticker every time.


Card by Shari Carroll Photo courtesy of http://www.simonsaysstamp.com/servlet/the-60698/tags-for-you-medium/Detail

Card by Shari Carroll photo courtesy of Simon Says Stamp

Now look at this same die used with the negative cut!  It is a great way to stretch your paper and create more projects.  

Card by Debby Hughes photo courtesy of Simon Says Stamp

Card by Debby Hughes photo courtesy of Simon Says Stamp

  Jackie used her Silhouette Cameo and purchased the online Monogram Flourishes to get this look.  She highlighted the B and the letters YOU in yourself with watercolor.  The effect is lovely.  This card is totally frameable. 

Card by Jackie Rockwell Photo from rockwelldesigns.blogspot.com

Card by Jackie Rockwell photo courtesy of Rockwell Designs 

Well hello again.  This lovely images was not even completely punched out.  The die was used to create an embossed impression and Christina used Copic markers to color the embossing in.  The colors and simplicity are awesome.

 Dielet from Simon Says Stamp

Card by Cristina Kowalczyk photo courtesy of My Paper Secret

Card by Cristina Kowalczyk photo courtesy of My Paper Secret

It’s beginning to look a lot like Christmas with these lovely Christmas projects.  This beautiful Christmas tag was made with a Cottage Cutz die.  It is a lovely way to incorporate a fancy spiral and fancy font in a project.  While keeping the sentiment the focus of the tag, the triple punched flower at the bottom of the tag with glitter is a show stopper as well.  Carol outdid herself on this tag.  

Tag by Carol Hurlock photo courtesy of Chocolate Crafts and Bears oh my

Tag by Carol Hurlock photo courtesy of Chocolate Crafts and Bears oh my

It’s easy to get in the spirit when you have cards this beautiful!  Everything is glitter and silver and light in this lovely Christmas card.  The glittered snowflake can be used in the background so the sentiment can stand out on the light inspired background paper in this clean Christmas card from Amy.

Amy O'Neill photo courtesy of Freshly Made Sketches

Amy O’Neill photo courtesy of Freshly Made Sketches

You can mix stamped words with die cuts and create a banner effect like Lynn did with this adorable snowman. The snowman and Merry are both die cuts from Papertrey Ink.

Lynn Put photo courtesy of The Queen Scene

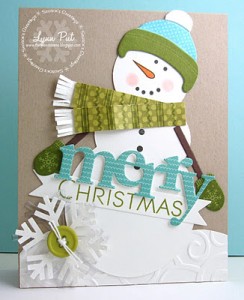
Lynn from the Queen Scene 

  Now, here are some die samples I want to share with you.

The first one is from Papertrey Ink Counting my blessings die collection. Counting My Blessings die collection

  Papertrey Inks Counting my blessings die collection

Simon Says Stamp has created a fun die they call the Big Hello.  Well named.

Simon Says Stamp big hello

Big Hello die cut by Simon Says Stamp

Spellbinders sentiments include words : Believe, Love, Happy, Birthday, Mom, Dad, Brother, Sisters, Happiness, Inspire, Journey, Destiny, Friend and Hope.  These would look great on a range of paper projects.

  Spellbinders Sentiments

Sentiments by Spellbinders

Because customization is the key to creativity, you can just get this great alphabet die cut set from Paper Smooches and create your own words or phrases. Paper Smooches

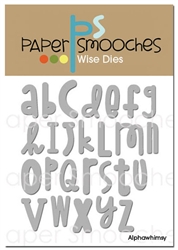
Alphawhimsy Wise Dies by Paper Smooches

For those of use who are lucky enough to have a fabulous Silhouette die cutting machine, you have the mother load of script options.  This Pretty Words collection is wonderful.

Silhouette pretty words set

Pretty words from Silhouette Online Store

Fab Scrap has done the die cutting for you in chipboard.  All you have to do is customize it and make it yours.  I can imagine this with lovely multicolor glitter or using a fun spritz spray.Fabscraps chipboard

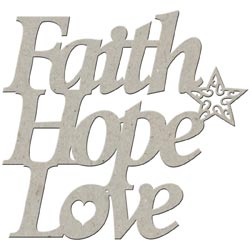
Die CutGrey Chipboard Word by Fab Scraps

So no more worrying about less than stellar handwriting.  Enjoy the premade expressions from all of these companies or put together your own with alphabet letters and stamps.  You are sure to love the results!

Go on, … make something pretty.

Mixed Media Monday: “Follow Your Heart” Video Tutorial

ArtJournalExpressLogoHappy Monday everyone! Welcome to another edition of Art Journal Express brought to you by Andrea from her personal blog The Art of Simple.

Art Journal Express is a weekly video tutorial series she created for her personal blog The Art of Simple. Each week on Monday she posts a video tutorial on how she created one of her art journal pages from start to finish. Because a typical art journal page takes between 20 minutes to an hour for her to create – which makes for a super long video to upload to You Tube, and for you to watch – the video clips are sped up, rather than having you watch what she’s doing in real time – hence the word “express” in Art Journal Express. However, what makes these video tutorials different from most of the “sped up” art journaling video tutorials out there is that Andrea narrated for you exactly what she’s doing and what she’s using – that way, even though you’re watching a “fast forward” version, you don’t miss a single detail.

The videos are hosted on a You Tube Channel that is separate from the Paper Crafter’s Library You Tube Channel, so if you don’t want to miss a single edition of Art Journal Express please subscribe to that You Tube Channel (you can do so from the video tutorial page from today’s post).

Today’s page is called “Follow Your Heart” – shown below. You can watch a video tutorial HERE.

FollowYourHeartCloseUpBlog

Featured Artist/Designer: Gayatri Murali

Today on the Paper Crafter’s Library blog, we’re continuing our weekly featured artist spotlight whereby each week we spotlight a different artist/designer in the paper crafting & mixed media world and introduce you to their fabulous work.

Today we’re thrilled to welcome back – Gayatri Murali.

Before we show you her fabulous projects, let’s get to know her a little bit more…

1114GayatriMuralijeadsjptMy name is Gayatri Murali also known as scrapawayg3 at various galleries.  I am a therapist by profession but chose to be a stay at home mom to my children.  I live in Perth, Australia with my husband, two teen children and my dog.   I started scrap booking first about 7 years ago. I am a card maker since 4 years. I began making cards with leftover papers after making a scrapbook page. But was unhappy with writing my own sentiments as my handwriting is not very pretty. That was when I started looking for sentiment stamps. I became a Stampin’ Up! demo. Soon all the polymer clear stamps excited me and I converted from rubber stamps to clear stamps lol! I still use rubber cling stamps:) 

My style is clean simple, bold and bright. I like graphic cards. I love to experiment with stamps and inks on cardstocks. But lately I have been experimenting with different styles and using pattern paper and embellishments on my card. I love the Freestyle style of cardmaking. I love when I am able to think outside the box and be able to put it on paper. Trends inspire me a lot. You can see a lot of trendy stuff on my cards. My Blog is called Handmade by G3.   My inspirations come from visiting blogs, going through magazine and Aha! Pinterest. I love Pinterest. I spend hours pinning. so if you like to see what I pin, here is my Pinterest Board http://pinterest.com/gayatri/ 

I currently design for Studio Calico and Uniko studio. And also for Curtain Call Inspirational Challenge and CAS(E) this Sketch Challenge Blogs. I have been published in Papercraft Magazine, Life Paper Scrapbook and Australian Cardmaking Stamping and Papercraft Magazine. I was blessed to be on the top 10 at this years Gallery Idol conducted by Papercraft Connection.

Website: http://scrapawayg3.blogspot.com
Pinterest: http://pinterest.com/gayatri/

I am also active in social media links to which are there on my blog right side bar:)  I am so excited to be featured on Paper Craft Library. Hope you enjoy my projects for today.


Card Projects

Card #1 Thank You card
1114gayatri003

This is a layered card with no stamping. I have used embellishment straight from the packet and pattern paper to make this card. Normally not my style. But I love it. Great way to use embellishments on the card. Layering is the key. There are many companies that release word dies. They can simply be used as the sentiment. No stamping necessary.

Supplies:
Cardstock: Stampers Select White and True Black from Papertrey Ink
Pattern Paper: 6x6paper pad from My Mind’s Eye Cut and Paste Absorbs Be Collection
Embellishment: Bits and Pieces pack from My Mind’s Eye Cut and Paste Charm Sweet Collection. Sequins from Avery Elle and Studio Calico Atlantic Collection.
Dies: Thank You dies from Papertrey Ink


Card #2 You Colour my World
1114gayatri001

This is one of my favourite card. I love scrapbooking style layering on a  card. Layering heaps of elements like pattern papers, tags, die cuts, twine, enamel dots and vellum banners. Yet I stamped some paint blotches and sentiments. This pattern paper is my favour of the month. It is from Pink Paislee called Colourwash Collection. Beautiful pastel colours which again is something I normally don’t seek. I am a bright coloured girl. I am no longer afraid of pastel colours. So experiment and you will never know, you will like something you have never sought out before.

Supplies:
Cardstock: Stamper Select White from Papertrey Ink
Pattern Paper: 6 x6 paper pad Colourwash Collection from Pink Paislee
Embellishment: Vellum Banner, Colourwash tags and from ColourWash Collection from Pink Paislee, Colour Magic Paper Good pack from Heidi Swapp. Enamel dots from Prima Marketing
Stamp Sets: Abstract Art from My Favorite Things. Dream in Colour from Reverse Confetti.
Inks: Bubblegum, Banana inks from My Favorite Things. Aqua Mist from Papertrey Ink. Memento Black ink
Accessories: White twine. Thank You die from Papertrey Ink 


Card #3 Together We are Family 1114gayatri002This card has no stamping too.  I have put together die cuts and stickers. The feather die cuts were the source of inspiration. I wanted to do something different using feathers. No embossing, stamping or coloured feathers. I decided to use the stickers on the feathers instead. This is a CAS freestyle card. Love how the colour pop against the white background. And the white feathers popped up against the white background.

Supplies:
Cardstock: Stampers Select White from Papertrey Ink
Dies: Pointed feathers from Simon Says Stamps
Embellishments: Sn@p Family Stickers from Simple Stories. Sequins from Avery Elle and Studio Calico.

We hope you have enjoyed today’s projects courtesy of Gayatri Murali.  Also, be sure to stop by Gayatri’s blog to see even more of her beautiful work (and let her know we sent you).


Featured Company: May Arts

mayartslogo

Today we are excited to welcome back this week’s Featured Company May Arts and to share a beautiful creation from one of their designers using some gorgeous May Arts Ribbon.

Here at Paper Crafter’s Library we’re ribbon lovers – you’ll find ribbon on almost all of our projects – which is why we’re so thrilled to bring you another fabulous May Arts project. You haven’t seen ribbon until you’ve seen May Arts Ribbon – they offer a multitude of different colors and styles of ribbon to suit any preference and taste – and all of it, top quality!

And, we also have a give-a-way for you!! The lucky winner will receive a “winners choice” of 2 spools of Ribbon from May Arts. The winner will be drawn from all the comments left here on the Paper Crafter’s Library blog to win. You certainly have a lot to choose from:

May Arts Ribbon

Remember, each comment you leave is one entry, so be sure to visit today not only for the great project idea, but also to enter your name into our give-away.

About May Arts

May Arts Ribbon was founded in the early 1980’s in Riverside, Connecticut. The original products were high-end silk flowers imported from Taiwan, which were decorated using quality ribbons. The decorative ribbons proved so popular among customers that the business gradually evolved into a dedicated ribbon wholesaler.

As a family-owned and operated business, May Arts began a long-standing tradition of quality, affordability and exceptional customer service. We are dedicated to carrying on this same tradition by offering high quality products at competitive prices. Our friendly, knowledgeable staff is always happy to answer your questions or to assist you in placing your order.

May Arts carries a wide selection of quality ribbons to choose from; such as grosgrain, silk, satin, burlap and a variety of prints and patterns. All inventory is held in stock, so we can ship orders out right away—typically the same day.

Where to Buy May Arts Ribbons

The May Arts website is their wholesale site for online and brink and mortar retailers. We’ve linked to it so that you can easily view their entire product line in one place. There are numerous places where you can purchase May Arts Ribbons including many local scrapbook stores as well as online stores. Two of the online stores that carry the biggest selections that we are aware of include Amazon, who carry the complete May Arts Ribbon Line (plus you can qualify for free shipping). Click on the link we provided and it will take you to our May Arts Ribbon Search Results. To find a particular ribbon, go to the May Arts website, find the name of the ribbon and color and then enter that into your Amazon search results. Please note that through Amazon you’re buying by the roll. Most other online and local scrapbook stores sell May Arts Ribbon by the yard. One of the online stores that carries a great selection is Stamp Simply Ribbon Store.

Special May Arts Guest Designer
Today we a special project for you created by May Arts Guest Designer Christina Colón.  You can see Christina’s fabulous project below, but first, here is a little more about Christina:
1113chrissybioshotHi crafters!  My name is Christina but I go by Chrissy.  I currently live overseas on the beautiful island of Okinawa.  I am married to a wonderful man and have four children and two dogs.  I love crafting and consider “off the page” pieces and mini albums my strong suit.

Today, I am sharing two Christmas ornaments I made using an item most of us have loads of, I’m sure.  Washi tape!  That’s right!  A couple rolls of your favorite tapes and some glass, or plastic ornaments and you have a quick and easy project the whole family can do.


May Arts Guest Designer Project

1113chrissyPCL Nov 2013 (3)
These ornaments are super easy to make.  Simply tear small pieces of tape and stick them to your ornament.  Once the ornament is covered, apply a coat of Mod Podge and sprinkle  with a clear glitter.  I used some May Arts ribbon to finish it off.

1113chrissyPCL Nov 2013 (2)

1113chrissyPCL Nov 2013 (1)
This project is so easy to do, my kids are making them as well.

Supplies Used:
         
May Arts Ribbon:
 
Other Supplies:
Gauche Alchemy washi tape
Mod Podge
Clear glitter
Helmar 450 Adhesive

We hope you have enjoyed today’s feature. We want to extend a sincere thank you to Christina Colón for her fabulous projects and May Arts for sharing their company with us. Be sure to visit May Arts to see more of their great products and to enter the fabulous give-away.

In order to enter the give-away to win the ribbon rolls, please leave us a comment in the comments section of this post and visit May Arts to leave a comment on their blog as well. If you do not check the blog regularly, please leave an email address to contact you. Winners will be announced next week on the Paper Crafter’s Library blog!