Bonus Tutorial from Cut@Home Design Team Member Corene Poznicek and a Give Away! 03 06 2015

This week we have a bonus tutorial for you, brought to you by one of Cut At Home‘s designers Corene Poznicek.

Before we show you Corene’s project, let’s get to know her a little bit more…

Cut At Home Designer – Corene Poznicek

CorenePoznicek-250W-02062015

Thanks for taking a minute to get to know me a little better! I’m so grateful to be featured  today on Paper Crafter’s Library.
My name is Corene. I was raised in Las Vegas, Nevada. I recently moved to a small town outside of Vegas. I have the best of both worlds…I live in a small town, but can be in Vegas in 30 minutes.
I am married to my childhood sweetheart, we have one beautiful and sweet boy, both are so supportive of my hobby. I love to craft. I started when I was about 15 years old, but then really became passionate about it when my son was little. A friend of mine gave me a bag full of goodies, and that lit the fire in me.
I spend time in my craft room every single day. It is a stress reliever for me, not to mention so much fun! I find so much joy in starting with a few pieces of chipboard & paper, and creating a mini album that will hold treasured memories for years to come.
I love to make cards, mini albums, scrapbook layouts, smash book, alter items, work with vinyl…pretty much anything I can get my hands on. I love making videos for YouTube, and have the best followers a girl could ask for!
I hope you will stop by, and check out my channel at corenescreations.

Spread Your Wings Mini Album

CorenePoznicek1-550W-03062015

CorenePoznicek2-550W-03062015

CorenePoznicek3-550W-03062015

CorenePoznicek4-550W-03062015

CorenePoznicek6-550W-03062015

CorenePoznicek5-550W-03062015

CorenePoznicek7-550W-03062015

Here’s my video instructions for this 6×6 Mini Album.


I hope you enjoyed my project as much as I enjoyed making it!

Supplies

Tim Holtz Idea-ology paper Wallflower
Tim Holtz Distress Paint Black Soot
Heartfelt Creations Deluxe Paper Shaping Kit
Heartfelt Creations Arianna Blooms Die
Sizzix Big Shot Machine
Kaisercraft Birds & Cages Die
JustRite Stampers
Versafine Black Ink
Wild Orchid Craft Flowers
Cotton Lace
Flat-back Pearls
Grafix Chipboard

We hope you have enjoyed today’s project courtesy of Corene Poznicek a Cut@Home design team member. Be sure to stop by Corene’s blog or visit her on instagram, facebook, pinterest and youtube to see even more of her beautiful work (and let her know we sent you).

CutAtHomeLogo-12052014-550W
And now for a give away…Cut@Home is graciously offering a give away which includes: 34 piece Gelatos Gift Set from Faber-Castell,  6 piece Essential Tools from Faber-Castell, Arianna Hummingbird stamp set form Heartfelt Creations and 4 ¼” Round Acrylic Stamping Block with Finger Grips and Guide Lines from Apple Pie Memories.

Total value is $65.00!!! *Please note this give-away is only open to residents of continental USA*

PriceCut@Home

In order to enter the give-away, please leave a comment in the comments section of this post. The winner will be announced next Friday.

Once again, the winner will be chosen from continental U.S. only.


Featured Artist/Designer: Tobi Crawford 03 06 2015

Welcome to another Featured Artist/Designer Spotlight. Today we’re thrilled to welcome Tobi Crawford. Before we show you Tobi’s project, let’s get to know her a little bit more…

TobiCrawfordProfilePic-250W-03062015

Currently, I am teaching Drama and Musical Theatre at a Canadian school in Shanghai, China! My degree is in Jazz and I double-majored on voice and piano. I’ve always been “crafty” but I got started with card-making in 2006 when a friend invited me to a Stampin’ Up! party (some friend!) and that was it, I was hooked! Card-making has been my passion for the past 9 years but mixed media is becoming a pretty huge part of my “artsy” life too.. I just love getting messy!! I have the pleasure of working with some great companies in the industry like: Technique Tuesday, The Twinery, DecoArt and in the past, Stampendous! SRM Stickers, and There She Goes.

Random: I’m your “weird” friend. I laugh loud, make inappropriate jokes, have a “colourful” family and enjoy living on the edge of normal and crazy! I have a bunch of tattoos, a bunch of piercings, very colourful hair, and a funky sense of style.

Hug in a Mug

Project instructions:
I am enamored with no-line watercolouring and I decided I would do a little project showing how I watercolour. First, I stamp the image in Versamark then emboss with white embossing powder on white watercolour paper

TobiCrawford1-550W-03062015

I don’t know if anyone else does this, but I watercolour with a waterbrush and I start by misting my palette of colours with a little water – that way they’re juicy when I go to pick them up and I’m not constantly squeezing the water out of the brush.

TobiCrawford2-550W-03062015

I begin by adding colour straight from the palette at the edges of the image, that way the colour is at its most intense and darkest. This helps me shade with just a few simple steps.

TobiCrawford3-550W-03062015

Next, I squeeze a little water out of the waterbrush (and along with it a lot of the colour), and finishing colouring the area. This gives me a highlight colour and allows me to have dark-to-light in each area.

TobiCrawford4-550W-03062015

So after I finished colouring the mugs I decided to fussy-cut them out instead of leaving them on the paper (as an artist I have the right to change my mind, right?? hehehe) and they look really cute:

TobiCrawford5-550W-03062015

Here’s the finished card:

TobiCrawford6-550W-03062015

Supplies
Stamp Set: a hug in a mug by Taylored Expressions
Patterned Paper: Dear Lizzy Lucky Charm by American Crafts
Ribbon: Papertrey Ink
Watercolours: Angora Water Colors
Bazzill Cardshoppe Cardstock
Watercolour paper: Speedball
Inks: Gathered Twigs by Ranger, Versamark Ink by Tsukineko

We hope you have enjoyed today’s project courtesy of Tobi Crawford. Be sure to stop by Tobi’s blog to see even more of her beautiful work (and let her know we sent you). You can also find Tobi on  Pinterest, and Instagram: @jazzytobi.

Happy Crafting!

Winner of the Power Poppy Give Away! 02 25 2015

PowerPoppy_LogoBanner2

I’d like to extend a HUGE thank you to Power Poppy’s guest designer Allison Cope for sharing such a wonderful project and to Power Poppy for their generous give-away of their entire February “Storm of Creativity” collection, which includes the following sets, and has a retail value of $90.

PowerPoppy_PCL_Giveaway

And now, the moment you’ve all been waiting for…….the winner is……Kathryn Hilliard!

WinnerPowerPoppy-03042015


Congratulations Kathryn! Be sure to email us at customerservice@papercrafterslibrary.com to claim your prize. Please be sure to put “(company name) Winner” in the subject line of the email, and then in the email itself, be sure to include your full mailing address and phone number.

Join us each week as we feature a different company and host a different giveaway!

Featured Company: Create A Smile 03 04 2014

Logo-550W

Welcome to another Featured Company Wednesday. We are happy to bring you this week’s Featured Company: Create A Smile.

The name says it all: Create A Smile products are made for cardmakers, scrapbookers, crafters – people, who like to create things that make others smile. The quality creates a smile on the customer’s face.

In March 2014 Christine Drogt, a cardmaker from Germany, started illustrating her own images. Crafty friends from around the globe suggested to turn them into stamps and in July 2014 the dream came true: Create A Smile released their first sets of Photopolymer stamp produced in Germany and started growing immediately. During the next months more fun and cute stamps, but also exclusive chipboard pieces and “treats” including paper, washi tape and flair buttons were added to the shop and the range of products is still growing.

Create A Smile is more than a name – it’s an ideal, an everyday challenge and an invitation to join us creating smiles.

Be sure to visit their site to see more of their products and their blog for some inspiration! You can also find Create A Smile on Facebook, Instagram, and Pinterest.

This week Create a Smile is giving away the Eggstraordinary Egghunt stamp set, two rolls of washi tape, 2 packs of chipboard pieces and the Feel Good paper pack. (Details at the end of the post.)

Create A Smile PCL Giveaway

Create A Smile Designer – Anika Lerche

Today we welcome Anika Lerche. We are so excited to have her showcase her work today on Paper Crafter’s Library. You can see Anika’s fabulous project below, but  first here is a little more about her.AnikaLercheProfilePic-250W-03042015

Hello, I am Anni and I’m from Germany. For 15 years now I´ve lived in the beautiful city of Berlin and I am married. I work as a math-teacher at a vocational college; to perform handicraft work is a perfect compensation for that.

I am into stamping since 2008, I love clean and simple cards, and yet eventually my cards often turn out to be somewhat more complex. I love the soothing of paper piecing and resist techniques. You can see all my projects at www. annikarten.blogspot.de.

Eggstraordinary Egghunt Mini Cards

A set of 4 mini cards is a perfect give-away to friends and family, you can also use them as little easter gifts. Eggstraordinary Egghunt is the perfect stamp set for cute, fun mini Easter cards.

The critters were stamped with black ink and then colored with Polychromos pencils by Faber Castell. You can find a tutorial on this coloring technique here. If you take a closer look you can see that each of the animals have some additional pattern at the bottom – they’re all included in the stamp set.

Matching embossing folders were used for every pattern to make the background match the image. The bright papers from the Feel Good paper pack and some washi add an extra graphic  to the cardbase and the twine pulls everything together.

EggstraordinaryEgghunt1-550W-03042015

EggstraordinaryEgghunt2-550W-03042015

Supplies

Cardstock: Neenah solar white
Stamps: Eggstraordinary Egghunt (Create A Smile)
Patterned Paper: Feel Good Paper Pack (Create A Smile)
Washi Tape: Yelloq Ovals (Create A Smile)
Ink: Versafine (Tsukineiko), Fog (Simon Says Stamp), Wet Cement (Hero Arts)
Twine: stash

We hope you have enjoyed today’s feature. We want to extend a sincere thank you to Anika Lerche for her fabulous project and Create A Smile for sharing their company with us. Visit Anika  on her blog: www.annikarten.blogspot.ca.

Be sure to visit Create a Smile to see more of their products, and their blog for some inspiration! You can also find Create A Smile on Facebook, Instagram, and Pinterest.

In order to enter the give-away to win the prize shown above, please leave us a comment in the comments section of this post. The winner will be announced next Wednesday.

Happy Crafting!

Trend Watch – Party! Party! Party!

I love a good party.  Good friends, lots of laughing,  smiling and of course good food.  And for a while, that was all I needed to make it a really good event.  Then I started to see these awesome displays that folks were creating in their homes and spaces to celebrate. That’s when the decorations started to become a huge part of the party for me too.

There are so many awesome DIYs you can follow to create cool looks for your next gathering.   Even though I married my lovely husband at a gorgeous winery on a gorgeous Fall day, we didn’t decorate at all.  I think we may have grabbed a few orange mums from the Farmer’s Market and that is it.  I really wish I had had the insight from the following ladies to create beautiful paper decorations to be a part of our day.

Check out a few of these and I hope to inspire you to try something new on your next go round.

This first picture is a full on onslaught of ballerina awesomeness from Kristen for her daughter’s themed party.  She incorporated a simple banner,  framed decorations, cup cake flags and even the table has a cool faux tutu!  If this were my party I would be totally in love with all the pink.

Ballerina-Birthday-Party-by-KristenDuke.com_

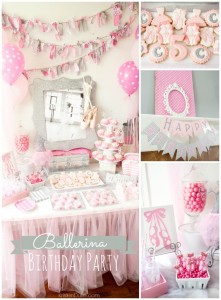
Party setting created by Kristen Duke photo courtesy of Capturing Joy

This next piece of wall art doesn’t necessarily have to be for a party but it could be.  You could spell out someone’s name or congratulations or just a simple hello and use it for your own wall.  I love that the papers could be awesome scraps you don’t want to part with.

create-box-wall-hanging-2-of-2

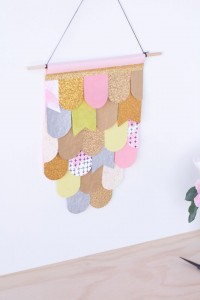
Wall hanging by Fiona photo courtesy of Craft Hunter

 I love the idea of including Dads and other dudes in our celebrations.  This banner uses a neck  tie as its shape.  Love it.  What other shape possibilities could you come up with for the special people in your life?

going-big-this-father1

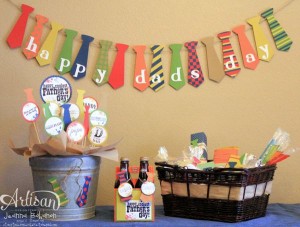
 Banner by Jeanna Bohanon photo courtesy of Stampin’ Up blog

Another cool possibility is this homage to Legos with this bright banner.  The primary colors make a perfect tribute and the look can be replicated with a circle punch or die.

lego-birthday-banner-50_thumb

Banner by Laurel photo courtesy of Laurel Lane

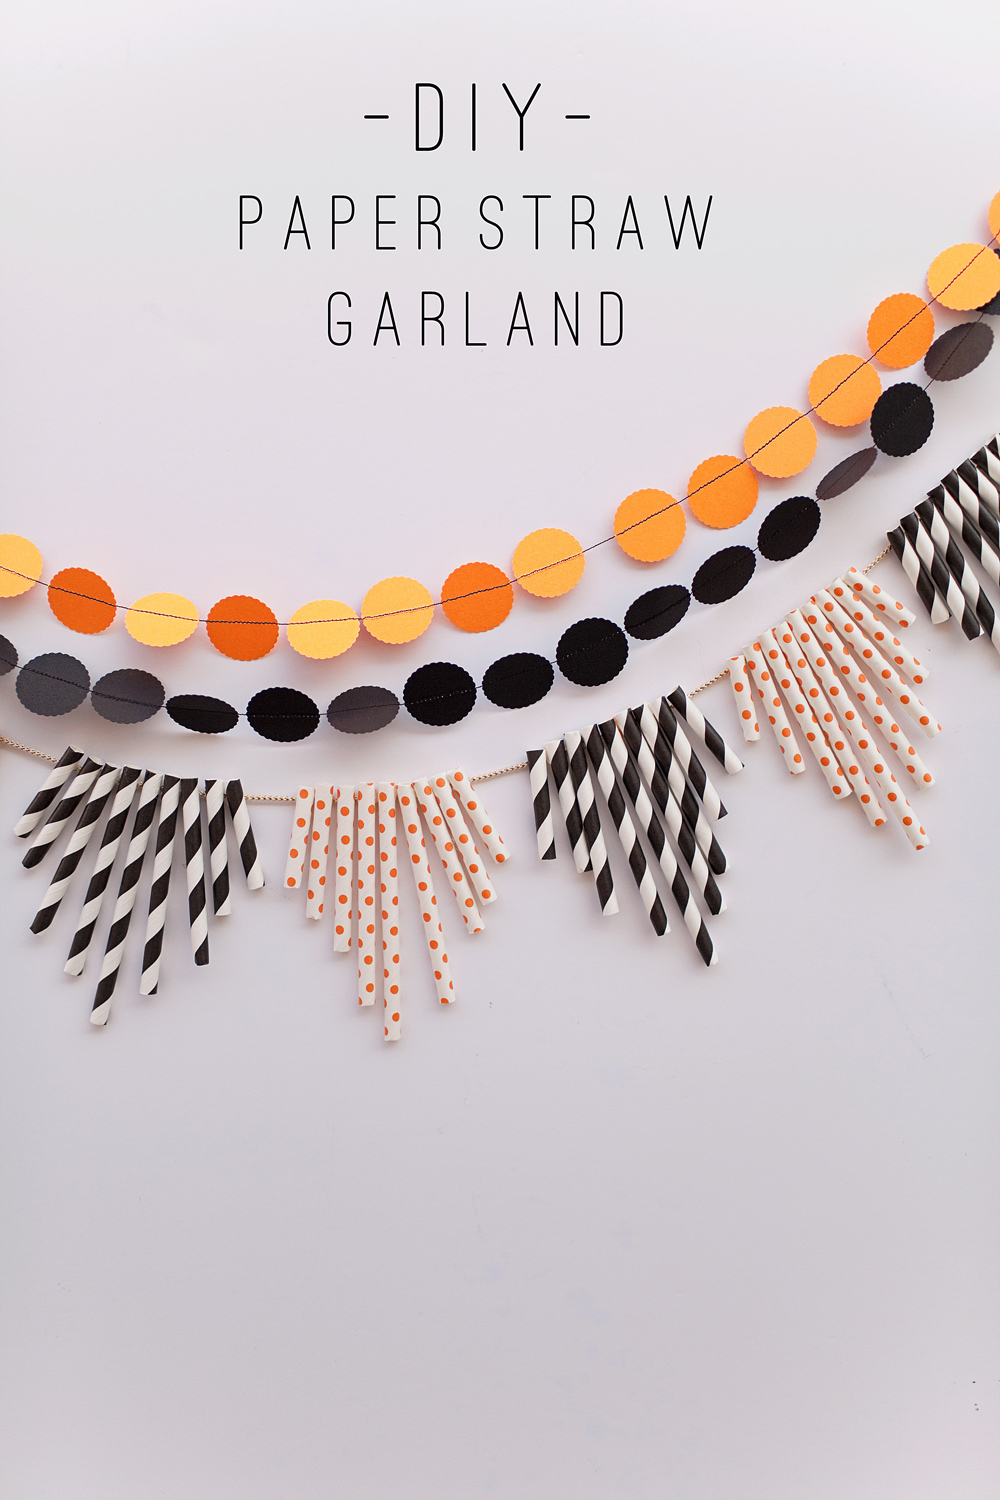
Did you buy a bunch of those lovely looking paper straws use a few and get stuck with so many more you don’t know what to do with them (like I did?) I just loved Sara’s use for paper straws as a banner.  How creative.  They create such a fun look when you cut and string them at different lengths.

Halloween-garland

Banner by Sara photo courtesy of Tell Love and Chocolate

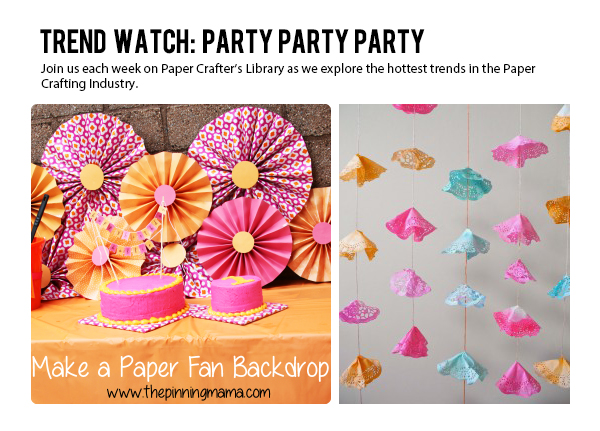
Doilies make another neat way to decorate a wall.  Hand dyed doilies look awesome hung on strings.  Imagine these hanging from a ceiling as a photo booth wall or table centerpiece focus.  The custom colors are so lovely.

paper doilies bunting

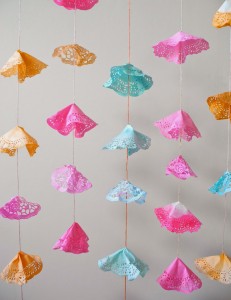
Garland by Giovannella photo courtesy of One Bunting Away

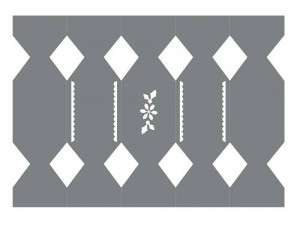
I don’t know if you have seen this tutorial but these look so professional and the color options are endless as well.  This would look awesome across your table.  Click the link below for the tutorial from Sarah.

tissue banner

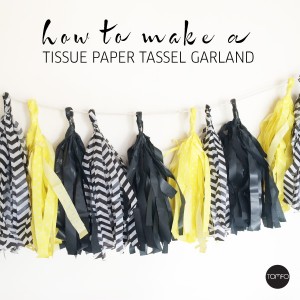
Banner by Sarah Preston photo courtesy of Live with Love

Don’t forget the treats!  No party is ever really done until everyone gets treats.  And it is another opportunity to bring in paper crafts to continue your party theme.  These bags were done with vintage fabric but could easily be done with decorative paper.  I just love the doilies and baker’s twine.

treat bags

 Treat bags by Tasha Noel photo courtesy of A little sweetness

You can get out your score board to create these colorful fans or go old school and make them yourself.  Kimber has a tutorial you can check out if you click her blog below.

web-Paper-Fan4

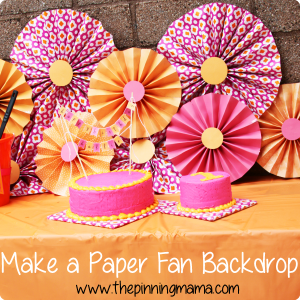
Paper Fans by Kimber photo courtesy of The Pinning Mama

I don’t quite believe I am too old for a crown.  And if I make it myself, I can have it be big enough to fit my head!  I plan to use Sandy’s tea party piece as an inspiration.  How fun are these?

(Vintedge) Duo Crown with Frame

Crowns by Sandy Ang photo courtesy of Sandy’s Space

Banners and paper party decorations are getting really hot with many manufacturers making kits and easy pieces for you to put together.  So when you have your party it can look as fun as the good time you had with the ones you love.  Get creative and put your own paper touch on special decorations.

Here are few products I found for inspiration.

pennants Darice

David Tutera pennant banner by Darice

bon bon die

Bon bon die cut by Couture Creations at Scrapbook.com

spellbinders

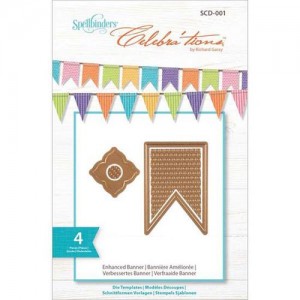
Spellbinders Celebrations die at Scrapbook.com

scallop chalkboard

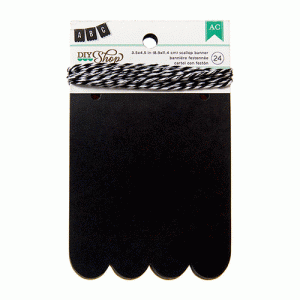
American Crafts scallop chalkboard banner at Scrapbook.com

banner kit

Banner Kit from Teresa Collins at Simon Says Stamp

banner kit AC

Crate Paper Banner Kit at Simon Says Stamp

So go ahead… make something pretty.

Praying For You – Simon Says Stamp Feature

PrayingForYou-SSS1

Happy Monday everyone!  I just wanted to pop in and share with you a video tutorial for a card I created for Simon Says Stamp. I share a variety of techniques including how to build a background from a single sentiment stamp, a quick and easy tip for die cutting fine images and sentiments, how to create a watercolor wash and a faux woodgrain technique.  You can watch the video tutorial HERE.

PrayingForYou-SSS2

Featured Artist/Designer: Kim Kesti – 02 26 2015

Welcome to another Featured Artist/Designer Spotlight. Today we’re thrilled to welcome Kim Kesti! Before we show you Kim’s project, let’s get to know her a little bit more…

KimKestiProfilePic-250W- 02262015

Kim Kesti is a self-proclaimed paper crafting addict. Her favorite thing to do is retreat to her cozy craft space and dive into new projects. She describes her style as bright, bold and a little bit funky. Kim started playing with paper when the scrapbooking craze was in full swing and was entered into the Creating Keepsakes Hall of Fame in 2005. After accumulating quite a bunch of supplies, she turned to card making and altered projects to get more mileage from her stash. Since then, paper crafting has become her first love. In addition to paper crafting, Kim also enjoys knitting, hand stitching, photography and organizing her scrappy space.

Thanks for letting me share a quick and easy technique to add some trendy fringe to your next paper crafted project!


Piñata Card

Fringe is so popular lately in decorating, jewelry and even clothing that I thought, “Why not bring a little of this trend into a card?” It’s fast, easy and you don’t even need any fancy tools!

Kesti_Pinata2-550W-02262015

First, trim some narrow strips of cardstock (maybe 1” – 1 1/”) and carefully cut slits into each strip about an inch deep. Repeat for as many colors as you want on your project. Use a bone folder to curl up the edges of your fringe. So fun!

Kesti_Pinata3-550W-02262015

Next, choose a stamped image and adds some of the same colors to your image with markers or pencils. I picked this fun piñata stamp from Fun Stamper’s Journey (http://www.funstampersjourney.com/) that matches the theme of my card.

Kesti_Pinata1-550W-02262015

To finish, layer your fringe elements (I stamped a border at the edge of my fringe, too) to the card front, add your stamped image with foam adhesive along with a sentiment grounded on a banner of cardstock. I just love how this card turned out! Try this technique on a variety of projects: cards, 3D projects or even gift wrap! Enjoy!

We hope you have enjoyed today’s project courtesy of Kim Kesti. Be sure to stop by Kim’s blog to see even more of her beautiful work (and let her know we sent you).

Happy Crafting!

Winner of the Graphic 45 Give Away – 02 18 2015

I’d like to extend a HUGE thank you to Graphic 45’s guest designer Nichola Battilana for sharing such a wonderful project and to Graphic 45 for their generous give-away of their collection shown below.

$41MotherGooseprizepack-PRIZE-550W

And now, the moment you’ve all been waiting for…….the winner is……shartl!

WinnerGraphic45-02262015

Congratulations shartl! Be sure to email us at customerservice@papercrafterslibrary.com to claim your prize. Please be sure to put “Graphic 45 Winner” in the subject line of the email, and then in the email itself, be sure to include your full mailing address and phone number.

Be sure to check out this week’s great company Power Poppy!

Featured Company: Power Poppy 02 25 2015

PowerPoppy_LogoBanner2

Looking for a stamp company that’s unabashedly upbeat and thoroughly original? That’s the spirit at Power Poppy.

Illustrator, graphic designer, and gardener Marcella Hawley’s irresistible stamp line is inspired by her somewhat starry-eyed take on life, with designs that boost positivity and delight in life’s small moments. Based in the Midwest, Power Poppy stamps feature whimsical botanicals, nostalgic vignettes, handlettering, and snappy sentiments. Power Poppy was founded to help folks experience the jolt of joyfulness that comes from the sheer act of making something creative and colorful, and doing it with love.

Visit the Power Poppy shop at powerpoppy.com, on Pinterest at pinterest.com/powerpoppyrocks or check out their idea-filled blog at powerpoppy.blogspot.com

This week Power Poppy is giving away  5 clear photopolymer stamp sets – their entire February “Storm of Creativity” collection, which includes the following sets, and has a retail value of $90. These 5 stamps are  Orchids Rock, Short Stacks, Potted Primroses, Big Scripts, and Good Thinking: True Love

PowerPoppy_PCL_Giveaway

Power Poppy’s Designer – Allison Cope

Today we welcome Allison Cope. We are so excited to have her showcase her work today on Paper Crafter’s Library. You can see Allison’s fabulous project below, but first, here is a little more about her:

ProfilePicAllisonCope-250WHi, I’m Allison Cope.  I am a 30-something stay at home Mom to one energetic 9 year old, Spencer and wife to my best friend, Todd.  Our little family of three live on a picturesque lake just East of Calgary, Alberta, Canada where I take inspiration from the gorgeous sunrises and mountainous sunsets every day.  My love of paper and ink began 10 years ago and with a wonderfully supportive husband, it grew into my passion and then a job.

I am honoured to have been coloring Marcella Hawley’s, owner of Power Poppy, delightful images for quite some years.    There is nothing more invigorating than stamping a beautifully detailed image and spending some relaxing time adding color using my favorite medium, Copic Markers.

Budgie Bird Card

Thanks for joining me today here at Paper Crafter’s Library!  For my card today, I created a fun easel card featuring the Power Poppy stamp sets “Short Stacks” and “Good Thinking: Love Notes” stamp sets.

AllisonCope1

I began by creating a simple black cardstock base with a decorative die cut edge at the bottom.  I created a fun teal green frame and adhered a fun similar label die cut in the center using the tippy tea cups and Budgie bird colored and hand cut as my focal point.

AllisonCope2

With the frame and focal label only attached on the bottom half of the card, these items easily lift up to reveal a fun inner love message and a mate for the Budgie.  The front of the card remains lifted up by tucking it on the label with the card’s sentiment on it.

AllisonCope3

Thank you for joining me today and I hope you stop and take a look at Power Poppy stamps and also take a moment to check creations by our Design Team, known as the Bloom Brigade.  A big thank you to the Paper Crafter’s Library for having me share my card with you today.

Supplies

Stamps: Power Poppy’s Short Stacks, Good Thinking: Love Notes
Patterned Papers:  Carta Bella (Yesterday 6×6 Paper Pad)
Cardstock:  Neenah Solar White Cardstock, Bazzill Black cardstock
Ink: Memento (Tuxedo Black)
Copic Markers:  BG11, BG13, R05, R08, Y13, Y15
Dies:  Spellbinders (Curved Borders2, Labels 28, Decorative Labels 28)
Button:  Queen & Co.
Other:  Seam Binding Ribbon.

We hope you have enjoyed today’s feature. We want to extend a sincere thank you to Allison Cope for her fabulous project and Power Poppy for sharing their company with us.  Be sure to visit Power Poppy to see more of their products and their blog for some inspiration or check out on pinterest.

In order to enter the give-away to win the prize shown above, please leave us a comment in the comments section of this post. The winner will be announced next Wednesday.

Happy Crafting!

Trend Watch – Winter

Snowflakes, winter critters, mittens and mugs full of hot chocolate. The trending topics for Christmas cards last year. But using them for Christmas cards isn’t the only option. You can still use those amazing snowflakes and winter images to make some nice winter cards. And it’s becoming a new trend. So just before we’ll get into the spring mood, I’ll share some beautiful winter themed cards with you.

The cute critters we’ve seen before are good for every season. Give them little hats or a scarf and they fit in the winter theme immediately. But even if you don’t have the extra imagery to give them a winter look, they still look cool without them ;).

Yainea used this Yeti to make a love-themed card. And even though it’s a real ‘Santa hat’ it’s still cute now. You could also give the Santa hat another color and than it looks more like a normal hat.

yainea-yeti
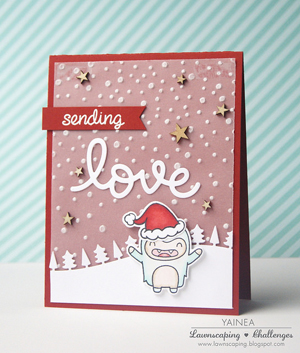
Sending Love by Yainea, image source My Paper Journey

Or this card from the husband and son from Emily Leiphart, just so cute. They even have a video which is narrated by her son, that’s even cuter ;).

leiphartonartYou’re Cool by the Leiphart boys, image source Art from the Heart

Isha Gupta has made a really lovely winter card that could be used for every occasion. Just nice to let someone know that you think of them.

isha-gupta-Lawnscaping_97
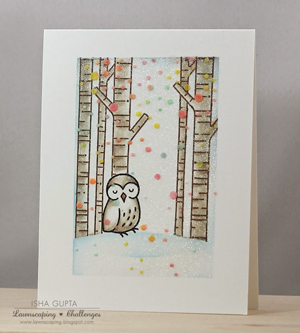
Owl card by Isha Gupta, image source New Ideas

Snowflakes are a pretty popular subject too. Their intricate shapes are really beautiful to use on cards. Virginia Lu has made this beautiful white on white card.

virginia-lu-white
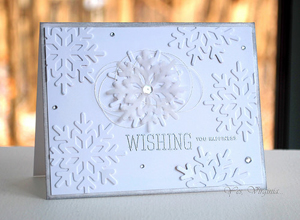
Wishing by Virginia Lu, image source Virginias View

Or you can add more color like Heather did.

heather-snowflakesOne of a kind card by Heather, image source Handmade by Heather

There are some beautiful winter papers too. They add an instant winter feel to your card and have beautiful color combinations. And, they’re great to combine with those beautiful snowflakes like Melissa did on her card.

melissa-snowthanks
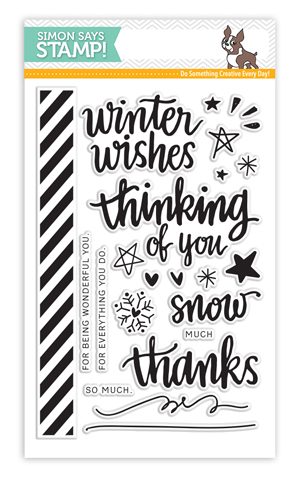
Snow much thanks by Melissa, image source Creating from the Heart

And some of the papers give you the possibility to add all the great things of winter on one card like this one that Stephanie used.

stephanie-Thanks
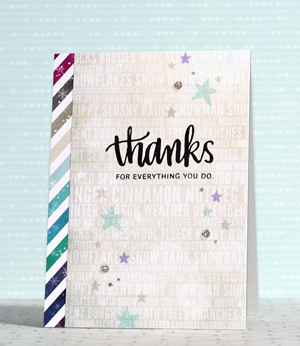
Thanks by Stephanie Klauck, image source Round Here

And of course I have a couple of supplies to share with you, so you could make your own winter themed cards.

bobunny-1_312762_ZMBo Bunny Altitude Paper Pad at Simon Says Stamp

simonsays-1_314548_ZM
Simon Says Stamp Hand lettered Winter Wishes at Simon Says Stamp

mft025_letitsnowflake_preview

Let it snowflake die by My Favorite Things at My Favorite Things

ARCTIC_PENGUINS

Arctic Penguins stamp set by Mama Elephant at Mama Elephant

LF567_YetiSetGo_1024x1024
Yeti, Set, Go stamp set by Lawn Fawn at Lawn Fawn

So there are a lot of ways to use the winter theme in your projects. It’s not only great for Christmas cards but you can make any kind of card with it. I hope you all have a great time!
– Lucinde