Trend Watch – Sweet Treats

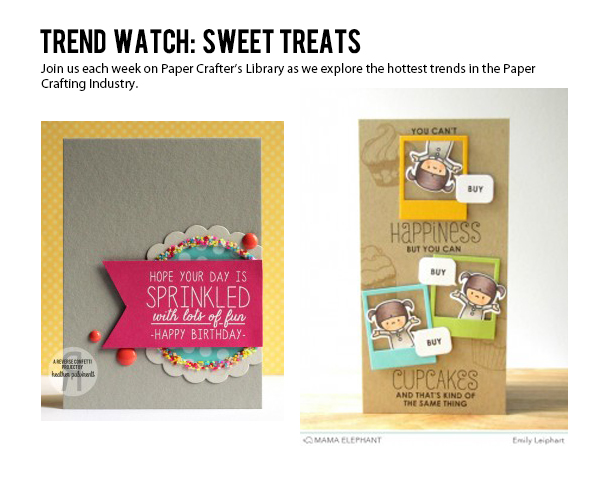
If you’re still holding on to your New Year’s Diet, you might want to skip this post. (Don’t say I didn’t warn you; sweet temptation abounds here!) Today we’re going to look at the “sweet treat” trend. Donuts, cupcakes, and cookies are all big themes right now in the world of paper crafting.

We’ll start our adventure into the land of sugar with some donut cards. There are SO many adorable donut stamps and dies out there, and so many punny sentiments!

I love how Heather used glitter to add sprinkles to her donut. I know the sprinkled donuts usually go first when my family gets together!

 Sprinkled with Fun Birthday Card by Heather Pulvirenti

Sprinkled with Fun Birthday card by Heather Pulvirenti, courtesy Witty Title Here…

Heather made her own little bakery box for the front of the card with some acetate. The box adds a perfect touch to the theme. I just love the sentiment pun!

 Donut Know Card by Heather Ruwe

Donut Know card by Heather Ruwe, courtesy Handmade by Heather

The play on words with Stephanie’s card makes me start humming in my head. The donut with the sunglasses matches the sentiment really well. the bright colors of the donut paper are so much fun.

 Donut Stop Believing Card by Stephanie Severin

Donut Stop Believing card by Stephanie Severin, courtesy Ingenious Inkling

The donut on Lisa’s card is so cute and simple. Her use of a tag as a background anchor is so simple and effective. (I am in strong agreement with the sentiment on this card!)

Life is Short Card by Lisa Henke

Life is Short card by Lisa Henke, courtesy My Little Creative Escape

Sheila’s idea for producing a card that looks like an Oreo is so much fun! I would never have thought to use a damask embossing folder to create the texture of an Oreo.

 Oreo Card by Sheila Bennett 1

Oreo Card by Sheila Bennett 2

Oreo card by Sheila Bennett, courtesy Sheila’s Stamping Stuff

If you’re more of a classic chocolate chip cookie sort of person, this card is right up your alley. Lori’s card reminds us that milk and chocolate chip cookies belong together, just like the recipients of this card!

You Belong Together Card by Lori Tecler

You Belong Together card by Lori Tecler, courtesy inking aloud

This adorable card by Emily reminds us that buying cupcakes is very similar to buying happiness. The little polaroid frames and word bubbles are so cute! I really like the different cupcakes she has in the background, too.

 You Can Buy Cupcakes Card by Emily Leiphart

You Can Buy Cupcakes card by Emily Leiphart, courtesy Art from the Heart

Di made this great pop-up card in a box with cupcakes that would be such a treat to receive. I really like the color scheme she uses among all of the cupcakes.

 Cupcake Pop-Up Card by Diane Barnes

Make a Wish pop-up card by Diane Barnes, courtesy colour me happy

Last but not least, we certainly need to give a nod to the supplies and appliances that help us produce such wonderful sweet treats! Nancy’s card is so adorable and includes some new stamps and dies from Lawn Fawn that will be available in a few short days.

Baked With Love by Nancy Krueger

Baked with Love card by Nancy Krueger, courtesy Happy Heart Studio

Debby created the background for this card with individual stamps. It looks like pre-printed paper! The hearts on each item add such a cute touch.

 Recipe for Love Card by Debby Hughes

Recipe for Love card by Debby Hughes, courtesy lime doodle design

Papertrey Ink just released this brand new set of thirteen different cupcake images. Just think of all the creating you could do with these options!

Baker's Dozen by Papertrey Ink

 Baker's Dozen by Papertrey Ink

Baker’s Dozen Collection by Papertrey Ink

In case you’re more interested in baking some real food, Lawn Fawn is going to be soon releasing these cute cupcake wrapper dies. Just think how well your parties can coordinate now!

 Scallop Cupcake Wrapper by Lawn Fawn

Grassy Cupcake Wrapper by Lawn Fawn

Cupcake Wrappers by Lawn Fawn

I have good news for you; you’ve made it through this entire post and not gained a single calorie by reading it! I hope you have found some great new sweet ideas for your next project.

Bonus Tutorial from Cut@Home Design Team Member Karen Nofziger and a Give Away!

This week we have a bonus tutorial for you, brought to you by one of Cut At Home‘s designers Karen Nofziger. Before we show you Karen’s project, let’s get to know her a little bit more…

Cut At Home Designer – Karen Nofziger

KarenNofzigerProfilePic-250WI’m a California girl, through and through. Like…totally. Born in Southern California, my family moved to Northern California when I was 9.  I love it here. I’m a second-time-around-happily married mother of four boys. Two are mine; two are his. They are all 20 and 21 (set of twins in there).  They make life crazy and wonderful, and I’m super proud of them. My hubby and I grew up around the corner from each other, but we never met until we were in our 40’s on an online dating site. When we married, our boys were all pre-teens and living with us full-time. Yes, we’re nuts! They are turning into such fabulous men; I couldn’t be prouder of my family. I started scrapbooking when my oldest was born, and I’ve been hooked on paper crafts since then. I craft mostly cards, but I’m also an avid scrapbooker and have dabbled in mixed media, altered art and home décor. During the day, I manage the arts departments at a local university.  That can be super stressful, but all that stress melts away when I have paper and scissors in my hands!

Heartfelt Creations Classic Sunflower Collection

When I was at CHA recently, I saw a lot of craft companies with their products being displayed by plastic easels.  I decided I needed to make my own easel.  I tore the back off of a 12×12 paper pad and cut it in half twice.  I tied two of the resulting 6×6 chipboard pieces with Timeless Twine and covered them with paper from the Heartfelt Creations Classic Sunflower collection paper.  On the front, I added a 1.5″ border to the bottom with a different paper and only adhered it on three sides with Angel Craft Tape to create a pocket.  At the very bottom of this pocket is a small piece of chipboard, so that my photos will have something to rest on.  On the back, I added another larger pocket.  The top is stuck together with a “table tent” adhered again with that wonderful super sticky Angel Craft Tape.

I created two sunflowers using stamps and dies from the Heartfelt Creations Classic Sunflower collection.  To create these, I stamped and then cut them with my Big Shot.  I spritzed water on them and then crinkled up the leaves of the flowers.  Once dried, I distressed them a little with Tim Holtz Tea Dye ink and layered them up.  The centers are a little bit of brown glitter flower soft.  I added some lace and ribbon, and then put the sunflowers on the frame.  The top sunflower is adhered with a small piece of chipboard.

I created a couple small lay-outs to exchange out in my frame.  I love how the lay-outs match the frame, so that it really has a coherent feel.  The back pocket is to keep my lay-outs with my frame.

PCL_FlowerClose-550W

PCL_Photo1-550W

PCL_photo2-550W

PCL_photo3-550W

My video includes instructions for completing a similar card.


I hope you enjoyed my project as much as I enjoyed making it!

Supplies

Heartfelt Creations – Classic Sunflower 12×12 pad
Heartfelt Creations – Classic Sunflower stamp and dies
Angel Craft Tape
Flower-soft
3 Girl JAM Lace and Ribbon
Timeless Twine
UmWow Studio Heart Confetti Chipboard

We hope you have enjoyed today’s project courtesy of Karen Nofziger a Cut@Home design team member. Be sure to stop by Karen’s blog to see even more of her beautiful work (and let her know we sent you).

CutAtHomeLogo-12052014-550W

And now for a give away…Cut@Home is graciously offering a give away which includes paper, stamps and a die from the Heartfelt Creations Classic Sunflower Collection:

Classic Sunflower 12×12 Paper pad which has 24 double-sided papers, 2 sheets of each design
Classic Sunflower die – one die with multiple sunflowers of different sizes
Sunflower Bouquet stamp – two cling stamps
Chick Retreat stamps – three cling stamps with two sentiments
Classic Sunflower stamp – one cling stamp that coordinates with the die
Sunflower Stem stamps – four cling stamps, one sentiment, a butterfly, sunflower and seeds
Summer’s Day stamps – three cling stamps, two butterflies and one rooster on a fence
Sunflower Patch stamps – two cling stamps, a sunflower and a sunflower patch

Total value is $175.00!!!  Wow!

PCL giveaway-550W

In order to enter the give-away, please leave a comment in the comments section of this post. The winner will be announced next Friday.

Featured Artist/Designer: Marcie Sharp

Welcome to another Featured Artist/Designer Spotlight. Today we’re thrilled to welcome Marcie Sharp. Before we show you Marcie’s project, let’s get to know her a little bit more…

MarcieSharpProfilePic-02052015-250WI am so thrilled to be featured today on Paper Crafter’s Library!  I live in a rural town in Ontario, Canada, near the Michigan border, in the same area where I grew up so there’s lots of family and friends nearby. My current role is a stay-at-home momma to my 2 adorable kiddos. I’m excitable and happy by nature- I love to look at the positive side of life.  I’m primarily a card maker that enjoys every minute I get to spend in my small crafting ‘corner’. Currently I work with CAS-ual Fridays Stamps and Butterfly Reflections, Ink. There’s not a particular designing style/category I think I fall into, but I gravitate to clean and simple designs. That being said, some of my own favourite creations have been full of layers and techniques! If I’m not cardmaking then I am reading, geocaching with my family, and taking any opportunity I can to visit with my friends!  I often lose my voice due to excessive talking. 🙂

I Thank My Lucky Stars

For my card today I started with a white cardstock base and used an ink blending tool to cover it with Surf Blue, Blue Violet and Bloomsberry inks. Then I flicked some water droplets across the front for a subtle splattered look. Once dry, I stamped the stars and sentiment in black.  I stamped the sentiment again slightly offset in Versamark ink and embossed it in white. The final touch was flicking on some watered down white ink. The end result is a one layer, colourful card perfect to send to a friend!

MarcieSharp2-02052015-550W

I loved the final product so much that I created two more cards in various colours using the same steps.

MarcieSharp1-02052015-550W

Supplies

Cardstock: (white) Papertrey Ink
Ink: (Black Licorice) My Favorite Things; (Blue Violet, Surf Blue) Simon Says Stamp; (Bloomsberry) WPlus9; (Unicorn White) Hero Arts
Clear Stamps: (Lucky Stars) WPlus9
Embossing: (Versamark) Tsukineko; (white embossing powder) Stampendous

We hope you have enjoyed today’s project courtesy of Marcie Sharp. Be sure to stop by Marcie’s blog to see even more of her beautiful work (and let her know we sent you). You can also find Marcie on Pinterest, Instagram and Twitter.

Happy Crafting!

Winner of the Donna Downey Studio Give Away 02 11 2015

Donna Downey Studios Logo

Thank you to everyone who left a comment on our give-away of the collection of 4 Donna Downey Studios stencils shown below (Count Downey, Keyhole Splatter, Blooming Floral and Big Toe 8×8 stencils).

DonnaDowneyStencils-550W

And now, the moment you’ve all been waiting for…….the winner is…… Mary Mac!

DonnaDowneyWinner

Congratulations Mary! Be sure to email us at customerservice@papercrafterslibrary.com to claim your prize. Please be sure to put “Donna Downey Studios Winner” in the subject line of the email, and then in the email itself, be sure to include your full mailing address and phone number.

Join us next week when we feature another great company!

Featured Company: Graphic 45

We are happy to bring you this week’s Featured Company: Graphic 45. We are so excited to be featuring them regularly on Paper Crafter’s Library!

Graphic 45 Designer – Nadya Tana Lifa

Our Graphic 45 Guest Designer for this week is Nadya Tana Lifa who is part of the 2014 Graphic 45 Design Team. You can see Nadya’s fabulous project below, but first, here is a little more about her.

NadyaTanaLifaProfilePic-02042015-250WI am an altered-art artist from the South of Russia. I live with my husband and little daughter Darianna in a suburb of a perfect Krasnodar city. I like to walk the streets, bicycle, drink cappuccino with cinnamon, and share hugs with my cat and dog. I love to take photos and love to listen to beautiful melodies. Paper and fabric are my absolute passion. I love to mix and play with many different materials to have a multilayered result. I love to inspire and I’m teaching my lovely students how to create colorful and tender projects. Now I’m on the Graphic 45 Design Team. They are an adorable manufacturer, and I think that G45 materials gives crafters so many ways to create gorgeous projects!

Once Upon a Springtime Scrapbook Page

I made this layout with a photo of my darling daughter, she reminds me of an elf-fairy! I wanted to create a beautiful LO with many layers to emphasize this photo. I love to use 2-4 colors and play just with them. For this layout I used colors from the Once Upon a Springtime Graphic 45 collection: peach, pistachio-color, green and white. I created the ancient scroll for this composition. And finally cut and added the flower details. I am convinced that fussy cutting is a perfect way to decorate cards and layouts.

NadyaTanaLifa-02042015

Supplies

Graphic 45 Once Upon a Springtime Deluxe Collector’s Edition
Prima Flowers
Ribbons, Handmade Vintage Lace
Prima Shabby Chic Resin
Prima Shabby Chic Treasures

We hope you have enjoyed today’s feature. We want to extend a sincere thank you to Nadya Tana Lifa for her fabulous project and Graphic 45 for sharing their company with us.

You can also find Nadya on Instagram, Pinterest, Facebook, and Snapguide.

Be sure to visit Graphic 45 to see more of their products and their blog for some inspiration! For more information about Graphic 45 click on their logo in the right hand sidebar of our blog.

Happy Crafting!

Trend Watch – Woodgrain wonders

Is it just me or do you  sometimes have paper that you think is so lovely that you don’t want to use it?  You just want to have it so you can save it for that project that is going to be extra super special?  I will admit that I am one of those crafters.  And I have it really bad for wood grain papers.  I haven’t yet tried to create my own but I am so inspired by the different hues and textures available that I wanted to share them with you and maybe give them a try myself.

 These papers just look so awesome.  On Lisa’s page she used a piece that looks like a worn white-washed wall in some cool beach house.  The colors and the texturing she did with the vertical strips just add to that open air feel.  I just love this page.  Plus her baby is adorable too.

6 months

page by Lisa Dickinson photo courtesy of Gettin’ By

When I think of how to use wood grain papers I typically think of them as a background.  When I saw Geri’s card I loved how she cleverly used it as a wooden table that holds several little paper tea cups.  Love it!

like a latte

card by Geri photo courtesy of Paper Wishes

Another great benefit of wood grain is that it works well when you need to create a masculine look.  I can imagine walking on the dock and catching this beautiful fish in Cindy’s card.

what a catch

card by Cindy Lawrence photo courtesy of The Creative Closet

With all of the awesome embossing folders around you  can create your own  wood grain look.  You don’t have to limit yourself standard wood colors.  This opposite look in blue and craft that Jacquie created is so striking.

blue

 card by Jacquie Southas photo courtesy of What did I do today?

I am still digging the monochromatic look and this lovely submission is just perfect.  A small piece of white paper was embossed and used to back this orchid card for Maria’s mom.  She also colored the flowers using a watercolor technique involving spray ink and bubbles!

cherry blossoms

 card by Maria F photo courtesy of Rieslingmama

Donna told me this is one of her favorite cards.  It is such a cool use of many fun trends:  a fun focal image that is watercolored, a gold sentiment that was die cut, sequins and awesome wood grain to make it all pop.

PrettyPinkPoshBlogHop

 card by Donna Mikasa photo courtesy of Three Umbrellas

 You can create another wood grain look with stamps too.  I keep looking at this card by Barbara and I want to be there on the beach in the hammock listening to the waves and going with the flow.

go with the flow

 card by Barbara Anders photo courtesy of Paper Pursuits

Beth’s card shows another way to use a wood grain stamp in a clean and simple format.  Lots of white space and the vibrant color of her flowers is a beautiful touch to this card.

hb with flowers

 card by Beth Rush photo courtesy of Beth’s Paper Cuts

 Jodi shows off two ways to get this cool look in one card.  The wood grain paper on the side and the alcohol ink tree stump for her adorable squirrel are both fabulous.

SEPT MFT Nuts_thumb[1]

 card by Jodi Collins photo courtesy of Stamping a Latte

 Taking wood grain off the card, you can even create awesome looking packaging.  I would love to get a gift this pretty.  Stamped in gold on vellum, this little slice of a branch looks so awesome.  You can also see the matching card in the background.  This is a really beautiful set.

Winnie & Walter Leading Lady Week 4 - The Gift of Giving 012

 card by Taheerah Atchia photo courtesy of Fill Your Paper with the Breathings of your Heart

We even have options to get the wood grain look in wrapping papers.  I am especially fond of the birch wood look with the Dear Lizzy embellishments.

woodgrain packages

 packages by Elizabeth Kartchner photo courtesy of Dear Lizzy

There are so many ways to play.   I hope you try some in your paper crafting, I know I wood (I just had to get one bad pun in there)

So go ahead… make something pretty.

I found a few products to help you in your wood grain journeys; take a look.

your next stamp woodgrain

Wood grain stamp Your Next Stamp

mft_bg7_woodplank_webpreview

Wood plank background stamp My Favorite Things

wood grain stamp set

Wood You be mine stamp set My Favorite Things

embossing folder

We R Memory Keepers embossing folder Scrapbook.com

cherry wood veneer

Cherry wood veneer at Simon Says Stamp

little B wood grain tape

Little B wood grain tape at Scrapbook.com

pockets

Jilliben Soup Stampables – wood grain mini bag at Scrapbook.com

Keep It CASual #7: Amour Card & A Giveaway

Happy Monday everyone!  It’s been awhile, so welcome back to another Keep it CASual – our video tutorial series featuring clean and simple card making.  Today I’m going to show you how I created this Amour card featuring stamps from one of my favourite stamp companies –  Clearly Besotted.  In this video you’ll see how I add shading to solid image stamps using my Copic Markers.  I am also offering a give-away!

One lucky winner will receive a 3 month subscription to Paper Crafter’s Library – that is a $60 value.  As part of the Paper Crafter’s Library membership you can expect 25+ new project tutorials per month as well as any online classes offered during the time period of your membership. All you have to do to enter is leave a comment on this post.

KIC7AmourBlog

You can watch the video of how I created this card below:

Supplies:

  • Stamps: Baby Shower, Je T’aime (Clearly Besotted)
  • Ink: Black, Fog and Lipstick Red dy ink (Simon Says Stamp); W00, W0, W1, W2, W3, W8 Copic Markers (Copic)
  • Paper: 120 lb White card stock, Schoolhouse red card stock (Simon Says Stamp)
  • Accessories: Wink of Stella Clear Glitter Brush Pen (Zig)

Here’s a link to all the products I used to create this card –

*Please note that I am an affiliate with Simon Says Stamp and receive a small commission from any purchases made using the links above.

Don’t forget to leave a comment to enter to win our PCL 3 month Membership give-away!  Also, if you’re looking for more project ideas using Clearly Besotted stamps be sure to check out their blog.

Featured Artist/Designer: Ashley Cannon Newell

Welcome to another Featured Artist/Designer Spotlight. Today we’re thrilled to welcome Ashley Cannon Newell.

Before we show you Ashley’s project, let’s get to know her a little bit more…

AshleyNewellProfilePic-012315-250W copyIn 2008, I started blogging my crafting experiences. Through the years, my projects have been published in magazines and featured on blogs. I design for Papertrey Ink. When I am not in my paper suite, I am spending time with my family, trying a new recipe, or surfing the Internet. I’m also a new mom to a very sweet baby girl.


Valentine’s Treat Tent

AshleyNewell6-012315-550W

I thought you may enjoy a Valentine’s treat project, so I created some Valentine Treat Tents.  The nice thing is that this project can be made with a half sheet of 8.5″ x 11″ cardstock.

◦Trim cardstock to 4.25″ x 11″
◦Score at 4.25″, 8.5″, and 10.5″
◦Follow remaining steps in tutorial

AshleyNewell1-012315-550W

AshleyNewell2-012315-550W

AshleyNewell3-012315-550W

AshleyNewell4-012315-550W

AshleyNewell5-012315-550W

Here’s what it looks like when it is done.

AshleyNewell7-012315-550W

Here’s the back…

AshleyNewell8-012315-550W

And from the side…

AshleyNewell9-012315-550W

Here’s a close up of the other two treat tents I created.

AshleyNewell10-012315-550W

AshleyNewell11-012315-550W

AshleyNewell12-012315-550W

AshleyNewell13-012325-550W

Supplies:
*all by Papertrey Ink unless otherwise noted

Stamps: Big Hugs, Love You to Pieces: Additions, Love You to Pieces: Fox
Ink: Hibiscus Burst, Hawaiian Shores, Summer Sunrise, New Leaf, Orange Zest, Aqua Mist, True Black
Cardstock: Vintage Cream, Aqua Mist, Hibiscus Burst
Dies: Love You to Pieces: Fox, Envelope Zipper, Limitless Layers: Hearts, Limitless Layers: Heart Stitches
Patterned Paper: Love You to Pieces: Fox Envelope Wraps
Other: double-sided tape (Scor-Tape), glassine bags (3.75″ x 6.5″), mini red heart washi tape (Just Artifacts)

We hope you have enjoyed today’s project courtesy of Ashley Cannon Newell. Be sure to stop by Ashley’s blog to see even more of her beautiful work (and let her know we sent you). You can also find Ashley on Facebook, Instagram, Twitter and YouTube.

Happy Crafting!

Winner of the Graphic 45 Give Away

I’d like to extend a HUGE thank you to Graphic 45’s guest designer Miranda Edney for sharing such a wonderful project and to Graphic 45 for their generous give-away of their collection shown below.

Graphic45PrizePack-01212015-550W

And now, the moment you’ve all been waiting for…….the winner is……Karen Talbot!

Graphic45Winner

Congratulations Karen! Be sure to email us at customerservice@papercrafterslibrary.com to claim your prize. Please be sure to put “Graphic 45 Winner” in the subject line of the email, and then in the email itself, be sure to include your full mailing address and phone number.

Join us next week when we feature another great company!

Featured Company: Donna Downey Studios

Donna Downey Studios Logo

This week we are thrilled to be be able to introduce you to Donna Downey Studios. I have long considered Donna to be my first and greatest mentor in the fields of art journaling and mixed media.

It was through a class I took with Donna about 4 years ago that I was introduced to the word of mixed media – prior to that I had only ever been involved in paper crafts – stamping, card making, scrapbooking and creating 3D paper projects. Since that class I’ve really fallen in love with mixed media and have been working to continue to develop my artistic skills through a variety of online and in person classes with Donna, as well as with many other talented artists.

I am sure you can imagine how thrilled I was when I was invited to be a part of Donna’s 2015 Artist Gang – a design team she put together to help showcase her line of products. Yesterday was my first post on her blog as a Donna Downey Artist Gang member, so I wanted to celebrate with you by sharing the video tutorial for the project I created, as well as sponsor a give-away of four 8″ x 8″ Donna Downey Studio Stencils (value $36) pictured below.

DonnaDowneyStencils-550W

This prize includes the: Count Downey, Keyhole Splatter, Blooming Floral and Big Toe 8×8 stencils (shown from left to right).

Donna Downey Studios Artist Gang 2015 Designer – Andrea Walford (me 😉 )

AndreaProfilePicture2014v2For those of you that don’t know me, I am the owner and creative director of Paper Crafter’s Library. I am also an avid art journaler and mixed media artist with a passion for teaching, sharing and inspiring others towards creativity. I have spent the last 10 years teaching paper crafting and more recently art journaling, online, to thousands of paper crafters around the world. I share my life with my husband Todd, 5 children (6, 8, 11, 14 and 16), my 94 year old Grandpa and our dog Ginger.  When not working I enjoy date nights with my husband, spending time with the kids, traveling and exploring, art journaling, reading, cooking and working out at the gym.  

“She Chooses To See” 12 x 16 Mixed Media Canvas

For my first Donna Downey Artist Gang post I created this 12 x 16 mixed media canvas using four different Donna Downey stencils along with a variety of other mediums.

ArtistGang_AndreaWalford_1272015_pic2

Here you can see a full view of the project.

ArtistGang_AndreaWalford_1272015_pic1

Now part of the criteria for our video submission was that we keep the videos to between 5-8 minutes in length – so as not to bore you guys LOL.  Of course as you can imagine, this canvas took a lot more than 8 minutes to create LOL.  From start to finish it took me just over 4 hours, working over 2 days (to allow for drying time).

For my Artist Gang post on Donna’s blog I did my best to piece together clips (in fast forward) of each of the essential steps in the creative process – so it captures everything I did “in a nutshell”.  As with my art journal express videos – I narrated for you what I was doing. You can watch that below:

Now I because I realize that there are probably many of you out there who are just like me and like to know all the details and the whole process, I have prepared a couple of “bonuses” for you.  First off, you can download a PDF handout below which lists the supplies I used and a general step by step process of how I created this canvas.

Download the PDF handout here.

I also put together a three part Bonus video series which shows you the entire creative process from start to finish!  In the same way I create my Art Journal Express videos for you, the video is in fast forward and is narrated for you – that way you can see exactly what I’m doing without having to sit through hours of film. I’ve broken it down into three parts so you can either watch the process in more detail in the part that interests you or watch them all.

Part 1 – Creating the Background

Part 2 – Painting and Shading the Face, neck, hair and sweater

Part 3 – The finishing touches (the sentiment and flower)

I hope you enjoyed today’s feature.  If you would like to see more of my mixed media work please check out my mixed media blog Andrea Walford Designs.  Please be sure to visit the  Donna Downey Studios shop and their blog for some inspiration.

I’d love it if you stop by my Artist Gang post and leave a comment!

In order to enter the give-away to win the prize shown above, please leave us a comment in the comments section of this post. The winner will be announced next Wednesday.

Happy Crafting!