Trend Watch – Stretch Your Stamps

I love to see all the new products and trends in the paper crafting industry but I have to admit that I can’t afford to buy everything I like (okay, not a big confession though, I mean: who can afford that? haha). So this week we are going to take another approach to trends – we’re going to share some tips with you on how you can stretch your stamps by looking at creative ways stampers from around the blogosphere have been stretching their own stamps! This is especially great for those Christmas stamps you bought that otherwise would be waiting for you ’till next year.

Tip 1: Use your stamps to create great custom backgrounds.

If you have some little stamps you can repeat them on your cards and you’ll have a great background. The little anchors Laura used for her card are great for this!

laura-sterckx-IMG_4350
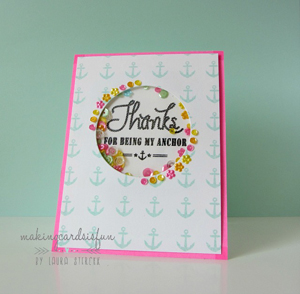
Thanks for being my anchor by Laura Sterckx, image source Making cards is fun

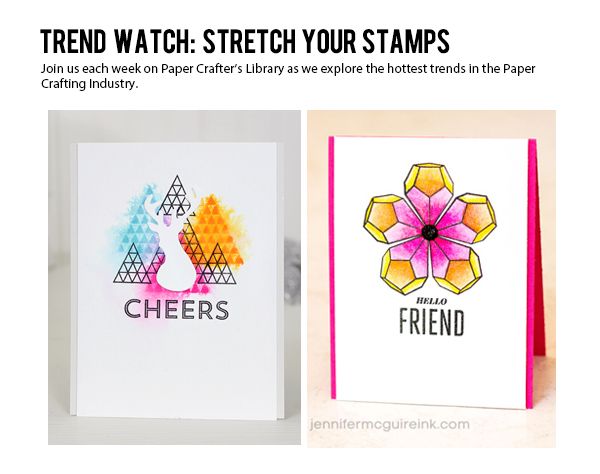
If you stamp with Distress ink you can ‘activate’ the ink with water and you’ll get a watercolor effect. You can get beautiful effects by mixing different colors like Dawn did on her card. (on her blog is another great card where she die cut a background she made with this same technique)

wplus9_TwentyFifteen_watercolor1Cheers by Dawn Woleslagle, image source Stamp away with me

Tip 2: Use the stamps for more than ‘just’ scrapbooking or card making.

Like this beautiful wrapping paper Mayuri made with Winnie and Walter stamps.

wrappingpaper-muyariWrapping paper by Mayuri, image source Winnie and walter

You can even stamp on fabric, like Kimberly did for these embroidery hoops.

KimberlyCrawford-hoops
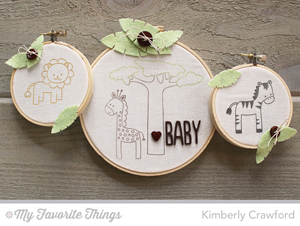
Embroidery hoops by Kimerly Crawford, image source For the love of paper

Tip 3: Make a new image with your stamp

You can even stamp with the back side of your stamps. I never thought of it, it probably won’t work with every image but it works beautifully on the card Craftilicious made.

craftilicious-DSCN6573
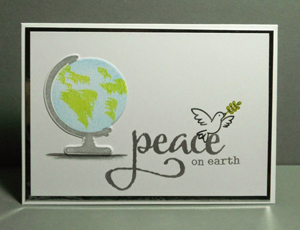
Peace on Earth by Craftilicious, image source Make the day special

Cover up a part of your stamp or just cut out only a specific part of the stamp. You can alter your stamps by stamping only parts of them. Kathy made her Christmas stamps suitable for everyday in the year this way. She removed the little number that’s on the stamp and now it’s just a little bird.

bird-ellenhutsonBird card by Kathy Racoosin, image source Ellen Hutson

Or repeat your stamps to make a completely new image. Jennifer made a great flower image out of a crystal stamp. Just repeat the stamp clockwise and you’ll get a great new image! It works a bit like making the backgrounds but now you’re making a focal point for your card instead of a complete background.

flower-Hero-Crystals2-Jennifer-McGuire-Ink
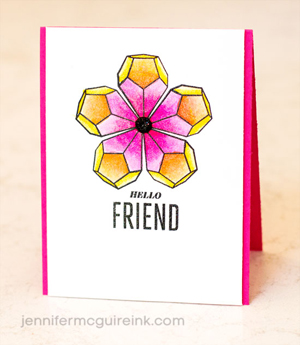
Hello Friend by Jennifer McGuire, image source Jennifer McGuire ink

And even though it’s the idea of stretching your own stamps, I have a supply list for you with stamps and materials that are used here in case you are interested.

wplus9_DocksideDockside stamps by Wplus9

distressink
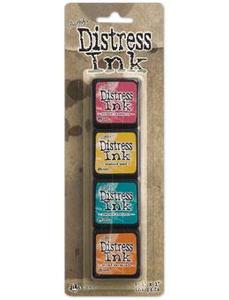
Distress mini ink pad kit #1 at Ellen Hutson

avery-elle-243370229
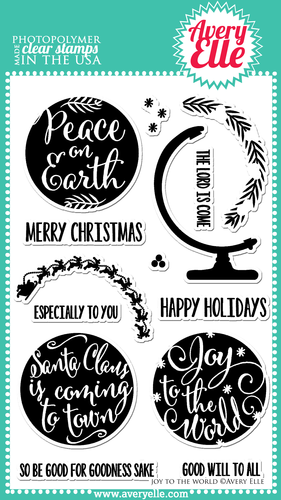
Avery Elle, Joy to the World stamps at Make the day special stamp store

hero-arts-1_306312_FS
Hero Arts Christmas Crystals stamps at Simon Says Stamp

embossing-1_103078_FS
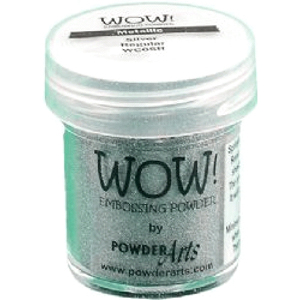
Wow embossing powder metallic silver regular at Simon Says Stamp

PCL Member Highlights

I wanted to show you a behind-the-scenes sneak peek of some of the projects that were released to our members these past two weeks. We’ve put together a sneak peek you of just a few of the video tutorials & pdf handouts our members received during the weeks of January 12 – January 23 .

MemberHighlights-01242015

Each week at Paper Crafter’s Library our monthly members can expect to receive access to a minimum of 5 exclusive videos each week. Typically members receive upwards of 25 exclusive videos each month. In planning for our projects we ensure that we cover a range of project types so that there is something for everyone whatever their interest or preference – whether it be card making, stamping, scrapbooking, altered art, mixed media, 3D items, templates, techniques etc. Projects range in difficulty level – so there will always be projects in library for whatever your paper crafting “level” whether you are a beginning paper crafter, or a more intermediate paper crafter.

Highlights these two weeks:

  • An art journal page
  • Scrapbook page with hidden journaling
  • Stamping onto a die cut and background panel
  • Watercoloring
  • Masking
  • Creating a sewn banner
  • Cards from our Heartfelt Cards 2015 online class

Did you also know that Paper Crafter’s Library members also receive free access to our online classes? Read about all the perks of being a Paper Crafter’s Library member you can visit our Benefits of Membership page HERE.

BecomeAMemberGreen

Featured Artist/Designer: Brandi Hall

Welcome to another Featured Artist/Designer Spotlight. Today we’re thrilled to welcome Brandi Hall. Before we show you Brandi’s project, let’s get to know her a little bit more…

BrandiHallProfilePic-012215-250W

My name is Brandi Hall and I live in upstate New York with my husband, son and two westies. I’m a project manager for an architectural firm during the day and a crafter when time allows. I am known in the blog world as Yankee Belle Stamper. When I’m not working or in my studio, you can find me on the golf course with the hubby. I want to thank the team at Paper Crafters Library for featuring me this week.


Wish You Were Here Card

I created this card for my best friend who lives in Texas. I kept the design pretty simple because I wanted the patterned paper to be a focal point. I stamped the suitcase image on kraft paper and adhered it with the sentiment to the card with pop up dots. I finished it off by adding a few yellow sequins.

BrandiHall1-012215-550W

Supplies

Cardstock: Stampin Up’
Patterned Paper: Crate Paper
Stamps: Mama Elephant Geotagged
Ink: Stampin Up’
Sequins: Avery Elle
Miscellaneous: adhesive, pop up dots

We hope you have enjoyed today’s project courtesy of Brandi Hall. Be sure to stop by Brandi’s blog to see even more of her beautiful work (and let her know we sent you).

Happy Crafting!

Winner of the Avocado Arts Give Away!

AvocadoArtsLogo-01142015-550W

I’d like to extend a HUGE thank you to Avocado Arts’s guest designer Tenia Nelson for sharing such a wonderful project and to Avocado Arts for their generous give-away of their collection shown below.

AvocadoArtsPrize-01142015-550W

And now, the moment you’ve all been waiting for…….the winner is……Nancy Thomas!

Avocado Arts Winner

Congratulations Nancy! Be sure to email us at customerservice@papercrafterslibrary.com to claim your prize. Please be sure to put “Avocado Arts Winner” in the subject line of the email, and then in the email itself, be sure to include your full mailing address and phone number.

Join us next week when we feature another great company!

Featured Company: Graphic 45

We are happy to bring you this week’s Featured Company: Graphic 45. We are so excited to be featuring them regularly on Paper Crafter’s Library! And this week we have a “Raining Cats and Dogs” collection prize package give-away valued at $71.  Details will be at the end of this post.

Graphic45PrizePack-01212015-550W

Graphic 45 Designer – Miranda Edney

Our Graphic 45 Guest Designer for this week is Miranda Edney who is part of the 2014 Graphic 45 Design Team. You can see Miranda’s fabulous project below, but first, here is a little more about her.

MirandaEdneyProfilePic-012115-250W

I am a fun loving silly woman with a passion to create! Mainly i share a deep love with altering pieces! Altered art is my home! My love is GRUNGE and all things distressed, vintage, and unique! I love to challenge myself with new styles and techniques all of the time. Love to be inspired and to see beauty in every day life! Live in sunny Florida with my sweet honey and our fur babies. Designing for Graphic 45 for the last 2 years has definitely been a dream come true! There isn’t a better team to be a part of! Hope you will enjoy my project 🙂 Hugs!


Precious Memories Mini Album

This project was so fun to create! I love to get messy with my mediums. And now that G45 has these amazing mixed media albums, it makes it so much easier! I used the Precious Memories line, lots of pretty colors and this will be a gift to my dear friend to cherish memories of her kids!

MirandaEdney1-012115-550W

MirandaEdney2-012115-550W

MirandaEdney3-012115-550W

MirandaEdney4-012115-550W

MirandaEdney5-012115-550W

MirandaEdney6-012115-550W

MirandaEdney7-012115-550W

MirandaEdney8-012115-550W

MirandaEdney9-012115-550W

MirandaEdney10-012115-550W

MirandaEdney11-012115-550W

MirandaEdney12-012115-550W

MirandaEdney13-012115-550W

Supplies

Graphic 45 Papers: Precious Memories, Baby’s Breath, Cuddle Time, Cherish, Cutie Pie, Pupp Dog’s Tails, Pat-A-Cake, Sugar And Spice (Precious Memories Collection)
Graphic 45 Staples
Mixed Media Album Ivory
Shabby Chic Ornate Metal Keys
Metal Butterflies
Metal Clothespins
Shabby Chic Ornate Metal Drawer Pull
Ornate Metal Brads
Antique Metal Keys
Antique Metal Keyholes
Assorted Tag Albums
Chipboards
Paints
Inks
Watercolors
Shimmerz sprays
Flowers
Laces and Ribbons

We hope you have enjoyed today’s feature. We want to extend a sincere thank you to Miranda Edney for her fabulous project and Graphic 45 for sharing their company with us. Be sure to visit Graphic 45 to see more of their products and their blog for some inspiration!  For more information about Graphic 45 click on their logo in the right hand sidebar of our blog.

In order to enter the give-away to win the prize shown above, please leave us a comment in the comments section of this post. The winner will be announced next Wednesday.

Happy Crafting!


Trend Watch – Fold Them Up Fabulous

It’s a brand new year and a great opportunity to try new things and push ourselves a bit.  Maybe it is just me , but my standard go-to card looks like an A6 folded in half.  There are a ton of possibilities with this shape, sure.  But when you add in an unexpected fold , you can make your cards look like works of art.  I am excited to share with you some of the ways our crafty colleagues are using folds, flaps and dies to create dimension, fun and folded fabulousness with their cards.

Kelly created a way to add dimension on her cards that still fit in the envelope so you can mail your loved one some lovely flowers in paper vases!  How clever is that?  They are just lovely.

3D Handmade Card Bottles and Vases on a Shelf_edited-1

card by Kelly Griglione photo courtesy of Notable Nest

I haven’t yet tried my hand at these cards in a box but they are so cool and add such a specialness to any occasion.  Could you imagine opening this box and being showered with these gorgeous butterflies.  What a neat treat.

butterfly box

card by Filomena Green photo courtesy of Personally Yours Create

The details on these next cards just blow my mind.  Helen sets up her scene so beautifully and when you open and close the card, the gingerbread house pivots back and forth.

ginger house

Card by Helen Cryer photo courtesy of The Dining Room Drawers

This minion is the perfect character for the Circle Thinlets die.  On the other side of his eye is the perfect place for a little message for a little fan.

Minion Card closed Minion Card open

card by Linda Higgins photos courtesy of Linda Higgins

I just could not resist these characters too.  Do you remember Pac Man and its little ghosts?  These guys are an awesome pop up that Kate created.  They are really fun.  You could come up with some funny sentiments for these guys.

pacman-13

Cards by Kate photo  courtesy of Mini-eco

I just love the way the ornament in the circle tag tucks into the circle outline on the opposite side of the card.  This is such a classy look.

ornament frame

card by Jenny Moors photo courtesy of Stamping Moments

These flowers are acrylic are just so lovely, I would set these on my desk at work to just bring in the sunshine.  They are so cute and they are pop ups.  Kelly has a tutorial on her site to help you make your own.

Papertrey Pop Up Card_edited-1

cards by Kelly Griglione photo courtesy of Notable Nest

The swing cards are a great option for a card that has a strong sentiment but you don’t need to write too much on the inside of the card.  This is a beautiful encouragement card by Brenda.

She believed swing

card by Brenda Rose photo courtesy of Rose Bloom Legacies

Helen’s easel card is another gorgeous example of how to incorporate interactive elements in your cards that still lie flat in envelopes.  Check out her snow flakes hanging from the top of the card.  Just lovely.

snowflake easle

Card by Helen Cryer photo courtesy of the Dining Room Drawers

This half century celebration is such a lovely statement card.  It is so stately in black and white, you could also use bright colors for a younger persons birthday celebration.

Typeset Large Square Double Display Card  (6)_thumb[6]

card by Amanda photo courtesy of The Craft Spa

Another look at black and white but this time in a Z fold.  I love that you can hide you message underneath the front panel or show it off boldly on the base behind the image.

Upright Z fold card. side view

 Card by Moz Roberts photo courtesy of All Things Moz

Whether you use an interactive version, a pop up or simple try a new way to fold your cards, I hope this year you push yourself to try a new technique or fold to give yourself another way of creating fun, fabulous folds this year.

So go ahead… make something pretty.

I found a few products to help you with your folding fabulousness.

su thinlits

Label Card Thinlets Die from Stampin’ Up

  circle thin

Circle Card Thinlets Die from Stampin’ Up

 sizzix die

Sizzix Thinlets Die Set – 5 pack – Square with Accordian Folds

 sizzix die 2

Sizzix Movers and Shapers L Die Card, Ornate Flip-its

sizzix die 3

Sizzix Movers and Shapers XL Die Card, Circle Stand ups

sizzix die 4

Sizzix Mover and Shapers Pro Die Set – Card, #10 and window panes

Featured Artist/Designer: Chrissy Larson

Welcome to another Featured Artist/Designer Spotlight. Today we’re thrilled to welcome Chrissy Larson. Before we show you Chrissy’s project, let’s get to know her a little bit more…

ChrissyLarsonProfilePic-01152015-250WI’m super excited to be joining you all here at Paper Crafters Library.  I’m Chrissy and I’m a former officer in the U.S. Air Force.  My husband was also in the Air Force and often teases that I’m CINC (Commander In Chief) of the household because I keep things running and everyone takes their orders from me.  He has no idea how right he is!  I have three boys who I homeschool.  Needless to say, they keep me busy.  My solace in the day is my craft space and card making is how I unwind.  Little did I know when my mother introduced me to making cards in high school just how big a part of my life it would become.  I remember teasing her about her obsession with stamps and paper and now I’m 100x worse than she ever was.  I own and run the CAS(E) this Sketch (CTS) challenge blog and it should come as no surprise to you that I’m obsessed with sketches.  In fact, my card today uses a sketch that is going to be on the CTS blog very soon and I hope you’ll enjoy it.

Hello Card

I used this sketch I created and while it’s a REALLY graphic sketch, I decided to make a softer looking card so I started playing with water colors along the edge of my paper.

ChrissyLarson1-01152015-325W

There was really no method to my watercoloring.  I just picked up colors and formed some blobs.  Ha ha!  After I let my watercolor blobs dry, I realized that the paper looked better if I flipped it the opposite way of the sketch but that is the great thing about a sketch, right?  It’s just a starting point.  I took my water colored background and attached it to a piece of charcoal glitter paper since my watercolor paper is only 4″ wide and I wanted a 4.25″ x 5.5″ card.  Next I diecut “hello” out of both my glitter paper and a piece of gold foil paper.  I attached the gold “hello” on top of the glitter but offset it just a tad so the glitter forms a shadow.  I attached my sentiment to the front of my card with some foam squares and my card was finished.  Super simple, clean, and a great representation of the sketch.  I hope you like it!

ChrissyLarson2-01152015-550W

Supplies

Die:  Lil’ Inker Designs Hello word die
Paper:  Strathmore blank watercolor postcards, American Crafts POW glitter paper in charcoal, Chickaniddy foil paper, Goldie lox
Paint:  Sakura 24 pc Koi watercolor field sketch set w/ waterbrush
Adhesive:  Scrapbook Adhesives foam squares, Scotch tape glider

Thanks so much for having me today and I hope you enjoyed my sketch and card.  Have a great day!

We hope you have enjoyed today’s project courtesy of Chrissy Larson. Be sure to stop by Chrissy’s blog to see even more of her beautiful work (and let her know we sent you). You can also find Chrissy on the Case This Sketch blog.

Happy Crafting!

Winner of the Unity Stamp Company Give Away

unitystampco

I’d like to extend a HUGE thank you to Unity Stamp Company’s guest designer Lisa Arana for sharing such a wonderful project and to Unity Stamp Company for their generous give-away shown below.

UnityStampCompanyPrize-01072015-550W

And now, the moment you’ve all been waiting for…….the winner is……Cindy K!

UnityStampCompanyWinner

Congratulations Cindy K! Be sure to email us at customerservice@papercrafterslibrary.com to claim your prize. Please be sure to put “Unity Stamp Company Winner” in the subject line of the email, and then in the email itself, be sure to include your full mailing address and phone number.

Join us next week when we feature another great company!

Featured Company: Avocado Arts

AvocadoArtsLogo-01142015-550W

We are happy to bring you this week’s Featured Company: Avocado ArtsAnd this week we are giving away A Latte Love stamp set. (Details at the end of the post.)

AvocadoArtsPrize-01142015-550W

Avocado Arts Designer – Tenia Nelson

Today we welcome Tenia Nelson. We are so excited to have her showcase her work today on Paper Crafter’s Library. You can see Tenia’s fabulous project below, but first, here is a little more about her:

TeniaNelsonProfilePic-01142015-250WTenia is an amazing designer on the Avocado Arts design team.  She has been featured in the top magazines, design teams and stamp companies in the craft industry.  She is a wife, momma, doggie momma, jazz pianist, percussionist, music teacher, soccer player and paper crafter that lives in Denver, CO.   Tenia is married to a wonderful guy named Tim, is a momma to her awesome son Thelonious (Theo) and has two doggie “kids” Miles and Brillo.  She loves paper, inks, stamps and embellishments.  Tenia has been creating since she was little and LOVES it!!!

Stuck On You Card

AvocadoArts3-01142015-550W

Bee Mine Card

AvocadoArts2-01142015-550W

Thanks A Latte Card

AvocadoArts1-01142015-550W

Supplies

Black and Red Dye Ink, Washi tape, cardstock, Avocado Arts “A Latte Love” stamp set, mini clothespin

We hope you have enjoyed today’s feature. We want to extend a sincere thank you to Tenia Nelson for her fabulous projects and Avocado Arts for sharing their company with us. Be sure to visit Avocado Arts to see more of their products and their blog for some inspiration! You can also find Avocado Arts on Pinterest and Facebook.

In order to enter the give-away to win the prize shown above, please leave us a comment in the comments section of this post. The winner will be announced next Wednesday.

Happy Crafting!


Trend Watch – Tags

You may think this post is a bit overdue. I saw a number of blog hops for Christmas Tags just a month or two ago. But did you know you don’t have to put your tag dies away just because you have the Christmas season is behind us? Today’s cards and projects feature a number of different ways to feature tags in your everyday work!

Since I’m going to be an aunt for the first time in April (!!), I’m now keeping my eyes peeled for good New Baby card and project ideas. I really like Yainea’s card with the cute bunnies! The bow on the tag is a nice touch.

Hello Baby Twins by Yainea Nunez

Hello Baby Twins card by Yainea Nunez, courtesy My Paper Journey

Alina’s card welcomes a new baby girl with a gorgeous vellum tag. What a neat idea for a way to use a tag without overwhelming the card. The vellum really allows the little hearts to shine!

Hello Baby Girl by Alina Kelo

Hello Baby Girl card by Alina Kelo, courtesy -Creating With My Hands-

Dawn created this fun Cowboy Birthday card and used a tag as a background feature. Tags provide a great place to feature some ribbon, too! I have so much fun ribbon in my stash that I’d like to put to use. I think making some cards with tags is in my crafting future.

Cowboy Birthday by Dawn Griffith

Cowboy Birthday card by Dawn Griffith, courtesy Dawn’s Stamping Thoughts

The tag on this card by Heather is the centerpiece and focal point. The tag makes a great backdrop for her trees and sentiment.

Grateful For You by Heather Nichols

Grateful For You card by Heather Nichols, courtesy Pine Is Here

Janet’s bookmarks feature Stampin’ Up’s Tag Topper Scalloped Punch.  This punch can be used to make a tag shape at the top of any strip of paper. The lanterns that she put on the bookmarks are so cute!

Happiness Bookmark by Janet Holmes

Happiness bookmark by Janet Holmes, courtesy Jan Girl Stamps

Julie made an adorable banner with tags that could be used for a number of occasions. I love how shapes like tags make it so easy to make decorations to spruce up any occasion or party.

Celebrate Banner by Julie Davison

Celebrate Banner by Julie Davison, courtesy Julie’s Stamping Spot

Papertrey Ink recently released this great Wine Bottle Tag. I really like the coordinating birthday tag and card that Laura made. What a cool coordinating gift!

Happy Birthday Tag and Card by Laura Bassen

Birthday Card and Bottle Tag by Laura Bassen, courtesy Doublestick Heaven

Maile used the same tag die, but made doorhangers for her niece and nephew. The Tag Sale 5 die by Papertrey Ink fits perfectly with the Wine Bottle Tag. The negative butterfly die cut adds so much to the tag.

Doorknob Hangers by Maile Belles

Doorknob Hangers by Maile Belles, courtesy Simply Stamped

If you’re looking to expand your collection of dies, here are just a few of the many that are out there.

Tags A Lot by Mama Elephant

Tags a Lot die set by Mama Elephant (This set has SO many possibilities!)

Birthday Tags by Lawn Fawn

Birthday Tag Stamp Set by Lawn Fawn

Tag, You're It dies by Lawn fawn

Coordinating Tag You’re It dies by Lawn Fawn

Tag Bulider Blueprints by My Favorite Things

Even though these dies by My Favorite Things include Christmas features, the tags themselves can be used year round!

Hopefully this post has inspired you to make some more cards featuring tags.  Let us know about your favorite part of using tags for your craft projects!