Featured Company: Waffle Flower Crafts 03 25 2015

Print

We are happy to bring you this week’s Featured Company: Waffle Flower Crafts.

Waffle Flower Crafts started in April 2014 to explore possibilities in product designs. We like to think of ourselves as a tool company. We hope our stamps, dies and inks will help make crafting fun and approachable for everyone!

Fun, Inspiring, Versatile and Easy to use: all of our products were designed with our FIVE code in mind. We’re dedicated to bringing you the best crafting experience by using high quality photopolymer for our stamps, safe metal for our dies; all made in USA.

We are now proud to have over 60 products in our product line with 15 new products available this April. You can find the previews on our blog now: http://bit.ly/WFC201504Preview

Follow us for your daily dose of inspiration:

Join the fun by

This week we are giving away this Tribal Thank You Stamp Set used in Tessa’s project! Roots and nature are the keywords for this stamp set. We hope that it will help bringing out the artist in you. Find more samples at: http://waffleflower.com/product/tribal-thank-you-stamp-set/.  (Details at the end of the post).

Basic RGB


Waffle Flower Crafts Designer – Tessa Wise

Today we welcome Tessa Wise. We are so excited to have her showcase her work today on Paper Crafter’s Library. You can see Tessa`s fabulous project below, but first, here is a little more about her:

TessaWiseProfilePic-250W-03252014

Hi there! I’m Tessa Wise, a mama and cardmaker from Northern Virginia. I am married to Jeremy and we have two little girls, Zoey and Natalie. I’ve been crafty all my life but paper crafts are my favorite. I love my stamps and ink! I also love to share what I know- I teach cardmaking and scrapbooking classes at local stores and events. I also share on my blog, Crafty Girl Designs.
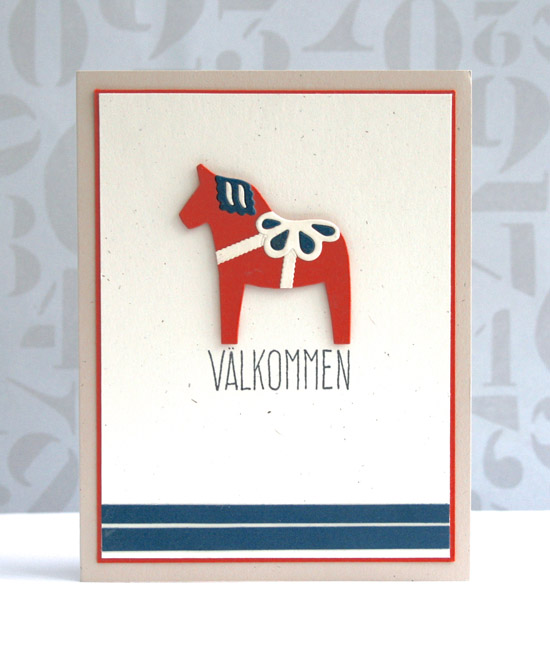


Bear card

I started my card with a white cardstock panel cut to the size of a A-2 card front.  I used the small patterned block stamp to create a border along the bottom of the panel.  Then, I cut about a quarter of an inch off of both sides of the panel, leaving the stamped border intact.  I stamped the tree in the center of the panel with tan ink and the sentiment with black ink on the right side.  I splattered some aqua mist over the entire thing and let it dry.

While the mist was drying, I stamped the bear using purple ink and cut it out.  I added a bit of linen thread around the border and then added my white panel to my turquoise card base with foam adhesive.  I added the bear and then finished it off with a few pink sequins.

WFTessaWiseBearCard1

WFTessaWiseBearCard2

Supplies

Stamps: Waffle Flower Tribal Thank You Stamp Set
Cardstock: mint, white.
Inks: various colors.
Accents: sequins; linen thread.
Other: scissors, paper trimmer, aqua mist, foam squares.

We hope you have enjoyed today’s feature. We want to extend a sincere thank you to Tessa Wise for her fabulous project and Waffle Flower Crafts for sharing their company with us.

Connect with Tessa:
Blog: http://www.craftygrl.blogspot.com/
Twitter: https://twitter.com/tessamwise
Instagram: http://instagram.com/tessawise
Pinterest: http://www.pinterest.com/tessawise/
YouTube: https://www.youtube.com/user/tessamwise/

In order to enter the give-away to win the prize shown above, please leave us a comment in the comments section of this post. The winner will be announced next Friday.

Happy Crafting!

ETA: The winner of this give-away is posted HERE.

Trend Watch – Inked Backgrounds

In today’s trend watch I would like to welcome you all in the world of inked backgrounds. You’ve probably made a couple of those backgrounds yourself and there are a lot of ways to use them for your paper crafts. It’s a fun and (most of the time) easy way to make the perfect matching background. You can blend, watercolor, stamp or just use a plain ink pad to create beautiful effects and colors. My stash of patterned papers is huge, but sometimes I just need something that isn’t in there. And then these inked backgrounds are a great way to make your own ‘patterned paper’.

Let’s have a look at some beautiful cards with inked backgrounds! I just had to start with this great flower-shaped card Amy Sheffer made. For the yellow background she sponged some ink on her paper and created a great soft look. And even the top layer with the sentiment is colored with inks.

amysheffer-PTI_enclosed-1_aks
Smile card by Amy Sheffer, image source Pickled Paper Designs

Another great card is this one from Lydia Evans. She used distress inks to create the background. I really love how bright the colors are in contrast to the black text and butterflies.

lydiaevans-DSC03970a-1024x1024You’re pretty darn awesome by Lydia Evans, image source Lydia Evans design.com

Kara used some lovely bright pinks for her card too. The little white elephant looks amazing in his ombre sky.

kandr-2015_0212ombrepurecolor0015
p.s. I love you by Kara, image source K and R designs

There are some great background stamps to create your own custom colored backgrounds. Kate stamped the ink splash image on her card a couple of times to create the background on her card, and when you use a neutral color it’s a great way to make masculine cards.

kate-IMG_0758
masculine valentine by Kate, image source Make the day special cards

You could use your graphic stamps and some bold colors for this technique too – and the look of your card can change completely by just adding another color!

kristie-HappyHappyBirthdayTriangles
Happy birthday by Kristie Larsen, image source The Kristie Sessions

There are a lot of great cards to share with you that use inked backgrounds but I want to finish this trend watch with one other technique that involves lots of ink on your background. Julie just used her ink pads straight onto the paper to create this great galaxy feeling. This is also a great way to add the perfect color to your background when you’ve done a lot of stamping in one color and don’t have a paper that matches that color. Just grab a white piece of cardstock and color you paper with ink!

julieebersole-6a00d83451614969e201bb07e276f6970d-450wi
Love you to the moon and back by Julie Ebersole, image source Ellen Hutson Classroom

For my supplies list this week I wanted to show you some great inks and background stamps.

so80s-225504950

So 80’s by Wplus9 design at Make The Day Special stamp store

Distress-Mini-Ink-Pad-Kit-_12-RITDPK40422_image1__32882.1411648887.1280.1280
Ranger Distress mini ink pads at Ellen Hutson

ranger-blending-1_133462_FS
Ranger mini ink blending tool at Simon Says Stamp

storybookCollection__15409.1423108094.1280.1280
Wplus9 Pure Color ink pads storybook collection at Wplus9

BrightDaysThumb__50707.1405464372.1280.1280
Bright days stamp at Avery Elle

Have fun creating! – Lucinde

Featured Artist/Designer: Kimberly Crawford 03 19 2015

​Welcome to another Featured Artist/Designer Spotlight. Today we’re thrilled to welcome Kimberly Crawford!

Before we show you Kimberly’s project, let’s get to know her a little bit more…

KimberlyCrawford-250W-03262015

I am a former elementary school teacher who has loved paper crafting and especially stamping, since my husband mentioned this “stamping thing” his mom did when we were getting married. I don’t let him forget it. 🙂

I currently design for My Favorite Things, Carta Bella, Maya Road, and Jillibean Soup. I was a former Paper Crafts Magazine Go-To-Gal and have been published in many magazines and books.
When I am not creating, I am an active swim mom, I love to golf, take photographs, play the piano, and bake. I live with my husband of 15 years, our son, who is 9, and our cat, in eastern Iowa.

Beyond Happy

I love the look of gold on anything I am making these days, so I thought it would be neat to try and heat emboss gold onto clear acetate. Acetate is basically a transparency, or clear piece of thin plastic.

KimberlyCrawford1-550W-03262015

On this card, I created an entire panel of stamped and heat embossed acetate and die cut it in the shape of a tag. Doing this technique is very easy, so I made a video tutorial for you.

KimberlyCrawford2-550W-03262015

I love the way this turned out!

Supplies
Cardstock: My Favorite Things-Smooth White, Tropical Teal
Acetate: Hot Off the Press-Heat Resistant Acetate
Stamps: My Favorite Things-Polka Dot Background, Totally Happy
Ink: My Favorite Things-Tropical Teal Dye Ink, Versamark Watermark Ink
Embossing Powder: Stampendous-Gold
Dies: My Favorite Things-Die-namics Stitched Traditional Tags STAX, Die-namics Winged Beauties, Die-namics Scribbles, Die-namics Blueprints 21
Enamel Dots-My Mind’s Eye Teals
Clothespins-Canvas Corp
Adhesive: Scrapbook Adhesives by 3L-3D Foam Squares White Small, Dodz Medium

Thinking Of You

KimberlyCrawford3-550W-03262015

I tried it again on this card, this time with a larger heart image.

KimberlyCrawford4-550-03262015

One tip, adhering a clear embellishment to your card can be tricky. On the first card, the small clothespin is holding the tag to the card. On the second card, the adhesive was applied behind the heart.

Thanks for letting me share this fun technique with you!

Supplies
Cardstock: My Favorite Things-Black Licorice
Acetate: Hot Off the Press-Heat Resistant Acetate
Patterned paper-Carta Bella Summer Lovin’ 6×6 pad
Dies: My Favorite Things-Die-namics Stitched Traditional Tags STAX
Sticker: Teresa Collins Studio Gold Sentiment Stickers
Sequins: Avery Elle
Adhesives:  Scrapbook Adhesives by 3L-3D Foam Squares White Small, EZ Runner Refillable Permanent

We hope you have enjoyed today’s project courtesy of Kimberly Crawford. Be sure to stop by Kimberly’s blog to see even more of her beautiful work (and let her know we sent you).

You can also find her on Facebook, Pinterest, Instagram and YouTube.

Happy Crafting!

Featured Company: Graphic 45 – 03 18 2015

We are happy to bring back this week’s Featured Company: Graphic 45. We’ve been huge fans for a long time and are thrilled to be able to feature them regularly on Paper Crafter’s Library!

This week they are generously giving away  a “Raining Cats and Dogs” and “Time To Celebrate” collection prize package valued at $60. Details will be at the end of this post.

$60 Prize Pack with RCAD and Time to Celebrate -550W


Graphic 45 Designer – Rhea Freitag

Our Graphic 45 Guest Designer for this week is Rhea Freitag who is part of the 2014/2015 Graphic 45 Design Team. You can see Rhea’s fabulous project below, but first, here is a little more about her.

RheaFreitagProfilePic-250W-03182015


I have always been identified as a creative person, but within the last three years my inner artist has really emerged.  Assemblage work, jewelry construction, art journaling and book making are all genres of mixed media art that I employ.   I strive to make art that tells a story, has a soul and engages the viewer through interaction, movement, memory and story.

Another aspect of the creation process that I adore is the adventure of searching for unique art supplies at estate sales, flea markets and antique shops.  Taking classes, blogging and gathering with my artsy pals are additional facets of the art world that bring me great pleasure and inspiration.   For me, my art expression also provides a welcome escape from my challenging career as a regional Director for Family Preservation Services serving four counties in Michigan.

I am so very pleased to be able to work with Graphic 45.  It really is a dream come true.


Times Nouveau Art Letters

RheaFreitag1-550W-03182015

RheaFreitag2-550W-03182015

RheaFreitag3-550W-03182015

RheaFreitag4-550W-03182015

RheaFreitag5-550W-03182015

RheaFreitag6-550W-03182015

Times_Nouveau_ART_Letters_Rhea_Freitag_7_of_8

RheaFreitag8-550W-03182015

Supplies

Graphic 45 Times Nouveau Deluxe Collectors Edition
Graphic 45 Ornate Metal Key Holes
Paper Mache Letters
Black Gesso
Distress Ink (Black Soot)
Gilders Paste (Silver)
Metal Embellishments
Petaloo Flowers
Tissue Tape
E6000
Matte Medium
Mica Flakes
Perfect Pearls Mist

We hope you have enjoyed today’s feature. We want to extend a sincere thank you to Rhea Freitag for her fabulous project and Graphic 45 for sharing their company with us. You can also find Rhea on pinterest and youtube.

Be sure to visit Graphic 45 to see more of their products and their blog for some inspiration! For more information about Graphic 45 click on their logo in the right hand sidebar of our blog.

In order to enter the give-away to win the prize shown above, please leave us a comment in the comments section of this post. The winner will be announced next Thursday.

Happy Crafting!

Trend Watch – Full Blown Foiling: the Shiny Retro Trend

How big is foiling now?  It’s huge!  Although it’s not new, anything this eye catching and shiny is just too compelling to ignore!

As you may have noticed, gold is very much on trend right now, and we’ve been seeing a lot of it, but foiling can be done in other colors as well.

  While there are a few new machines that make creating foil looks a breeze, there are  techniques you can use to create the same look with laminators, along with crafty techniques and products that can give you the same look right off the rack.   And for all of us craft hoarders, we can use products we already have to achieve this yummy look.  I know I am not alone in my attraction to all this metallic shininess so let’s get busy and get ready for some sparkles!

We are well into the new year but you can keep the celebration going with all of this sparkly goodness.  In the card shown below, the foiling actually comes in via the background star paper peeking out from the holes.  I just love all of this gold and each type looks so good together.

010115-NewYearsCard-1

card by Lea Lawson photo courtesy of Don’t let your dreams stay dreams

Yana used a kit to create this collage card.  Check out the polka dot coolness that is part of the background of this card.  I love the subtle addition of such a vibrant color.

Yana-Smakula-Gossamer-Blue-September-2014-Card-4-1

card by Yana Smakula photo courtesy of Yana Smakula cardmaking and scrapbooking

I originally chose this card from Lydia because she used foiling on her tag and created such a sweet background for part of her card.  But then I really looked closely at the other details incorporated into this card and just fell in love.  I noticed that the kitty was in the litter box.  Did you check out the matching sentiment? Double word score awesome!

that stinks kitty

Card by Lydia Evans photo courtesy of Lydia Evans Design.com

You can also get your full foiling on with stripes as the entire background.  This birthday card from Mercedes is so striking!

happy birthday stripes

card by Mercedes photo courtesy of Paper Paradise

Lydia again dazzles us with this hello card and used Add a Little Dazzle metal sheets and a die to create her look.

hello

card by Lydia Evans photo courtesy of Lydia Evans Design.com

When I saw these framed foiled signs being made I thought I could just fill up an entire wall with fun sayings and inspirational quotes.  You can get this St. Patrick’s day inspired download free here.

Printables-on-TCB-1502271

Framed print by Colleen photo courtesy of Lemon Thistle

  I love the contrast of the wood grain and the shiny gold foiled embellished letters and anchor in this lovely card.

Yana-Smakula-Gossamer-Blue-September-2014-Card-3-1

card by Yana Smakula photo courtesy of Yana Smakula cardmaking and scrapbooking

I love the way you can include so many types of gold interest on a project and yet the foiled element draws your eye because of its shine.  This is a lovely example from Amy.

RCbeautifulbanners_aks

card by Amy Sheffer photo courtesy of Picked Paper Designs

Julie shares how to use elements you may have in your craft stash to make your foiling pop with and without a laminator.  These gorgeous tags were made with stencils and rubber cement.

Julie tags with stencils

tags by Julie Fei Fan Balzer photo courtesy of Balzer Designs

I love the stripes and the idea that you can take die cuts and layer on the metallic color – it just adds to the possibilities.  The foil also looks so nice with the soft watercolor.

Soar card (1)

card by Danielle Flanders photo courtesy of Homespun with Heart

Another great example of going full blown foil is to use large swatches of  a foiling sheet to create this cool sunburst look.

sunburst

card by Carol Payne photo courtesy of Stamping Rox My Fuzzy Blue Sox

Jennifer experimented and found several ways to apply the foiling technique – she shares them here.  This lovely card shows off foil lettering and the pretty solid hearts.

021516-Laser-Foil7-Jennifer-McGuire-Ink

card by Jennifer McGuire photo courtesy of Jennifer McGuire Ink

Put your sunglasses on and join in the fun (again?) with this shiny retro foiling trend.  Maybe this time you can use something new.  Try it with rubber cement, or that laminator you forgot about in the garage or print some signs for your house and use your printer’s toner ink.  There are so many fun possibilities and they all look really bright!

So go ahead…make something pretty.

Here are some supplies you might find helpful in your foiling quest.

stampin up foil sheet

Foil Sheet from Stampin’ Up!

HS foil stickers

Heidi Swapp Foil stickers from Simon Says Stamp

ranger foil sheets

Ranger Foil Sheets from Simon Says Stamp

thermoweb deco foil

 Deco Foil from Thermoweb

sticki it

Stick it from Simon Says Stamp these are great for foiling sentiment dies and intricate background dies.

wanderlust pouch

Heidi Swapp Embellishment pouch from Simon Says Stamp

Add a litte dazzle sample pack

Metal sample pack from Add a Little Dazzle 

Minc machine

Heidi Swapp Minc foil machine from Scrapbook.com

Winner of the Cut @ Home Give Away! 03 06 2015

CutAtHomeLogo-12052014-550W

I’d like to extend a HUGE thank you to Cut @ Home’s designer Corene Poznicek for sharing a Spread Your Wings Mini Album video tutorial and to Cut @ Home for their generous give-away which includes: 34 piece Gelatos Gift Set from Faber-Castell,  6 piece Essential Tools from Faber-Castell, Arianna Hummingbird stamp set form Heartfelt Creations and 4 ¼” Round Acrylic Stamping Block with Finger Grips and Guide Lines from Apple Pie Memories.

Total value is $65.00!!!

PriceCut@Home

And now, the moment you’ve all been waiting for…….the winner is……Lynn Koepke!

 WinnerCut@Home-03062015

Congratulations Lynn Koepke! Be sure to email us at customerservice@papercrafterslibrary.com to claim your prize. Please be sure to put “Cut @ Home Winner” in the subject line of the email, and then in the email itself, be sure to include your full mailing address and phone number.

Happy Crafting!

Winner Create A Smile Give Away! 03 04 2015

Logo-550W

I’d like to extend a HUGE thank you to Create A Smile’s guest designer Anika Lerche for sharing such a wonderful project and to Create A Smile for their generous give-away of their Eggstraordinary Egghunt stamp set, which includes 2 rolls of washi tape, 2 packs of chipboard pieces and the Feel Good paper pack.

Create A Smile PCL Giveaway

And now, the moment you’ve all been waiting for…….the winner is…… Lynn Gauthier!!!

WinnerCreateASmile-03112015

Congratulations Lynn! Be sure to email us at customerservice@papercrafterslibrary.com to claim your prize. Please be sure to put “(company name) Winner” in the subject line of the email, and then in the email itself, be sure to include your full mailing address and phone number.

Join us each week as we feature a different company and host a different giveaway!

Featured Artist/Designer: Miriam Prantner 03 12 2015

Welcome to another Featured Artist/Designer Spotlight.

Today we’re thrilled to welcome Miriam Prantner. Before we show you Miriam’s project, let’s get to know her a little bit more…

MiriamPrantner-250W-03122015

My name is Miriam Prantner.  My husband Andrew and I have two daughters Ellie (7) and Carina (4). I’ve been crafting ever since I was little, scrapbooking for over 15 years, and making cards for the last several years.

I love to dabble and try new techniques/styles, but I tend to have a pretty CAS style even when I’m experimenting.

I am currently on the Design Team for Neat & Tangled, Jane’s Doodles, and the My Favorite Things Challenge & Inspiration Team.  In addition, I design stamps and dies for Neat & Tangled.

Miriam’s Projects

My projects today feature some of my designs from Neat & Tangled’s March release which will be available for purchase tomorrow, March 13th.

This first card features the Dala Horse stamp set and coordinating dies.  My husband’s mother is Swedish and we were able to vacation in Sweden several years ago.  I fell in love with the colorful Dala Horses there and had so much fun creating this set.

MiriamPrantner3-550W-03122015

I kept this card very simple, using the small Dala Horse die and coordinating cuts.  I felt like the card lacked some balance, so I added a couple strips of blue cardstock at the bottom of the card to anchor it.

MiriamPrantner4-550W-03122015

My second card is a bit more involved.  I embossed the floral elements from my Scandinavian Flowers set in gold on vellum and fussy cut them.  These were adhered to the pink panel of cardstock lightly, meaning not totally adhered.  I like leaving the ends loose, it adds some great dimension/texture to the card.

MiriamPrantner1-550W-03122015

The sentiment panel is vellum layered over cardstock layered over vellum, and then the entire piece is popped up with foam tape.  Finally, I added some clear sequins for some extra sparkle.

MiriamPrantner2-550W-03122105

I should also say that this card uses my two current cardstock favorites:  Insulation Pink and Natural, both from My Favorite Things.  The pink is just the right subtle shade, and can almost be used as a neutral, and the Natural is a wonderful cross between cream and kraft.

Supplies

Dala Horse Card
Cardstock:  My Favorite Things – Natural Cardstock; Avery Elle – Papaya, Sapphire, Cream, and Speckled Cardstock
Stamps:  Neat & Tangled – Dala Horse
Ink:  Memento – Tuxedo Black
Other:  Neat & Tangled – Dala Horse Dies, Tombow – Mono Adhesive; Scotch – Foam Adhesive
Grateful Beyond Measure Card
Cardstock:  My Favorite Things – Insulation Pink, Natural, and Sweet Tooth Cardstock; Recollections – Vellum
Stamps:  Neat & Tangled – Scandinavian Flowers and Dala Horse
Ink:  Versamark
Other:  Neat & Tangled – Crystal Clear Sequins; Close to My Heart – Gold Embossing Powder, Liquid Glass; Create & Craft – Adhesive Runner; Tombow – Mono Adhesive; Scotch – Foam Adhesive; Creative Memories – Corner Rounde

We hope you have enjoyed today’s project courtesy of Miriam Prantner. Be sure to stop by Miriam blog to see even more of her beautiful work (and let her know we sent you).

Happy Crafting!

Featured Company: May Arts 03 11 2015

MayArtsLogo-09102014-250W

We are happy to bring you this week’s Featured Company: May ArtsIn today’s spotlight you’ll learn more about May Arts, see a fantastic project by Karen Hanson and have the opportunity to win a “winners choice” of 2 spools of Ribbon from May Arts. (details at the end of this post). Please note that this give-away is only open to residents of Canada and the USA.

May Arts Ribbon

May Arts Designer – Karen Hanson

Today we welcome Karen Hanson. We are so excited to have her showcase her work today on Paper Crafter’s Library. You can see Karen’s fabulous project below, but first, here is a little more about her:

KarenHansonProfilePic-250W-03112015

Karen Hanson is a wife, mom, blogger, and proud member of the May Arts design team, working out of the beautiful city of Calgary, Alberta.

She originally started crafting after receiving a Cricut for her first Mother’s Day, and has not really looked back.

While Karen works on all types of projects from cards, to home decor, to scrapbooking, ribbon finds it’s way onto almost everything she creates!

Celebrate Spring Banner

Spring in Calgary, Canada can be a bit of a strange thing – slow to start, with hints here and there that change is on the way.

Most of spring is actually spent thawing out, surrounded by cracking bark and hints of fresh green popping up ever so slowly.  In fact, the real colour of spring here in Calgary comes from the sky; a big, bright prairie sky as far as the eye can see.

It is these blue and teal skies that we see most days during the coming season, with only a few grey days here and there.  It was the Calgary spring skies that inspired this banner!

Springbanner1-550W-03112015 (2)

Springbanner2-550W-03112015

Springbanner3-550W-03112015

Springbanner4-550W-03112015

Springbanner5-550W-03112015

May Arts recently released the most beautiful collection of doubles-faced satin ribbon (HA-78), a collection of blues and greens and teals and turquoise .  The collection is so beautiful together that you will want them all!

I decided to use each colour of the 7/8″ ribbon to add a bit of texture to a simple banner, simply tying and knotting each across the streamer line that held each banner piece together.

The banner pieces themselves were cut from paper from DCWV (each banner piece was simply cut to 5″x 6″ – a favourite dimension of mine for banners).  I went with rustic wood grains to mimic much of what I see around me right now in my backyard, and what I will continue to see for much of the rest of spring.

Each banner piece was topped off with a letter cut with the Cricut Cartridge Don Juan, and topped off with a paper rose taken from DCWV’s Paper Rose Project stack.

I love that this banner celebrates the beauty of this season, even if that beauty isn’t what we typically think of for spring.  I think I am actually going to have a hard time taking this one down!

Supplies

May Arts Ribbon – 7/8 Inch Double Faced Satin (HA-78)
DCWV Paper – Gilded Stack and Project Stack (Paper Roses)
Adhesive Rhinestones
Glue Gun
Cricut Cartridge – Don Juan

We hope you have enjoyed today’s feature. We want to extend a sincere thank you to Karen Hanson for her fabulous project and May Arts Ribbon for sharing their company with us. Be sure to visit May Arts to see more of their products and their blog for some inspiration! You can find them also on facebook, pinterest, twitter, instagram and youtube.

In order to enter the give-away to win your choice of any two spools of May Arts Ribbon, please leave us a comment in the comments section of this post. The winner will be announced next Wednesday. Please note that this give-away is only open to residents of Canada and the USA.

Happy Crafting!

Trend Watch – Happy Hexagons

The hexagon seems to be a trendy shape that is sticking around for the long haul. The chemist in me is partial to them, since a hexagon can be used to represent a 6-carbon ring, but I digress. This post is full of a variety of ways to use hexagons. I am always so amazed at how creative you crafters can be with such a simple shape!

This card by Susan uses the hexagon shape as the focal point and shape of her card! It would be such a unique treat to receive in the mail.

Happy Birthday Hexagon by Susan Goetter

Happy Birthday Hexagon by Susan Goetter, image source keeping in touch

Mindy’s card is so vibrant that I am sure it will definitely cheer up the recipient! I love the hexagon “scaffold” and how she layered it over the bold black and white stripes.

Cheer Up Buttercup by Mindy Backes

Cheer Up Buttercup by Mindy Backes, image source Bada-Bing! Paper-Crafting!

Marisa used cute patterned paper for the hexagons on her sweet greeting card. The way she accentuated the quilt-like appearance with some stitching and burlap makes the card just perfect.

My Friend by Marisa Gunn

My Friend by Marisa Gunn, image source Dzines by MEG

This bright and colorful card takes advantage of the way hexagons fit together to provide a great backdrop for birthday wishes. Yana made such an eye-catching card that would make anyone’s birthday cheerier!

Colorful Happy Birthday Hexagons by Yana Smakula

Colorful Happy Birthday Hexagons by Yana Smakula, image source Yana Smakula

Diane’s card would be perfect for any of the men in your life. I like how she used more masculine colors and accentuated a segment of the hexagon background with the navy blue paper. This card reminds me also of a number of board games I love to play that use hexagon tiles to build the board. (Is anyone out there familiar with Settlers of Catan, Takenoko, or Eclipse?) How much fun would it be to make a hexagon card that connects to a board game for someone that loves to play?

Masculine Hexagon Happy Birthday by Diane Barnes

Masculine Hexagon Happy Birthday by Diane Barnes, image source colourmehappy

Stephanie’s card does a great job of using hexagons to add a unique flair to the front of her card. The bright pink really sets off the constellation background.

You're Out of this World by Stephanie Severin

You’re Out of this World by Stephanie Severin, image source Ingenious Inkling

Don’t forget that hexagons are one of the shapes on a soccer ball! Look at how Amanda used her Hexagon Hive die to produce a great soccer ball! I’m sure this idea could go a long way for all of the soccer or sports fanatics in your life.

Simply World Cup by Amanda Mertz

Simply World Cup by Amanda Mertz, image source Did You Stamp Today?

Hexagons are also the shape of beehives, and I would be remiss to not show you at least one bee card. Lisa made such a cute background for her little honeybee to travel across. The variation in color really adds interest to the little hexagons!

Bee Mine by Lisa Petrella

Bee Mine by Lisa Petrella, image source Bellalistona

There are so many different hexagon related products out there, it was hard to choose a few.  Be sure to visit your favorite paper crafting retailer and search for hexagons!

Sizzix has this great set of 14 dies that make small, layered hexagon shapes.

Sizzix Triplits Hexagon Die Set

Sizzix Triplits Hexagon Die Set

Fiskars sells this fun stamp set.  That large stamp at the top has so much great potential!

Fiskars Hexagon Sentiments Stamp Set

Fiskars Hexagon Sentiments Stamp Set

I’m sure there are a million different options out there for nesting hexagon dies, but check out this set from Echo Park at Simon Says Stamp.

Echo Park Hexagon Die Set

Echo Park Hexagon Nesting Dies

Stampin’ Up sells this Hexagon Hive die that was featured in a number of the cards in this post, and they also sell a coordinating stamp set!

Hexagon Hive Thinlits Die by Stampin' Up

Hexagon Hive Die by Stampin’ Up

Honeycomb Hello Stamps by Stampin' Up!

Honeycomb Hello Stamps by Stampin’ Up

Hopefully you’ve been inspired to add some hexagons to your crafty work in the near future!  Happy Hexagon crafting!