Freebie Friday Winner & A Video Tutorial For You

Things have been busy here at Paper Crafter’s Library as we are gearing up for a whirlwind of exciting collaborations and spotlights with a variety of different manufacturers within the paper crafting industry.  Each of the collaborations and spotlights will feature some awesome give-aways as well as LOTS and LOTS of project inspiration, and TONS of FREE video tutorials, along with some extra special projects for our Paper Crafter’s Library members as well.

We’re kicking things off Monday morning with our week long collaboration with Graphic 45. We’re super excited because we’ve never worked with them before, and they are a top-notch company with top-notch products!  Throughout the course of next week we’ll be sharing over 10 different projects with you using the Tropical Travelogue collection – including a tag, a card, card set, scrapbook layout, a couple of mini albums, a few altered art pieces, an art journaling page and some mixed media canvases. And, as I mentioned above, we’ll have an abundance of free video tutorials for you on a range of different projects and techniques.  The week after that, we’ll be spotlighting Ranger ink, and we’ll have somewhere around 10 free video tutorials for you as well.  

Of course because we’ve been spending so much time creating videos for the next number of weeks, and because we’ll be doing a TON of giveaways over the next few months, we decided to take a break from our regular “Freebie Friday” programming, and simply announce the winner of last week’s give-away.

BUT because we wanted to leave you with some inspiration for the weekend, we decided to pull one of our complimentary videos out of Paper Crafter’s Library and showcase it here. Did you know that Paper Crafter’s Library has an abundance of information and inspiration even for non-members? In fact, if you visit our VIDEO LIBRARY page, look for all the categories that say “this section contains one or more complimentary videos” and click on them to see what free videos we have.  

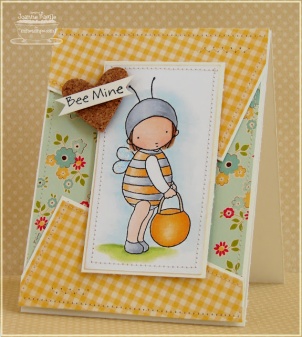
The card below is one example of the the free video tutorials that we offer at the Paper Crafter’s Library.  You can view a video for this card and download the pdf handout from here.

Feminine Birthday Card #6

So, if you haven’t checked out the free tutorials on the Paper Crafter’s Library then be sure to stop by and check them out.

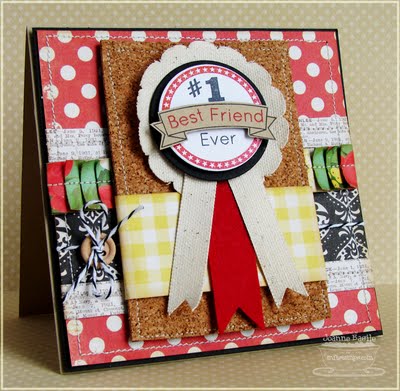
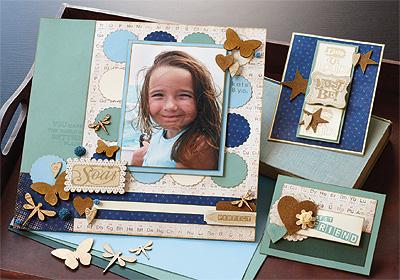
Today for our Paper Crafter’s Library members, I filmed a video showing how you can add multiple colors of glitter to a die cut adhesive shape.  I also created this “Always A Friend To Me” card which features this technique. 

Also, Michelle Wecksler has created a video on how to create this Fabric Bookmark for our Paper Crafter’s Library members. 

If you’re currently not a member of Paper Crafter’s Library, we encourage you to take a look at the Benefits of Membership. Along with our existing video library of over 700 videos, you’ll receive daily inspiration, great project ideas, fun techniques, instruction on how to use your products and more! For more information and to join, click here.

Also, if you are not already receiving our weekly email newsletter, make sure you take a minute to sign up from the top right sidebar of our blog. Every Monday, we create a project with a video tutorial for all of our newsletter subscribers and Paper Crafter’s Library Members.

And now, the winner of last week’s May Arts ribbon prize pack:

is………

Congratulations Amy! Please email us at customerservice@papercrafterslibrary.com to claim your prize! Be sure to put Freebie Friday Winner in the subject line, and include your phone number and shipping address in the body of the email!


Technique Thursday: Faux Letterpress Using Die Cut Images

Every Thursday on Paper Crafter’s Library is Technique Thursday – This is where we create and feature projects for our Club 52 online class (our year-long technique club), which our Paper Crafter’s Library members also access as a free benefit of their membership. We’re now on week 30, and we’re learning a faux letterpress technique using die cut images.  In the first tag Soph inks up a die cut image to use as her “stamp” and then runs the die cut image and her tag through the Big Shot to transfer the ink onto her tag.  In the second tag Soph uses the die cut images as “masks” on her tag.  She then sponges the surface of the tag.  When the sponging is done and you remove the die cut images, you are left with a beautiful faux letterpress look.

If you’re interested in checking out what we’ve covered so far, you can look at our Club 52 page. If you’re a technique junkie and would like to learn new techniques (as many of them are ones we have created), or revisit old ones – you can still sign up from this page – you’ll be able to access all 30 weeks we’ve done so far, plus the remaining weeks, and your access to the classroom will last for 15 months.

If you are not already receiving our weekly email newsletter, make sure you take a minute to sign up from the top right sidebar of our blog. Every Monday we create an exclusive project with a video tutorial for all of our newsletter subscribers and Paper Crafter’s Library members. So make sure that you sign up now, so that you don’t miss out!

March Design Team Projects From Keren Baker

Hi everyone! It’s great to be sharing some more projects with you. As I’m preparing this post, the English sun is streaming through my window and I can see daffodils and snowdrops everywhere! It’s a beautiful and inspiring time of year and I hope these 3 projects bring you a little creative inspiration too!

You may well be wondering what this is! It’s a unique Notebook Necklace. None the wiser? If I give you the dimensions; 1 1/4″ x 2″ you’ll see it’s really tiny.

Maybe this second picture will give you a better idea. It has little pages on the inside and each is perforated at the top so you can tear away your little note if you wanted to give your phone number to someone (for example). It’s useful wearable art and its really simple. I’ve re-purposed a tag die & you won’t believe how quick and easy it is to make! You can make your chain much more interesting- perhaps by adding some beads onto a fabric chain- but I’ve kept it simple so you can see the idea. My model for the necklace wanted to remain anonymous!! I’ve used some of the packaging from the Pink Paislee Vintage Vogue Ephemera die cuts. It’s really sturdy and makes the perfect front cover. To decorate, I’ve done some stamping, used some tiny pieces of Vintage vogue papers and given a ‘linen effect’ to the whole thing using Mod Podge (a sealant/glue). They are perfect for little gifts and unfortunately you’ll not be able to stop at just making one!

My overall theme this month is ‘using up the little leftovers’. We all end up with bits at the end of our projects, and apart from using a whole page for the base of the Scrapbook layout, the rest of the projects all use very small amounts of patterned papers & supplies.

This next project is a card in the style of Bargello patterns (often found on quilts)- I was equally inspired by watching the volume bars on my music equipment. Inspiration can come from absolutely everywhere! This is a really speedy make and is very inexpensive to create. It would make the perfect accompaniment to the Notebook Necklace!

My final project is a scrapbook page.  This is another ‘clustered’ type of design and it also goes to show that sometimes you can create something- leave it for a while and then decide you can improve on it. It is a 12×12 page but maybe in hindsight I would probably chop the left hand section off this page and make it into a 8 1/2″ x 11″ page. What do you think? Should I leave it as it is?!!

Here’s a close-up so you can see the details better. The ‘happy’ is curved to make a more dimensional embellishment.   Handouts for all these project are available for Paper Crafters Library members. Check out all the many benefits of becoming a member here.

Well, I’m done here. Hope you enjoyed this week’s post. Please feel free to pop by my blog and say Hi! There are lots more projects just like these. I’ll be back next month with lots of my favourite technique; stamping!! xx


Trendy Tuesday: All About Cork

All About Cork
By Colleen Harshaw

As I have been cruising around online and blog hopping over the past several months, I have noticed the increasing popularity of cork as an element on both cards as well as scrapbook pages. It is easy to see the appeal of these products, particularly for use on masculine projects and school themed projects. Cork also gives the feel of dimension and texture, which are both elements that add visual interest to projects, and that many of us strive for when creating.
The following are some projects that I found online to inspire you!

Card by Joanne Basile
www.stampedbyhand.blogspot.com

In this card, you can see that cork has been used for the heart behind the sentiment.


Card by Joanne Basile
www.stampedbyhand.blogspot.com

Here we have cork used as the mat for the main image on a card.

Card by okcapitolgirl, photo courtesy of Splitcoast Stampers
www.punkydoodlepapers.typepad.com

This image shows how well cork elements can be incorporated into a school themed project.

Page by Ali Edwards
www.aliedwards.com

This scrapbook page uses cork letter stickers in the title.

Layout by stidwell, photo courtesy of Two Peas in a Bucket

Once again, here we have cork used on a scrapbook page. In this case, it helps to give the page a bit of a masculine feel since the subject featured is a baby boy.

Photo from Stampin’ Up! idea gallery

Here cork embellishments are used on cards as well as on a scrapbook page, showing us the versatility of the products.

Layout by Wendeeb, photo courtesy of Two Peas in a Bucket

Once again, here cork is used on a school themed page.

Project by abaldwin, photo courtesy of Two Peas in a Bucket

I was happy to find this example of cork being used for a project other than a card or scrapbook page. In this case, the cork is used to create a football calendar. How cute is that?! Once again…this use of the product shows how very useful it is for those masculine projects and cards.

Project from Stampin’ UP! Idea Book and Catalogue    2011-2012

In the above example, cork was used to create a peg board for hanging keys, pinning up receipts, etc.


With the trend of using cork in crafting, it isn’t surprising that many companies are creating cork stickers and embellishments for scrapbookers and stampers alike. Cork can also be purchased in sheets; in most cases as 6 x 6 inch or 12 x 12 inch sized sheets. These sheets are thin and can be used with many die cutting systems and dies.

Below I have listed some products and the companies that are making them.

www.stampinup.com
Stampin’ Up!
6x 13 cork sheets

www.scrapbook.com
Canvas Corp
6 x 6 inch sheets
12 x 12 inch adhesive corkstock

www.amazon.com
Darice 12 x 18 cork sheets

Pink Paisley Bayberry Cottage Cork Buttons

Hot off the Press Inc.
12 x 12 cork sheets

www.makingmemories.com

Making Memories
Great Escape Cork Alpha Stickers

www.mftstamps.com
My Favorite Things
6 x 6 cork sheets

www.closetomyheart.com
Close To My Heart
Color-Ready Alphabet

www.closetomyheart.com
Close To My Heart
Color-Ready Evergreen Cork Shapes

If you haven’t already used cork in your crafting, I hope that this article has given you the inspiration needed to jump right in and give it a try! I look forward to seeing your projects posted in the blogosphere!

Trendy Tuesday: Please Welcome Trend Reporter Colleen Harshaw

Colleen HarshawTo continue with the introduction of our Trendy Tuesday, we would like to introduce to you our second Trend Reporter – Colleen Harshaw.  Collen is also going to keep us up on some of the latest trends in paper crafting.   Colleen is always researching “what’s new” and is so excited to be able to bring it to Paper Crafter’s Library.  She can’t wait to put all her research together for you and share all her findings on the latest trends.  She loves to find unique projects and watch them come to life. Her first article appears later today, in the meantime, you can visit her blog and see some of her work here: www.creative-expressions-papercrafting.blogspot.com


Learn more about Colleen:

I am a wife, a mother, a lover of travel and literature, and a paper crafter.  I have been involved in paper crafting for the last 10 years, and I must admit, I have a bit of a paper addiction!  My life is busy, and full of blessings.  I have a wonderful husband (with whom I will celebrate our 15th anniversary later this year!), and two healthy and happy children…ages 7 and 10 years.

Four major moves, and homes in three countries in less than six years (our home country of Canada, Switzerland, and now the United States), were the motivating factors in starting my blog(s).  We are fortunate to have friends and family scattered in numerous countries, and it is my effort to keep in touch and bridge the gap.  It is my hope that my blog(s) will help me to achieve that goal.

Here are a few questions we asked Colleen:

How long have you been papercrafting?: I have been papercrafting for over 10 years.  I started with scrapbooking, and then a few years ago I got very involved in stamping and card making.  Lately, I have been doing more scrapbooking again, but I still enjoy making cards when time permits!

What is your favorite type of papercrafting?: My favorite craft is scrapbooking.  I love making albums as gifts.  I often joke about how I have so little to show for the fact that I have been scrapbooking for as long as I have, because I give so many of my creations away as gifts!  It is one of the ways that I enjoy showing my love and appreciation for the significant people in my life.

Do you have any tips for fellow members that may help jump start their creativity?:  I would have to say, just use the world around you as your inspiration!  Your inspiration does not have to come from a scrapbooking magazine or website, it can come from the world.  I love to use magazines for ideas for layouts.  How a page is laid out in a magazine can certainly be a jumping off point for a scrapbook layout.  Use the colours in a beautiful scarf or throw pillow as inspiration for a colour palette in your papercrafting.  Also, creativity becomes easier the more you exercise it, in the same way learning a language becomes easier when you are immersed in it.  The more time you spend being creative, the easier those layouts will become for you!

Project Newsletter Makeover Challenge – Rock ‘n Roll Happy Birthday

Welcome to the Makeover Monday challenge. Every Monday, as part of our project ideas newsletter we’re going to make over one of our own older cards, showing you how easy it is to use existing designs (your own OR someone else’s) as inspiration. This week Tracy has designed this “Rock ‘n Roll” birthday card.  This card features the Rock ‘n Roll stamping technique.  Tracy also uses wire to embellish the guitars.

Your challenge – as with our previous Makeover Monday Challenges – is to use our piece as inspiration and make it into a card, scrapbook page, or other project. You can use the layout, the colors, an element you like…it can look like our piece, or nothing at all like our piece. We want to see where YOU take this. This challenge is strictly a “work from your stash” challenge.

As a newsletter subscriber you will have received a link to a private web page, from which you can watch the video tutorial. If you didn’t receive the video tutorial link then please be sure to email us at customerservice@papercrafterslibrary.com. In order to ensure you don’t miss any more of our Makeover Monday Challenge video tutorials, please be sure you sign up for our FREE email newsletter from the top right sidebar of this blog. Please note that the video tutorial will be available for general viewing for one week only – and then will be moved into our library for our members only

Every Monday, here on the blog, we’re going to post the original picture, and the made over picture. You will have ONE week to upload your challenge piece.

Instead of a weekly prize though, we’re going to award a prize monthly. So for each week you participate and each project you submit – you will get one entry into our monthly draw. On the first Monday each month – we will announce one challenge winner, who will receive one of our grab bags featuring over $30 of paper crafting products. Our first draw will take place on Monday, April 2nd, 2012.

Our inspiration piece, shown below, is an archived project from the Andrea Walford blog.

Here are the details on how you can participate in the Makeover Monday Challenge:

A new Makeover Monday Challenge video tutorial will be emailed out to newsletter subscribers every Monday (so make sure you are signed up). Then, here on the blog, we will post a picture of our inspiration piece and made-over project along with an Inlinkz button for you to enter your project. Here are the details:

  • Work from your own stash to create a project based on the inspiration project provided – you can use any products you would like, and make any type of project you like – card, scrapbook page, album, 3D item etc.
  • Post your project on your blog, in your gallery or on any other photo-hosting site (such as photobucket or flickr).
  • Click on our inLinkz button below to add a link to your project for our challenge
  • You will have until 7am, Monday, March 26th to add your link to the list to be eligible to win. And you can enter as many times as you like.
  • One randomly selected winner will be chosen from ALL the entries on Monday, April 2nd.
  • For each project you submit, your name will be entered into our monthly draw. The winner will be announced on Monday, April 2nd.

Good luck to everyone and we look forward to seeing your projects!


Product Spotlight & Freebie Friday: May Arts Grosgrain/Satin Ribbon…Enter To Win!

This week’s Freebie Friday Give-Away is this package of 5/8″ Grosgrain/Satin ribbon from May Arts. We’re giving away two yards of ribbon in the 5 different colors shown here. For today’s Freebie Friday Video Tutorial, Tracy has created this “Laugh A Little” card using using the 5/8″ Grosgrain/Satin ribbon:

Download the pdf handout here

You can watch Tracy’s video here:

In addition to the Laugh A Little card, Tracy also created this Celebrate Today & Everyday card. This project also features the 5/8″ Grosgrain/Satin ribbon from May Arts.

We have a video tutorial and a pdf handout for the Celebrate Today & Everyday card available to our Paper Crafter’s Library members. If you’re not already a member, it’s worth checking out. As a member, along with our existing video library of over 700 videos, you’ll receive daily inspiration, great project ideas, fun techniques, instruction on how to use your products and more! For more information and to join, click here.

If you are not already receiving our weekly email newsletter, make sure you take a minute to sign up from the top right sidebar of our blog. Every Monday, we create a project with a video tutorial for all of our newsletter subscribers and Paper Crafter’s Library Members.

And now, the winner of last week’s Vintage Vogue prize pack:

is………

Congratulations Nancy! Please email us at customerservice@papercrafterslibrary.com to claim your prize! Be sure to put Freebie Friday Winner in the subject line, and include your phone number and shipping address in the body of the email!

How to enter this week’s giveaway:

All you have to do is leave us a comment in the comments section of this blog post. The winner will be announced on Friday, March 30th at the bottom of that week’s Freebie Friday post! Good luck to all!

March Design Team Projects by Kristin Wilson

Hi there everyone! It’s so great to be back this month sharing some more wonderful projects with you. For my first project I have this adorable decorated box all tied up with a button and bow! You wont believe how simple and fast this project is to put together. There is a PDF with instructions and a video in the members area on how to create such sweet gift packaging.

For my second project I decided to decorated a large clothes pin. These clothes pins can be found at your local craft store and they make displaying your works of art so much fun! A few of these around your work space and you are never short for inspiration. A PDF with instructions and a video on this project are available in the member’s area.

Who doesn’t love getting a box of chocolates? For my third and final project this month I show you how to create this decorated nugget tin with wrapped chocolates. School secretaries, church staff, and teachers alike all rave over this little tin. Come find out how its made with PDF instructions and a video in the member’s area.

I hope you have been inspired to make your own creations! Have fun creating and I will see you here next month. For a look at some of my other projects just visit my blog at: http://lilsweetpeasplace.blogspot.com/

Trendy Tuesday: Time for Tea

One of our goals at Paper Crafter”s Library is to keep you up-to-date on latest trends in the paper crafting industry. Each Tuesday we are going to showcase a different trend, with today”s post being our first.  Please welcome our first Trend Reporter Katherine Elliot. If you missed Katherine”s introduction, you can visit this link: https://blog.papercrafterslibrary.com/please-welcome-new-trend-reporter-katherine-elliott/. 


Time for Tea
By: Katherine Elliot

Is it the upcoming London Olympics that has tea on everyone”s mind?  Maybe, maybe not, but tea and papercrafting seem well suited for each other.  No doubt, tea themes have been around for awhile, but images of tea cups, teapots, and tea inspired techniques remain very popular.

Featured above: Tea for Two from Papertrey Ink, Image source: www.christinamaclaren.blogspot.com

Versatile stamp sets that include images with related phrases, and some with coordinating steel rule dies, make it easy to create a lovely tea themed project.

You can find many styles and coordinating products to make something sweet and dainty, bright and beautiful, or soft and soothing…

Stampin up tea shoppe rubber stamps punch occasions mini catalog group
Featured above: Tea Shoppe stamp set from Stampin' Up! Image source www.stampinpretty.com

Even for those that may not ink up a stamp very often, a vintage die cut or tag can perk up something brewing on your scrapbook pages.

CS15-DS Wonderland Tea
Featured above: Wonderland Tea Creative Scraps from Crafty Secrets

Tea has inspired paper crafting for a very long time… The technique of “tea bag folding” was originally done with tea bag wrappers.  Decoratively folded wrappers were once used for this simple form of origami.

tea bag folding
image source made-in-china.com

More commonly used today, folded squares of patterned paper can create a variety of beautiful shapes to decorate a card or project.  Learn tea bag folding techniques and more at the Origami Resource Center.

Pretty Paper Teapot
Image source and teapot template found at Disney Family.com

Do you need some creative plans for this spring? Have a tea party!

No need to be confined to a flat page or project when there are many tea-inspired 3D projects to create. Tea party decorations make a perfect complement to a spring tea party, baby or wedding shower.

Lacy Paper Gloves Invitation
Lacy Gloves invitation instructions at Disney Family.com

And last but not least, a favorite tea inspired paper craft technique is tea staining. This technique can be taken literally – stain your paper with a steeped tea bag to create a truly custom tea inspired page or card.

image source from www.keywordpicture.com
How to Stain Paper With Tea Bagsthumbnail
Click the photo to read instructions on tea staining at ehow.com

Take the time to enjoy a cup of tea and relax, then try a tea stain technique on your next project.

With a variety of different teas available, you can create a unique look depending on the tea you use (such as green or black tea).

Of course, if you are not a tea drinker, you can easily “cheat” by using ink specifically designed to mimic aged paper or tea stain colors.

Tea Dye Distress Ink

Sponge or dab the ink where you desire to achieve beautiful, vintage, tea-inspired results.

Image source: www.scissorspapercard.blogspot.com

Now, it looks like it”s time for tea… Cheerio and happy crafting!

Project Newsletter Makeover Challenge – Off The Beaten Path

Welcome to the Makeover Monday challenge. Every Monday, as part of our project ideas newsletter we’re going to make over one of our own older cards, showing you how easy it is to use existing designs (your own OR someone else’s) as inspiration.

Your challenge – as with our previous Makeover Monday Challenges – is to use our piece as inspiration and make it into a card, scrapbook page, or other project. You can use the layout, the colors, an element you like…it can look like our piece, or nothing at all like our piece. We want to see where YOU take this. This challenge is strictly a “work from your stash” challenge.

As a newsletter subscriber you will have received a link to a private web page, from which you can watch the video tutorial. If you didn’t receive the video tutorial link then please be sure to email us at customerservice@papercrafterslibrary.com. In order to ensure you don’t miss any more of our Makeover Monday Challenge video tutorials, please be sure you sign up for our FREE email newsletter from the top right sidebar of this blog. Please note that the video tutorial will be available for general viewing for one week only – and then will be moved into our library for our members only

Every Monday, here on the blog, we’re going to post the original picture, and the made over picture. You will have ONE week to upload your challenge piece.

Instead of a weekly prize though, we’re going to award a prize monthly. So for each week you participate and each project you submit – you will get one entry into our monthly draw. On the first Monday each month – we will announce one challenge winner, who will receive one of our grab bags featuring over $30 of paper crafting products. Our first draw will take place on Monday, April 2nd, 2012.

Our inspiration piece, shown below, is an archived project from the Andrea Walford blog.

Here are the details on how you can participate in the Makeover Monday Challenge:

A new Makeover Monday Challenge video tutorial will be emailed out to newsletter subscribers every Monday (so make sure you are signed up). Then, here on the blog, we will post a picture of our inspiration piece and made-over project along with an Inlinkz button for you to enter your project. Here are the details:

  • Work from your own stash to create a project based on the inspiration project provided – you can use any products you would like, and make any type of project you like – card, scrapbook page, album, 3D item etc.
  • Post your project on your blog, in your gallery or on any other photo-hosting site (such as photobucket or flickr).
  • Click on our inLinkz button below to add a link to your project for our challenge
  • You will have until 7am, Monday, March 26th to add your link to the list to be eligible to win. And you can enter as many times as you like.
  • One randomly selected winner will be chosen from ALL the entries on Monday, April 2nd.
  • For each project you submit, your name will be entered into our monthly draw. The winner will be announced on Monday, April 2nd.

Good luck to everyone and we look forward to seeing your projects!