Makeover Monday Project And Newsletter Will Be Delayed

We just wanted to take a moment to let you know that our weekly Makeover Monday project, which is sent out in the Project Ideas Newsletter, will be slightly delayed.  Unfortunately, we are having technical difficulties with the video for this weeks makeover project.  We are hopeful that the problem will be rectified by Tuesday and will then be promptly sent out to all newletter subscribers.   If you are not already a newsletter subscriber, please take a moment to sign up for our email newsletter in order to receive the Makeover Monday project ideas.

We apologize for any inconvenience.

Product Spotlight & Freebie Friday: Pink Paislee Vintage Vogue Collection Week 1…Enter To Win!


This week’s Freebie Friday Give-Away comes from the Pink Paislee collection called “Vintage Vogue”. We’re giving away a set of six Vintage Vogue 12″ x 12″ double sided patterned papers, and a package of Vintage Vogue Ephemera.  For today’s Freebie Friday Video Tutorial, Tracy has created this “Friends” card using paper and elements from the Vintage Vogue Collection:

Download the pdf handout here

You can watch Tracy’s video here:


In addition to the Friends card Tracy also created this Timeless Treasures card. This project features the Vintage Vogue Ephemera by Pink Paislee.


We have a video tutorial and pdf handout for the Timeless Treasures card available to our Paper Crafter’s Library members. If you’re not already a member, it’s worth checking out. As a member, along with our existing video library of over 700 videos, you’ll receive daily inspiration, great project ideas, fun techniques, instruction on how to use your products and more! For more information and to join, click here.

If you are not already receiving our weekly email newsletter, make sure you take a minute to sign up from the top right sidebar of our blog. Every Monday, we create a project with a video tutorial for all of our newsletter subscribers and Paper Crafter’s Library Members.

And now, the winner of last week’s Sweet Tooth prize pack:

 BoBunnySweetToothCollectionFreebie2

is………


Congratulations Lucy! Please email us at customerservice@papercrafterslibrary.com to claim your prize! Be sure to put Freebie Friday Winner in the subject line, and include your phone number and shipping address in the body of the email!

How to enter this week’s giveaway:

All you have to do is leave us a comment in the comments section of this blog post. The winner will be announced on Friday, March 9th at the bottom of that week’s Freebie Friday post! Good luck to all!

Technique Thursday: Dry Embossing Using A Light Table, Stylus And Brass Stencils


Every Thursday on Paper Crafter’s Library is Technique Thursday – This is where we create and feature projects for our Club 52 online class (our year-long technique club), which our Paper Crafter’s Library members also access as a free benefit of their membership. We’re now on week 26, and are moving on to dry embossing techniques. This week we’re learning how to dry emboss using a light table, stylus and brass stecnils, both on light and dark cardstock.

If you’re interested in checking out what we’ve covered so far, you can look at our Club 52 page. If you’re a technique junkie and would like to learn new techniques (as many of them are ones we have created), or revisit old ones – you can still sign up from this page – you’ll be able to access all 26 weeks we’ve done so far, plus the remaining weeks, and your access to the classroom will last for 15 months.


If you are not already receiving our weekly email newsletter, make sure you take a minute to sign up from the top right sidebar of our blog. Every Monday we create an exclusive project with a video tutorial for all of our newsletter subscribers and Paper Crafter’s Library members. So make sure that you sign up now, so that you don’t miss out!


February Design Team Projects From Keren Baker

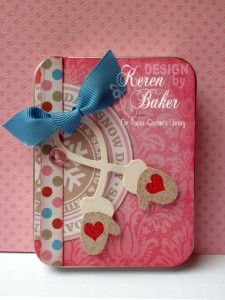
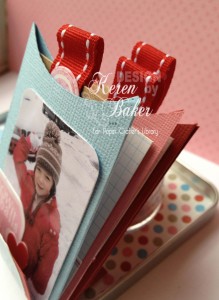
Hi! This is my first post as part of the Design Team & its been really exciting getting to this point. The first project I have to show you is a little Scrapbook tucked into an Altoid Tin and instead of the usual fold-out design, I wanted to create something just a little bit different while also giving a new spin to a die that I already owned. As you open this tin up, the pockets inside all contain little inserts that you can pop extra photos on or simply scribble on some journalling reminding you of exactly what happened and where. To make these pockets I used the Pillow Box Die from Sizzix (Stampin’Up!) and simply cut it down a little. The whole thing folds out  forwards to give you access to each little pocket and I have loved using the Snow Day papers and accessories by Pink Paislee.

I have to confess that initially I thought that some of the papers weren’t my ‘thing’. But, its always worth persevering, and while I didn’t use the snowmen, some of the other Snow Days papers in the set were absolutely perfect for the tin project. To see the full details of exactly how to create this pocket sized scrapbook, you’ll need to get access to the Video Library. I have lost myself in there several times because there is an incredible amount of information and inspiration. Whether you’ve just begun papercrafting or you’re an old (or young!) pro, the subscription is well worth it. You’ve also got access to the forums, detailed instruction sheets for every projects and you can replay the videos to your hearts content.

The second project using these gorgeous supplies is a card. I make mostly cards at the moment and this was really quick and easy as I just used a few of the diecuts from the Ephemera packet in the Snow Days collection plus some offcuts left over from the mini-tin you’ve just seen. The video in the Paper Crafters Library explains how to put it all together. I love how with just a little sponging, your projects develop more depth and lots of tiny accents give it a finished look.

The next two projects are using the Sweet Tooth range from Bo Bunny. These two aren’t videoed but you can access all the information on how to do it on pdf’s that are available to Paper Crafters Library Members. This picture is hard for you to see the detail- but I didn’t want you all falling asleep whilst reading the post so I kept the pictures to a minimum!

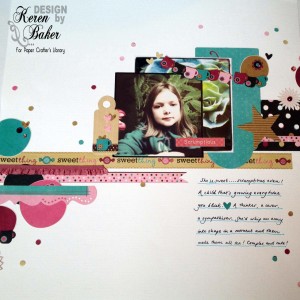
In this 12×12 scrapbook page (and the next project) I’ve used a bit of the confetti style that seems really popular right now. You only need a hole punch and either follow the holes in the patterned paper to punch out the circles or using different coloured papers. I thought it would be fun to create some bunting with the teacups on one of the papers. This is to show that you don’t need to stick  exactly to  how the patterns are presented- have a think outside the box and use your supplies your way! Even though I love baking, I wanted to use them for two ‘non-food’ related projects.

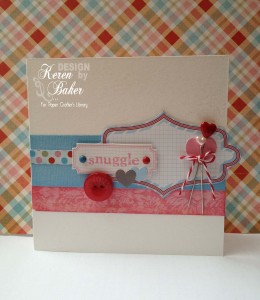
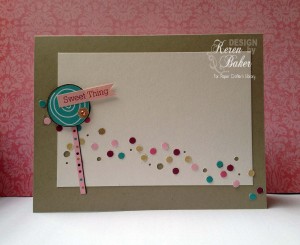
I had lots of fun creating this second project; again using the same ‘scattered’ technique that is fairly random in positioning of the dots but this helps move your eye across the card. There wasn’t a ‘lollipop’ shape in the papers but I simply used the inside of one of the swirls and added a ‘stick’. You might be able to see that I’ve punched out two different sized holes in the white shimmer card too and finished it all off with a tiny jewel.

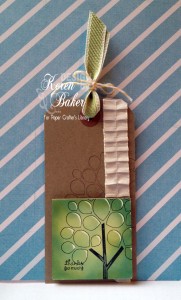
Last but not least, is this tag. In the Paper Crafters Library video collection you will also find masses of technique and ‘how to’ videos on a really wide range of subjects. There are product explanations and the best collection of stamping and ink technique tutorials I’ve seen anywhere. For my final video I’ve concentrated on an amazing product that’s been forgotten a little and I felt it needed a spotlight. Stampbord is a wonderful product that will make you stamp like a pro because the surface is so kind to ink!! You’ll learn what Stampbord is, how to use it and finishing off with how to make this tag.

Phew! Hope you’re all still with me. Thanks so much for letting share these projects with you. I’m busy creating the next set and I’m really looking forward to more Design Team projects next week. If you want to see more detailed photographs, hop on over to my blog where I’ll post a few over the next few days. Till next time… xx 


Please Welcome New Design Team Member Keren Baker

Keren BakerKeren  BakerTo round out our introduction of the Design Team members, we are very pleased to introduce you to our final Design Team member, Keren Baker.

Keren is also very excited to be a part of the first Paper Crafter’s Library Design Team.  She brings great ideas and inspiration to our team.  Keren will give anything a shot when it comes to creating.  She loves to create unique cards that others will enjoy and you will see that first hand in her projects.  You’ll have a chance to see Keren’s projects on Wednesday.  In the meantime, please be sure to visit Keren’s blog: http://kerenbaker.wordpress.com/

Learn more about Keren:

Keren is a papercrafter, stamper, scrapbooker and ‘try-anything once kind of crafter. Her favourite mediums are paper and fabric. She describes her style as clean and graphic. Her favourite technique is stamping – hands down.  Keren is a mum of 5 living in Liverpool, UK with her hubby.  If not crafting, she’s usually found baking!!!

Keren answered a few questions for us:

How long have you been papercrafting:

For about 9 years. I started with a couple of peel offs and cardstock to make some basic invites. I thought it was an amazing thing to create!  I progressed to trying to do heat embossing, using my toaster as the heat source (not recommended!!) and my love of papercrafting and stamping began!

Do you have any papercrafting goals or things to accomplish?:

I don’t have any specific goals – to be honest.  I’m amazed that I’m on this design team; something I never would have imagined a couple of years ago.  Ultimately I guess I’d love to keep learning and developing – oh and actually get photographs off my computer and onto some more scrapbook pages!

Do you have any tips for fellow members that may help jump start their creativity:

First, I’d say just look around you. Sometimes its a color scheme in a garden, or a magazine advertisement that I find inspires a card or scrapbooking layout. Even food packaging can be a source of inspiration . When you search for design and beauty – you’ll find it in surprising places. I’d also say to try a brand new color or style.  Copy someone else’s project that inspires you and before long you’ll find your creativity is recharged!

Countdown To Spring / Easter Newsletter Makeover Challenge

Welcome to the new face of the Makeover Monday challenge.  Every Sunday, as part of our project ideas newsletter we’re going to make over one of our own older cards, showing you how easy it is to use existing designs (your own OR someone else’s) as inspiration.

Your challenge – as with our previous Makeover Monday Challenges – is to use our piece as inspiration and make it into a card, scrapbook page, or other project.  You can use the layout, the colors, an element you like…it can look like our piece, or nothing at all like our piece.  We want to see where YOU take this. This challenge is strictly a “work from your stash” challenge.

As a newsletter subscriber you will have received a link to a private web page, from which you can watch the video tutorial.  If you didn’t receive the video tutorial link then please be sure to email us at customerservice@papercrafterslibrary.com.  In order to ensure you don’t miss any more of our Makeover Challenge video tutorials, please be sure you sign up for our FREE email newsletter from the top right sidebar of this blog. Please note that the video tutorial will be available for general viewing for one week only – and then will be moved into our library for our members only

Every Monday, here on the blog, we’re going to post the original picture, and the made over picture. You will have ONE week to upload your challenge piece.

Instead of a weekly prize though, we’re going to award a prize monthly. So for each week you participate and each project you submit – you will get one entry into our monthly draw.  On the first Monday each month – we will announce one challenge winner, who will receive one of our grab bags featuring over $30 of paper crafting products.  Our first draw will take place on Monday, April 2nd, 2012.

Our inspiration piece, shown below, is an archived project from the www.andreawalford.com blog.  

Here are the details on how you can participate in the Makeover Monday Challenge:

A new Makeover Monday Challenge video tutorial will be emailed out to newsletter subscribers every Sunday (so make sure you are signed up). Then, on Monday we will post a picture of our inspiration piece and made-over project here on the blog along with an Inlinkz button for you to enter your project. Here are the details:

  • Work from your own stash to create a project based on the inspiration project provided – you can use any products you would like, and make any type of project you like – card, scrapbook page, album, 3D item etc.
  • Post your project on your blog, in your gallery or on any other photo-hosting site (such as photobucket or flickr).
  • Click on our inLinkz button below to add a link to your project for our challenge
  • You will have until 7am, Monday, March 5th to add your link to the list to be eligible to win. And you can enter as many times as you like.
  • One randomly selected winner will be chosen from ALL the entries on Monday, March 5th.
  • For each project you submit, your name will be entered into our monthly draw.  The winner will be announced on Monday, April 2nd. 

Good luck to everyone and we look forward to seeing your projects!
 

Product Spotlight & Freebie Friday: Bo Bunny Sweet Tooth Collection Week 2…Enter to Win!

 BoBunnySweetToothCollectionFreebie2

This week’s Freebie Friday Give-Away comes from the fun Bo Bunny collection called “Sweet Tooth”. We’re giving away a set of nine Sweet Tooth 12″ x 12″ double sided patterned papers, a package of Sweet Tooth Noteworthy die cut elements and a package of Sweet Tooth jewels.

For today’s Freebie Friday Video Tutorial, Tracy has created this “Sweet Thing” card using paper and elements from the Sweet Tooth Collection:

SweetThingCard

Download the pdf handout here

You can watch Tracy’s video here:

In addition to the card Tracy also created this Let Them Eat Cake Mini Album. This project features the Sweet Tooth Collection by Bo Bunny as well as bakers twine by The Twinery.

We have a video tutorial and pdf handout for the mini album available to our Paper Crafter’s Library members – please make sure you are logged in first. If you’re not already a member, it’s worth checking out. As a member, along with our existing video library of over 700 videos, you’ll receive daily inspiration, great project ideas, fun techniques, instruction on how to use your products, and more! For more information and to join, click here.

If you are not already receiving our weekly email newsletter, make sure you take a minute to sign up from the top right sidebar of our blog.  Every Sunday we create an exclusive project with a video tutorial for all of our newsletter subscribers. This project will be made available to all Paper Crafter’s Members on the following Monday.

And now, the winner of last week’s Sweet Tooth prize pack:

 SweetToothForBlogPost

is………


Congratulations Sandi Dailey! Please email us at customerservice@papercrafterslibrary.com to claim your prize! Be sure to put Freebie Friday Winner in the subject line, and include your phone number and shipping address in the body of the email!


How to enter this week’s giveaway:

All you have to do is leave us a comment in the comments section of this blog. Winner will be announced on Friday, March 2nd at the bottom of that Freebie Friday post!


Technique Thursday: Faux Bleach and Emerging Image Techniques

 Club52Week25Introduction

Every Thursday on Paper Crafter’s Library is Technique Thursday -This is where we create and feature projects for our Club 52 online class (our year-long technique club), which our Paper Crafter’s Library members also access as a  free benefit of their membership. We’re now on week 25, and are continuing on with embossing techniques. This week we’re learning the faux bleach technique, as seen here with the tag on the left, and the emerging image technique, as shown on the tag on the right.  

If you’re interested in checking out what we’ve covered so far, you can look at our Club 52 page. If you’re a technique junkie and would like to learn new techniques (as many of them are ones we have created), or revisit old ones – you can still sign up from this page – you’ll be able to access all 25 weeks we’ve done so far, plus the remaining weeks, and your access to the classroom will last for 15 months.


If you are not already receiving our weekly email newsletter, make sure you take a minute to sign up from the top right sidebar of our blog.  Every Sunday we create an exclusive project with a video tutorial for all of our newsletter subscribers. So make sure that you sign up now, so that you don’t miss out!


February Design Team Projects by Kristin Wilson

Hi everyone! My name is Kristin and I am going to be sharing a few projects with you today. First let me start off by saying how excited I am to be here and say thank you for making me feel so welcome. I plan on covering a few styles over the next 3 months. This month is a more CAS, clean and simple, style. I was fortunate enough to be able to play with two collections this month. Snow Day by Pink Paislee and Sweet Tooth by Bo Bunny.

The first project I have to show you was actually made from a spaghetti jar. This fun and whimsical project is perfect to do with kids and it makes an adorable gift! It’s super simple. Just check out the member’s area to see a video on how it’s made.

For this tag I used the Snow Day collection from Pink Paislee. I just fell in love with these hat & mittens die cuts. A simple bow of colored twine can make a really sweet accent.

This card actually has some Sparkly Fluff from Our Craft Lounge on the cake. What a fun product to work with. To learn more about Sparkly Fluff, a how to video is available in the member’s area. This card features product from the Sweet Tooth Collection by Bo Bunny.

My style is usually more complex and I will build on that as we go into the next few months. To see some of my other projects just visit my blog at Lilsweetpea’s Place.

Video tutorials and pdf handouts are available for each of these projects on the Paper Crafter’s Library member side. If you’re not already a member of Paper Crafter’s Library, it’s worth checking out.  As a member, along with our existing video library of over 700 videos, you’ll receive daily inspiration, great project ideas, fun techniques, instruction on how to use your products, and more!  For more information and to join, click here.

Thanks for letting me share my projects with you today! I hope you’ll give them a try. I’ll see you back here next month!

Kristin's Siggy

Please Welcome New Design Team Member Kristin Wilson

Kristin Wilson

To continue with our introduction of the Design Team members, we are very pleased to introduce you to the third of our Design Team members, Kristin Wilson.

Kristin is honored to be a part of the first Paper Crafter’s Library Design Team.  She brings her passion and excitement for paper crafting to the team.  She enjoys what she does and thinks outside the box and for this reason, she will be a great member of the team.  You can see for yourself how her love for the craft shines through in her projects.  You’ll have a chance to see Kristin’s projects on Wednesday.  In the meantime, please be sure to visit Kristin’s blog: http://lilsweetpeasplace.blogspot.com/

 Learn more about Kristin:

“I am 42 and I live in NW Indiana, part of the Chicagoland area, with my husband of 14 years and our son who is 11. I am a stay at home mom and fortunate to have a schedule where I can craft everyday in my studio which my husband built for me. It is by far my most fave room in the house. I am the only girl in my family. Even the cat and dog are male. What’s wrong with this picture?”

Being the only girl in her family, Kristin loves to craft and create with all things pink and lacey. She describes her style as Shabby Chic & Eclectic but always evolving and she designs for the task at hand.

 Kristin answered a few questions for us:

 How long have you been papercrafting:

“I have been a paper crafter for 3 years. Mainly I create cards, mixed media, and altered art. If I scrapbook, it’s usually a mini album.”

Do you have any papercrafting goals or things to accomplish?:

“I have a ton of pictures stock piled that need to be scrapbooked. My ongoing goal is to get them into an album and all caught up. Someday!”

Do you have any tips for fellow members that may help jump start their creativity:

“Try something new! A new technique, color scheme, embellishment. Have something you have been wanting to try? Just do it! It’s so fun to break out of the norm. That’s when you learn more about your personal style.”