Ranger Week: Tim Holtz Distress Stains Day 5

Welcome to Day 5 of Ranger Week on the Paper Crafter’s Library blog as we finish our week-long focus on Tim Holtz Distress Stains. Throughout the course of this week we’ve shared with you LOTS of free video tutorials on a range of different techniques using Distress Stains, and we’ve shown you some examples of projects incorporating these techniques.  To top off the week, Ranger has graciously donated five sets of twelve Distress Stains.  We’ll be picking one winner from each of the posts from this week.  All five winners will be announced today Friday, April 20th at 4 pm EST.  Because we’re late putting up today’s post, we’re going to give away a BONUS set of 12 Distress Stains on Monday.

You can keep up to date on what’s going on at Ranger by visiting their blog, and their Facebook Page.

Today we again have three different videos for you all variations all related to the Blended Distress Technique.  Yesterday we featured a couple of variations on the Wrinkle Free Distress technique which involved applying different colors of Distress Stains to your non-stick craft mat and then swiping your card stock or tag through the stains.  The Blended Distress Technique involves the application of water – so you are applying your Distress Stains to a wet surface.

In the card shown below Sophia uses the Blended Distress Technique to create the lightbulb, and the Ghosted Distress Embossing Technique for the background of the card.  We have a free video both on the Blended Distress Technique, as well as the Ghosted Distress Embossing Technique.

Blended Distress Technique Featuring Distress Stains

Ghosted Distress Embossing Technique

Blended Distress Variation Featuring Distress Stains

In the card below I use a variation of the Blended Distress Technique.  Instead of dragging the stains across my wet card stock, I use more of a splatting motions, giving you a different effect.

The video on how to create both the cards from start to finish will be available to our Paper Crafter’s Library members.

A Bit About Paper Crafter’s Library

The world of paper crafting is HUGE! Whether you are a beginner, or you’ve been creating for years, the sheer number of different products, tools, techniques and project ideas can be overwhelmingAfter spending 6 years helping thousands of paper crafters around the world become more successful in the creative space through my series of kits, digital tutorials and online classes, I began looking for a new approach to education. In 2011 I launched Paper Crafter’s Library – the first, and still to this day, only website that provides an all-in-one learning solution for paper crafters. With almost 800 videos currently in the library and 4-5 new videos added each week, Paper Crafter’s Library offers comprehensive training on products, tools, techniques, and project ideas. From beginner through to advanced, whether your interest is in stamping, card making, scrapbooking, creating 3D items or altered art – you’ll find all the resources you need to navigate the world of paper crafting in ONE place, organized and indexed so that it’s quick and easy to find.

Here at Paper Crafter’s Library, we make a great effort to provide tons of FREE content in the form of video tutorials.  You can access our free videos from our Public Video Library Page by clicking on the categories that say “this section contains one or more complimentary videos” underneath the link.  By signing up for our free email newsletter,  you’ll also receive a free weekly video tutorial.  Another great source of ongoing inspiration and information is the Paper Crafter’s Library Facebook page. Access to the FULL library and to our premium content is a members-only benefit, for which there is a monthly fee (like signing up for an ongoing online class).  If this interests you, you can check out the Benefits of Becoming a Member.

Distress Stain Give-Away

As we mentioned at the beginning of this post, every day this week we’ll be giving away one set of 12 Distress Stains – to a total of 5 winners.  All you have to do to enter is to leave us a comment on each day’s post.  You can expect the posts to be published before 12 pm EST each day this week.  All five winners will be announced on Friday, April 20th at 4 pm EST.

P.S.  We’d appreciate it if you’d spread the word about Ranger week on your blog, FB and/or Twitter!  The more people that visit and comment, the more we have companies like Ranger sponsoring our site with great products we can give away to you!

P.P.S.  We encourage you to stop by the Ranger Blog to thank them for their great give-away, and let them know we sent you!


Ranger Week: Tim Holtz Distress Stains Day 4

Welcome to Day 4 of Ranger Week on the Paper Crafter’s Library blog as we continue with our week-long focus on Tim Holtz Distress Stains. Throughout the course of this week we’re going to share with you a TON of different free video tutorials on a range of different techniques using Distress Stains, we’ll also show you some examples of projects incorporating these techniques.  To top off the week, Ranger has graciously donated five sets of twelve Distress Stains.  Each day this week someone will win this fabulous collection of Distress Stains.  All five winners will be announced on Friday, April 20th at 4 pm EST.  You can keep up to date on what’s going on at Ranger by visiting their blog, and their Facebook Page.

Today we have three different videos for you.  In the first video I’m going to share with you more in depth about Picket Fence Distress Stain which is a white Distress Stain.  It’s different than all the other Distress Stains because it’s only semi-transluscent, whereas all the other Distress Stains are totally translucent (meaning you can see through them).  Picket Fence has a white pigment in it which is what gives it it’s color, along with some opacity.  The more layers of Picket Fence you apply to your surface, the more opaque it becomes.  There are so many different things that you can do with Picket Fence both on it’s own and in combination with the other Distress Stains, that we thought it warranted a video of it’s own.

Introduction To The Picket Fence Distress Stain


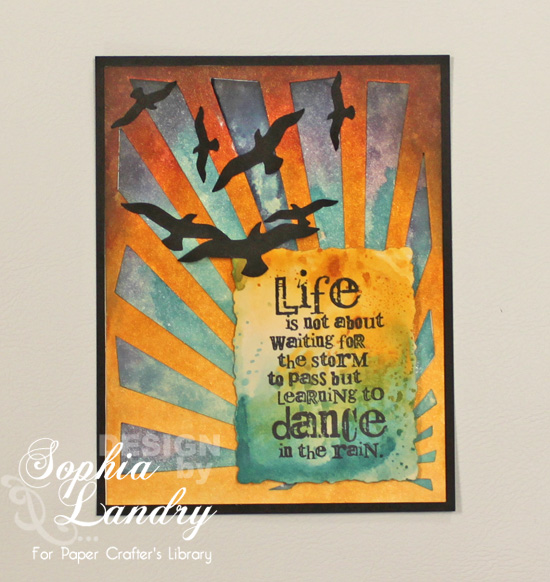
Today we’re also going to share with you two variations of Tim Holtz’s Wrinkle Free Distress Technique.  In the first video Sophia will show you the traditional Wrinkle Free Distress Technique, and then in the second video she shows you the Wrinkle Free Distress Technique incorporating Picket Fence. She uses both techniques in the card below.  The greeting label using the Wrinkle Free Distress Technique with Picket Fence, and the background of the card (the sunburst pattern) uses the regular Wrinkle Free Distress Technique.  Please note that in the videos, the give-away date is listed as Monday, April 16th, the date on which we announce all five winners is actually Friday, April 20th (tomorrow) at 4 pm EST.

Wrinkle Free Distress technique


Wrinkle Free Distress With Picket Fence Technique


The finished card includes a colouring with Distress Markers technique.  The video on how to create the card from start to finish is available to our Paper Crafter’s Library members.

A Bit About Paper Crafter’s Library

The world of paper crafting is HUGE! Whether you are a beginner, or you’ve been creating for years, the sheer number of different products, tools, techniques and project ideas can be overwhelmingAfter spending 6 years helping thousands of paper crafters around the world become more successful in the creative space through my series of kits, digital tutorials and online classes, I began looking for a new approach to education. In 2011 I launched Paper Crafter’s Library – the first, and still to this day, only website that provides an all-in-one learning solution for paper crafters. With almost 800 videos currently in the library and 4-5 new videos added each week, Paper Crafter’s Library offers comprehensive training on products, tools, techniques, and project ideas. From beginner through to advanced, whether your interest is in stamping, card making, scrapbooking, creating 3D items or altered art – you’ll find all the resources you need to navigate the world of paper crafting in ONE place, organized and indexed so that it’s quick and easy to find.  

Here at Paper Crafter’s Library, we make a great effort to provide tons of FREE content in the form of video tutorials.  You can access our free videos from our Public Video Library Page by clicking on the categories that say “this section contains one or more complimentary videos” underneath the link.  By signing up for our free email newsletter,  you’ll also receive a free weekly video tutorial.  Another great source of ongoing inspiration and information is the Paper Crafter’s Library Facebook page. Access to the FULL library and to our premium content is a members-only benefit, for which there is a monthly fee (like signing up for an ongoing online class).  If this interests you, you can check out the Benefits of Becoming a Member.

Distress Stain Give-Away

As we mentioned at the beginning of this post, every day this week we’ll be giving away one set of 12 Distress Stains – to a total of 5 winners.  All you have to do to enter is to leave us a comment on each day’s post.  You can expect the posts to be published before 12 pm EST each day this week.  All five winners will be announced on Friday, April 20th at 4 pm EST.

P.S.  We’d appreciate it if you’d spread the word about Ranger week on your blog, FB and/or Twitter!  The more people that visit and comment, the more we have companies like Ranger sponsoring our site with great products we can give away to you!

P.P.S.  We encourage you to stop by the Ranger Blog to thank them for their great give-away, and let them know we sent you!

If you are interested in purchasing the products we are featuring this week, they are all carried by our trusted partner Simon Says Stamp. They have fantastic customer service and great shipping rates. Simply click on any image below to be directed to the product.


Ranger Week: Tim Holtz Distress Stains Day 3

Welcome to Day 3 of Ranger Week, as with continue with our week-long focus on Tim Holtz Distress Stains. Throughout the course of this week we’re going to share with you a TON of different free video tutorials on a range of different techniques using Distress Stains, we’ll also show you some examples of projects incorporating these techniques.  To top off the week, Ranger has graciously donated five sets of twelve Distress Stains.  Each day this week someone will win this fabulous collection of Distress Stains.  All five winners will be announced on Friday, April 20th at 4 pm EST. You can keep up to date on what’s going on at Ranger by visiting their blog, and their Facebook Page.

In today’s video, Sophia is going to show you how easy it is to create a gorgeous background by stamping WITH the Distress Stains.  The technique we are featuring today is called Watercolor Stamping with Distress Stains.  It involved applying the Distress Stains to a stamp, misting it with water, and then stamping onto your surface.  Although Sophia applied this technique to a Hero Arts Background stamp, it can be used on any solid image stamp.

When you are stamping with Distress Stains, it’s important to keep in mind that Distress Stains are much more fluid than your traditional dye-based ink pads or pigment ink pads.  No matter how you apply it, you are NOT going to get a crisp, clean impression, the same way that you do with dye-based or pigment ink pads. If this is the look you are going for, then know that you won’t be happy with the outcome.  However, if you like the watercolor look, then that is exactly what you’ll get with Distress Stains.   By knowing and understanding the properties of your medium and knowing how to work with it, you’ll get results you love. In this technique Sophia plays up the fluidity of the Distress Stains, by misting on water, and then applying it to a watercolor paper. She also shows you what kind of effect you’d get working on other surfaces.

Sophia also shows a variation on this technique, where she replaces the water with Perfect Pearls Mist – another awesome Ranger product.

Watercolor Stamping With Distress Stains

*Please note that the video mentions that all 5 winners will be announced on Monday April 16th.  The correct date should be Friday April 20th at 4pm EST.

The finished card includes a colouring with Distress Markers technique.  The video on how to create the card from start to finish is available to our Paper Crafter’s Library members.

A Bit About Paper Crafter’s Library

The world of paper crafting is HUGE! Whether you are a beginner, or you’ve been creating for years, the sheer number of different products, tools, techniques and project ideas can be overwhelmingAfter spending 6 years helping thousands of paper crafters around the world become more successful in the creative space through my series of kits, digital tutorials and online classes, I began looking for a new approach to education. In 2011 I launched Paper Crafter’s Library – the first, and still to this day, only website that provides an all-in-one learning solution for paper crafters. With almost 800 videos currently in the library and 4-5 new videos added each week, Paper Crafter’s Library offers comprehensive training on products, tools, techniques, and project ideas. From beginner through to advanced, whether your interest is in stamping, card making, scrapbooking, creating 3D items or altered art – you’ll find all the resources you need to navigate the world of paper crafting in ONE place, organized and indexed so that it’s quick and easy to find.

Here at Paper Crafter’s Library, we make a great effort to provide tons of FREE content in the form of video tutorials.  You can access our free videos from our Public Video Library Page by clicking on the categories that say “this section contains one or more complimentary videos” underneath the link.  By signing up for our free email newsletter,  you’ll also receive a free weekly video tutorial.  Another great source of ongoing inspiration and information is the Paper Crafter’s Library Facebook page. Access to the FULL library and to our premium content is a members-only benefit, for which there is a monthly fee (like signing up for an ongoing online class).  If this interests you, you can check out the Benefits of Becoming a Member.

Distress Stain Give-Away

As we mentioned at the beginning of this post, every day this week we’ll be giving away one set of 12 Distress Stains – to a total of 5 winners.  All you have to do to enter is to leave us a comment on each day’s post.  You can expect the posts to be published before 12 pm EST each day this week.  All five winners will be announced on Friday, April 20th at 4 pm EST.

P.S.  We’d appreciate it if you’d spread the word about Ranger week on your blog, FB and/or Twitter!  The more people that visit and comment, the more we have companies like Ranger sponsoring our site with great products we can give away to you!

P.P.S.  We encourage you to stop by the Ranger Blog to thank them for their great give-away, and let them know we sent you!

If you are interested in purchasing the products we are featuring this week, they are all carried by our trusted partner Simon Says Stamp.  They have fantastic customer service and great shipping rates. Simply click on any image below to be directed to the product.


April Design Team Projects by Kristin Wilson

Hi everyone! I hope you all had a wonderful Easter. Ours was lovely and the weather was perfect! Can you believe we are in the third week of April already? That’s why I have some fun beach projects to share with you today. Summer will be here before you know it!

This Discover New Horizons card takes a clean and simple approach to paper crafting. It’s amazing what a bright colored ribbon can do for a project. Little splashes of color here and there make a dramatic effect when doing this type of card.

Plan on having a beach party? What a clever little take home bag this makes. Best part is, it takes very little time to put together.

We will all be taking summer pictures at some point. Why not begin making some tags for scrapbook pages now? Or even summer birthday tags for gift bags & boxes. This tag is sure to delight with it’s whimsical waves. Learn how to make all three of these projects with a how to video and PDF for you to print out in our member’s area.

Thanks for spending some of your time with me today and I hope I have been able to give you some great ideas for your summer paper crafting projects. Till next time… happy crafting!


Ranger Week: Tim Holtz Distress Stains Day 2

Welcome to Day 2 of Ranger Week, as with continue with our week-long focus on Tim Holtz Distress Stains. Throughout the course of this week we’re going to share with you a TON of different free video tutorials on a range of different techniques using Distress Stains, we’ll also show you some examples of projects incorporating these techniques.  To top off the week, Ranger has graciously donated five sets of twelve Distress Stains.  Each day this week someone will win this fabulous collection of Distress Stains.  All five winners will be announced on Friday, April 20th at 4 pm EST. You can keep up to date on what’s going on at Ranger by visiting their blog, and their Facebook Page.

Today’s video continues on with a technique I shared with you in the “Introduction to Distress Stains” video we posted on Day 1 of Ranger week when I showed you how Distress Stain can be applied to fabrics (including ribbon and fabric embellishments).  In that video I mentioned some of the great canvas resist products that are on the market.  In today’s video, Paper Crafter’s Library Senior Educator/Designer Sophia Landry introduces you to the “Canvas Resist Technique” – showing you how easy it is to create your own canvas resist embellishments.  Sophia uses this technique to create the leaves that you see on the “Popping Poppy” card below.

Canvas Resist With Distress Stains Technique


*Please note that the video mentions that all 5 winners will be announced on Monday April 16th.  The correct date should be Friday April 20th at 4pm EST.

The finished card includes another resist technique, this time using Distress Inks.  The video on how to create the card from start to finish is available to our Paper Crafter’s Library members.

A Bit About Paper Crafter’s Library

The world of paper crafting is HUGE! Whether you are a beginner, or you’ve been creating for years, the sheer number of different products, tools, techniques and project ideas can be overwhelmingAfter spending 6 years helping thousands of paper crafters around the world become more successful in the creative space through my series of kits, digital tutorials and online classes, I began looking for a new approach to education. In 2011 I launched Paper Crafter’s Library – the first, and still to this day, only website that provides an all-in-one learning solution for paper crafters. With almost 800 videos currently in the library and 4-5 new videos added each week, Paper Crafter’s Library offers comprehensive training on products, tools, techniques, and project ideas. From beginner through to advanced, whether your interest is in stamping, card making, scrapbooking, creating 3D items or altered art – you’ll find all the resources you need to navigate the world of paper crafting in ONE place, organized and indexed so that it’s quick and easy to find.


Here at Paper Crafter’s Library, we make a great effort to provide tons of FREE content in the form of video tutorials.  You can access our free videos from our Public Video Library Page by clicking on the categories that say “this section contains one or more complimentary videos” underneath the link.  By signing up for our free email newsletter,  you’ll also receive a free weekly video tutorial.  Another great source of ongoing inspiration and information is the Paper Crafter’s Library Facebook page. Access to the FULL library and to our premium content is a members-only benefit, for which there is a monthly fee (like signing up for an ongoing online class).  If this interests you, you can check out the Benefits of Becoming a Member.


Distress Stain Give-Away


As we mentioned at the beginning of this post, every day this week we’ll be giving away one set of 12 Distress Stains – to a total of 5 winners.  All you have to do to enter is to leave us a comment on each day’s post.  You can expect the posts to be published before 12 pm EST each day this week.  All five winners will be announced on Friday, April 20th at 4 pm EST.


P.S.  We’d appreciate it if you’d spread the word about Ranger week on your blog, FB and/or Twitter!  The more people that visit and comment, the more we have companies like Ranger sponsoring our site with great products we can give away to you!


P.P.S.  We encourage you to stop by the Ranger Blog to thank them for their great give-away, and let them know we sent you!

If you are interested in purchasing the products we are featuring this week, they are all carried by our trusted partner Simon Says Stamp.  They have fantastic customer service and great shipping rates. Simply click on any image below to be directed to the product.


Trendy Tuesday – Hemp Twine and Linen Thread

Hemp Twine and Linen Thread
By Colleen Harshaw

Welcome back to Trendy Tuesday from the Paper Crafter’s Library!  Today I want to talk about a product that is not a new trend, but it is certainly a trend with longevity!  Hemp Twine and Linen Thread have been out on the market for years, but there must be a lot of love for them out there in the crafting world, because they are still going strong.

Personally, I have used hemp twine and linen thread on scrapbook pages as well as on cards.  I often use these materials when I want one of my projects to have an ‘earthy’ or masculine feel.  When I started browsing around on the internet while doing my research for this article, I was shocked at how many different and creative ways others have used these materials!  There is a lot of crafty eye candy out there just waiting to be discovered!

I have several different projects to show you today, to give you an idea just how versatile these products are.

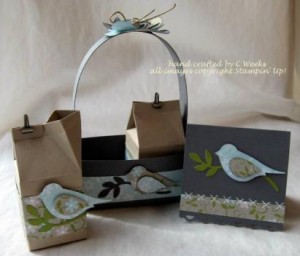
 Hand crafted by C. Weeks. All images copyright Stampin’ Up!
Photo courtesy of splitcoaststampers.com

This sample shows hemp twine being used for stitching on a card, while the basket has a twine embellishment on the handle.  And there are those birds…that is another trend that has been around for a while!

 Created by Denise Marzec of There She Goes
Clear Stamps.  Photo courtesy of splitcoaststampers.com

Hemp twine was used as a simple embellishment on this altered picture frame.  This project is a good example of how twine can be used to give that ‘earthy’ feel that I made reference to above.  The twine works beautifully with the flowers!

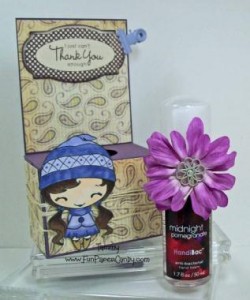
Created by Tammy of funpapercandy.com
Image courtesy of splitcoaststampers.com

In this sample, hemp twine is used on another three dimensional project.  In this case, it is simply wrapped around the box to create texture and visual interest.

 Created by divastamper.blogspot.com
Photo courtesy of splitcoaststampers.com

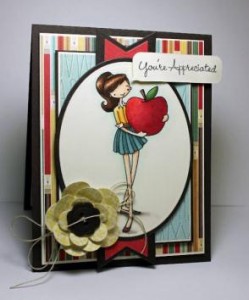
This adorable little project uses just a touch of hemp twine to decorate a button center.  This is a common use for hemp twine or linen thread in card making.  Hemp twine and linen thread are very similar, with linen thread being just a bit finer and more pliable.

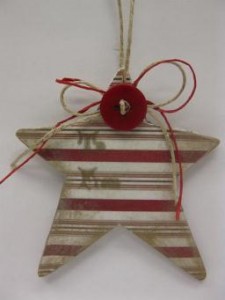
Created by youwantthecookie.blogspot.com
Photo courtesy of splitcoaststampers.com

Here we have hemp twine used to hang a Christmas ornament.  Simple, but adorable!

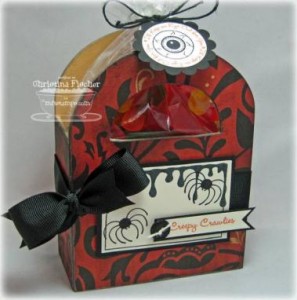
 Created by Christina Fischer for mftstamps.com
Photo courtesy of splitcoaststampers.com

I found this cute little Halloween bag on splitcoaststampers.com.  I was surprised to learn from the supplies listed, that hemp twine comes in colored versions too!  On this project, Christina used both black and white hemp twine.

 Created by Jodi of stampingalatte.blogspot.com
Image courtesy of splitcoaststampers.com

Here is a sample of linen thread used on a card.  As I mentioned above, linen thread is a bit finer than the twine.  It is easier to tie into bows, as Jodi did on this adorable card.

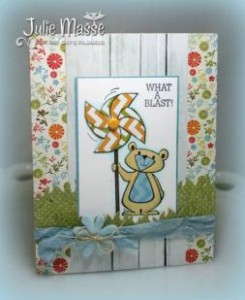
Created by Julie Masse for The Cat’s Pajamas
Photo courtesy of splitcoaststampers.com

Here is another adorable card sample using linen thread tied into a bow.  These products are so versatile, it really is hard to go wrong.  You can use this stuff just about anywhere!


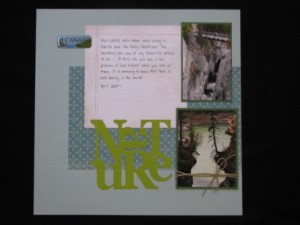
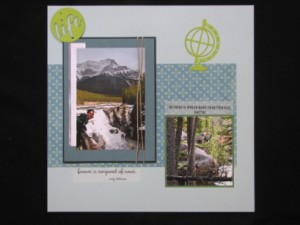
Created by Colleen Harshaw of creative-expressions-papercrafting.blog’spot.com

This sample is a two page scrapbook layout that I created.  In this layout, I wound hemp twine around two of my photos.  The twine helps to give a very natural feel to these scenic photos of western Canada.

Now comes the fun part….time to shop!

Fortunately, hemp twine and linen thread can be found just about anywhere.  All you have to do is google ‘hemp twine’ and you will see exactly what I mean.  Firstly, www.amazon.com has what they list as ‘hemp bead cord’ which, from what I can tell, appears to be the same thing.  They carry it in dozens of colours.

I also came across a website called www.createforless.com where they sell craft and beading supplies.  The alos carry hemp twine.

Next, I found www.hempbasics.com.  This site carries both natural and dyed hemp.  You can find just about any colour your heart desires there!

In terms of catalogue companies….both Stampin’ UP! (SU!) and Close To My Heart (CTMH) carry hemp twine.  CTMH carries it in black, white and natural.  SU! also carries the linen thread.

If you are looking for a brick and mortar store, Joann Fabric and Craft Stores also have a decent selection of hemp twine to choose from.

So, there you have it!  There are so many choices out there, that you have no excuse not to give it a try.  It is a very affordable way to embellish your projects.  A huge roll of this stuff goes for just a few dollars!

So get cracking!  I will be looking for all of your hemp and linen embellished projects in the blogosphere!

Welcome to Ranger Week Featuring Tim Holtz Distress Stains!

This week we’re thrilled to bring you Ranger week on the Paper Crafter’s Library Blog! Throughout the course of this week we’ll be focusing on Tim Holtz Distress Stains and sharing a TON of different free video tutorials on a range of different techniques using Distress Stains, we’ll also show you some examples of projects incorporating these techniques.  To top off the week, Ranger has graciously donated five sets of twelve Distress Stains.  Each day this week someone will win this fabulous collection of Distress Stains.  All five winners will be announced on Friday, April 20th at 4 pm EST. You can keep up to date on what’s going on at Ranger by visiting their blog, and their Facebook Page.

For those of you that may be unfamiliar with Ranger, here’s a little bit of background:

Ranger was founded in 1929 and originally manufactured an exclusive line of commercial ink products for the U.S. banking industry. In 1979, Ranger developed the first art stamp pads in unique, vibrant colors. Until 1998, Ranger’s primary business was private label products for stamp manufacturers. Ranger then began marketing product lines of its own beginning with inks and eventually developing embossing powders. With a continuous focus on innovation, they have developed numerous additional successful lines, which have become popular worldwide. 

Ranger is well known for bringing quality inks, embossing powders and innovative craft products to the arts and crafts market worldwide. Their company has a proven track record of excellence in product development and has won several awards of achievement in the industry. Their mission is to provide a fun, creative and successful experience for artists and crafters, and they accomplish this by continuously developing exciting new products, combined with a comprehensive program of educational support.

Ranger prides itself on the education they offer about their products. To start, their packaging is filled with an abundance of information, techniques and ideas to spark the creative imagination. Additionally, extensive information for projects, tips and techniques is available on their website at www.rangerink.com. 

Ranger is very proud of the fact that all of their inks, embossing powders, paints, dimensional glitters, glues and stamp cleaners are manufactured  in the USA. Their products are made in their facility located in Tinton Falls, New Jersey as well as a satellite location in Montrose, Pennsylvania.

First off, we wanted to start by giving you a good overview of Distress Stains – what they are, what they are used for and how to use them:

Introduction To Distress Stains

Because Distress Stains were designed for quick and easy coverage of backgrounds and large areas, we wanted to start off the week with a simple background technique using one color of Distress Stain.  This background technique was used in the card you see pictured below, but as I show you in the video, it can be used on canvases, in art journals…really anything you can imagine.

Creating a Distress Stain Background

Here’s another example of a super simple application of Distress Stains.  This project was created by Tracy, one of our Paper Crafter’s Library Designer/Educators. It involves simply swiping different colors of Distress Stain onto a wet water-colour paper background.  The video for this card  is available to our Paper Crafter’s Library members. As the week progresses, you’re going to see all sorts of different ideas and techniques featuring Distress Stains, with projects that increase in complexity.

A Bit About Paper Crafter’s Library

The world of paper crafting is HUGE! Whether you are a beginner, or you’ve been creating for years, the sheer number of different products, tools, techniques and project ideas can be overwhelmingAfter spending 6 years helping thousands of paper crafters around the world become more successful in the creative space through my series of kits, digital tutorials and online classes, I began looking for a new approach to education. In 2011 I launched Paper Crafter’s Library – the first, and still to this day, only website that provides an all-in-one learning solution for paper crafters. With almost 800 videos currently in the library and 4-5 new videos added each week, Paper Crafter’s Library offers comprehensive training on products, tools, techniques, and project ideas. From beginner through to advanced, whether your interest is in stamping, card making, scrapbooking, creating 3D items or altered art – you’ll find all the resources you need to navigate the world of paper crafting in ONE place, organized and indexed so that it’s quick and easy to find.


Here at Paper Crafter’s Library, we make a great effort to provide tons of FREE content in the form of video tutorials.  You can access our free videos from our Public Video Library Page by clicking on the categories that say “this section contains one or more complimentary videos” underneath the link.  By signing up for our free email newsletter,  you’ll also receive a free weekly video tutorial.  Another great source of ongoing inspiration and information is the Paper Crafter’s Library Facebook page. Access to the FULL library and to our premium content is a members-only benefit, for which there is a monthly fee (like signing up for an ongoing online class).  If this interests you, you can check out the Benefits of Becoming a Member.


Distress Stain Give-Away


As we mentioned at the beginning of this post, every day this week we’ll be giving away one set of 12 Distress Stains – to a total of 5 winners.  All you have to do to enter is to leave us a comment on each day’s post.  You can expect the posts to be published before 12 pm EST each day this week.  All five winners will be announced on Friday, April 20th at 4 pm EST.


P.S.  We’d appreciate it if you’d spread the word about Ranger week on your blog, FB and/or Twitter!  The more people that visit and comment, the more we have companies like Ranger sponsoring our site with great products we can give away to you!


P.P.S.  We encourage you to stop by the Ranger Blog to thank them for their great give-away, and let them know we sent you!


If you are interested in purchasing the products we are featuring this week, they are all carried by our trusted partner Simon Says Stamp.  They have fantastic customer service and great shipping rates. Simply click on any image below to be directed to the product.


Project Newsletter Makeover Challenge – You Make Me Smile

Welcome to the Makeover Monday challenge. Every Monday, as part of our project ideas newsletter we’re going to make over one of our own older cards, showing you how easy it is to use existing designs (your own OR someone else’s) as inspiration. This week Tracy has designed this “You Make Me Smile” card. This card features a variety of alphabet stickers and embellishments.

Your challenge – as with our previous Makeover Monday Challenges – is to use our piece as inspiration and make it into a card, scrapbook page, or other project. You can use the layout, the colors, an element you like…it can look like our piece, or nothing at all like our piece. We want to see where YOU take this. This challenge is strictly a “work from your stash” challenge.

As a newsletter subscriber you will have received a link to a private web page, from which you can watch the video tutorial. If you didn’t receive the video tutorial link then please be sure to email us at customerservice@papercrafterslibrary.com. In order to ensure you don’t miss any more of our Makeover Monday Challenge video tutorials, please be sure you sign up for our FREE email newsletter from the top right sidebar of this blog. Please note that the video tutorial will be available for general viewing for one week only – and then will be moved into our library for our members only

Every Monday, here on the blog, we’re going to post the original picture, and the made over picture. You will have ONE week to upload your challenge piece.

Instead of a weekly prize though, we’re going to award a prize monthly. So for each week you participate and each project you submit – you will get one entry into our monthly draw. On the first Monday each month – we will announce one challenge winner, who will receive one of our grab bags featuring over $30 of paper crafting products.

Our inspiration piece, shown below, is an archived project from the Andrea Walford blog.


Here are the details on how you can participate in the Makeover Monday Challenge:

A new Makeover Monday Challenge video tutorial will be emailed out to newsletter subscribers every Monday (so make sure you are signed up). Then, here on the blog, we will post a picture of our inspiration piece and made-over project along with an Inlinkz button for you to enter your project. Here are the details:

  • Work from your own stash to create a project based on the inspiration project provided – you can use any products you would like, and make any type of project you like – card, scrapbook page, album, 3D item etc.
  • Post your project on your blog, in your gallery or on any other photo-hosting site (such as photobucket or flickr).
  • Click on our inLinkz button below to add a link to your project for our challenge
  • You will have until 7am, Monday, April 23rd to add your link to the list to be eligible to win. And you can enter as many times as you like.
  • One randomly selected winner will be chosen from ALL the entries on Monday, May 7th.
  • For each project you submit, your name will be entered into our monthly draw. The winner will be announced on Monday, May 7th.

Good luck to everyone and we look forward to seeing your projects!


Technique Thursday: Melted Crayon Technique

This week on Paper Crafter’s Library’s Technique Thursday we are featuring some awesomely fun techniques using crayons….yep, the everyday Crayola crayons. A supply that anyone with children likely has in abundance!

Soph has created some fantastic projects using three different variations of a Melted Crayon Technique.  On the tag on the top which says “You Color My World” Sophia actually stuck crayon pieces to the tag and then melted them to create those gorgeous color drips.  On the “Surprise” Tag, the blue and purple colors you see running out of the bucket are melted crayon.  Finally, on the “Find joy every day” tag, the crayon was melted to create the effect of dirt underneath the plants.   

For those of you unfamiliar with Technique Thursday , this is where we create and feature projects for our Club 52 online class (our year-long technique club), which our Paper Crafter’s Library members also access as a free benefit of their membership. 

If you’re interested in checking out what we’ve covered so far, you can look at our Club 52 page. If you’re a technique junkie and would like to learn new techniques (as many of them are ones we have created), or revisit old ones – you can still sign up from this page – you’ll be able to access all 32 weeks we’ve done so far, plus the remaining weeks, and your access to the classroom will last for 15 months.

If you are not already receiving our weekly email newsletter, make sure you take a minute to sign up from the top right sidebar of our blog. Every Monday we create an exclusive project with a video tutorial for all of our newsletter subscribers and Paper Crafter’s Library members. So make sure that you sign up now, so that you don’t miss out!

April Design Team Projects by Ezlie Perez

Hello again paper crafters!  April is my favorite month and I am so happy to be able to share more fun projects and videos with you.

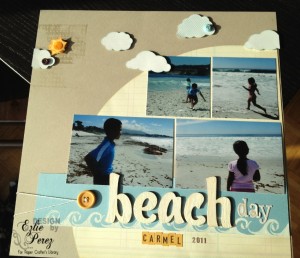
My first project is a scrapbook layout.  On this layout I used acrylic paint to stamp with as well as dress up my title.  I hope you enjoy the video tutorial, available to Paper Crafter’s Library members, to see how this layout came together.

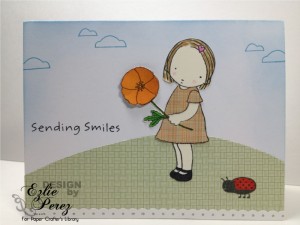
My second project is a fun paper pieced card. I was able to color with my Bic alcohol markers to finish off the card. Making scenes with pretty paper and stamps is lots of fun. I hope you are inspired to give it a try.

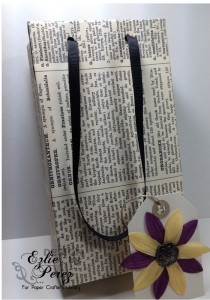
My third project is a bonus project, so there is no video. But I did included a PDF, for members, of how this cute gift bag came together. Imagine all the pretty paper you have in your stash and how they would look so cute as bags! I know I definitely will be making more of these!

I hope you’ve enjoyed my projects for this month. I appreciate your kind comments! Happy crafting!