Shadow Box Easel Cards

As PCL members may have noticed, I am on a new shadow box kick!  I started creating them when I realized that just using my homemade action wobbles or dimensional foam was not enough to build the scenes which I wanted to create.  I wanted layers…..lots of them.  I wanted dimensions and I wanted to create small windows into little worlds of my creation.  The perfect solution was a shadow box.  Each shadow box is created with internal pieces which allows me to evenly create layers in my work.  Each card is meant to be a little work of art which can be kept on a mantel or desk like a picture.  Each design can easily be placed in a shadow box frame, singly or in multiples to create a scene.  All in all, I love the effect which I get with each of them.

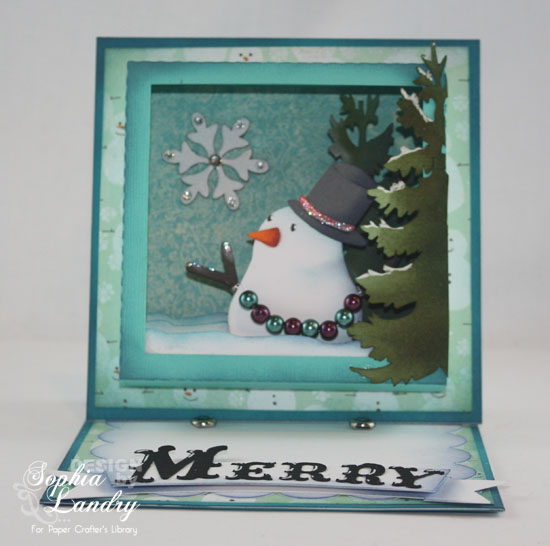
The first card is my snowman in a square shadow box.  He is what started my “craze”.  All images in this scene were cut using my Silhouette Cameo.  The great thing with the software for this machine is that you don’t have to have a machine to get access to the shapes.  You can simply purchase the individual shapes and hand cut them.  Lifters (a little thing I designed in my triptych photo project) add stability and support to my snowman.  The snowman himself was constructed extra sturdy so that he had the ability to hold the litte beads which I had purchased at Michael’s.  Careful shading was added to each and every layer.  The end result is a snow-scape in a forest.  Beautiful papers (Basic Grey), grace every surface of this easel card which was also specialy designed to support the weight of this card.  In the end, it will only be given to a very special person lol.

SnowmanShadowBoxEaselCard-12202012-550W

The second card was meant to highlight some of the adorable snail stamps from LeLo Designs.  I am in love with all her snail images (and own the majority of them).  She is a stamp designer based out of Germany.  Her prices for un-mounted stamps is fair and the shipping reasonable.  I love/hate ? how easy it is to shop on her site!  So with this card, you get the bonus feature of seeing how the snail is colored.  I used my real watercolors for him, but it is easily adapted to coloring with any other medium which you might have.  The snail was designed to be multi-layered (hence plenty of fussy cutting) but you can easily omit that portion.  The back-drop was designed using my Silhouette Studio digital cuts, but again, you can purchase and cut by hand if you don’t have a machine.  There was also a bit of hand cutting for the rolling hills.  Careful attention was payed to the shading of each piece with inks and chalks and Copic markers were used to add details to some of the cut pieces.  The card features gorgeous designer papers (Basic Grey) and cardstock on all surfaces, and every detail carefully thought through.  The way I see it, if you spend that much time on the front image, you better make the rest look as good lol.  I love the end result, and could not wait to show my daughter.  Her response …….. ” I would die before the fireman snail could save me, he would be late!”  Aren’t children precious?

FiremanSnailShadowBoxEaselCard-01032013

FiremanSnailShadowBoxEaselCardSideView-01032013

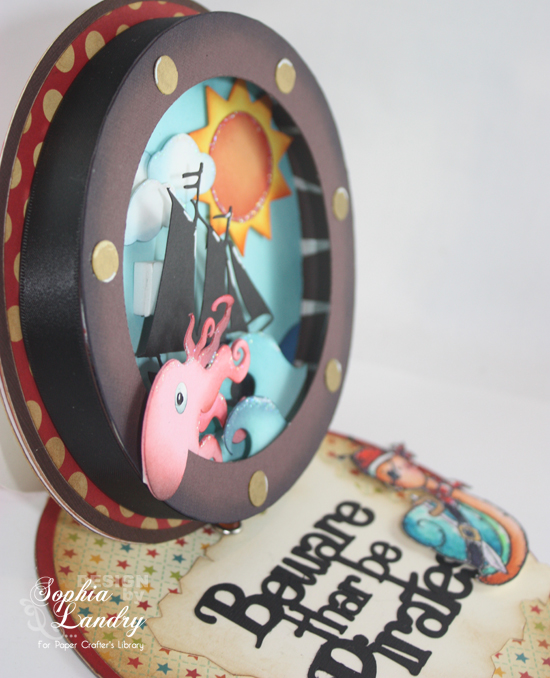
The final card is my Pirate Snail in a circular shadow box.  Once again he is from LeLo Designs.  He is my little plunderer of the Seven Snail Seas (and once again my daughter found the thought of a pirate snail to be less than terrifying).  The snail is once again watercolored with my paints, layered with fussy cutting, and placed along the bottom portion of the card.  I did not want him to block out the scene of his little world.  The scene was created with plenty of Silhouette Studio cuts, lots of shading ( surprised? ), and little dollops of stickles to add the necessary bling.  The circular shadow box was designed to look like a port-hole on a ship with the little studs colored in gold.  The card was again covered thouroughly in beautiful designer papers (Cosmo Cricket) and every detail placed with thought and consideration!

PirateSnailShadowBoxEaselCard-01222013-550W

PirateSnailShadowBoxEaselCardSide-01222013-550W

Well I hope you love these as much as I do!  I can guarantee that they were created with plenty of love!  Each template is available in PCL along with all the instructions for creating every aspect of this card!  I promise these cards are not hard to make, just that they do have a bit of a time commitment lol.  Each card has a place to write your message, which will not be seen when using it for display.  Each one is designed to last a long time and to be very sturdy!  Finally, each one will be treasured by the person to whom it is given. Make sure you give it wisely 🙂

Cheers,

pcsophiasiggy

Trendy Tuesday – Knitting and Sweater Themes

Trendy Tuesday – Knitting and Sweater Themes
by Katherine Elliot

Baby, it”s cold outside!  Well, depending on where you live, you may or may not be feeling winter”s chill.  Just ignore that thermometer and instead hide away in your favorite crafting space and capture a warm, cozy feeling using a chic new sweater or knitting themed item from your favorite brand of stamping products.  These themes are showing up everywhere in my searches for inspirational new paper craft ideas, and as I”m an avid stamp collector, it”s especially fun to share these samples with you today.

Knit-bits-2

Knit Bits card by Betsy Veldman, image source Paper, Scissors, Super Heroes

Papertrey Ink has released some wonderful new stamps sets over the past couple months that include some terrific knitting motifs.  Knit Bits stamp set and the Sweater Die Collection from Papertrey Ink can be used together to make some adorable projects.

 Knitbits_meliphillips1

Sweet New Baby card by Melissa Phillips, image source LilyBean Paperie

I love knit patterns used as background stamps like Papertrey Ink”s Striped Sweater background stamp set. The pattern allows you to ink the element of texture directly on your paper without embossing or other techniques.

Warmest Wishes card by Kelly Griglione, image source Notable Nest

Several brands offer knitting themed stamps, although I only have time to showcase a few.  Knit background patterns and winter hats featured in the stamp set, Knit Wits, from Technique Tuesday are showcased on the next projects below…

Cool Cat Card

Cool Cat card by Kris Chrihart, image source Technique Tuesday Galleries

Canada Card

O Canada! card by Tanis Gieserecht, image source Technique Tuesday Galleries

I love the witty name for this stamp set, too.  Here are the images that are included in the set from Technique Tuesday:

Knit Wits

Knit Wits stamp set from Technique Tuesday, image source Technique Tuesday

Knit hats, sweaters, background stamps, what else could there be?   Mittens of course!  Mittens are an essential winter accessory and they sure make cute images on cards.   Check out the Make a Mitten stamp set from Stampin Up! and this cute Thank You card by Ann Clemmer.  Her card features the cute mittens from the set punched out with a coordinating mitten punch from Stampin” Up!

WinterThankYou

Knit mittens with sweater trim card by Ann M. Clemmer, image source StamperDog.com

Make a Mitten Clear-Mount Stamp Set

Stampin” Up! Make a Mitten stamp set, image source Stampin” Up

The bit of white trim on the mittens you may have noticed on Ann”s card is white sweater trim from Stampin” Up!.  The trim is available in red, green or white.  It”s stretchy and touchable, just like a sweater.

Cherry Cobbler 1/4" Sweater Trim

Stampin” Up! Sweater Trim, image source Stampin” Up!

Sweater trim pom-pom decoration by Julie Davison, instructions and image source from Julie”s Stamping Spot

 The fourth brand of stamps I am sharing with you today with a knit theme stamp comes from Flourishes.

  Stitched for You stamp set from Flourishes

The Stitched For You set includes other timeless sewing images as well as yarn and knitting needles.  The image is so skillfully colored by Flourishes” artists, I must share both of these beautiful projects featuring the knitting stamp.

Stitched For You 2 - OHS

The Thread that Binds card by Cindy Lawrence, image source The Creative Closet

 FTTC196 Stitched For You - Broni Holcombe

Stitched for You card by Broni Holcombe, image source Flourishes

Not a stamper?  There are many winter papers that will look great for a sweater theme card.  Make it easy by cutting a sweater shape from felt and add to your card.  My favorite die of the day is the Lifestyle Crafts sweater tag die featured in this clean and simple card by Shelly Mercado.

 lc24

Card by Shelly Mercado Lifestyle Crafts sweater die used in card above, image source Popsicle Toes 

Feeling warmer now?  I think I may end up a “knit freak” once I get a hold of these products.  Enjoy your indoor paper crafting hobbies this winter.  Happy stamping everyone!

PCL Membership Highlights Jan 14th – 18th

PCLWeekltHighlightJan14-18


Paper Crafter’s Library was launched in January 2011 with the goal of becoming an all-in-one learning solution for paper crafters. With over 1000 videos in our library to date, and over 50 videos being added each month – we are the largest and most comprehensive online learning resource for paper crafter’s worldwide.

Starting today, each Monday we’re going to be providing you with a behind-the-scenes sneak peek of the projects that were released to our members the previous week.  So the sneak peek you see above is a snapshot of the video tutorials & pdf handouts our members received for the week of January 14th – 18th.

Each week at Paper Crafter’s Library our full monthly members can expect to receive access to a minimum of 8 exclusive projects – totalling around 50 different projects each month.  In planning for our projects we ensure that we cover a range of project types so that there is something for everyone whatever their interest or preference – whether it be card making, stamping, scrapbooking, altered art, mixed media, 3D items, templates, techniques etc.  Projects range in difficulty level – so there will always be projects in library for whatever your paper crafting “level” whether you are a beginning paper crafter, or a more advanced paper crafter.

Some of the techniques/products included in this weeks projects include:

  • color blocking a scrapbook layout
  • enhancing metal accents by embossing on metal
  • altering a common house hold item with alcohol inks to create a paper crafting embellishment
  • Creating a focal point on your card using washi tape
  • Creating a faux double-looped bow
  • heat embossing

To see a sample of our teaching style you can check out our Free Project of the Week – which is released every Friday.  You can see this week’s project HERE.

read about all the perks of being a Paper Crafter’s Library member you can visit our Benefits of Membership page HERE.

andreasiggypcl


Call Me Video Tutorial

This week has been an absolutely crazyweek!   Sophia and I were away in California for the last week attending CHA.  I thought that we were going to get away from the cold Canadian winter weather and boy was I surprised to arrive to the same cold temperatures!   Despite the weather, we had a great time and had a chance to reconnect with some amazing people!   I always have a great time in the company of my sister… as usually we are  staying in touch by telephone.  We are usually texting each other “Call Me!” and that was the inspiration for this card.  The simple color combination and layout here enabled me to let the greeting and main image stand out on its own!

Download the pdf handout here

You can view a video on how I created this Call Me card below.

Supplies:

Stamps: Call Me (WOW! Embossing)

Ink: Grey Flannel Memento ink, VersaMark ink (Tsukineko)

Paper: Kraft CS, Ebony CS (Bazzill)

Accessories: bone folder, Stampin’ Dimensionals, Craft scissors, glue dots (Stampin’ Up!); Primary Ebony Super Fine embossing powder, heat gun (WOW! Embossing); Tape Runner XL (thermo-web); Linen and Canvas impression plate, Black Vintage buttons (papertrey ink); Big Shot (Sizzix); Charcoal baker’s twine (The Twinery); Embossing Magic (Inkadinkadoo)


Have a great weekend!

Thank You Card Featuring Milk Bag Tabs

Do you ever hang on to those milk bag or bread bag tabs knowing they will come in handy for something?  I had a stash of them in my kitchen and thought that there must be a way to use them in my papercrafting.  By altering the color of the milk tabs, using complimentary colors, I created a unique focal point for my card. 

We have a video for our members here. (You must be logged in to view the video)

Supplies:

Ink: Sunset Orange and Pool Adirondack Alcohol inks (Ranger)

Paper: Stamper’s Select White CS (papertrey ink); Ebony CS (Bazzill)

Accessories: bone folder, Basic Black 1/8″ Taffeta ribbon, glue dots (Stampin’ Up!); ink blending tool (Ranger); Linen and Canvas impression plate (papertrey ink); Big Shot (Sizzix); Tape Runner XL, 3D Foam (thermo-web); Postage Stamp Edger punch (EK Success); tape (Scotch); ABC stickers (lily bee designs); milk bag tags


Graphic 45 Spotlight With Designer Tara Orr

Here is the latest installment of our Graphic 45 Guest Designers. Many of you may remember that back in April we hosted a Graphic 45 Week on the Paper Crafter’s Library Blog. It was week filled with projects and inspiration using Graphic 45’s Tropical Travelogue Collection. We had such a great experience partnering with Graphic 45 and their design team, and such a great response from you, that we’ve decided to partner with them on an ongoing basis. The first and third week of every month one of the Graphic 45 Designers will share a project they’ve created here on the PCL Blog. We started with our monthly designers in June and before I introduce you to our latest Designer, I just wanted to take a minute to re-introduce Graphic 45 for those of you that may not be familiar with the company.

Graphic 45 is an award-winning scrapbook and paper crafting company­— owned and operated by a mother and her two daughters.

Diane Schultz (pictured center)—Designer and CEO (aka mother)

“I’m passionate about being creative and eager to make it possible for others to find their creative voice. My background includes stints as a designer for, McCalls, Simplicity, Vogue/ Butterick, Mattel Toy Company and a host of other jobs that each, in some way, led me to what I do now. At 45 I went back to school and got my degree in graphic design— I named the company to celebrate that achievement.”

Aimee Filimoehala (pictured left) —Director of Operations

“I wear a lot of hats and love it that way. Business, marketing, operations, etc. have made me a pro at multitasking (aka juggling‑figuratively and literally). When we launched Graphic 45 just three years ago we had no idea what was in store, working together as a family has been an amazing journey that we all feel so grateful to be apart of.”

Charee Filimoehala (pictured right)—Director of Customer Service and Design Team Coordinator

“I joined the team a little over three years ago and haven’t looked back…what a life-changing experience this has been. I love working with and around creative people and products (not to mention I like my co-workers quite a bit). I spend my days working with our friendly stores and talented design team…the occasional trip to a workshop or tradeshow pretty nice too.”

Together we create vintage inspired crafting products that capture the flamboyant style of the 1920’s and 30’s – with vibrant color, irresistible texture and imaginative design to create products with decades-old appeal that’s both fresh and familiar. Let our products inspire your next scrapbook layout, card, album or home decor project.

***********

Here’s a picture of their booth at the CHA show which absolutely blows us away every year! The artwork inside is absolutely stunning and totally unique. At the last show as we were speaking with Diane she told us that many of the altered pieces were vintage finds which she and her team transformed with their gorgeous Graphic 45 products. We can’t wait to stop by their booth at the Chicago CHA and see what they’ve got in store this year!

Here’s a picture of the Graphic 45 team – they’re always dressed in period costumes to complement the themes in their collections – every day of the show brings a new set of costumes. The ones shown below were for their Little Darlings collection.

Graphic 45 Designer Tara Orr

Our next Graphic 45 Guest Designer for this month is Tara Orr who is part of the 2012 Graphic 45 Design Team.  As always, we have a fabulous project to share with you.

You can see Tara’s fabulous project below, but first, here is a little more about Tara:

I live in Beautiful British Columbia, Canada with my gorgeous husband of 12 years and our three amazing kids who are the heart and soul of my projects. I am now a SAHM to my precious little kiddos but before that, I worked as a webmaster in the Technology industry for many years and loved it. I think I will return to the ‘work’ force one day but for now, my job is at home, raising my kids (and squeezing in a little scrapping on the side).
Random Facts about Me: I have a degree in Psychology, a green belt in karate, love horseback riding (although its been way too long since I last rode), I order a grande dark from Starbucks almost every day, prefer chocolate to any other sweet – although I’ll eat any other sweet over chips/salty stuff any day, I’m the oldest of 3 siblings, gave up hope of maintaining my ‘Monica from Friends’ (as my husband would describe) cleaning habit once I had kids of my own, have earned more grey hairs and wrinkes in the past 8 years than I could have imagined and love my family more than anything else on the face of this earth!  I love papercrafting – LOVE it. It challenges me, it relaxes me and it lets me escape into a world of creativity that I adore.
If you want to take a peek at some more of my work, please stop by my blog for a visit – I’d love to have you!  http://eachmoment-onlyonce.blogspot.com


Altered Art Box Project

I absolutely ADORE the Place in Time collection from Graphic 45! It is the most versatile collection with which I have ever worked. Each month is loaded with the most beautiful imagery and the most stunning colours. For my project today, I was inspired with the shabby chic softness and colours found in the Spring months of this collection.
Graphic 45 Supplies:
Metal Tag
Metal Key Hole
Patterned Paper: May Cut Aparts, June Cut Aparts, April Cut Aparts, June Foundation, February Foundation: Place in Time
Place in Time Chipboard 1
Place in Time Stickers
5×5 Kraftboard Altered Art Box
We hope you have enjoyed this fun creation from Tara. I would also like to extend a warm thank you to Tara for sharing her exciting holiday gift idea with us! Please take a minute to stop by Tara’s Blog and of course the Graphic 45 blog to check out all their amazing creations!

Trendy Tuesday – Rosettes

Trendy Tuesday – Rosettes
By Colleen Harshaw

A few months ago, I noticed an increase in the frequency with which I was receiving projects to my inbox featuring rosettes.  I took note of this, and decided that it would be a good topic to talk about here at the Paper Crafter’s Library.

There are a few ways to make rosettes.  The first option is to use a die and a die cutting machine.  There are several availale on the market including options from Tim Holtz Alterations, My Favorite Things, the Cats Pajamas and Sissix Bigz.  The second option is to buy pre-made rosette embellishments.  The third option is to make your own rosettes by hand.  There are several tutorials available online.  One of those tutorials can be found via the link below.  It was written by Heather Nichols for Papertrey Ink.

http://pinefeather.typepad.com/pine_is_here/2012/09/supplies-all-supplies-from-papertrey-ink-unles-noted-merry-ros.html

Heather Nichols also created this adorable rosette banner using the method above.


Rosette Banner by Heather Nichols
 Image credit www.pinefeather.typepad.com

Another cute project I came across are these rosette name tags.  These tags would be appropriate for many occasions: birthdays, showers, holiday parties and more.

Crepe Paper Rosette Name Tags
Photo credit to www.foldingtrees.com

This next photo shows how you can use homemade rosettes as party decorations.  This room looks festive and beautiful with these rosette hanging from the ceiling!


Photo credit to www.juneberry-lane.blogspot.com

This next use of rosettes as a floral arrangement is also very versatile.  In this case the arrangement was created for a baby shower, but the uses of such a display are limited only by your imagination!


Photo credit to www.chavezdesigns.blogspot.com

This next idea is my favorite of the projects I have featured today.   I would never have thought of this creative idea on my own!  This clever girl used graduated sized rosettes to create a Christmas tree!  I love it!


Photo credit to www.especiallymade.blogspot.ca

Finally, I have a card to show you!  Usually, I have card sample after card sample, but today I have been all about the three dimensional projects.  That is what I love about writing these articles…..I learn somthing new every time too!


Card by Mona L. Pendleton
Photo credit to www.cupcakescreations.blogspot.com

Next I have a 12 x 12 scrapbook layout to share with you.  This fun layout was created by Heather J. Landry and I found it on scrapbook.com.  Scrapbook.com has an extensive gallery where you can find all sorts of wonderful ideas to jumpstart your creativity!


Layout by Heather J. Landry
Photo credit to www.scrapbook.com

The last project I have to share with you today is a miniature album with a rosette decorating the front.


Project by Karan Gerber
Photo credit to www.karangerber.blogspot.com

As I mentioned earlier, there are several dies available on the market for making rosettes with your die cutting machine.


Memory Box Blooming Rosette Die
Photo credit to www.ellenhutson.typepad.com

The Cat’s Pajamas offers quite a few rosette die options.  Their line of dies are called CutUps. Among the CutUps die options are dies called Easy Rosettes, Heart Rosettes and Star Rosettes.


Easy Rosette CutUp Die from the Cat’s Pajamas
Photo credit to www.thecatspajamas.com

Here is another die option……

Sissix Bigz Pro Die – Rosettes
Photo courtesy of www.sissex.com

In addition to the dies shown above, My Favorite Things offers a 1/4 inch Rosette Die and Tim Holtz Alterations offers the Paper Rosette and the Mini Paper Rosette Dies.

All in all, there are quite a few options for using rosettes in your paper crafting and in three dimensional crafting as well.  The best part about this technique is that you can make rosettes yourself with very limited supplies.  What could be better than that?  So many times as paper crafters, we feel like we need to buy the latest and greatest product in order to keep up with the trends.  This is one of those rare times where that is not the case!  Enjoy it while you wait for the next great product to arrive!


Wishing You a Speedy Recovery Video Tutorial

For this week’s free project I wanted to share with you a card I created using Lawn Fawn’s adorable “On The Mend” stamp set. Although all the images are absolutely adorable, I just couldn’t resist the little bandaid, especially with a pair of googly eyes LOL!  I used my Copic Markers to color in the band-aid images and you’ll see how quick and easy that was in the video.

Download the pdf handout here

Watch the video below to see how I created this Wishing You a Speedy Recovery card.

Supplies:

Stamps: On the Mend (Lawn Fawn)

Ink: Tuxedo Black Memento ink (Tsukineko); E50, E51, E53 Copic markers (Copic)

Paper: Stamper’s Select White CS (papertrey ink); Double Dutch Collection (Lily Bee Designs)

Accessories: bone folder, paper snips, glue dots, Craft scissors, Googlies (Stampin’ Up!); Honeydew baker’s twine (The Twinery); Chartreuse Vintage button (papertrey ink)

Have a great weekend!

andreasiggypcl

Fluttering Gratitude

I absolutely love butterflies!  These spring time colors and butterfly images made me momentarily happy and I forgot about the snow that is falling out side right now!  This Embossed Spotlight technique is a fun way to pull in a few different colors into any project.

We have a video for our members here. (You must be logged in to view the video)

Supplies:

Stamps: Antique Background (Hero Arts); Mat Stack 1 Collection (papertrey ink)

Ink: Whisper White Craft ink (Stampin’ Up!); Jet Black Archival ink (Ranger)

Paper: Whisper White CS, Pretty in Pink CS, Certainly Celery CS, Basic Gray CS (Stampin’ Up!); Hawaiian Shores CS (papertrey ink)

Accessories: Stampin’ Dimensionals, 2 ½” Circle punch, 1 ¾” Circle punch, bone folder, paper snips (Stampin’ Up!); Opaque Bright White Super Fine embossing powder, heat gun (WOW! Embossing); Embossing Magic (Inkadinkado); Tape Runner XL (thermo-web); ⅞” Circle punch, ⅝” Circle punch (EK Success)


Project Ideas Newsletter – Just Because

For today’s Project Ideas Newsletter I created this Just Because card.  The layout of this card is a great way to use up those scrap pieces of designer paper that we all have laying around.  The rounded corners on the bottom of the card and the beautiful Satin ribbon bow add those final touches to the card.

Newsletter subscribers will have received a link to a private web page, from which they can watch the video tutorial for this Just Because card. Please note that the video tutorial will be available for general viewing for one week only – and then will be moved into our library for our members only. In order to ensure you don’t miss any more of our Project Ideas Newsletter video tutorials, please be sure you sign up for our FREE email newsletter from the top right sidebar of this blog. If you didn’t receive the newsletter then please be sure to email us to confirm your subscription.