Featured Company: Hero Arts

logo_425x45

I’m so excited to welcome this week’s Featured Company: Hero Arts! They have a vast selection of crafting products that we love and we know you will too!  In today’s spotlight you’ll learn more about Hero Arts, see a fantastic project by one of their designers and have the opportunity to win the prize package shown below (details at the end of this post).

HeroArts-PCL-Giveawayjuly

 About Hero Arts

Hero Arts is a top brand in the crafting market with almost 40 years of experience making premium stamps, papers and inks. Hero Arts is a family-run, green-certified, solar-powered, manufacturing company that continues to hand-make a majority of its products here in the USA. The company is well known for its industry-leading website, high-quality products, and stylish designs. For more, visit www.heroarts.com.

Hero Arts Social Media Links:

Facebook  https://www.facebook.com/pages/Hero-Arts/149795132607
Twitter  https://twitter.com/myheroarts
Instagram  http://instagram.com/HeroArts/#

Pinterest http://pinterest.com/heroarts/


Special Hero Arts Guest Designer

Today we have Hero Arts designer Kelly Rasmussen to share a fabulous project with us. You can see her project below but first, let’s introduce you to her:

kellyrasmussen_headshotKelly began making cards when she was in college and has been addicted ever since. She quit her day job at a graphic designer to become a stay-at-home mom and has been working with Hero Arts since 2009.

Besides making cards she also enjoys shopping, volleyball, photography, graphic design, baking and spending time with her family and friends. Kelly lives in a small town in Nebraska with her husband Lee and three children Halle, Gage and Lexi.

Splatter Card

I paired up the Hero Arts Stamp Your Story line of products with the Hero Arts Daubers to create this bright and artistic-looking card.

heroarts_073113_PCL_1

You can use the Daubers just like ink — the ink splotches were stamped using the Neon Pink, Neon Orange and Neon Yellow Daubers.  And to create those orange splatters in the background I just mixed the Neon Orange Dauber with a little water on my craft sheet and then flicked it on the card with a paintbrush. I heat embossed the sentiment with white embossing powder on some Hero Arts Pool Layering Paper, which is a perfect match to the Tide Pool Dauber that i used to stamp the brush stroke across the card.

heroarts_073113_PCL_2
I finished off the card with a scattering of Hero Arts black gemstones and mounted the stamped panel to a Hero Arts Black Folded Card.
We hope you have enjoyed today’s feature. We want to extend a sincere thank you to Kelly Rasmussen for her fabulous project and Hero Arts for sharing their company with us. Be sure to visit Hero Arts to see more of their great products.

In order to enter the give-away to win the prize package shown above, please leave us a comment in the comments section of this post. Winner will be announced next Wednesday on the Paper Crafter’s Library blog!

Winner of Lawn Fawn Give-Away

I’d like to extend a HUGE thank you to Lawn Fawn and their guest designer Elena Roussakis for sharing such a wonderful project and for their generous give-away of prize package shown below.

724giveawayPinkLemonadePetitePaperPack_productImage 724giveaway1

And now, the moment you’ve all been waiting for…….the winner is……Pamela!

731winner

Congratulations Pamela!!
Be sure to email us at customerservice@papercrafterslibrary.com to claim your prize. Please be sure to put “Lawn Fawn” in the subject line of the email, and then in the email itself, be sure to include your full mailing address and phone number.

For those of you that didn’t win, each week on PCL we feature a different company, and each of those companies generously sponsors a prize. Join us next week when we feature another great company.

andreasiggypcl

Trendy Tuesday – Circles

Trendy Tuesday – Circles
by Katherine Elliot

What”s an easy way to become a well-rounded paper crafter?  Let”s take a short cut and simply use circles!  Geometric shapes of all kinds seem to be on trend lately and circles are no different.  A long lasting trend in the paper craft world, here are some projects using this easy to use shape and the tools you can easily find to help you recreate them.

Brightly colored embossing powder used on Laurie Schmidlin”s card below looks fantastic.  She used a set that can double for great circle patterns as well as the fruit theme the set is designed for, Big Berries Cherry.

Just a Note by Laurie Schmidlin

Card by Laurie Schmidlin featuring circle stamps from Waltzingmouse Stamps Big Berries-Cherry set, image source Just Give Me Stamps

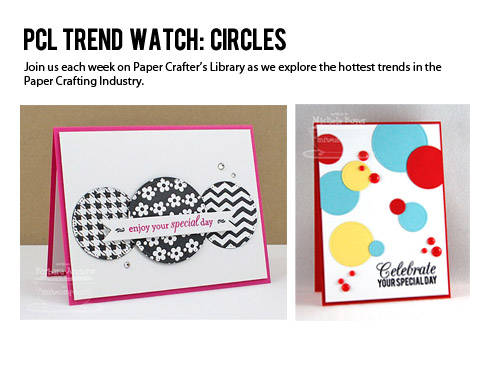
Pattern stamps of any kind combined with different size circle punches are a fun way to play with a circles on your card layout.  Leanne Pugliese captures the sense of bouncing balls perfectly with her circle card…

Card by LeAnne Pugliese, image source Wee Inklings

Barbara Anders shows a clean and simple layout with just a few well placed patterned circles in her project.

Card by Barbara Anders, image source Paper Pursuits

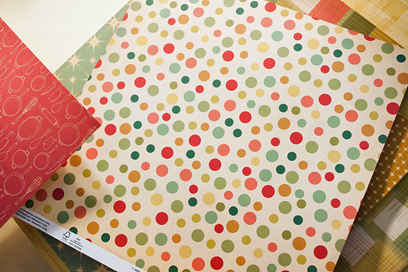
Arranged in random patterns or placed in very specific arrangements, circle shapes can be easily applied to projects with many different themes and occasions.  Check out these attractive designs featuring images, patterns and circle punches from Stampin” Up!

CircleCircus

Fall themed circle card by Andrea Walford, image source Andrea Walford blog

Birthday_Basics_DSP_Chris_Smith_

Festive circle birthday card by Chris Smith, image source From My Ink Pad to Yours

Perfectly Penned Circle Punch Card

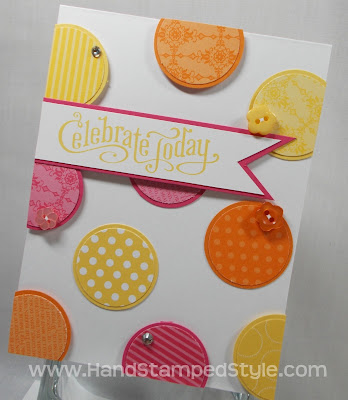
Bright, cheery card by Erin Gonzales image source Hand Stamped Style

Here”s a simple reminder, to get the image or patterned paper perfectly aligned in your circle punch, punch it out while viewing it through the back of punch.  You can do this with any lever-style punch, including the latest, sleeker body styled punches that are easy to store in your supplies.

Circle punch in action, image source Scrap n Crop

1-3/4 Inch Circle Punch

Circle punch, image source Stampin” Up!

Stamping and cutting circles are not the only ways to use circles in your projects.  Try piercing circles with a simple piercing guide as demonstrated in Dawn Griffith”s creative and trendy project below…

I miss you already upclose

Card with pierced circles by Dawn Griffith, image source Dawn”s Stamping Studio

Essentials Paper-Piercing guide from Stampin” Up!

Pierced circles are already prepared for your crafting pleasure in one of the latest Die-namics Stax from My Favorite Things.

RN Pierced Circle STAX

Card by Michelle Boyer, image source My Favorite Things

Pierced Circle STAX Die-namics

Pierced Circle Stax dies, image source My Favorite Things

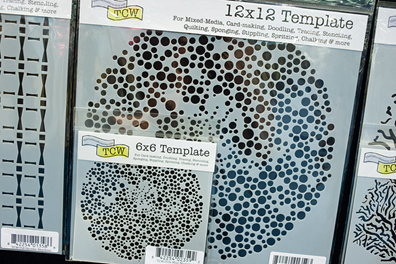
You can find some of the largest collections of different sized circles in the steel rule dies offered from Spellbinders.  Spellbinders Nestabilities dies are designed in incrementally sized shapes to make layering easy for perfect placement on your projects.


Spellbinders dies, image source Create for Less 

Bonsai Birthday by Theresa Momber

Card by Theresa Momber, featuring Spellbinders dies, image source Spellbinders Idea Gallery

 Shaped cards are surprising and fun to receive and large circle dies make them easy to create.  Simply keep the very top of your card fold outside the cutting part of the die to keep the card shape intact.  Julie Fountain”s heroic Captain America shield card is a fantastic example of a circle shape card that is sure to impress.

Captain America circle card by Julie Fountain, image source Handmade by Julie

Combine scallop circles with regular circle shapes to add more style and glamour to your shaped card.  Monika Davis shows off a beautifully designed shaped card in her project…MakeItAmazing-round

Card by Monika Davis, image source M.A.D. Stamper

Circle dies can help you easily make a window card, too.  Combine circle stamps that match the dies for a well coordinated window project.

Card featuring Waltzingmouse Vintage Circles stamps, image source Waltzingmouse Stamps

Waltzingmouse Stamps Vintage Circles

Papertrey Ink”s Sketched Shapes stamp set includes trendy sketched circles and other shapes you can layer, as Tracy McNeely”s attractive project demonstrates…

Card by Tracey McNeely, featuring Sketched Shapes stamps from Papertrey Ink,  image source In My Creative Opinion

 After playing with this trend, punching or cutting out circles, don”t forget that the hole-ridden scraps left behind can be re-purposed as well.  Using the negative space left behind from your circle cutting projects is a fashionable way to achieve a creative card layout.  Check out these fantastically designed cards that feature patterns, shapes and images placed inside the cut circle holes…

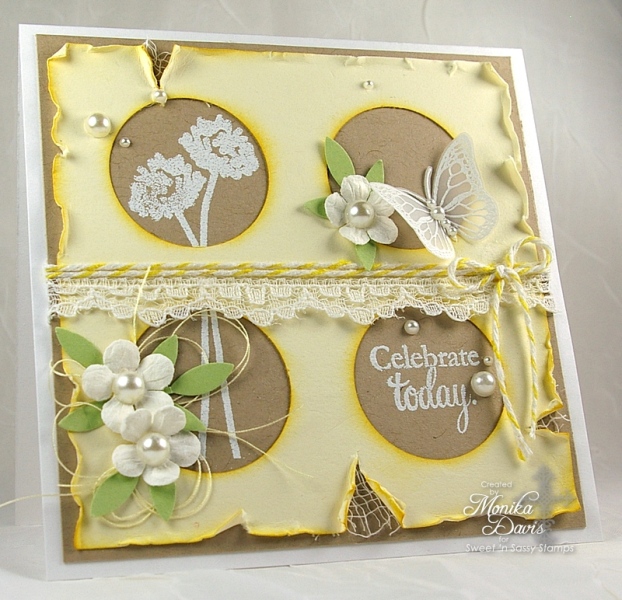
Elegantly distressed card by Monika Davis, featuring negative cut circle design, image source Splitcoast Stampers

1

Modern negative circle cut card by Wanda Guess, image source A Blog Called Wanda

What”s your favorite way to use circles on your projects?  I think I use this shape more than any others, and love all the circle themed layouts the talented artists featured today have created.  We”ve come full circle on today”s post, so it”s time to close.   Happy crafting, everyone!
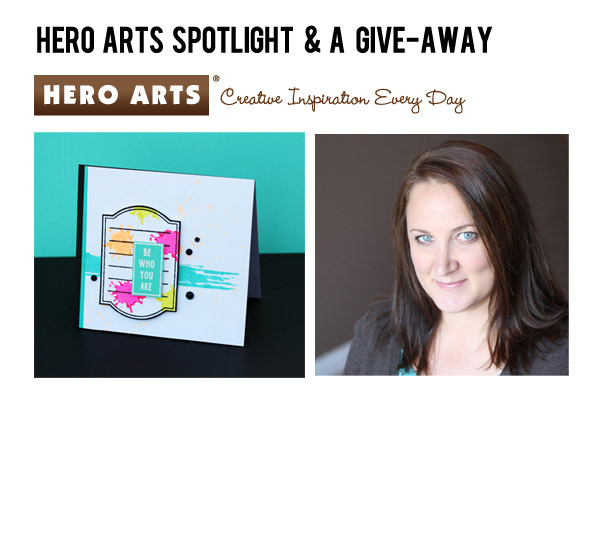
Free Project of the Week: Oh, Hello – 07 16 2013

Welcome to this week’s Free Project of the Week.

Today’s project is this Oh, Hello card, featuring Stampin’ Up!’s Epic Day This and That washi tape and Hexagon embossing folder.  You can watch a video on how this card was made and download a pdf handout below.

OhHello-07262013-550W

Download the pdf handout here

If you enjoyed today’s project, you enjoy our style of teaching and would like to learn even more I encourage you to check out the benefits of becoming a Paper Crafter’s Library member.

Featured Artist/Designer: Jennifer McGuire

Today on the Paper Crafter’s Library blog, we’re continuing our weekly featured artist spotlight whereby each week we spotlight a different artist/designer in the paper crafting & mixed media world and introduce you to their fabulous work.

Today we’re thrilled to welcome – Jennifer McGuire

Before we show you Jennifer’s fabulous projects, let’s get to know her a little bit more..

jennifermcguireAn avid stamper, Jennifer McGuire has been sharing her card and scrapbook creations in countless publications and online since 2002. Notably, her work has been showcased in two special issues from Creating Keepsakes magazine: 101 Things to Do with Your Scrapbook Supplies (2007) and 101 Creative Ways to Use Your Scrapook Supplies (2010). Most recently, her endeavors include sharing technique videos and inspiring stampers through Online Card Classes, which she co-founded with her dear friend Kristina Werner, and serving as Education Director for Hero Arts. Thanks to the high-energy classes Jennifer teaches both in-person and online, thousands of stampers all over the world have come to love stamping and cardmaking. Jennifer is both Copic and Ranger certified, which helps her take her students’ creativity to the next level.

You can currently find Jennifer’s work at Online Card Classes; at the Hero Arts blog and website and in their catalog; in Paper Crafts magazine, where she was a contributing editor (Go-To Gal); and, of course, at her own blog, Jennifer McGuire Ink. Jennifer resides in Cincinnati with her husband Ken, stepdaughter Audrey, son Colin, and daughter Lila. Her stepdaughter Kay attends college in Texas.


Miss You Card 1

 jenmcguireDistress-Markers

I am a big fan of bright and happy colors on cards. (After all, cards are supposed to cheer someone up, right?) And teaming the bright colors up with a watercolor look and a fun technique? That makes me giddy.  You can watch this card come together in the video below:


Miss You Card 2

For this next card, I first stamped the MFT Jumbo Mod Borders triangle border stamp repeatedly with white pigment ink to cover a kraft background. (I love the MFT kraft cardstock – a great middle shade.) After heat setting it, I stamped over the already-stamped triangles with a colored MFT Dye Ink, but slightly offset.

After covering the whole card with a rainbow of inks, I stamped the greeting with black ink and drew a tiny heart. I feel like I am always needing “miss you” cards and this image is just perfect.

jennifermcguireMiss-You2


Rainbow Card

jennifermcguirerainbowcard1

I have a love of summery sherbet colors and used them to create the card above with new Mama Elephant stamps.  I used the Sunny Skies stamp set for the rainbow and for the sentiment, the Wanderlust stamp set. Yummy sherbet colors with a bit of shine? Yes, please! I used Hero Arts Shadow Inks along with a bit of Wink of Stella glitter brush marker. (LOVE this marker! The subtle shine smoothly brushes on your paper and blends perfectly.)

Tips:

– Whenever I am stuck, I look through photos of my old cards. I find this to kickstart my creativity better than anything else. Afterall, if I did a look or technique before, I can do it again easily!
– Whenever I am struggling with color combos, I head to landofnod.com or garnethill.com. Their colors are amazing!

We hope you have enjoyed today’s projects courtesy of Jennifer McGuire. Also, be sure to stop by Jennifer’s blog to see even more of her beautiful work (and let her know we sent you).


Featured Company: Lawn Fawn

LawnfawnI’m so excited to welcome back this week’s Featured Company: Lawn Fawn! They have a great collection of fun and adorable stamps, fantastic coordinating dies as well as a whole lot more! In today’s spotlight you’ll learn more about Lawn Fawn, see a fantastic project by one of their designers and have the opportunity to win the Lawn Fawn package shown below (details at the end of this post).

Blue Skies stamp set and 6×6 Pink Lemonade paper pad.

724giveaway1

724giveawayPinkLemonadePetitePaperPack_productImage

About Lawn Fawn

lawnfawnowners

We’re a small company from Southern California that specializes in crafting products that are fun and lively. We began in March 2010 with the release of four stamp sets and are now proud to showcase our entire collection of over 95 sets in our little corner of the web. In 2012, we introduced paper, stickers and twine, and as of 2013 we are happy to feature new dies for some of our most popular stamp sets!

At Lawn Fawn, we love crafting products that are truly one of a kind. All of our stamps and paper feature original designs that have been created just for you; even our fonts have been customized! Our products have been seen in the pages of Paper Crafts, CARDS, Take Ten, and Creating Keepsakes magazines with many more publications to come.

Here at Lawn Fawn you will find crafting products that are cute, whimsical, and even a bit quirky, but one thing they all have in common is the ability to inspire creativity in everyone. Our products can’t wait to jump start your next craft project!

Visit us anytime to browse our latest products or simply find inspiration! And don’t forget to check out our Flickr and Facebook pages, follow us on Twitter and read our blog. We love to feature our customers and give away free stuff!

We hope our products make you smile!

Special Lawn Fawn Guest Designer

Today we have Lawn Fawn designer Elena Roussakis to share a fabulous project with us. You can see her project below but first, let’s introduce you to her:

724elenabiopicI drink lots of coffee. Lots. I’ve been happily married for 10 years. I’m a 30-something mom of three kids under the age of seven.

When I’m not playing dress-up or cooking or cleaning the same messes for the 26th time in the same day, I like to make pretty things.


Happy Feast Card


724elanacompleted card
Stamps: Happy Feast
Paper: Papertrey Ink’s rustic white and kraft
Patterned Paper: Anything that matches your theme or color scheme
Markers: Copics: e30, r14, yr18, t1, t4, e13, e15, b000
Inks: Hero Arts Cup o Joe and soft brown, memento black


724elanacard

724elanacloseup
Designer Tip: I doubled on the patterned paper and then used Martha Stewart fringe scissors across the top and bottom.  Because I didn’t adhere the 2 sheets of patterned paper together at the tips, I was able to pull back on the fringe and have a more “fluffy” edge
 
Lawn Fawn links:


We hope you have enjoyed today’s feature. We want to extend a sincere thank you to Elena Roussakis for her fabulous project and Lawn Fawn for sharing their company with us. Be sure to visit Lawn Fawn to see more of their great products.

In order to enter the give-away to win the prize package shown above, please leave us a comment in the comments section of this post. Winner will be announced next Wednesday on the Paper Crafter’s Library blog!

Winner of Graphic 45 Give-Away

I’d like to extend a HUGE thank you to Graphic 45 and their guest designer Denise Hahn for sharing such a wonderful project and for their generous give-away of their collection shown below.

717steamplunkspells

And now, the moment you’ve all been waiting for…….the winner is……Christi Conley!

724winner

Congratulations Christi!! Be sure to email us at customerservice@papercrafterslibrary.com to claim your prize. Please be sure to put “Graphic 45 Winner” in the subject line of the email, and then in the email itself, be sure to include your full mailing address and phone number.

For those of you that didn’t win, each week on PCL we feature a different company, and each of those companies generously sponsors a prize. Join us next week when we feature another great company.

andreasiggypcl

Trendy Tuesday: Confetti Prints & Bokeh Prints

Confetti Prints and Bokeh Prints
By Colleen Harshaw

Today I would like to write about the papercrafting trend of using confetti prints and Bokeh prints.  I think we all know what confetti is, but Bokeh may take a bit more explaining.

As per Wikipedia, Bokeh is the blur, or the aesthetic quality of the blur, in out-of-focus areas of an image. Bokeh has also been defined as “the way the lens renders out-of-focus points of light”.  See an example of Bokeh in the photograph below.
trendycolleen7231

Image courtesy of www.cg-blog.com

Most of us likely think of confetti as a party decoration.  Something one throws at a wedding or that one sees sprinkled around a center piece on a table at a shower.  It is pretty and colourful and very difficult to clean up.
trendycolleen7232

Image courtesy of www.cakeeventsblog.com
via www.creatingkeepsakesblog.com

Well, confetti is no longer just a party decoration, but it is also a paper crafting trend!

The great thing about confetti prints is that they are so easy to create and it is also a great way to use up small scraps of paper.  EK Success has a punch called the Swiss Cheese Punch which is perfect for creating circular shaped confetti in a variety of sizes.
trendycolleen7233

Image courtesy of www.shimelle.com

Next I found this fun example of how to use confetti in your crafting.  Here we have photos that have been punched into small circles and mixed with solid cardstock circles to create a confetti effect.  This would be a perfect use of those small thumbnail sized photos that you receive on index cards when you have your digital photos printed!
trendycolleen7234

Image courtesy of Lil’ Luna
via www.creatingkeepsakesblog.com

This adorable layout was created with a smattering of confetti in bright colours to match the palette of the photos.  Although many of the patterned papers on the market are solid confetti from top to bottom, this layout shows us how just a dusting of confetti as an accent can be effective in drawing the eye towards the focal point of the layout.  Sometimes a little can go a long way!
trendycolleen7235

Photo courtesy of www.creatingkeepsakesblog.com
Layout by Maggie Holmes

This next layout was created by Stephanie Bryan.  She incorporated a confetti pocket into her layout and even wrote a tutorial so that you can learn to make your very own confetti pocket too!
trendycolleen7236
Layout by Stephanie Bryan
Image courtesy of www.shimelle.com

Confetti Pockets: A Tutorial by Stephanie Bryan can be found at http://www.shimelle.com/paper/1788/confetti-pockets-a-scrapbook-tutorial-by-stephanie-bryan/

Here is a close-up shot of the confetti pocket on Stephanie’s layout.
trendycolleen7237

Image courtesy of www.shimelle.com

There are many, many companies out there who are offering patterned papers in confetti prints.  A few are listed for you below.

The paper on the left in this photo is a heart shaped confetti pattern.  Who ever said confetti had to be round?
trendycolleen7238

Lily Bee Sweet Shoppe Collection
Image courtesy of www.scrappyjedi.com


This next patterned paper (below center) is also from Lily Bee Designs.
trendycolleen7239

Lily Bee Designs Pinwheel Collection – Kite Strings
Image courtesy of www.scrappyjedi.com

Next is another heart shaped confetti print, although this one is by Destination.  This pattern incorporates two current trends….wood grain and confetti.
trendycolleen72310

Image courtesy of www.scrappyjedi.com


I am a big fan of Cosmo Cricket.  They have such fun, colourful, retro inspired lines.  They have not missed out on the confetti trend either.  This fun print from their TV Dinner Collection is their contribution to the confetti offerings!
trendycolleen72311

Cosmo Cricket TV Dinner Collection
Image courtesy of www.scrappyjedi.com

There are numerous other confetti prints out there from a variety of companies including Little Fawn, Glitz Designs and American Crafts.

I have one Bokeh patterned paper to share with you before I come to my conclusion.  This print is from the Maggie Holmes Collection with Crate Paper.  The pattern is called Dreamy, and it is found on the reverse side of Maggie’s camera printed paper.
trendycolleen72312

Maggie Holmes Collection with Crate Paper
Image courtesy of www.scrappyjedi.com

Lastly, aside from using patterned papers or making your own confetti using punches, The Crafter’s Workshop offers this stencil as an option for those who want to create a confetti pattern in a different way.  This stencil would be an option to use with mists or inks in order to get a confetti effect on your projects.
trendycolleen72313

Image courtesy of www.scrappyjedi.com

All in all, it seems like confetti is a fun trend that is easy to create.  From the research I did online, the trend watchers are predicting that it is here to stay!  I guess time will tell if they are correct!

Until next time, happy crafting!

Winner of May Arts Give-Away

mayartslogoI’d like to extend a HUGE thank you to May Arts and their guest designer Gini Williams Cagle for sharing such a wonderful project and for their generous give-away of 2 rolls of ribbon from their collection shown below.

SAMSUNG DIGITAL CAMERA

And now, the moment you’ve all been waiting for…….the winner is……Sandy Lewis!

717winnermayarts

Congratulations Sandy!! Be sure to email us at customerservice@papercrafterslibrary.com to claim your prize. Please be sure to put “May Arts” in the subject line of the email, and then in the email itself, be sure to include your full mailing address and phone number.

For those of you that didn’t win, each week on PCL we feature a different company, and each of those companies generously sponsors a prize. Join us next week when we feature another great company.

andreasiggypcl

Featured Company: Graphic 45

We are happy to bring you this week’s Featured Company: Graphic 45. We are so excited to be featuring them again on Paper Crafter’s Library. Many of you may remember that back in April we hosted a Graphic 45 Week on the Paper Crafter’s Library Blog. It was week filled with projects and inspiration using Graphic 45’s Tropical Travelogue Collection. I will take just a minute to re-introduce Graphic 45 for those of you that may not be familiar with the company.

Graphic 45 is an award-winning scrapbook and paper crafting company­— owned and operated by a mother and her two daughters.

Diane Schultz—Designer and CEO (aka mother)

“I’m passionate about being creative and eager to make it possible for others to find their creative voice. My background includes stints as a designer for, McCalls, Simplicity, Vogue/ Butterick, Mattel Toy Company and a host of other jobs that each, in some way, led me to what I do now. At 45 I went back to school and got my degree in graphic design— I named the company to celebrate that achievement.”

Aimee Filimoehala —Director of Operations

“I wear a lot of hats and love it that way. Business, marketing, operations, etc. have made me a pro at multitasking (aka juggling‑figuratively and literally). When we launched Graphic 45 just three years ago we had no idea what was in store, working together as a family has been an amazing journey that we all feel so grateful to be apart of.”

Charee Filimoehala —Director of Customer Service and Design Team Coordinator

“I joined the team a little over three years ago and haven’t looked back…what a life-changing experience this has been. I love working with and around creative people and products (not to mention I like my co-workers quite a bit). I spend my days working with our friendly stores and talented design team…the occasional trip to a workshop or tradeshow pretty nice too.”

Together we create vintage inspired crafting products that capture the flamboyant style of the 1920’s and 30’s – with vibrant color, irresistible texture and imaginative design to create products with decades-old appeal that’s both fresh and familiar. Let our products inspire your next scrapbook layout, card, album or home decor project.


And, we also have a give-a-way for you!!  One lucky winner will receive a package of Graphic 45’s Steampunk Spells Collection (seen below).  The lucky winner
will be drawn from all the comments left here on the Paper Crafter’s Library blog to win.
717steamplunkspells

Graphic 45 Designer Denise Hahn

Our Graphic 45 Guest Designer today is Denise Hahn who is part of the 2013 Graphic 45 Design Team. Denise has a beautiful project to share with us today. 

designerdenisehahnYou can see Denise’s fabulous projects below, but first, here is a little more about Denise:

My name is Denise Hahn and I am a mixed media artist and crafter from Long Beach California. I have always loved creating and I get my creativity from my Mom and Grandmother. They always had elaborately decorated packages under the Christmas tree along with handmade decorations. They also sewed amazing Halloween costumes for us. I was always in awe of what they could create and soon started joining them. But somehow I lost sight of creating and for many years let it slip away. Then I was introduced to scrapbooking from a friend and I have never looked back. I consider myself a crafter of all trades; I do paper crafting, mixed media, altered art, and jewelry. But I am always looking to learn new things. Currently I spend my time teaching workshops and creating for the Graphic 45 Design Team and Clearsnaps Creative Team. I live in Long Beach, Ca with my husband and our two lovable pit bulls Juno and Pipi. When I am not crafting I enjoy rollerskating, biking, and skiing in Colorado. You can visit my blog at inmyblueroom.blogspot.com


Grahpic 45 Designer Project
This Graphic 45 Steampunk Spells Love Potion #45 looks like it took forever, but can actually be done super quick, and can easily be adapted to all of the Graphic 45 lines. Just swap out the focal piece. As an example you could use a little bouquet of dried flowers for Secret Garden, a Baby Bottle for Little Darlings, or just a plain perfume bottle for Ladies Diary. The options are endless.
717Denise-Hahn-Graphic-45-Steampunk-Spells-Shadow-box - 1-imp

Here are the instructions:

-Ink and stencil 8×8 box-separate the two sides
717Denise-Hahn-Graphic-45-Steampunk-Spells-Shadow-box - 6-imp

-Cut out front cover piece 7.5×7.5 inch and then cut center out 1.75 inches in and attach to outside box
717Denise-Hahn-Graphic-45-Steampunk-Spells-Shadow-box - 1-imp

-Cut out a 7.5x7x5 inch piece of black cardstock and glue into inside box

-Cut your favorite rectangle from Steampunk Spells Vintage Voyage-attach to a piece of chipboard to give dimension and then attach that to center of inside box

717Denise-Hahn-Graphic-45-Steampunk-Spells-Shadow-box - 3-imp

-Attach Love potion #45 sticker to a miniature bottle and hot glue into center of Vintage Voyage piece

717Denise-Hahn-Graphic-45-Steampunk-Spells-Shadow-box - 5-imp

-Slide into the outside box
717Denise-Hahn-Graphic-45-Steampunk-Spells-Shadow-box - 4-imp

-Attach embellishments to top and lower left box front

717Denise-Hahn-Graphic-45-Steampunk-Spells-Shadow-box - 7-imp

717Denise-Hahn-Graphic-45-Steampunk-Spells-Shadow-box - 2-imp

Tips and Tricks– Sometimes it can be hard to use your coveted vintage pieces so try mixing them with store bought embellishments. If you have flowers that you love but aren’t exactly the right color, try inking them and using Smooch glitz or Pearl Accents to make them match your project. I hot glue pipe cleaner to the back for an easy hook to hang my project on the wall.

Love Potion 45 Shadow Box Supplies

Graphic 45 Steampunk Spells Clockworks #4500682
Graphic 45 Steampunk Spells Vintage Voyage 8×8 Pad
Graphic 45 Metal Staples 8×8 Matchbox
Graphic 45 Metal Staples Keys
Graphic 45 Metal Staples Door Knob
Graphic 45 Steampunk Spells Chipboard #1
Graphic 45 Steampunk Spells Chipboard #2
Graphic 45 Steampunk Spells Stickers
Core’dinations Signature Series Graphic 45
Petaloo Darjeeling Flowers
Colorbox Pigment Ink in Lava
Smooch Glitz Goldrush
Ribbon May Arts
Prima: Stencil and Vintage Trinkets
Vintage Ephemera- Miniature Perfume bottle, watch part and glass knob


We hope you have enjoyed this fun creation from Denise. I would also like to extend a warm thank you to Denise for sharing her project with us! Please take a minute to stop by Denise’s Blog and of course the Graphic 45 blog to check out all their amazing creations!