Make A Splash

This week in our part of Ontario, we have been in an extreme heat wave (with crazy humidity!). When I sat down to create all that I could think about was differnet ways to keep cool!

Make A Splash

What a cute pattern of Designer Paper! I felt that the pattern could speak for itself and that is why I did not use as many embellishments on this card as usual. I just loved the paper patterns and as you all know I love bling so the thicker sticker alphabet that I used seemed like a great choice!

Download the pdf handout here

Supplies

Paper: Whirlpool CS (Bazzill); Early Espresso CS, Peach Parfait CS (Stampin’ Up!); Splash Collection DP (Echo Park)

Accessories: bone folder, Stampin’ Dimensionals (Stampin’ Up!); Tape Runner XL (thermo-web); Glitter Foam Thickers (Amy Tangerine); ABC stickers (Lilybee Designs); 3D Phrases gel coated stickers (Recollection – Michael’s Craft Store)


Butterfly Blessings

I just love bling!!!!   Coating the chipboard butterflies just added the extra touch that this card needed as I felt that the patterns in the Designer Paper that I used kind of stood out on its own.

A video and pdf handout is available to our members here. (You must be logged in to see the page)

Supplies

Stamps: Signature Greetings (papertrey ink)

Ink: Early Espresso Classic ink (Stampin’ Up!); VersaMark ink (Tsukineko)

Paper: Riding Hood Red CS, Pink Pirouette CS (Stampin’ Up!); Smooth Ivory CS, Java CS (Bazzill); Madeline Collection (Prima Marketing)

Accessories: bone folder, Scallop Edge border punch , Stampin’ Dimensionals, Decorative Label punch, paper snips (Stampin’ Up!); Tape Runner XL (thermo-web); Mini Butterflies chipboard set (Maya Road); Princess Pink embossing glitter, Amber Rose embossing glitter (WOW! Embossing); Heat It! tool (Ranger)


Have a wonderful weekend!

Graphic 45 Guest Designer: Clare Charvill

Here is the latest installment of our Graphic 45 Guest Designers.  Many of you may remember that back in April we hosted a Graphic 45 Week on the Paper Crafter’s Library Blog.  It was week filled with projects and inspiration using Graphic 45’s Tropical Travelogue Collection. We had such a great experience partnering with Graphic 45 and their design team, and such a great response from you, that we’ve decided to partner with them on an ongoing basis.  The first and third week of every month one of the Graphic 45 Designers will share a project they’ve created here on the PCL Blog.    Last month we had our first designers and before I introduce you to our latest Designer, I just wanted to take a minute to re-introduce Graphic 45 for those of you that may not be familiar with the company.

Graphic 45 is an award-winning scrapbook and paper crafting company­— owned and operated by a mother and her two daughters.

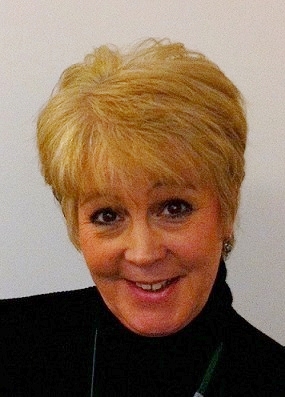
Diane Schultz (pictured center)—Designer and CEO (aka mother)

“I’m passionate about being creative and eager to make it possible for others to find their creative voice. My background includes stints as a designer for, McCalls, Simplicity, Vogue/ Butterick, Mattel Toy Company and a host of other jobs that each, in some way, led me to what I do now. At 45 I went back to school and got my degree in graphic design— I named the company to celebrate that achievement.”

Aimee Filimoehala (pictured left) —Director of Operations

“I wear a lot of hats and love it that way.  Business, marketing, operations, etc. have made me a pro at multitasking (aka juggling‑figuratively and literally). When we launched Graphic 45 just three years ago we had no idea what was in store, working together as a family has been an amazing journey that we all feel so grateful to be apart of.”

Charee Filimoehala (pictured right)—Director of Customer Service and Design Team Coordinator

“I joined the team a little over three years ago and haven’t looked back…what a life-changing experience this has been.  I love working with and around creative people and products (not to mention I like my co-workers quite a bit).  I spend my days working with our friendly stores and talented design team…the occasional trip to a workshop or tradeshow pretty nice too.”

Together we create vintage inspired crafting products that capture the flamboyant style of the 1920’s and 30’s – with vibrant color, irresistible texture and imaginative design to create products with decades-old appeal that’s both fresh and familiar. Let our products inspire your next scrapbook layout, card, album or home decor project.

***********

Here’s a picture of their booth at the CHA show which absolutely blows us away every year! The artwork inside is absolutely stunning and totally unique.  At the last show as we were speaking with Diane she told us that many of the altered pieces were vintage finds which she and her team transformed with their gorgeous Graphic 45 products.  We can’t wait to stop by their booth at the Chicago CHA and see what they’ve got in store this year!

Here’s a picture of the Graphic 45 team – they’re always dressed in period costumes to complement the themes in their collections – every day of the show brings a new set of costumes.  The ones shown below were for their Little Darlings collection.

Graphic 45 Designer Clare Charvill

Our next Graphic 45 Guest Designer for this month is Clare Charvill.  Clare is part of the 2012 Graphic 45 Design Team.

 Claire Charville

You can see Clare’s fabulous projects below, but first, here is a little more about Clare:

“I’m a working mum, have two gorgeous teenage boys and a fabulous partner who’s become my best critic when it comes crafting. and live in the heart of Shakespeare’s country in England. I’ve  been interested in all things crafty for as long as I can remember, something I think I inherited from my mum and have turned my hand to many different crafts over the years including sugarcraft which I taught in the evenings at my local college for over 10 years. I loved teaching others all the techniques they needed to make that special cake for a family occasion.  Seeing people discover hidden talents they never new they had is really rewarding.

My interest in scrap booking started about 7 years ago, when a new crafty shop opened in  town.  I had to go in lol, and came out with a few essential items, some papers and a couple of books and then set about creating two 12 x 12 albums for my boys adding journalling to the photos.  I really enjoyed capturing the memories and the boys loved their albums.  Last year I thought I’d make a mini album for my youngest son after a holiday in France, a first for me. It was very basic but I had great fun making it. Little did I know it would be the start of an unbelievably creative journey in my life.  I joined the crafting community on You Tube last year and found the Graphic 45 paper collections. Totally inspired by the era they’re based on, the colours and designs, I brushed up on loads of techniques and started making photo albums to add photo’s to, and then moved onto altered art pieces too. The boys think I’m completely addicted… perhaps I am.  I’m loving my creative journey but most of all I’m enjoying sharing my inspiration and creative ideas with crafter’s around the world through videos on my You Tube Channel (charliejones2686) and demo’s and workshops here in the UK so that others can discover their own hidden talents too.  Happy crafting – Clare Charvill

Now you can see her projects below:

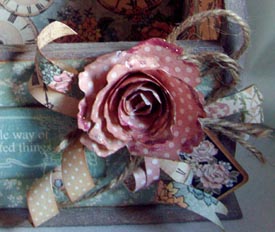
Project 1 – Gift Case

Clare Charvill

Supplies

A ladies Diary 8 x 8 papers – Picture Perfect and A Moment in Time and Afternoon Tea for the flower and paper swirls from off cuts of focal Point,Delicate Details and Lasting Impression.

Clare Charvill

Clare Charvill

Clare Charvill

A Ladies Diary chipboard piece
A Ladies Diary stamp from the sticker sheet
Wooden crate with handle – bought at a craft show
Acrylic Dabber – Mushroom
Perfect Pearls Mist – Biscotti
String
Tacky Glue
Soap, relaxing candle and holder & eye mask are my own


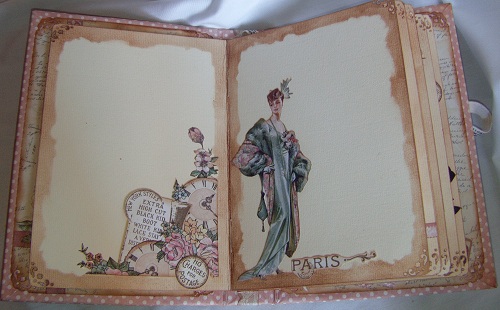
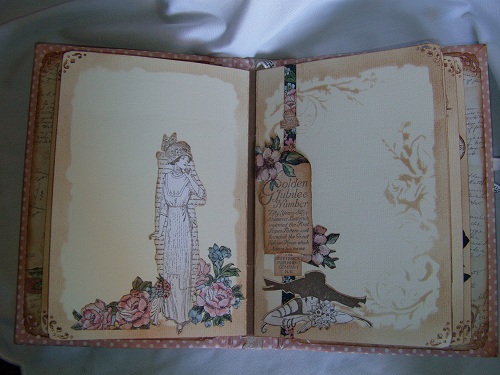
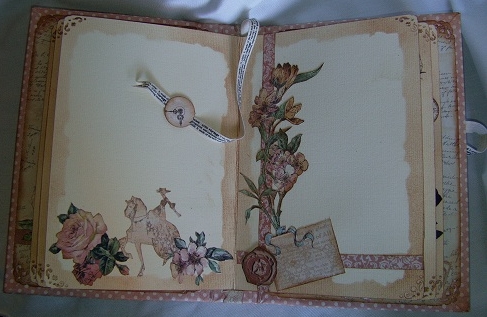
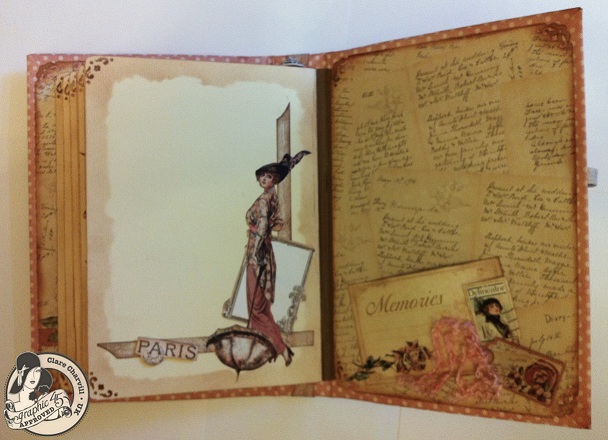
Project 2 – A Ladies Diary

Clare Charvill

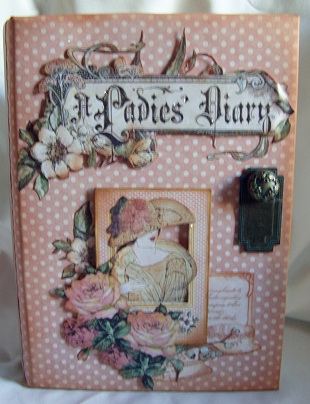
Inspired by Edith Holden’s Country Diary of an Edwardian Lady which I love.  Each of the pages has an inked border to give them an aged feel, the corners are punched and the pages edges in gold acrylic dabber.  The pages were stitched into the spine before being decorated with fussy cut elements.

 Clare Charvill

 Clare Charvill

 Clare Charvill

 Clare Charvill

 Clare Charvill

Clare Charvill

Supplies
Papers – various 12 x 12 sheets from A Ladies Diary collection
A Ladies Diary chipboard pieces
A Ladies Diary stickers
Graphic 45 Staples – Metal Tags x 2 small, cream ribbon & metal buttons
A Ladies Diary Cling Stamps – set 1, 2 and 3
2mm chipboard for the cover
300gsm Manilla card for the internal spine binding
300gsm cream textured card for the pages (A4 size folded in half)
Vintage photo Distress Ink – Ranger
Coffee Archival Ink – Ranger
Papermania magnetic clasp for book closure
WOW! embossing glitter – Sahara Sunset and clear gold highlight
Prima Mask for page edging and inking ref no 554644
Foam Tape and tacky glue
Corner punch – Hobbycraft UK
Acrylic Dabber – Gold


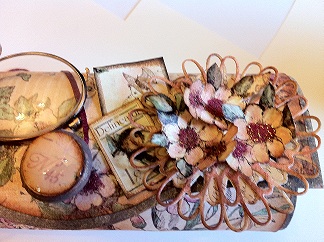
Project 3 – Vintage Pince-nez Case

Clare Charvill

A ladies Diary 8 x 8 papers Delicate Details and Timeless Memoir, stamps and blossoms cut from A Picture Perfect and flower silhouette cut from Afternoon Tea.

Clare Charvill

Clare Charvill

Supplies:
Memory Box Die –  Small Tilda Swirl
A Ladies Diary sticker sheet
Glossy Accents & Tacky Glue
WOW! Glitter – Sahara Sunset
Perfect pearls mist – Biscotti
Acrylic Dabber – mushroom
Pince-nez – purchased privately


Thats all from me.  Many thanks for the feature!

We hope you have enjoyed these beautiful creations from Clare.  I would also like to extend a warm thank you to Clare for sharing her wonderful projects with us! Please take a minute to stop by Clare’s Blog and of course the Graphic 45 blog to check out all their amazing creations!

Trendy Tuesday – Smash Books

Trendy Tuesday – SMASH Books
By Colleen Harshaw

SMASH books are a trend that I learned about fairly recently.  Last fall I attended CKC Cincinnati, and in one of my Copic classes there was a woman sitting next to me who was carrying around a SMASH book.   That was my very first introduction to this craze.  We chatted about SMASH books and what their purpose was, but then I headed home and didn’t think about it again….that is until I began to see SMASH books and SMASH accessories popping up everywhere!

What is it?  A SMASH book is a type of journal that is made to hold all of the ephemera of everyday life….ticket stubs, receipts, clippings, photos, doodles, etc.  It is a way of scrapbooking on the go, with a lot less fuss, and a lot less time commitment.  SMASH books are often small enough (journal size) to carry in your purse or bag.  You can jot down things as you think of them, such as funny things your kids say, a quote you heard and liked, or any of the other random occurences of your life.  For those of you who are overwhelmed by scrapbooking, this is the perfect way to save your memories in a scaled back way.

The website of K&Company, makers of SMASH books, have this fun explanation of SMASH books on their website:

Photo courtesy of K&Company

There are different types of SMASH books available too.  You’ll find themed books, such as wedding, baby or travel SMASH books.  There are also mini SMASH books and SMASH books with embossed or patterned covers.  Then there are all of the accessories!

The first book that I have to show you below has a pretty floral pattern embossed on the front.  It comes with a pen and glue stick fastened to the side of the book.  The interior pages feature different designs for inspiration.

Pretty Pink SMASH Folio – K&Company
Photo courtesy of www.paper-source.com

This next SMASH book is a wedding themed book.  This book contains journaling prompts and various page designs.

Wedding Style SMASH Book – K&Company
Photo courtesy of www.paper-source.com

This next item is one of the many SMASH book accessories available on the market.  These bands are used to keep your book closed and keep loose items from falling out.  They are available in various styles and colours.

SMASH Bands – K&Company
Photo courtesy of www.paper-source.com

This is a travel themed SMASH pad.  It contains 30 themed pages with prompts and jounaling ideas to include in your SMASH book.

SMASH pad – K&Company
Photo courtesy of www.paper-source.com

This is a view of the some of the inside pages of the SMASH pad above….

SMASH pad – K&Company
Photo courtesy of www.paper-source.com

I took the following photo at my local Michael’s here in northern New Jersey.  They had a whole endcap of SMASH books and accessories on display.

Photo courtesy of Colleen Harshaw

Now I want to show you some samples of completed SMASH book pages.  This will give you a better feel for what this SMASH craze is really all about!


Layout by Sam – happie-scrappie.blogspot.com
Photo courtesy of www.smashstoriesblog.com

Layout by Sam – happie-scrappie.blogspot.com
Photo courtesy of www.smashstoriesblog.com

 
Layout by Sam – happie-scrappie.blogspot.com
Photo courtesy of www.smashstoriesblog.com

Layout by Dorothy – thelittlehouseoutback.blogspot.com
Photo courtesy of www.smashstoriesblog.com

The reality is, you can make your own SMASH book from any type of journal or hard cover notebook.  You can purchase the SMASH accessories, or use scrapbooking items you already have at home.  Cut things out of magazines and newspapers, save receipts, and add anything else that speaks to you!

The most important thing is that you document your stories.  There will come a day in the future when you will be glad you did!

Project Newsletter Makeover Challenge – Chill, Have A Pill

Please Note: The expression “Chill….Have a Pill” is modern day vernacular for “Relax and Don’t Take Life So Seriously” – a card that we’d only give to someone we knew very well.  We recognize however that this is not everyone’s brand of humour and apologize if it offends.

Welcome to the Makeover Monday challenge. Every Monday, as part of our project ideas newsletter we’re going to make over a card, scrapbook page or 3D project, showing you how easy it is to use existing designs (your own OR someone else’s) as inspiration. This week, Sophia has designed this “Chill, Have a Pill” card.

Your challenge – as with our previous Makeover Monday Challenges – is to use our piece as inspiration and make it into a card, scrapbook page, or other project. You can use the layout, the colors, an element you like…it can look like our piece, or nothing at all like our piece. We want to see where YOU take this. This challenge is strictly a “work from your stash” challenge.

As a newsletter subscriber you will have received a link to a private web page, from which you can watch the video tutorial. If you didn’t receive the video tutorial link then please be sure to email us at customerservice@papercrafterslibrary.com. In order to ensure you don’t miss any more of our Makeover Monday Challenge video tutorials, please be sure you sign up for our FREE email newsletter from the top right sidebar of this blog. Please note that the video tutorial will be available for general viewing for one week only – and then will be moved into our library for our members only

Every Monday, here on the blog, we’re going to post the original picture, and the made over picture. You will have ONE week to upload your challenge piece. Instead of a weekly prize though, we’re going to award a prize monthly. So for each week you participate and each project you submit – you will get one entry into our monthly draw. On the first Monday of each month – we will announce one challenge winner, who will be featured as a guest designer on the Paper Crafter’s Library blog as well as our Facebook page. As a guest designer, we’ll feature your biography, some of your favorite paper crafting projects and we’ll link to your blog.

Our inspiration piece, shown below, is an archived project on the Andrea Walford blog.

Here are the details on how you can participate in the Makeover Monday Challenge:

A new Makeover Monday Challenge video tutorial will be emailed out to newsletter subscribers every Monday (so make sure you are signed up). Then, here on the blog, we will post a picture of our inspiration piece and made-over project along with an Inlinkz button for you to enter your project. Here are the details:

  • Work from your own stash to create a project based on the inspiration project provided – you can use any products you would like, and make any type of project you like – card, scrapbook page, album, 3D item etc.
  • Post your project on your blog, in your gallery or on any other photo-hosting site (such as photobucket or flickr).
  • Click on our inLinkz button below to add a link to your project for our challenge
  • You will have until 7am, Monday, July 9th to add your link to the list to be eligible to win. And you can enter as many times as you like.
  • For each project you submit, your name will be entered into our monthly draw. The winner will be announced on Monday, August 6th.

Good luck to everyone and we look forward to seeing your projects!

Before I announce the Makeover Monday winner for June, I would encourage you to check out all this months entries.  You can click on the links below to be taken to the direct posts.

Makeover Monday June 4

Makeover Monday June 11

Makeover Monday June 25

And now it’s time to announce our Makeover Monday winner…

Congratulations Brenda B.  Please email us at customerservice@papercrafterslibrary.com and put “Makeover Monday Winner” in the subject line.


Ribbons & Buttons For You

Today we wanted to showcase May Arts fabulous ribbon.  In this card we used May Arts pink and yellow Solid/Plaid ribbon.

Ribbons & Buttons For You

When creating this card I wanted to showcase May Arts beautiful ribbons as the focal point. I just added the embossing behind to soften the look of the card and let the buttons and ribbons stand alone!

Download the pdf handout here

Supplies

Stamps: Wonderful Words Additions (papertrey ink)

Ink: Basic Black Craft ink (Stampin’ Up!)

Paper: Pretty In Pink CS, Basic Gray CS (Stampin’ Up!); Smooth White CS (Bazzill)

Accessories: buttons (papertrey ink); buttons, embossing buddy, Stampin’ Dimensionals, ribbon scissors, bone folder, white baker’s twine (Stampin’ Up!); Primary Ebony Superfine embossing powder (WOW! Embossing); Heat It! tool (Ranger); Tape Runner XL, tiny glue dots (thermo-web); Pink Solid/Plaid ribbon, Yellow Solid/Plaid ribbon (May Arts); Mystic M-Bossabilities , Grand Calibur (Spellbinders); Fabri-tac (Beacon Adhesives); Tombow multi-purpose liquid adhesive (Tombow); hot glue (Martha Stewart)


Congratulations Card

I had a small pile of Just Eat Cake Designer Series Paper scraps on my desk. I pieced the small strips together completing the background for this card. Adding the greeting and buttons to highlight just pulled the card together.

CongratulationsCard

A video and pdf handout is available to our members here. (You must be logged in to see the page)

Supplies

Stamps: Curly Cute (Stampin’ Up!)

Ink: Early Espresso Craft ink (Stampin’ Up!)

Paper: Baja Breeze CS, Whisper White CS, Early Espresso CS, Peach Parfait CS, Just Add Cake DP (Stampin’ Up!)

Accessories: bone folder, SNAIL adhesive, mini glue dots, paper trimmer, Brights Designer buttons, clear embossing powder, heat tool, paper snips (Stampin’ Up!); Big Shot (Sizzix)


Have a wonderful weekend!

Guest Designer: Sara Nell Langland

Today we are excited to bring to you a special  Guest Designer, Sara Nell Langland.  Sara was a Makeover Monday winner in May.  Would you like a chance to be featured on Paper Crafter’s Library?  Here’s how:

At the end of each month, we will draw one name from all our Makeover Monday participants and the winner will be featured as a guest designer on the Paper Crafter’s Library blog as well as our Facebook page.  As a guest designer, we’ll feature your biography, some of your favourite paper crafting projects and we’ll link to your blog.

This month we bring you Sara Nell Langland.  You can visit her blog here.  Below, you can see Sara’s projects, but first, here is a little more about Sara:

Sara L
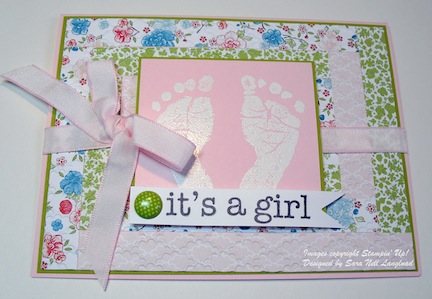
Since I was a child, I have enjoyed many needle crafts:  embroidery, cross-stitch, knitting, crocheting, quilting, and smocking.  My first “official” paper-crafting project was a card I made with tissues, wax paper and diluted white glue when I was about 13.    My mother was so impressed (or desperate for a program for her ladies’ group) that I demonstrated the technique at her meeting.   About ten years ago I rediscovered  my love of card making, scrapbooking and paper crafting and became a Stampin’ Up!  demonstrator.  I love being able to complete a project in so little time and rubber stamping makes me feel like an artist without having to draw the images!  I still do some needle work now and then, but paper and ink are my mediums of choice now.

Because I was a math major and then a lawyer for over 34 years, I came into rubber stamping with an underdeveloped creative side.  For that reason, my style is usually very clean and simple.  Over the years, I have been able to step out of my comfort zone and have used the challenges on Paper Crafter’s Library and other sites to help me grow as a stamper.  Lately, I have been experimenting with what I call my paper quilts (math coming through) and collage type cards (really outside my comfort zone!).

When I am not putting ink to paper, I enjoy sailing and traveling with my husband, Herb; catering to my Cocker Spaniel,  Princess Sophia; visiting and shopping with my daughter, Katharine; and reading lots of different things.

Card Projects

The projects I am sharing with Paper Crafter’s Library are listed below.

Be Yourself Bear Card

This card uses an old favorite retired Under the Stars Stampin’ Up!® stamp set using a favorite paper piecing technique.  All supplies are from Stampin’ Up!:   Under the Stars Stamp Set (retired); Early Espresso, Cajun Craze, Soft Suede and Very Vanilla card stock; Well Worn Designer Series Paper (retired); 3/8″ taffeta ribbon in Not Quite Navy; Early Espresso craft (retired) and Not Quite Navy and Soft Suede Classic inks; Clear embossing powder, Designer Frames and Houndstooth textured impressions embossing folders for the Big Shot.

 Sara Langland spotlight

It’s a Girl Card

This card uses  a Log Cabin paper quilt as the background.  All supplies from Stampin’ Up!:  Baby Prints stamp set; Pink Pirouette, Lucky Limeade, and Whisper White card stock; Twitterpated designer series paper; 3/8″ taffeta ribbon in Pink Pirouette, Versamark and Basic Gray classic inks; white embossing powder; Designer Printed brad in Lucky Limeade

Sara Langland spotlight

Dream Card

Lastly, a collage card using the Faux Layering technique.  All supplies from Stampin’ Up!:  The Open Sea and Loving Thoughts stamp sets; Island Indigo and Very Vanilla card stock; Soft Suede, More Mustard, Island Indigo and Pool Party classic inks; Stampin’ sponges; Linen Thread.

Sara Langland spotlight

We hope you have enjoyed Sara’s projects.  We look forward to next month’s Makeover Monday Guest Designer.  Could it be you?


Pinwheel Card by Kristin Wilson

Hello everyone! I have a super fun project to share with you all today and it’s very easy to do. It’s a pinwheel card. Have you seen one of these yet? So summer isn’t it? Complete instructions, supply list, and how to video are in the member’s area just waiting for you. I hope you give it a try. What a great way to use up scraps too!

This would make the perfect 4th of July card. Anyone having a 4th of July party? How cute would these be as invites? It would make a great kids birthday card too. To see more of my projects just visit my blog at: www.kristinwilsonhandmade.com

Trendy Tuesday – Bright Colors

Trendy Tuesday – Bright Colors
by Katherine Elliot  

BRIGHT colors are looking HOT this summer!

Put on your sunglasses and check out some of these bright ideas using pops of color in a big way.  The first card I found makes creative use of bright colored Post-It note papers.  If you don”t have bright color cardstock readily on hand, think of what else you can create.  You may have to play with this fun trend.

7244966082 422e0fc072 Graduation—Its That Time of Year!image source papercraftsconnection.com

Bright colors are fun to play with and are perfect for summer time crafts for parties.  Click on the image source link to see more fun cupcake and party decorations like the ones shown below.

5 19 nina yang party joyslife sentimentsimage source waffleflower paper crafts

Neon bright colors are by all means eye catching.  The card below shows neon layers and a die cut image combined with crisp white to look bright and fresh.

Retro Phone card by Jesse Rone; image source Can you say addicted to stamps?

 Patterned papers provide many choices in bold colors that you can use to inspire yourself to break out of a monochromatic mode.

Jillibean Soup Butter Beans scrapbook paper, image source twopeasinabucket.com

If you are looking for summer time inspiration, then a themed patterned paper pack is perfect to add a dash of bright island flair or any pop of color that may be out of your usual comfort zone.


Echo Park Paradise Beach paper, image source bluemoonscrapbooking.com


   A fresh scrapbook page like the ones shown below will quickly stand out from competing pages which may be suffering from “the winter blues.”

Imaginisce paper, Makin” Waves, scrapbook page image source imaginisce.blogspot

Summertime Favorites

Summertime Favorites scrapbook page featuring Little Yellow Bicycle “Splash” Collection, image source mylyb.com

“Sixteen” digital scrapbook page, image source from A Cherry On Top

Toned-down, not quite so neon-bright colors, can combine to look fresh and vibrant like in the card below featuring Stampin” Up! Summer Smooches paper and coordinating Bright Blossoms stamp set.  The artistic reference to the colorful works of Andy Warhol in this next card is also very chic.

 Carte Bright Blooms Warhol

Warhol Blossoms card by Cindy Major, image source CindyMajor.typepad.com

A neutral black background, with punched images of bright butterflies showcased in the card below demonstrate another easy way to combine bold colors.

Bright Butterfly Birthday card featuring images and die cuts from Stampin” Up!,  by Jennifer Brum, image source Ladybug Designs

Bold colors are for everyone and every gender.  These colors can be “girlie” when used for pretty bright flowers and butterfly accents…

Bugaboo flower trio card by Elaine Stark, image source Simpli Crafti


D. Daisy”s card and treat holder featuring Stampin” Up! Summer Smooches paper, image source splitcoaststampers.com

Or the colors can be combined for the perfect card for any boy.  The brightly colored green monster here looks fantastic combined with a color similar to Pantone”s , Spring 2012 HOT color of the year, Tangerine Tango (an orange color).  Oh, and you”ve gotta love those googly eyes!!

image source meine-bastelarena

 Craving even more BRIGHT color ideas outside your usual crafts?  Check out this festive tissue paper decorated lantern from a very creative designer, Alexa Westerfield

rainbow lantern 2  DIY instructions and image source from swelldesigner.blogspot.com

Do you have enough bright ideas now?   I hope so!  But of course, we”re always seeking out more fun trends and inspiring images for you,  so keep the blog bookmarked.

Enjoy & happy crafting!

Project Newsletter Makeover Challenge – You Make Me Happy

Welcome to the Makeover Monday challenge. Every Monday, as part of our project ideas newsletter we’re going to make over a card, scrapbook page or 3D project, showing you how easy it is to use existing designs (your own OR someone else’s) as inspiration. This week, I have designed this “You Make Me Happy” card.

Your challenge – as with our previous Makeover Monday Challenges – is to use our piece as inspiration and make it into a card, scrapbook page, or other project. You can use the layout, the colors, an element you like…it can look like our piece, or nothing at all like our piece. We want to see where YOU take this. This challenge is strictly a “work from your stash” challenge.

As a newsletter subscriber you will have received a link to a private web page, from which you can watch the video tutorial. If you didn’t receive the video tutorial link then please be sure to email us at customerservice@papercrafterslibrary.com. In order to ensure you don’t miss any more of our Makeover Monday Challenge video tutorials, please be sure you sign up for our FREE email newsletter from the top right sidebar of this blog. Please note that the video tutorial will be available for general viewing for one week only – and then will be moved into our library for our members only

Every Monday, here on the blog, we’re going to post the original picture, and the made over picture. You will have ONE week to upload your challenge piece. Instead of a weekly prize though, we’re going to award a prize monthly. So for each week you participate and each project you submit – you will get one entry into our monthly draw. On the first Monday of each month – we will announce one challenge winner, who will be featured as a guest designer on the Paper Crafter’s Library blog as well as our Facebook page. As a guest designer, we’ll feature your biography, some of your favorite paper crafting projects and we’ll link to your blog.

Our inspiration piece, shown below, comes from Teri Andreson’s blog – A Bit of This, A Bit of That.

Here are the details on how you can participate in the Makeover Monday Challenge:

A new Makeover Monday Challenge video tutorial will be emailed out to newsletter subscribers every Monday (so make sure you are signed up). Then, here on the blog, we will post a picture of our inspiration piece and made-over project along with an Inlinkz button for you to enter your project. Here are the details:

  • Work from your own stash to create a project based on the inspiration project provided – you can use any products you would like, and make any type of project you like – card, scrapbook page, album, 3D item etc.
  • Post your project on your blog, in your gallery or on any other photo-hosting site (such as photobucket or flickr).
  • Click on our inLinkz button below to add a link to your project for our challenge
  • You will have until 7am, Monday, July 2nd to add your link to the list to be eligible to win. And you can enter as many times as you like.
  • For each project you submit, your name will be entered into our monthly draw. The winner will be announced on Monday, July 2nd.

Good luck to everyone and we look forward to seeing your projects!


Winners of the Spellbinders Week Give-aways!

Before I announce the winners of our Spellbinders week give-aways, I wanted to take a moment to thank Spellbinders for their generosity!  They are such a quality company with a quality product. It’s always such a pleasure to partner with them.

Okay, so now it’s the moment you’ve all been waiting for….the lucky winners of our fabulous Spellbinders Week Give-aways! 

Day 1 Winner of the Spellbinders Labels 4 Nestabilities

Day 2 Winner of the Spellbinders Fleur De Lis Square

Winner of Day 3 Spellbinders Cut Fold Tuck Floral Burst Die

Winner of Day 4 Spellbinders Classic Triple Scallop Edgeabilities

Winner of Day 5 Spellbinders Mystic M-Bossibilities and Junior Raspberry Plate

ETA (June 26th, 2012) – My Apologies!  I think I must have been “asleep at the wheel” so to speak.  Yesterday I received a number of emails that I had forgotten to announce the Day 5 winner.  Well don’t you know, I kept looking at the post and saw the title of the Day 5 winner, and the picture of the Day 5 prize and couldn’t figure out why everyone thought the Day 5 winner was missing LOL. It wasn’t until I received a few more emails this morning that I took another look and realized that I had posted all the day 5 info but not the winner.  Seriously, I think I either need more sleep or better contact lenses LOL.  I’m just like my dad who we joke about being the “absentminded professor”.  Anyways, here is the winner:

How To Claim Your Prize

Congratulations to all the lucky winners.  Please email us at customerservice@papercrafterslibrary.com to claim your prize.  Please note that you have until 1 week today to claim your prize.  Please put “Spellbinders Day X Winner” in your subject line (swap out the “X” for the day), and include your full shipping address and phone number in the email as well.

P.S.  Sorry about the late post today.  I had meant to post the winners at 9 am this morning.  Today is my kids first official day of summer vacation, so things have been a bit crazy here as we work on adapting to our new daily routine for the next few months.