PCL Member Highlights

I wanted to show you a behind-the-scenes sneak peek of some of the projects that were released to our members these past two weeks. We’ve put together a sneak peek you of just a few of the video tutorials & pdf handouts our members received during the weeks of November 17, 2014 and November 28, 2014.

~MemberHighlights-12012014

Each week at Paper Crafter’s Library our monthly members can expect to receive access to a minimum of 5 exclusive videos each week. Typically members receive upwards of 25 exclusive videos each month. In planning for our projects we ensure that we cover a range of project types so that there is something for everyone whatever their interest or preference – whether it be card making, stamping, scrapbooking, altered art, mixed media, 3D items, templates, techniques etc. Projects range in difficulty level – so there will always be projects in library for whatever your paper crafting “level” whether you are a beginning paper crafter, or a more intermediate paper crafter.

Highlights these two weeks:

  • An art journal page
  • A scrapbook page
  • A goodie bag
  • Faux letterpress Christmas card
  • Christmas tag
  • Christmas gift card holder
  • Upcycling dryer sheets on your cards

Did you also know that Paper Crafter’s Library members also receive free access to our online classes? Read about all the perks of being a Paper Crafter’s Library member you can visit our Benefits of Membership page HERE.

BecomeAMemberGreen

Bonus Tutorial from Cut@Home Design Team Member Patti Senter and a Give Away!

This week we have a bonus tutorial for you, brought to you by one of Cut At Home‘s designers Patti Senter. Before we show you Patti’s project, let’s get to know her a little bit more…

Cut At Home Designer – Patti Senter

PattiSenterProfilePic-12052014-250WThank you Paper Crafter’s Library for featuring me in today’s spotlight post, my name is Patti Senter and I live in the South West corner of Utah in Washington City. You may also know me as A Soul’s Heartbeat which is my blog and Facebook or as nwlady1949 on YouTube (NW = Northwest since I lived most of my years in the Pacific NW, Washington State).

I’ve been using paper, inks and glue for the last five years but crafting since I was a young person, always wanting to make it instead of buy it. I started out doing solely digital scrapbook layouts, working for stores such as Cottage Arts and Digitals as well as numerous individual digital kit designers. When visiting one of the designers in 2008 she gave me a bag of ‘stuff’. I tried to explain I didn’t do hands on things, just digital, but she persisted. That was the beginning, it took a few months of the bag being in the closet before it got the best of me. That was the start and I haven’t looked back since. Currently I am on the design teams for Cut @Home which I started in the fall of 2013 as well as Meg’s Garden and have just finished terms for SaCrafters and The Piece by Piece.

I love creating and sharing how I do things. As I’m sure you know, YouTube and the large family of crafting enthusiasts online are very supportive people, many of whom have helped me to learn. I enjoy being able to pay forward the knowledge on my blog and YouTube channel by giving back to those looking for a little inspiration or newbies who are just beginning and need a little push to believe they too can do it!

I don’t feel I have any particular style, it’s usually the paper or item I’m working with that provides flow as the project takes on a life of it’s own and determines whether it’s embellished with lots of bling or left to shine for itself. My passion is mini albums, to start with chipboard and paper and end up with a gorgeous album to house photos and memories is my definition of fun.

Today I’m sharing a ‘Manly Man’ Gift Box and Mini using Graphic 45’s 5″x 5″ Mixed Media Box in black and Heartfelt Creations All Geared Up Collection of papers and stamps. I often find that most crafters have difficulty creating for the men in their lives. Most men shy away from the things we women love, bling, glitter, ribbons and flowers. So today’s project showcases the box and the paper and leaves the rest on the masculine side.

PattiSenter2-12052014-550W

PattiSenter1-12052014-550W

PattiSenter3-12052014-550W

You can watch a video on how Patti created this project below.

Supplies

Graphic 45 Mixed Media Box in Black
Heartfelt Creations – All Geared Up Paper and Stamp Collection
Embossing powders – UTEE and Lindy’s Stamp Gang
Sakura – 3D Crystal Accents
Tim Holtz Distress Ink in Black Soot
Core’dinations Black Cat cardstock
Mod Podge

We hope you have enjoyed today’s project courtesy of Patti Senter a Cut@Home design team member. Be sure to stop by Patti’s blog to see even more of her beautiful work (and let her know we sent you). You can also find Patti on YouTube, Facebook, Pinterest and Google+.

And now for a give away…Cut@Home is graciously offering a give away valued at $94.00 to one lucky reader.  (Sorry – Give away is only open to residents of the continental United States.)

CutAtHomeLogo-12052014-550W

PattiSenterGiveAway-12052014-550W

In order to enter the give-away, please leave a comment in the comments section of this post. The winner will be announced next Friday.

Simon Says Stamp Featured Guest

I’m very excited to have been invited as a guest designer on the Simon Says Stamp blog. Thank you Simon Says Stamp!

SimonSaysLogo-500W

I’ve created three cards each with a video tutorial for the feature – which you can see sneak’s of below.  You can see the full cards and watch the video tutorials HERE.  Also please be sure to scroll down to see our featured artist post for today as we have the talented Kelly Griglione with us today.

WarmWinterWishesVideoSneak


JoySneak

JoyToTheWorldSneak


Featured Artist/Designer: Kelly Griglione

Welcome to another Featured Artist/Designer Spotlight. Today we’re thrilled to welcome Kelly Griglione. Before we show you Kelly’s project, let’s get to know her a little bit more…

KellyGriglioneProfilePic-12042014-250WHi! I’m Kelly, and like many of us, crafting has always been a large part of my life. I have such fond memories of time spent with my Grandma at her kitchen table learning every type of craft imaginable. My passion is for paper, both collecting it (19th century valentines/postcards/scrapbooks) and making things with it (cards/home decor/party decorations/scrapbooks). I currently love pushing the boundaries in card making, and I get such a thrill figuring out how to make something work the way I want it to. Find me at www.notablenest.blogspot.com. I’d absolutely love to see you there!


Noel Chandelier Cards

Hi folks! I am excited to share a few cards with you!  I wanted to make this chandelier the main focal point on a Christmas card, but was having trouble with where to put the sentiment. So I decided to make the chandelier the sentiment!

KellyGriglione1-12042014-215W

After die cutting the chandelier, I snipped off the candles from the chandelier and replaced them each with letters spelling out “NOEL”. Don’t be afraid to alter your dies! Make them work for you. Behind this panel I embossed the card base for some extra dimension. This card would be a great candidate for mass-producing for the holidays.

KellyGriglione2-12042014-550W

Here’s another example of the same idea. This one is even easier to reproduce, as instead of embossing, I’ve just layered two pieces of patterned paper (cut following the line of the pattern) to highlight the chandelier.

KellyGriglione3-12042014-550W

Notice that both cards have patterned paper on the inside of the card. The inside is half the real estate of the card, so it’s good to dress that up when you can.

KellyGriglione4-12042014-550W

I hope you’ve enjoyed these projects! Thanks so much to Paper Crafter’s Library for having me as a guest on their blog!

Supplies:
Memory Box Graceful Chandelier Die
Alpha stamps
Patterned paper
Papertrey Ink Mehndi Medallion Impression Plate

We hope you have enjoyed today’s project courtesy of Kelly Griglione. Be sure to stop by Kelly’s blog to see even more of her beautiful work (and let her know we sent you). Have a great day!

Featured Company: Faber-Castell Design Memory Craft

DMC_Newlogo_RegMark_2012

This week we are thrilled to welcome back Faber-Castell! In today’s post you’ll see a fantastic project by Zoey Emanuela Scarpelli and have the opportunity to win a prize pack consisting of some Red Gelatos, Metallic Gelatos, Gold/Silver Gelatos and an Essential PITT Artist Pen Set. (details at the end of this post)

FaberCastellPrizePack-12032014

Faber-Castell Designer – Zoey Emanuela Scarpelli

Today we welcome Zoey Emanuela Scarpelli. We are so excited to have her showcase her work today on Paper Crafter’s Library. You can see Zoey’s fabulous project below, but first, here is a little more about her:

FaberCastellZoeyProfilePic-12032014-250WI’m Zoey and I live in Bologna and I am 29 years old, but I still feel like I am 18.

I’ve always loved playing with paper, cardmaking and decorating school notebooks with magazines scaps and everyone thought I was kinda of crazy.
Growing up, things have not changed a bit, I am still the “crazy one”, but at least now I can “hide” behind the word Crafter!

When I am not creating, I spend my time browsing Pinterest or YouTube always looking for new inspiration, techniques and motivations.

If I had to explain why I chose crafting, I would use the phrase: “Crafting keeps me sane”.  It ‘s my relief, my way to feel free, my way to get dirty without worry about anything, it’s my way to decorate a moment of my life and a place where I can hide and feel safe!

Everything You Want Canvas

FaberCastell11-12032014-550W

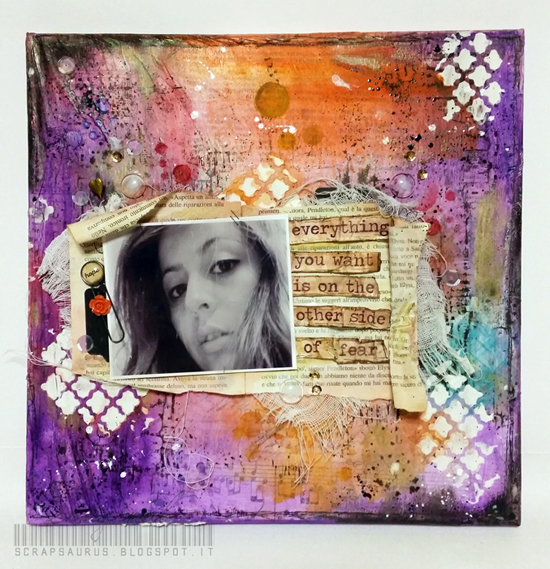
I worked on a 12×12’’ white canvas – I covered the surface with tissue wrap paper by Tim Holtz, I glued it down to my canvas using GEL MEDIUM , then to tone down a little the tissue wrap paper I added a layer of Gesso mixed with a bit of water.

FaberCastell1-12032014-550W

When the gesso was dry I started adding colors with Gelatos. First I used a mix between Black Cherry and Metallic Grape, then I added a bunch of other colors like Red Cherry, Cinnamon, Tangerine, Mango and Snow Cone.

FaberCastell2-12032014-550W

I blended everything using my fingers and when I was satisfied with the result, I let it dry.

FaberCastell3-12032014-550W

I wanted to add some stamping, so I started by coloring a bubble wrap plastic with Pitt Artist Pen in Deep Scarlet color , I spritzed a bit of water and then I stamped onto my canvas.

FaberCastell4-12032014-550W

I did the same thing with a normal rubber stamp, using the black Pitt Artist Pen and again spritzing the surface of the stamp with water.

FaberCastell5-12032014-550W

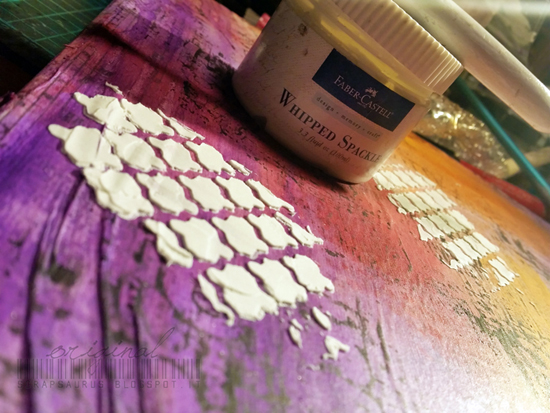
Next step was adding Whipped Spackle through a Hero Arts stencil. I love how creamy is the whipped sparkle and how easy it is to apply over a stencil.

FaberCastell6-12032014-550W

To add even more color I use again a Pitt Artist pen, this time in Scarlet Red and then I quickly blended it to the background with a water brush. I did the same thing around the whole canvas with different colors.

FaberCastell7-12032014-550W

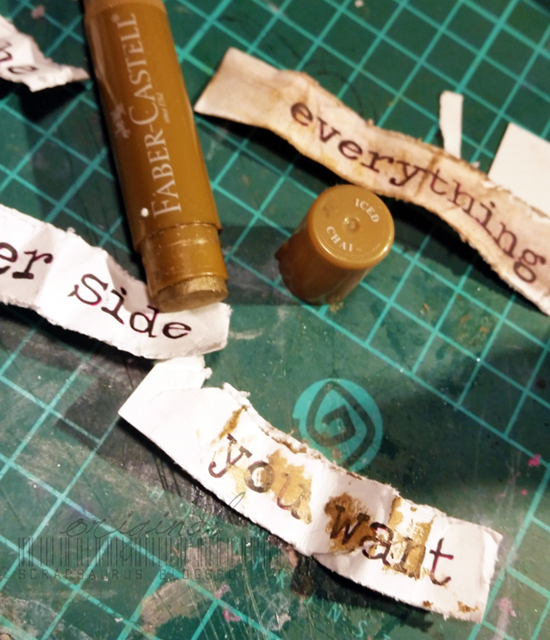
For my sentiment I wrote the quote by Jack Canfield with Faber Castell Eco Pigment 0.2 and I colored the paper with Iced Chai Gelatos. I also added some shadow with Chocolate Gelatos.

FaberCastell8-12032014-550W

Then I assembled everything together.

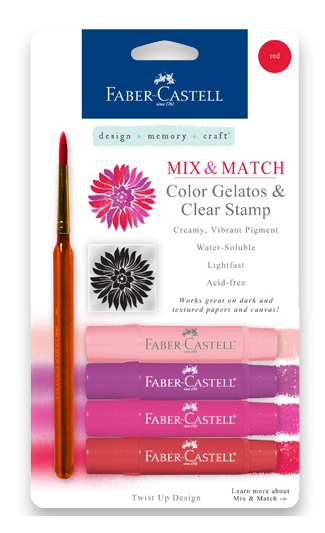
Faber-Castell Supplies

Gesso
Gel Medium
Whipped Spackle
PITT Artist Pen Big Brush: Scarlet Red, Deep Scarlet Red, Light Cobalt, Orange Glaze, Walnut Brown, Black,
Gelatos: Mango, Tangerine, Red Cherry, Iced Chai, Champagne, Chocolate, Bubble Gum, Snow Cone, Metallic Grape, Black Cherry and Cinnamon
Eco Pigment 0.2

We hope you have enjoyed today’s feature. We want to extend a sincere thank you to Zoey Emanuela Scarpelli for her fabulous project and Faber-Castell for sharing their company with us. Be sure to visit Faber-Castell to see more of their products and their blog for some inspiration!

In order to enter the give-away to win the prize, please leave us a comment in the comments section of this post. One winner will be announced next Wednesday on the Paper Crafter’s Library blog!

Winner of the Simon Says Stamp Give Away!

SimonSaysLogo-500W

I’d like to extend a HUGE thank you to Simon Says Stamp’s guest designer Shari Carroll for sharing such a wonderful project and to Simon Says Stamp for their generous give-away of a $25 US Gift Certificate.

SimonSaysStampGiftVoucher-550W

And now, the moment you’ve all been waiting for…….the winner is……Denise Bryant!

SimonSaysStampWinner

Congratulations Denise! Be sure to email us at customerservice@papercrafterslibrary.com to claim your prize. Please be sure to put “Simon Says Stamp Winner” in the subject line of the email, and then in the email itself, be sure to include your full mailing address and phone number.

Join us next week when we feature another great company!

Trend Watch – Monochromatic

I don’t know about what you see when you look out of the window, but here in Minnesota, there is white stuff everywhere; although maybe not as much as in Buffalo NY but still.  I love how creative people use everything they see and this week I want to focus on the monochromatic trend.  Because of the season, most of my selections are white on white but that is not the only way to take advantage of the trend and I’ll show you a few examples of that.  I hope you find something inspiring to try this week or can just imagine a snow-filled world a bit better.

I love the art deco style Laurie used on this card.  The white embossing on the white vellum is so cool.  It looks neat and clean like a set of high-end hotel sheets.

best wishes

card by Laurie Willison photo courtesy of Soapbox Creations

Another crisp and clean card by Sherry.  How awesome are the embossed lines in keeping the same color of the background paper and using the snowflakes in a new way?

snowflake

card by Sherry Eckblad photo courtesy of Button Junkie

Karren used a die as the center point and a few snowflakes to give her Christmas card a white on white look.

White Snowflakes

card by Karren photo courtesy of Karren J – Stamping Stuff

I just love the negative space and the glitter on the star Tillymint created.  Even in the all white environment, there is so much to look at and so many textures in this card.

joy---Nov_-Challenge-2_by_Tillymint

card by Tillymint photo courtesy of Splitcoast stampers

This card makes me feel calm just looking at it.  Cover plates are a great way to get a monochromatic look by coordinating background paper.

peace

Card by Kim S photo courtesy of Joyful Creations with Kim

The sweet touches of pale pink on the inside of the flower petals in this card make it so lovely.  Paula also shows us a great way to layer the same color paper on paper using a die cut negative.

flower-shop

card by Paula Knall photo courtesy of Knall Crafting

This next card uses a similar color pallet and increases the concentration of pigment to create a unified design.  The color added also creates cool dimension as well.

Louise_Sharp_Wonderous_Wreath_2

card by Louise Sharp photo courtesy of Louise Sharp Independent Stampin Up demonstrator – Australia

I am a major fan of the metallic mirror shiny paper being used lately.  Just a bit of a pop of color totally pulls together the joy and the snowflake on this pretty card.

snowflake with silver

card by Laurie photo courtesy of Stampin up North

This card is just lovely!  Andrea inked the inside of an embossing folder to create the soft look of the snowflakes.

snowflakes are wonders

card by Andrea Ewen photo courtesy of Ewen Style

Tan and beige colors can look very pulled together and work for several styles of card.  I love the unconventional look of this women’s empowerment card in the softer colors.

tan

card by Kimberly Van Diepen photo courtesy of Stampin by the Sea

As promised, here is a non white example of this cool monochromatic trend.  Attaching the flowers gives this card depth and the colors are so warm.

yellow toy

card by Mariana Grigsby photo courtesy of Mariana Grigsby’s blog

It is so cool to achieve interesting depth and texture by using the same or similar colors.  The look  can be clean and simple to shabby chic.  Use some of the work as inspiration or look outside of your snowy window and create your own look.

So go ahead… make something pretty.

I found a few products that might offer even more inspiration.

vellum

vellum cutouts

gold vellum

vellum stickers

liquid pearls

                 flowers

more flowers

Keep it CASual #6: Merry Christmas Shaker Card & A Giveaway

Happy Monday everyone!  Welcome to another Keep it CASual – our  video tutorial series featuring clean and simple card making.

Today I have a video tutorial for this Merry Christmas Shaker Card which I created using some wonderful products from the Fancy Pants Designs Oh Deer collection.

MerryChristmasShakerCard-Blog1

I also wanted to share with you 7 other cards I created with the same collection of products.  I have individual photos of each card later on this post so be sure to read all the way to the bottom.

FacnyPantsCards

Before I share today’s projects with you I wanted to announce the winner to last week’s 3 month Paper Crafter’s Library membership give away, as well as let you know that we are continuing on with another PCL membership giveaway this week.

One lucky winner will receive a 3 month subscription to Paper Crafter’s Library – that is a $60 value.  As part of the Paper Crafter’s Library membership you can expect 25+ new project tutorials per month as well as any online classes offered during the time period of your membership. All you have to do to enter is leave a comment on this post. Winner will be announced on Monday December 8th – next Monday’s Keep it CASual post.

And now, I want to announce the winner of last week’s Keep it CASual giveaway for a 3 month membership to Paper Crafter’s Library. Actually, since it’s Thanksgiving weekend for all of our wonderful American friends – I would like to pass on some blessings from Paper Crafter’s Library, so, I have decided that instead of just ONE winner, I decided to draw TWO winners for last week’s 3 month membership giveaway.  And

Screen Shot 2014-11-30 at 6.55.13 PM

Screen Shot 2014-11-30 at 6.55.43 PM

Congratulations Vicki and Barbara – can you please email me at customerservice@papercrafterslibrary.com to claim your prize. Be sure to put Keep it CASual winner in the subject line.

Keep it CASual #6 - Merry Christmas Shaker Card - Andrea Walford

Okay, and now on to today’s video tutorial.  I created the shaker card using the Fancy Pants Designs Oh Deer Photo Frames, the Ephemera Pack and the Confetti (sequins).

Now in addition to the shaker card I decided to see how many other cards I could create using the Oh Deer Ephemera pack.  I had so much fun with this – using the ephemera pack made creating CAS cards so quick and easy! The elements were all so beautiful and made for some great card designs.  I ended up making 6 cards before I ran out of virtually all of the larger elements.

In addition to the ephemera pack I also used paper from the Fancy Pants Oh Deer 6×6 paper pad as well as Oh Deer confetti.  The only other thing I used was some enamel dots I had in my stash.

FancyPants-LoveandJoyCard

FancyPants-SeasonsGreetingsCard

FancyPants-WishCard

FancyPants-HoHoHoCard

FancyPants-JoyCard

FancyPants-BeMerryCard

I probably could have kept going bringing in additional stamps and elements to use up the rest of what was in the ephemera pack but by that point, the adorable flairs were calling my name so I decided to make a card using the flairs and an alphabet die from My Favorite Things.  In order to ground the focal sentiment I created a water-colour background using some of my Dylusions Calypso Teal spray and a wet paint brush.

And yeah, I just noticed the flair is a bit crooked 🙁  It must have shifted while the glue was still drying.  I’m going to see if I can fix it without wrecking the card and re-upload it.

FancyPants-WatercolorJoyCard

Honestly, I probably could have kept going creating as I still had more of the photo frames left and more of the flairs left, but I ran out time before I ran out of ideas LOL!

I hoped you enjoyed the projects I shared today.  I have linked to the supplies I used below – unfortunately there is no one online store that carries all the products I used.

Don’t forget to leave a comment to enter our give-away!

* Please note that I receive a small commissions from some of the stores I have linked to below (Scrapbook.com, Simon Says Stamp and Donna Downey Studios).

Featured Artist/Designer: Nichol Magourik

Welcome to another Featured Artist/Designer Spotlight. Today we’re thrilled to welcome Nichol Magourik.  Before we show you Nichol’s project, let’s get to know her a little bit more…

NicholMagourikProfilePic-11272014-250WI have been paper crafting and stamping for sixteen years. During that time, I have been published in many different scrapbooking publications and idea books, have contributed to several manufacturer’s design teams and teach online classes. Currently, I work with Lawn Fawn, Mama Elephant, Simon Says Stamp, Pretty Pink Posh, and Kerri Bradford Studio. I also regularly update my blog with new projects and how-to videos. I am passionate about stamping and card making and hardly a day goes by where I don’t create something.  I reside in Kansas with my husband, Chad, and our three children.


Warm Wishes

I am addicted to creating shaker cards! Not only are they on trend and interactive, they are fun to imagine and create! This snowman shaker card features ideas on creating a snowy Distress Ink and stenciled background, Copic coloring a stamped image, stamping on acetate/transparencies and assembling the shaker.

NicholMagourik1-11272014-550W

NicholMagourik2-11272014-550W

You can watch a video on how I created this card below.

Supplies

Avery Elle BE JOLLY Clear Stamp and Die Set SET-14-04
Peacock Feather Distress Ink
Distress Ink Pad, Chipped Sapphire
Simon Says Stamp Pigment Ink Pad WHITE INK
StazOn Opaque Ink, Cotton White
Memento Tuxedo Black
COPIC Sketch Marker R81, Rose Pink
Copic Sketch Marker R83 ROSE MIST Violet Pink
COPIC Sketch Marker R85, Rose Red
Copic Sketch MARKER R27 CADMIUM RED
Copic Sketch Marker YR68 ORANGE
COPIC Sketch Marker BG11, Moon White
Copic Sketch Marker BG32 AQUA MINT
COPIC Sketch Marker BG49, Duck Blue
COPIC Sketch Marker E55, Light Camel
COPIC Sketch Marker E57, Light Walnut
Copic Sketch Marker C00 COOL GRAY
Copic Sketch Marker C1 COOL GRAY Grey
COPIC Sketch Marker C2, Cool Gray
Sakura WHITE OPAQUE GLAZE GEL PENS
Sakura BLACK GLAZE GEL PENS
ZIG Wink of Stella GLITTER CLEAR Brush Tip Marker
Tim Holtz DISTRESS WATERCOLOR CARDSTOCK Ranger
Neenah Solar White Cardstock
Studio Calico Transparency Paper Pack: 6×6”
Pretty Pink Posh Sequins, 4mm Cupped, Cobalt
Pretty Pink Posh Sequins, 6 mm Cupped, Sparkling Clear
Pretty Pink Posh 4MM MARSHMALLOW Cupped Sequins
Sizzix BIG SHOT MACHINE Powder Blue & Teal
Lawn Cuts Dies, Small Stitched Rectangle Stackables
Lawn Cuts Dies, Stitched Hillside Border
Simon Says Stamp Stencil FALLING SNOW
Ranger MINI ROUND INK BLENDING TOOLS
Ranger Studio Paintbrushes
3M Scotch DOUBLE-SIDED FOAM TAPE Permanent

We hope you have enjoyed today’s project courtesy of Nichol Magourik. Be sure to stop by Nichol’s blog to see even more of her beautiful work (and let her know we sent you). You can also find Nichol on YouTube, Twitter, Facebook, Instagram and Pinterest.

Have a great day!

Featured Company: Simon Says Stamp

SimonSaysLogo-500W

We are happy to bring you this week’s Featured Company: Simon Says Stamp.  And this week we are giving away a $25 US Gift Certificate to Simon Says Stamp.  (Details at the end of the post.)

SimonSaysStampGiftVoucher-550W

Simon Says Stamp Designer – Shari Carroll

Today we welcome Shari Carroll. We are so excited to have her showcase her work today on Paper Crafter’s Library. You can see Shari’s fabulous project below, but first, here is a little more about her:

ShariCarrollProfilePic-08272014-250WShari has been a professional stamper/cardmaker for nearly a quarter of a century (that’s a long time) starting with Hero Arts in 1989. She began as a replication artist creating display boards for retail stores, which lead to demonstrations and catalog work.

Over the years Shari has been published in numerous magazines including Somerset Studio, The Gallery, Stampers Sampler, Take Ten, Creating Keepsakes, Better Homes and Gardens, Paper Crafts and more. Shari has also contributed to several Design Original Books along with the Autumn Leaves Designing With series. In 2006, Shari was asked to write her own book for Northlight Publications called Layers.

In June of 2013, Shari resigned from her position with Hero Arts to join the Simon Says Stamp family where she holds the title of Creative Director and Product Manager. Shari’s stamps, dies, stencil and flair designs can be found in the Simon Says Stamp exclusive line of products.

Shari resides in a small farm community outside of Chicago with her husband Tom, sons Brooks (nearby) and Scooter, plus her tortoise Chester. Her love for nature is evident in her photography and instagram shots of her friendly squirrels.

Merry Christmas Shaker Card

I’ve created a little winter scene shaker card using a few of my favorite Simon Says Stamp dies. Once all the papers are cut, assembly goes really quickly.

ShariCarroll1-11262014-550W

Supplies

Simon Says Stamp Stitched Circles Dies
Simon Says Stamp Village Dies
Simon Says Stamp Slopes and Hills Dies
Simon Says Stamp Christmas Blessings Die
Simon Says Stamp Present and Ornaments Stamps
Simon Says Stamp Sea Glass cardstock
Simon Says Stamp Fog cardstock
Simon Says Stamp Slate cardstock
Simon Says Stamp Smoke cardstock
Simon Says Stamp Green Apple cardstock
Simon Says Stamp Snowflake sequins
Simon Says Stamp Slate Ink
Hero Arts Acetate Notecards
Doodle Bug Lily White sequins
Neenah White cardstock
Foam Squares
Big Shot
Memory Box metal adapter

We hope you have enjoyed today’s feature. We want to extend a sincere thank you to Shari Carroll for her fabulous project and Simon Says Stamp for sharing their company with us. Be sure to visit Simon Says Stamp to see more of their products and their blog for some inspiration!

In order to enter the give-away to win the gift certificate shown above, please leave us a comment in the comments section of this post.  The winner will be announced next Wednesday.