
Today on the Paper Crafter’s Library blog, we’re continuing our weekly featured artist spotlight whereby each week we spotlight a different artist/designer in the paper crafting & mixed media world and introduce you to their fabulous work. Today we’re thrilled to welcome Wida Miller.
Before we show you Wida’s projects, let’s get to know her a little bit more…

My name is Wida Miller and here are my “stats”. I have been blogging for about 2 years, scrapbooking for ten, card making for about five. I have 4 kids, and 1 career as a nurse practitioner. I call my style fresh and edgy. I have been on many wonderful design teams, guested for some fabulous companies, won some fantastic awards and contests and enjoyed friendships within this community that I hold dear. What a wonderful place to be creative, share a common passion for art, and a love of pretty things. I am so honored to be here!
Wida has created two projects for us today.
To My Lovely Valentine Card
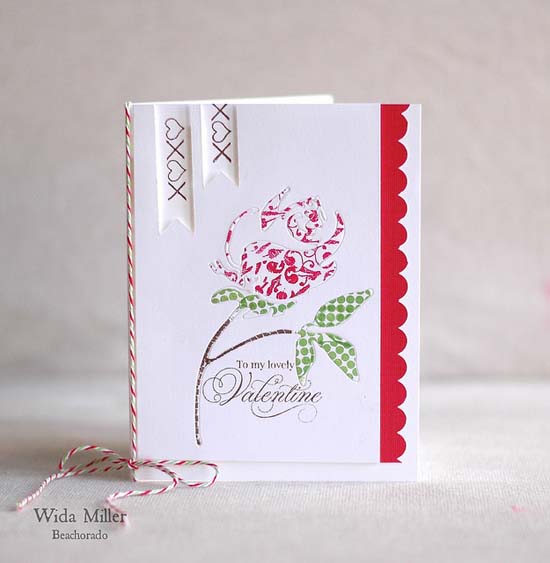
1-Die cut Penny Black Rose from card stock, but leave in the paper.
2-Stamp image with various print stamps. For this I used Penny Black Heart Swatches

3-Remove from card stock

4-Cut 2 pieces of card stock the same size.
5-Generously tape the first piece with dry tape, especially covering the entire area where the die cut will go.
6-Die cut another rose using the second piece of card stock. Remove the rose. Keep the negative.
7-Adhere the 2 pieces of card stock together.
8-Insert the die cut image like a puzzle.

You want to do your other stamping and such before inlaying the image, in case you mess up but the finished look is quite lovely. The sentiment is Penny Black From the Heart.
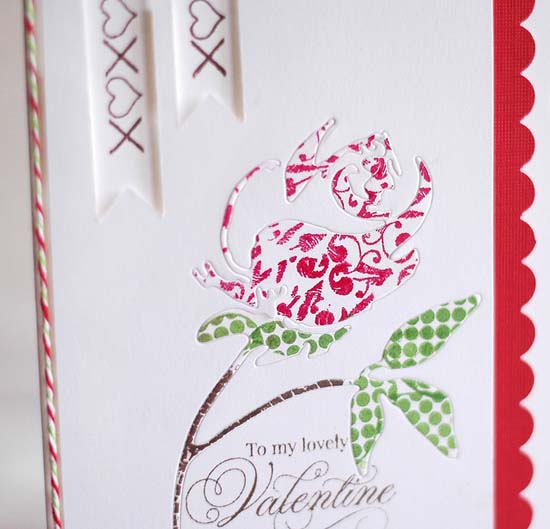
Supplies: Penny Black Rose die, Penny Black Heart Swatches stamp set, Penny Black From the Heart stamp set, Divine Twine Christmas, Scalloped Edge punch by Stampin’ Up!
Baby Card
Wida’s second card for us is this beautiful baby card. The cardstock that shows through the die cut area is coated with glitter.

Here’s a side shot so you can see the glitter better.

You can watch a video on how Wida created this baby card below.
Supplies: Ali Edwards Baby Flair, Martha Stewart chrystal fine glitter, Elmers spray adhesive, Clear &Simple Stamps heart die, Fresh Ink in Slate and Island, Hero Arts cube ink in Pool
We hope you have enjoyed today’s projects courtesy of Wida Miller. Also, be sure to stop by Wida’s blog to see even more of her beautiful work (and let her know we sent you). Wida can also be found on Flickr, Splitcoast Stampers, and Two Peas in a Bucket.

Fabulous projects and tutorials, Wida!!! Always love your creations!!!
That rose card is very interesting. I like the way the stamping creates the color for the rose. Think I’ll give this one a try! Thanks!
Wida these are so pretty! Congrats on your guest spot!
Beautiful cards – both of them. Your techniques are quite interesting.
What a cool effect! Beautifully done Wida! I’m gonna need to go through my dies and try this.
Congrats on the guest post, Wida! Both cards are gorgeous! I LOVE that you stamped the inlaid die cuts–that was a great idea! The glitter on the second card is such a great detail, and thanks for sharing a video about the process. I’m definitely going to try adding the foam before glittering (I always do it afterwards–yuck). I laughed out loud over your video…that’s awesome!
What’s not to love about Wida?! Excellent projects and tut!
I loooove what you did with the die cuts! Adds so much texture!
And what a great idea to add a glitter layer over a stamped background. Can never have too much glitter if you ask me:)
The stamping behind the heart window looks great. I want to try that!
Such a fun post, Wida – ‘educational’, enjoyable and your cards: simply and absolutely amazing! Love the stamped inlaid die cuts on the first, and the sweet glittery heart on the second. Tutorial and video are just the icing on the cake! So glad I stopped by…feeling inspired!
c
Oh, what a great tutorial! And I JUST bought this die Penny Black die this week! Woohoo! I plan to try this technique, Wida! Both cards are beautiful! Thanks!
Such beautiful cards! love the inspiration!
Lovely cards and great techniques. TFS)
I especially love how you have used that Rose diecut by Penny Black. I think it is such a beautiful rendition of a rose and you have made it even more lovely!! Great technique! And love the glittery baby card!!
Love you method of doing the rose card — Very brilliant and so pretty.
Thank you for the video. I see what you mean about the mistakes you made. I would have made the same ones and then decided it was complicated a process. You take the learning curve to a new level. Thank you for doing that for us. Your cards are unique and I will try both ideas! I am so sayed in my ideas right now that this has been a real boost. I look forward to you posting new ideas soon.