Trend Watch – Love it right off the page

At first glance, this technique was very intimidating to me.  I still haven’t tried it and it takes patience and precision which are not my strong suits.  It is a good thing that so many of our fellow crafters are so talented in this area so I can show you this cool technique and you can decide for yourself if you have the stuff to take it right to the edge.

I like this idea of stamping or using a die cut and instead of letting the page continue in a standard straight cut, you fussy cut it or partial cut it with a die to make the look seamless like a stamp on one side and like a die cut or sticker on the other.  I am probably not explaining it well so I will show you what I mean with beautiful examples.

In this first card, Sarah does a lovely job masking and stacking her flowers on one side of her card and fussy cutting around them.  You can just see the fuchsia paper she used on the inside of the card.  It only adds to the jagged focus of the petals.  So cool.

flowers

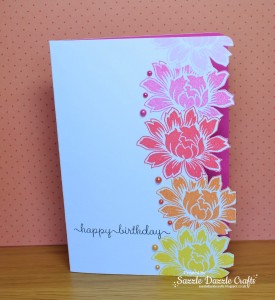
card by Sarah Platt photo courtesy of Sazzle Dazzle

Another cool look at the flower on the edge is this card from Karen.  She lifted the flowers in a panel and back it on the card front with grey paper to highlight her blooms and her petals.  What a clever idea to have the card work vertically but to stamp the sentiment horizontally to match the flower garden.

grateful_pti_mft

card by Karen Giron photo courtesy of The Sweetest Thing

Anika used both sides of a panel to show off her flowers.  She used a combination of fussy cutting and a paper cutter.  The flowers offer such a nice contrast to the card back when the colors are on top of each other.

Summer Silhouettes Happy birthday

card by Anika Kerche photo courtesy of AnniKarten

These next two gorgeous cards look like a photograph or art for your walls but they are really stamps expertly water colored by Marika.  I love the contrast gradient she creates between the blues on the panel she does not cut out.

altenewmagnolia2

card by Marika Rahtu photo courtesy of Alte New Blog

And just in case you needed to be even more gobsmacked, check out what she did with her watercolors on these poppies.  She used a paper cutter and fussy cut the poppies out.  These are just stunning.

AltenewPaintedPoppy1

card by Marika Rahtu photo courtesy of Me and MiniMe Crafting

Sometimes you can create something so lovely but it does not fit in the envelope after all of your creating.  Gina created this card specifically to fit in her envelope.  She used two images to peek over the top of her card.  A how-to video is linked below on her website.

bird

card by Gina K photo courtesy of Gina K Designs

Father’s Day is coming up in the U.S.,  so I didn’t want to forget the guys.  You can use this technique for more than flowers.  Look how cool this ship looks on Narelle’s card.  It looks like it is floating right out of the card.

fms189

card by Narelle Farrugia photo courtesy of Stamplicious

The lemons in Marika’s card look so fresh and lovely I had to include it.  She cuts deeply into the card and gets right up to the leaves.  This creates a great space for the cool lime paper in the background to shine through.

lemons

card by Marika Lemay photo courtesy of La Magie des etampes

Maile shows us that words can work too.  You don’t have to strictly cut off the whole design.  look how cute her corner is.  She can show off a really bright or busy pattern behind it without it overwhelming the simplicity of the card.

love

card by Maile.belles@gmail.com photo courtesy of Simply Stamped

By tilting the angle of the paper and floating her hot air balloon.  Mimi looks like she has already taken off on an adventure.  This is such a sweet card and has such great movement.

mimi

card by Cathy Fongjoyo photo courtesy of Fong Crafty Place

Rachel combined several techniques to create this awesome card.  She did an inlay with the get well die cut and used several colors to get the cheery sentiment.  She also used a cool angle on the card.  But most relevant for this story is how she used the die to have the cursive letters be the edge of the top layer of her card.  How cool is this effect?

Rachel

card by Rachel Izakowicz photo courtesy of Seize the Stamp

After looking again at all of these awesome cards, I remain intimidated by this technique but can truly appreciate the hard work and the talent people have to create these masterpieces.  Have you tried this technique?  What do you used to make your edges look good:  fussy cutting, dies, a straight edge, a combo?  I’d love to hear your stories and see what cool things you come up with.

So go ahead… make something pretty.

I found a few things to inspire you (and me) to try.

5x7mt

Prima self healing cutting mat from Scrapbook.com

dies

Tim Holtz Thinlet dies from Scrapbook.com

magnolias_for_her_-1_grande

Magnolias for her stamp set from Altenew

SBC_f-03314_0

Fiskars fingertip control knife from Scrapbook.com


Winner of the Lawn Fawn Give Away – 06 03 2015

LawnFawnLogo-550W

I’d like to extend a HUGE thank you to Lawn Fawn’s guest designer Nancy Krueger for sharing such a wonderful project and to Lawn Fawn for their generous give-away of the Gleeful Gardens stamps and dies below.

Lawn Fawn 06 30 2015 giveaway

And now, the moment you’ve all been waiting for…….the winner is……Lisa Petrella!

Winner of Lawn Fawn Giveaway - 06 03 2015

Congratulations Lisa! Be sure to email us at customerservice@papercrafterslibrary.com to claim your prize. Please be sure to put “Lawn Fawn Winner” in the subject line of the email, and then in the email itself, be sure to include your full mailing address and phone number.

Be sure to check out this week’s featured company and make sure you leave a comment!

Featured Artist/Designer: Nichol Magouirk 06 11 2015

Welcome to another Featured Artist/Designer Spotlight. Today we’re thrilled to welcome Nichol Magouirk . Before we show you Nichol’s project, let’s get to know her a little bit more…

NicholMagourikProfilePic-250W-06112015I have been paper crafting and stamping for sixteen years. During that time, I have been published in many different scrapbooking publications and idea books, have contributed to several manufacturer’s design teams and teach online classes. Currently, I work with Lawn Fawn, Mama Elephant, Simon Says Stamp, Pretty Pink Posh, Kerri Bradford Studio, and Bella Blvd as a Fabric Designer. I also regularly update my blog with new projects and how-to videos. I am passionate about stamping and card making and hardly a day goes by where I don’t create something.  I reside in Kansas with my husband, Chad, and our three children.

Multiple Thank You Cards

Color layering stamping using the amazing new stamps from Hero Arts is a great way to build up color for a multi-colored/dimensional looking stamped images, no coloring needed! Grab one of the new Hero Arts Color Layering stamp set, several shades of ink and stamp darker inks over lighter hues to see the images come to life! By using a the MISTI Stamping Tool, I was able to create multiple cards in no time at all for a wonderful set of thank you greeting cards. Create a set of cards for yourself or consider making up sets to give as gifts. You will love how quick and easy cards come together when you create them assembly line style!

NicholMagouirk1-550W-06112015

NicholMagouirk2-550W-06112015

NicholMagouirk3-550W-06112015

Here’s a video instruction for my project:

Supplies

•Hero Arts Color Layering Bird & Branch Stamp Set CL866
•Hero Arts Thanks Stamp Set DC152
•Simon Says Stamp Diagonal Background Stamp
•Hero Arts Fresh Peach Ink
•Simon Says Stamp Cotton Candy Ink
•Simon Says Stamp Rosie Cheeks Ink
•Hero Arts Butter Bar Ink
•Hero Arts Soft Vanilla Ink
•Simon Says Stamp Sunshine Ink
•Simon Says Stamp Green Leaf Ink
•Simon Says Stamp Green Apple Ink
•Simon Says Stamp Scuba Ink
•Simon Says Stamp Teal Ink
•Simon Says Stamp Spring Rain Ink
•Simon Says Stamp Khaki Ink
•Simon Says Stamp Dark Chocolate Ink
•Simon Says Stamp Sparrow Ink
•Lawn Fawn Black Licorice Ink
•Sakura Black Gel Marker
•Sakura Whtie Gel Marker
•Wink of Stella Clear Glitter Brush Marker
•Simon Says Stamp Khaki Cardstock
•Neenah Solar White Cardstock
•Sizzix Big Shot Die Cutting Machine
•MISTI Stamping Tool

We hope you have enjoyed today’s project courtesy of Nichol Magourik. Be sure to stop by Nichol’s blog: http://nicholmagouirk.typepad.com/  to see even more of her beautiful work (and let her know we sent you). You can also follow Nichol on the following Social Media sites:

Happy Crafting!

Featured Company: May Arts Ribbons 06 10 2015

MayArtsLogo-09102014-250W

We are happy to bring you this week’s Featured Company: May Arts . In today’s spotlight you’ll learn more about May Arts, see a fantastic project by Gini Williams Cagle and have the opportunity to win a “winners choice” of 2 spools of Ribbon from May Arts. (details at the end of this post). Please note that this give-away is only open to residents of Canada and the USA.

May Arts Ribbon

May Arts Designer – Gini Williams Cagle

Today we welcome Gini Williams Cagle. We are so excited to have her showcase her work today on Paper Crafter’s Library. You can see Gini’s fabulous project below, but first, here is a little more about her:

GiniWilliamsCagleProfilePic-250W-06102015

I have always loved everything vintage – and that has really influenced my work. Even as a little girl, I collected beaded purses and antique clothes, and had boxes of old photos and ephemera. And yeah, this was all by the time I was 9 years old. So I guess I was that quirky kid that everyone just kind of thought marched to her own drum. That early sense of style lead to someone who has a passion to create, who is confident in her own designs, but who also appreciates the historic influences of the past.

I have been crafting all of my life, in one form or another. I was a very successful bead artist. I had my work published in over a dozen books and magazines, and lectured and taught all over the country, but…my beaded pieces took 500-1000 hours to complete. About 14 years ago, I started scrapbooking, when my first nephew was born. I instantly fell in love with the immediacy of the medium (compared to the crazy hours I spent beading!) I have really grown to love the paper crafting industry and enjoy finding new ways to take my pieces to the next level. I’ve been fortunate to design for some amazing companies in this field. It’s really funny to look at any of my work, from beaded pieces to mixed media and to be able to see the same style emerge, regardless of the medium. I have always loved dimension, and color and layers.
I am blessed to live in the beautiful mountains of North Carolina – an area that could inspire anyone to create.

Satin Anchors Shaker Card

Shaker cards are all the rage, but for a twist, I thought it would be fun to fill mine with some of May Art’s Satin Cutouts.  These little shapes are so cute, and there are so many  themes, you can find the perfect one for any occasion. Since we are heading into the summer season, I chose to create a nautical themed card, and use the Satin Anchors to shake. Even after you cut these shapes apart, they don’t fray at all.  My shaker is very dimensional, but I didn’t want to see ugly edges, so it was super easy to cover my “seams” using satin ribbon. This just really finishes the card in a very professional way.

GiniWilliamsCagle-550W-06102015

GiniWilliamsCagle2-550W-06102015

Supplies

May Arts Ribbons:
HA-8-14 3/8″ Double Faced Satin Ribbon – 2 yards
SM-28 String Burlap Ribbon – 1 yard
408-05-09 1/2″ Woven Burlap Ribbon – 6 inches
Vintage Nautical Print – 3 inches              ******I couldn’t find this one!
EX02 Nautical Satin Cutouts – Anchors
Other:
Graphic 45 – By the Sea Collection
Crafter’s Companion – Construction Cardstock 16 x 20
Crafter’s Companion Heat Resistant Acetate
Collall Adhesive
Foam Adhesive
Buttons

We hope you have enjoyed today’s feature. We want to extend a sincere thank you to Gini Williams Cagle for her fabulous project and May Arts Ribbon for sharing their company with us. Be sure to visit May Arts to see more of their products and their blog for some inspiration! You can find them also on facebook, pinterest, twitter, instagram and youtube.

In order to enter the give-away to win your choice of any two spools of May Arts Ribbon, please leave us a comment in the comments section of this post. The winner will be announced next Wednesday. Please note that this give-away is only open to residents of Canada and the USA.

Happy Crafting!

Trend Watch – Containers to Fill

I’ve always loved stamps and dies that offer the opportunity to fill them with any number of unique things. Today we’ll take a look at different shapes or containers that are just begging to be filled.

Sue used a jar stamp to create a place to put little valentine messages (look at the little envelopes!)

You + Me by Sue Mc Rae

You + Me by Sue Mc Rae, courtesy a blog named Hero

This card by JJ features a jar with the “Ball” label and some pretty butterflies flying out of it. I like how she overlapped the jar stamp on her sentiment.

Thanks by JJ Bolton

Thanks by JJ Bolton, courtesy handmade cards by jj bolton

Nichol’s card features the Lawn Fawn Bugs and Kisses set, which contains a cute jar (with holes in the lids, so the bugs can breathe of course!) and some fun varieties of bugs. These bugs are sending sweet “bugs” and kisses!

Bugs & Kisses by Nichol Magouirk

Bugs & Kisses by Nichol Magouirk, courtesy Lawn Fawn Blog

This card by Yukari is similar to Nichol’s, but features a different sentiment and the fireflies. I love the translucent material she used to create the effect of the fireflies appearing to be inside the jar.

You Light Up My World by Yukari Yoshioka

You Light Up My World by Yukari Yoshioka, courtesy Handmade by Yuki

This apothecary jar could contain any number of things. Miriam used little circles to look like little balls of candy that match the card.

You're Sweet by Miriam Prantner

You’re Sweet by Miriam Prantner, courtesy MFT Challenge & Inspiration

Laura used the Gumball Machine Die from Simon Says Stamp to create her adorable gumball card. The bright colored gumballs are such a great touch!

You're So Sweet by Laura Bassen

You’re So Sweet by Laura Bassen, courtesy Doublestick Heaven

Sarah’s card doesn’t have a container on it, but it caught my eye as a great way to create your own container to fill; whether that be with sequins as she did here, or with other shapes or stamps to fill areas.

Happy Birthday by Sarah Moerman

Happy Birthday by Sarah Moerman, courtesy My Impressions

If you’re looking for a jar to fill to get started on these types of projects, here’s one from Lifestyle Crafts at Simon Says Stamp.

Mason Jar Die by Lifestyle Crafts

Mason Jar Shape Die by Lifestyle Crafts

Wouldn’t some of these jars be adorable filled with some wildflowers on stems? You could even hand-draw the stems into the jar from your favorite flower stamps. Hopefully this has inspired you to see what kind of “containers” you have in your stash to put to use!

Winner of the Graphic 45 Give-Away 05 20 2015

I’d like to extend a HUGE thank you to Graphic 45’s guest designer Tati Scrap for sharing such a wonderful project and to Graphic 45 for their generous give-away . A fabulous prize package consisting of the Eire Tale collection, valued at $60.

An Eerie Tale prize pack $60 -1

And now, the moment you’ve all been waiting for…….the winner is……Cindi!

WinnerGraphic45-05202015

Congratulations Cindi! Be sure to email us at customerservice@papercrafterslibrary.com to claim your prize. Please be sure to put “Graphic 45 Winner” in the subject line of the email, and then in the email itself, be sure to include your full mailing address and phone number.

Be sure to check out this week’s great company Graphic 45!

Winner of the Poppy Stamps Give – Away! 05 27 2015

Poppystampslogo-550W

I’d like to extend a HUGE thank you to Poppy Stamps’ guest designer  Jeane Jachna for sharing such a wonderful project and to Poppy Stamps for their generous give-away of 2 clear stamp sets “Into the Words” and “A Fox Tale” with matching companion dies.

1231-original CL402-originalCL403 (1)

And now, the moment you’ve all been waiting for…….the winner is……Taunya Butler!!!

WinnerPoppyStamps-05272015

Congratulations Taunya Butler! Be sure to email us at customerservice@papercrafterslibrary.com to claim your prize. Please be sure to put “Poppy Stamps Winner” in the subject line of the email, and then in the email itself, be sure to include your full mailing address and phone number.

Join us next week when we feature another great company!

Featured Artist/Designer: Alice-Lihsuan Wertz – 06 04 2015

Welcome to another Featured Artist/Designer Spotlight. Today we’re thrilled to welcome Alice-Lihsuan Wertz . Before we show you Alice’s project, let’s get to know her a little bit more…

AliceWertzProfilePic-250W-06042015

 Hi, all! My name is Alice Wertz and I am a happy card maker living in Northern California with my sweet husband and our two cat children. =) I was introduced to card making by a friend about seven years ago and still loving every minute of it. I love coloring with Copic markers and definitely can’t craft without my Cuttlebug and dies. =) You can see more of my work at my blog – Alice’s {Little} Wonderland.

Happy Meow Day

AliceLihsuanWertz1-550W-06042015

I used the adorable kitty from Neat & Tangled’s Meowwww set for my card.

AliceLihsuanWertz2-550W-06042015

I created a little scene with a couple of the accessary stamps from the same set. Adding these little images can make it a little more fun! =)

AliceLihsuanWertz3-550W-06042015

The images are colored with Copic markers and I paired the scene with Seven Paper/Studio Calico’s Baxter 6×6 paper pad.

That’s all I have. Hope you like my card! =)

Supplies

cardstock: (Rustic White, kraft) Papertrey Ink
clear stamps: (Meowwww) Neat & Tangled
patterned paper: (Baxter 6×6 Paper Pad) Seven Paper/Studio Calico
hybrid ink: (Black Licorice) My Favorite Things
accents: (enamel dots) My Midn’s Eye
die: (Polaroid) Paper Smooches
tool: (die-cut machine) Provo Craft
other: (foam tape) 3M
Copics used:
kitty: W9, W7, W5, E33, R20, E95
fish: E09, E08, YR68, YR04
yarn ball: RV66, RV55, RV63, RV52
card size: 3 5/8″ x 5 3/8″

We hope you have enjoyed today’s project courtesy of Alice Lihsuan Wertz. Be sure to stop by Alice’s blog to see even more of her beautiful work (and let her know we sent you). You can also find Alice  on  Facebook and Instagram.

Happy Crafting!

Featured Company: Lawn Fawn – June 03, 2015

LawnFawnLogo-250W

We are happy to bring you this week’s Featured Company: Lawn Fawn.

This week Lawn Fawn is giving away Gleeful Gardens stamps and dies (details on how to enter at the end of this post).

PrizePackage1-LawnFawnPrizePackage2-LawnFawn

Lawn Fawn Designer – Nancy Krueger

Today we welcome Nancy Krueger. We are so excited to have her showcase her work today on Paper Crafter’s Library. You can see Nancy’s fabulous project below, but first, here is a little more about her:

NancyKruegerProfilePic-250W-06032015Hi my name is Nancy and I’m a happy wife, mom of 2 married sons and a Grammy to 2 delightful grandsons with a granddaughter on the way. I live in sunny Southern California with my hubby of 37 years. We have filled our empty nest with a goofy Golden Retriever and an adorable Chihuahua. I enjoy the beach, cool breezes and sunrises!

I’ve been an avid crafter since I was a child but when I bought my first rubber stamp and ink 30 years ago I was hooked on stamping and paper-crafting! My talented mom is my crafting inspiration. She once painted pretty flowers on my sneakers to hide the worn spots!

I am blessed to work with the wonderful folks at Lawn Fawn. Mike and Kelly are like family and they have assembled a wonderful crew of “Fawnies”. I share my cards and paper-crafting projects along with the occasional story about my family at my blog Happy Heart Studio: http://happyheart-nancyljk.blogspot.com/

Pocket Letter

OLYMPUS DIGITAL CAMERA

OLYMPUS DIGITAL CAMERA

OLYMPUS DIGITAL CAMERA

OLYMPUS DIGITAL CAMERA

I was intrigued by pocket letters when I first found them on Janette Lane’s blog and I thought it would be fun to try one! Be sure to click the link for a definition of Pocket Letters and check out Pinterest for lots of great examples! I will tuck a note to the recipient in the center pocket before I send this on its way in a regular business size envelope.

I started my pocket letter with a color palette using papers from Lawn Fawn’s Let’s Polka, Mon Amie collection in Vanilla, Strawberry and Lemon. This ties the whole page together so I can use lots of different images for the individual 2 ½” x 3 ½” pockets. For each pocket I cut a panel of patterned paper to size and rounded the corners.

Row 1, left to right:
• Die cut a Stitched Oval and the stamp the sentiment from Gleeful Gardens; stamp color and die cut the cute snail and attach to oval with a glue dot along with a die heart; attach oval to Strawberry Polka panel
• Die cut Stitched Rectangle and attach to center of Lemon Line Dance panel; stamp the sentiment from Chit Chat with bright pink ink, die cut and attach to panel; stamp, color and die cut the bird from Chit Chat and attach to prepared panel
• Create small pocket with vellum, attach to Lemon Polka 6×6 panel; stamp flowers from Summertime Charm with Wild Rose, Sunflower and Fake Tan ink then die cut them to fill the vellum pocket.

Row 2, left to right:
• Layer a white panel die cut with Forest Border and a Strawberry Line Dance 6×6 panel die cut with Stitched Hillside Borders to the Vanilla Polka panel; stamp the sentiment from Flirty Frames with Versamark ink and emboss using gold embossing powder; stamp, color and die cut the deer from Into the Woods and attach to prepared panel
• Die cut a heart using Lemon Polka 6×6 paper and attach to a Vanilla Polka 6×6 panel; stamp sentiment from Scripty Sentiments with Versamark ink and emboss with gold embossing powder
• Die cut Scripty Hugs from bright pink cardstock and attach to a Vanilla Polka panel

Row 3, left to right:
• Stamp, color and die cut several strawberries and the Mason jar from Summertime Charm, arrange strawberries in jar and attach the jar to a Lemon Line Dance 6×6 panel
• Die cut a Strawberry Polka 6×6 tag from Tag, You’re It tie with coordinating Lawn Trimmings (I used gold from the Vivid Triple pack) and layer it over a white panel; I attached 2 small crochet flowers from my stash
• Die cut a Stitched Rectangle and stamp sentiment from Best Pun Ever, and attach to a Lemon Line Dance 6×6 panel; stamp, color and die cut the teapot and teacup from Best Pun Ever and attach to prepared panel
After including your note or letter and tiny gifts in the pockets, fold the pocket page in thirds horizontally and insert in a #10 business size envelope to mail. You may need to include extra postage.

Supplies

Stamps and Dies: Gleeful Gardens + dies, Best Pun Ever + dies, Summertime Charm + dies, Into the Woods + dies, Chit Chat + dies, Flirty Frames, Scripty Sayings, Forest Border, Hearts Dies, Scripty Hugs, Tag, You’re It, Stitched Rectangle, Stitched Oval
Paper: Let’s Polka, Mon Amie 12×12 and 6×6 paper
Ink: Wild Rose, Fake Tan, Sunflower, Hippo, Black Licorice
Lawn Trimmings: Gold cord from Vivid Triple Pack
Other Supplies: Corner Rounder, Memento Tuxedo Black ink, Copic Markers, Smooth White Cardstock, Bright Pink Cardstock,  Heavy vellum paper, Versamark ink, Gold embossing powder, Bright Pink dye ink, Pocket Page

We hope you have enjoyed today’s feature. We want to extend a sincere thank you to Nancy Krueger for her fabulous project and Lawn Fawn for sharing their company with us.

Be sure to visit the following sites to see more  Lawn Fawn products and for some inspiration: www.lawnfawn.com;  www.lawnfawn.blogspot.com; www.twitter.com/lawnfawn; www..facebook.com/lawnfawn and www.youtube.com/lawnfawn.

In order to enter the give-away to win the surprise prize, please leave us a comment in the comments section of this post. The winner will be announced next Wednesday.

Happy Crafting!

Trend Watch – Stick a Pin in it – It’s Cork

I have sheets of cork on the backdrop of the wall where I make my paper creations.  I have pinned crafty quotes, funny photos of my niece and inspiring photos of cards I would like to try.  I am also very tactile and I like the feel of cork when I punch a new picture in my board.  I love that the sheets are so much thinner and firmer for paper crafting so they can go easily through a die cut machine and even be cut cleanly with scissors to make shapes and letters and all sorts of fun things.  Join me today as I explore some of the fun finds I discovered while looking for paper crafting  projects with cork.

This first scrapbook page is in homage to the cork backboard.  I love how Lisa created a fun banner and tacked it into the cork, making the whole page look an awesome wall dedicated to back to school for her kids.

back 2 books

Page by Lisa Dickerson photo courtesy of Gettin’ By

Yuki used her cork as a decorative element on her page.  She also shared how to make your own embellishments with cork which is totally cool too.  The tags with the cork stars and very fun.

BFF page

page by Yuki Shimada photo courtesy of Love Today

Look how detailed the butterfly is on Karolyn’s card. Never thought you could do that with cork did you?  I just love how delicate it is.  The coordinating colors are a beautiful match as well.

RIC68---Thanks_thumb2

card by Karolyn Loncon photo courtesy of Paper Therapy

I would have never thought to color cork.  It looks so good on Amy’s card that  I am inspired to try colors myself.

Hello Love

card by Amy Tsuruta photo courtesy of Tsuruta Designs

She also created this trendy cactus card and colored the cork as well.  The texture comes through really well and is perfect for her cactus.  Very clever.

BRI_LF thanks_amy tsuruta

card by Amy Tsuruta photo courtesy of Butterfly Reflections Ink

You can write on cork too! How awesome is this art journal page from Jodie?  You can center the theme around whatever you chose and incorporate your own handwriting.  Or in my case find a cool stamp 🙂

IMG_4469

Art Journal by Jodie York photo courtesy of Polka Dot Creative

I love all of the elements that Cindy created on this cork inspired card.  Below I found you a piece of cork that has that cool chevron just in case you were coveting it as much as I was.  Though Cindy created her pattern with a stencil.  I am very impressed.

hi tag

card by Cindy Lawrence photo courtesy of The Creative Closet

Get out your die cuts!  This trend supports those too.  You can create themed cards and titles for your pages with cork.

thanks

card by Julie Dinn photo courtesy of Kreative Jewels

We are getting closer to Father’s Day in the States and cork is a wonderful element that can translate into masculine cards well.  This next card just says it all.

dad

card by Agnieszka  Malyszek photo courtesy of Just Made From Paper

I think this card is so quirky and fun.  The cork banner is an unexpected touch that just adds to the fun.

Gehring- WFC-FF 1

card by Katie Ghering photo courtesy of Stamping Lightly

Even detailed dies can work well.  How impressive is this message all in cork?

Text Block Bday Cork 1

card by Lizzie Jones photo courtesy of Don’t Forget to Write

The circle cork background is the perfect way to add dimension and highlight the sentiment on Yuki’s card.  The cork stars get their just do as accents for the card as well.  This is a beautiful execution.

ty

card by Yuki Shimada photo courtesy of Love Today

I hope you can think of new ways to use cork to create great embellishments and backgrounds.  I guess now it is time to put a cork in me…I’m done.

Below are a few of the awesome cork products I found to give you even more inspiration and to tempt you to try the cork trend.

So go ahead… make something pretty.

DCWV cork

DCWV Cork stack from Scrapbook.com

stickers

Prima cork stickers from Scrapbook.com

owls

Paper House Productions Owl Stickers from Scrapbook.com

whittles

American Crafts Whittles cork clothespins from Scrapbook.com

chevron cork

American Crafts Chevron cork sheet from Scrapbook.com