Featured Company: Fancy Pants Designs

blacklogowithborder

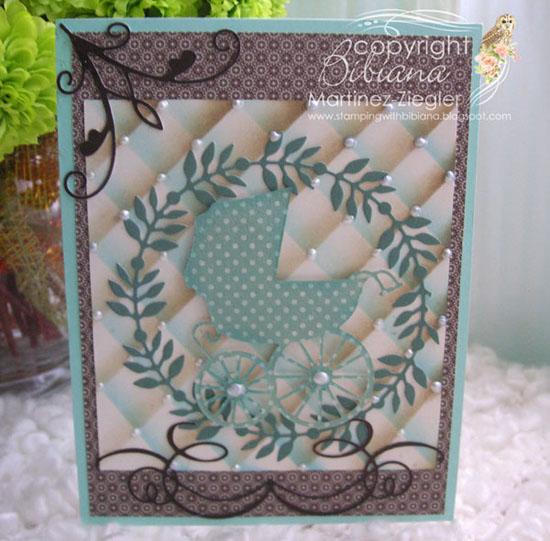
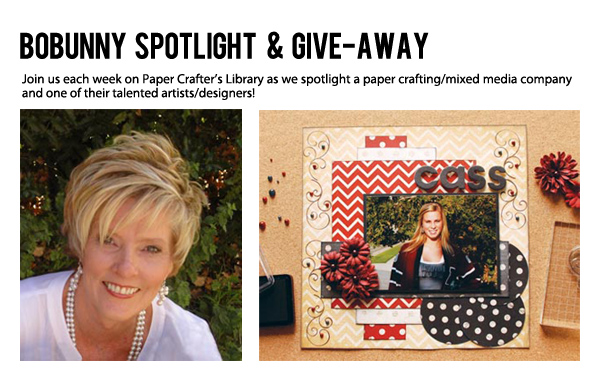
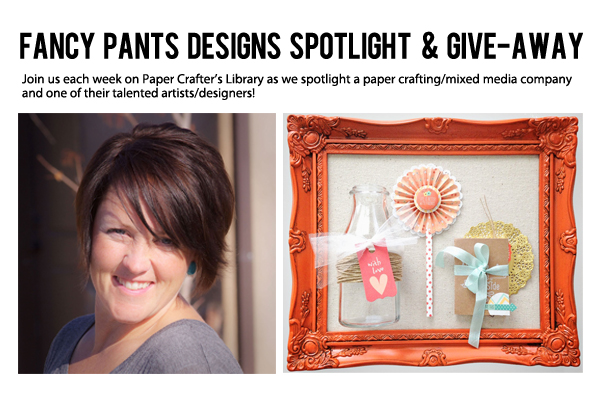
This week we are thrilled to welcome back Fancy Pants Designs! In today’s spotlight you’ll learn more about Fancy Pants Designs, see a fantastic project by Jodi Sanford and have the opportunity to win a fantastic prize consisting of a True Friend 6×6 pad with coordinating envelopes, patterned photo frames, button set and mini brush trees…all before they are released in stores! The frame shown in the photo below is NOT included in the prize pack.  (details at the end of this post).

FancyPantsDesignsPrizePack-08062014-550W

About Fancy Pants Designs

Fancy Pants Designs was founded almost 10 years ago by Jared and Jodi Sanford. With Jodi’s love of scrapbooking and the support of many creative people, Fancy Pants Designs quickly grew into a must-have product line in the paper crafting industry and continues to produce fabulous designs and unique embellishments today. Jared directs the day to day business and warehouse management of the office, while Jodi directs all art and product development and marketing. She also teaches her love of scrapbooking and crafting to many dedicated scrapbookers and is honored to have been given this opportunity. They know that their business is a success because of devoted fans who use their products and hope to continue developing even more products that meet the needs of all crafters!

Fancy Pants Designer

Today we welcome Jodi Sanford, the owner. We are so excited to have her showcase her work today on Paper Crafter’s Library. You can see Jodi’s fabulous project below, but first, here is a little more about her:

JodiSanford-250WJodi Sanford is the founder and owner of Fancy Pants Designs, Inc. She is a wife to a wonderful husband and the mother of four busy kids and considers being a Mom the greatest job she has—with designing and teaching being a close second!

Jodi has enjoyed stationary, stickers and crafting since she was very young, and began to focus more specifically on her scrapbooking and paper crafting hobby over 20 years ago. She is regularly published in national magazines and online, has developed magazine articles and concepts and taught classes worldwide!

Along with her husband, Jared, she started Fancy Pants Designs, in 2004, as a way to offer new and innovative products to this creative market and their company has been blessed with wonderful fans ever since!

Jodi enjoys spending time with her family hanging out in the backyard, watching her kids play sports, running, and hitting a movie now and then—not to mention traveling and teaching her love of scrapbooking throughout the world!

Designer Project

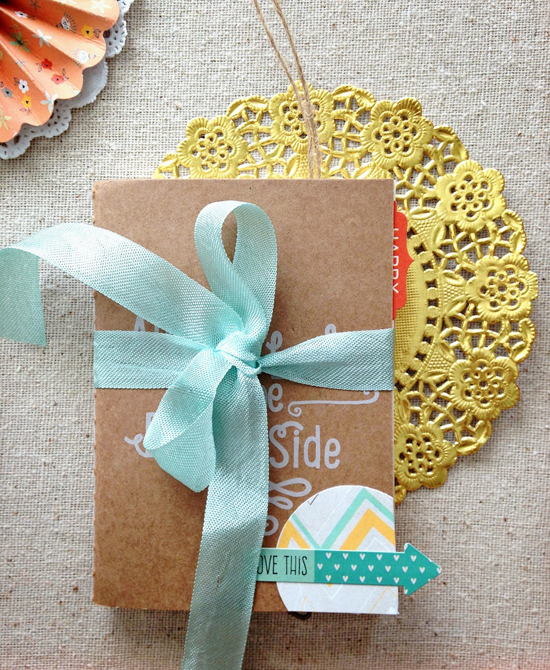
Today I am excited to share with you a little gift pack that I made using our all new collection, True Friend.  {Hitting stores the very first part of September—get your requests in now!} As well as one of our adorable new kraft mini journals (3×4) that will be in stores this fall!

This collection is all about life, love, happiness, family, friends…the list goes on and on…and so do the fabulous papers and embellishments in this line!  I just loved so many different elements that I ended up with a few different ideas and used a mix of embellishments to create them!

My project consists of a quick and easy decorative jar, an adorable and delicate accordion flower design and a super mini album!

FancyPantsDesigns1-08062014-550W

I loved the jar because it was so quick and easy to make and would be perfect for a fresh flower delivery, filled to the brim with chocolate or even tucking the handmade flower right inside… a very easy gift where the product does the work! Simply wrap the bottle with twine, wrap one of the True Friend tags around with tulle, and you have a very cute, simple and sweet gift ready to go!

FancyPantsDesigns2-08062014-550W

The flower, another quick and easy project features one of my favorite papers from the line—this adorable mini floral pattern came from our 6×6 pad!  I cut two 1-3/4” x 6” strips out, folded and put them together!  Then, I placed the flower right on to a 4” white doily.  Next, I took another 6×6 patterned paper and punched a 2” circle out and adhered it to the center!  Last, I added the adorable ‘Life is better with friends’ flair piece… It’s so simple, and that delicate look is so pretty!  Oh, I used a decorative straw as the base of my flower…this project makes a great book mark for the mini album as well!

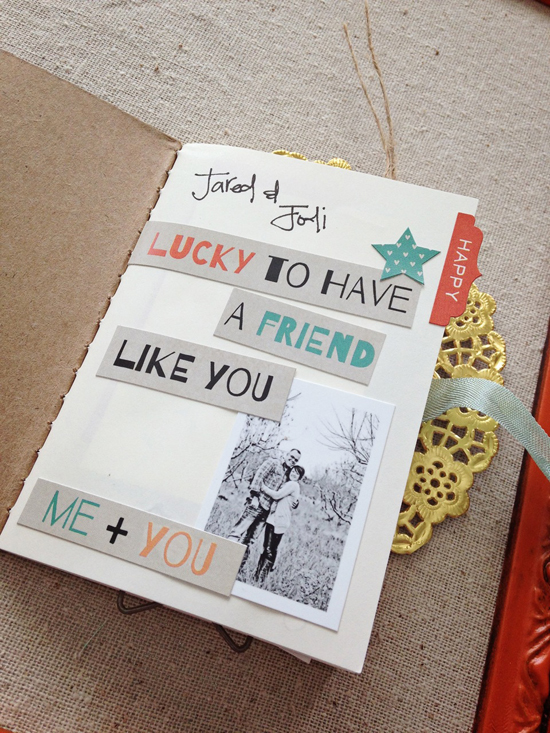
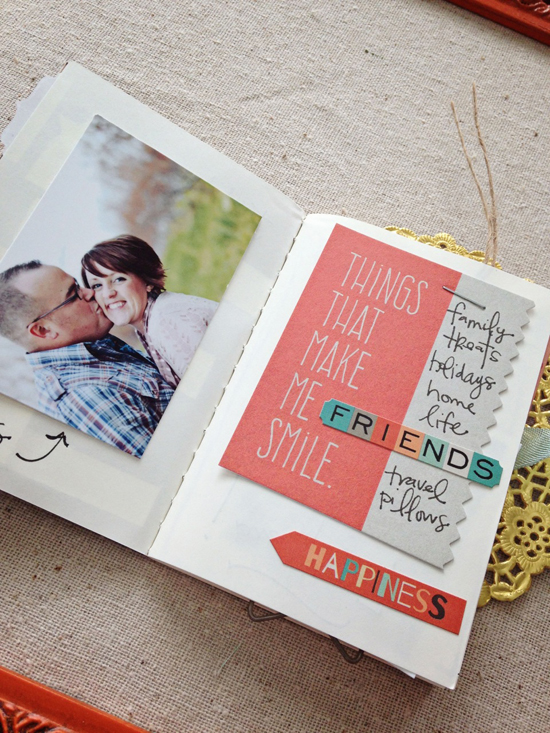
Up next is just a little peek at the mini album.  I ADORE these albums so much…they are tiny, compact, and easy peasy to work with!  These fit snugly right in your wallet or bag and are great for jotting down the every day happenings…quotes, thoughts, schedule and more! I decided to use up a mix of mini (similar to index sized) photos that I had around and wrote down/added stickers, just a few thoughts about Always Looking on the Bright Side {the book cover}!  It’s nice to remember the things we have to be thankful for…especially on a bad day…that’s why I loved this as another gift idea!  I hope you like it, too!

FancyPantsDesigns3-08062014-550W

FancyPantsDesigns4-08062014-550W

FancyPantsDesigns5-08062014-550W

FancyPantsDesigns6-08062014-550W

FancyPantsDesigns7-08062014-550W

Thanks so much for joining me today for another Fancy Pants Designs feature! We hope you’ll love these BRAND NEW products and we’ll be SO EXCITED to pick a winner that will receive a few items from our True Friend line BEFORE, yes, BEFORE they hit stores!  Leave your comments below and thanks so much for joining me today!

Products Used:  {Fancy Pants Designs} True Friend 6×6 pad, tags, flair, label stickers, 12×12 sticker set, chalk tags and brag cards.  {Fancy Pants Designs} mini kraft journal  {Maya Road} heart paper clip and twine  {Other} mint ribbon, tulle, black journaling pen, white SHARPIE pen, white and gold doilies.

We hope you have enjoyed today’s feature. We want to extend a sincere thank you to Jodi Sanford for her fabulous project and Fancy Pants Designs for sharing their company with us. Be sure to visit Fancy Pants Designs to see more of their products and their blog for some inspiration!  You can also find Fancy Pants Designs on Facebook, Pinterest and Instagram.

In order to enter the give-away to win the prize shown above, please leave us a comment in the comments section of this post. One winner will be announced next Wednesday on the Paper Crafter’s Library blog!

Karen


Trend Watch – My Creativity is Up in the Clouds

Another fun summer pastime is sky gazing (preferably in a hammock with the cold beverage of your choice)  and you can’t do sky gazing without running into fluffy white clouds adding some interest to the great blue canvas.  This week, I want to show you how versatile and playful clouds can be and how many different ways you can use them to add some interest in your paper crafting.

Clouds are so great for creating a scene and this first scene is so compelling.  A floating piggy high in the sky with dimensional clouds of different sizes and shapes just begs for a funny sentiment and Amy doesn’t disappoint in this awesome card scene.

hambofloatingpigoutside_aksinside of pig card

 card by Amy Sheffer photo courtesy of Pickled Paper Designs

This next card is another scene stunner.  I just loved the details in the die cut clouds.

pamsparkspartygrilleaselside
card by Pam Sparks photo courtesy of Expressions with Heart

You don’t have to wait for  a rainbow to add your clouds.  Clouds can be a lot of fun colors too.  Look how fun these next cards are.  This combination of a silhouette and the fun striped clouds is just a bright little spot of happy.

silhouette with kite

card by Michele Williams and photo courtesy of Case Study Challenge Blog

And how can you have a rainbow cloud with a little bit of bling?  We get that in spades with Elena’s sparkle cloud.

sparkly clouds

card by Elena photo courtesy of Just ME

I love how expressive the clouds can be.  Emily very cleverly used them to express love, I just love that.

love in the air

card by Emily Leiphart photo courtesy of Art from the Heart

But they do make sense and look really great as encouraging cards like Jax did in this  stitched beauty.

twinery_stripes
card by Jacklyn Miller photo courtesy of Designs by Jax

I love the creative uses for clouds.  I love the inside looking out point of view that Laurie took by using the frame and the edges of several clouds.

window die
card by Laurie Wilson photo courtesy of Soapbox Creations

Clouds are also super cute as a pretty place to stamp your sentiment.   This lovely collage style is so cute and the button sun peeking out from the sentiment is just darling.

shaped card 2

card by Andrea photo courtesy of Creative Paper Trail

I have also seen this super cute trend of using a die right up to the edge of the page to create a type of border.  How awesome is this baby/wedding shower card?  So adorable.

showering you with love

card by Regina Mangum photo courtesy of The Stampin’ Bean

The same concept is used in this awesome card but the “sky” is shortened to create a raining cloud look with stitching.  This is so awesome.

because I care

card by Laurie photo courtesy of Soapbox Creations

I just fell in love when I saw this sun busting from the morning clouds card.  It is so cheerful and happy and perfect for a hello.

Simply Said Hello 2

card by Karolyn Loncon photo courtesy of Paper Therapy 

If you don’t have paper, stamps or a die, you can still play by making your own paper clouds and masking them in.  Isn’t this card lovely? Clare also has a link to the tutorial for making the clouds.   And since she is such a lovely woman, she also gave us a link to the lovely quilled flowers too, here.

masked clouds

card by Clare photo courtesy of Clare’s Creations

 Truthfully, I find it so hard not to include a shaker card in every article I write.  But they are so awesome and fun and interactive, don’t you agree?  Look at how much beautiful you can send to someone you love by making a card like the one Wida made!

wishing you a happy day

card by Wida Miller photo courtesy of Beachorado

Create your own bit of sky gazing appreciation in your paper crafts by adding some clouds to your projects, they are so versatile.

So go ahead…make something pretty.

by Aliya White

Below are a few fun cloud products I found for your inspiration.

poppystamps-die-puffy-cloud-border-4

           curling cloud

cloud paper

   echo park cloud paper

cloud punch

stencil

chipboard cloud

CT-0328 Cloud9 Acrylic Stamps

Featured Artist/Designer: Laina Lamb

Today we’re thrilled to welcome Laina Lamb. Before we show you Laina’s project, let’s get to know her a little bit more…

LainaLambProfilePic-07242014-250WLaina lives outside of Cleveland, Ohio with her husband Steve and their three rowdy and loveable boys. After graduating from the University of Cincinnati, she designed retail stores and malls for over ten years. While taking a career break to raise her sons, Laina discovered the world of paper crafting and instantly fell head over heels in love. This passion for storytelling and art helped transition her into a free-lance graphic designer for the craft industry. Laina has designed everything from paper to cutting cartridges. Her signature line of stamps and coordinating Die-namics can be found at mftstamps.com. She was formerly a Dream Team Member for Creating Keepsakes and is currently a Paper Crafts and Scrapbooking Go-to Gal and Contributing Editor. When she’s not at her desk creating, Laina likes to eat long dinners out with friends, watch live local bands, and travel. Especially if it involves a cruise ship or a warm sandy beach!


Before I Was Your Mom

LainaLamb1-07242014-550W

Instructions

1. Adhere grid paper to gray card stock base.
2. Stamp woodgrain stamp onto cotton candy wonky pieces with pink lemonade hybrid ink.
3. Stamp typewriter text stamp onto pink lemonade rectangles with cotton candy dye ink. Adhere top left and bottom right of precut photo mat.
4. Adhere wonky pieces to corners of layout. Add tiny staple accents to each if desired.
5. Adhere scrap white paper to center of cotton candy journaling mat. Adhere both at odd angle.
6. Backstitch around Peek-a-Boo Alpha letters with floss using tape on reverse to secure threads. Adhere to top of journaling frame with pop dots, using scrap white paper below as guide.
7. Adhere pre-designed journaling to lower area of journaling mat with pop dots.
8. Cover seam of journaling and stitched piece with prestamped woodgrain pink lemonade strip.
9. Adhere gray title flag above stitched area.
10. Adhere die cut “Before” above journaling mat.
11. Adhere photo mat to top right corner of page.
12. Embellish layout with rolled flowers, hearts, sequins, and layered circles as shown.
13. Add butterflies with pop dots, adhere gems to large butterflies.
14. Add stick pins to pop dot holding largest butterfly at the top.

My Favorite Things Supplies
Card stock: Whip Cream, Steel Grey, Pink Lemonade, Cotton Candy, Razzle Berry
Felt: Cotton Candy
Ink: Cotton Candy Dye Ink, Steel Grey Hybrid Ink, Pink Lemonade Hybrid Ink
Stamps: Woodgrain Background, Typewriter Text Background
Die-namics: Butterflies, Peek a Boo Alpha, Mini Delicate Doily, Sequins, Little Letters, Accent It – Flags and Tags, Royal Rose, Mini Royal Rose

General Supplies
12×12 Gray Card stock
12×12 Grid Paper
DMC Floss
Gemstones
Flower Stamens
3L Adhesive Sheets
Silver and Pink Glitter
Maya Road Pins
Tiny Stapler

Want to recreate this sketch?  Here’s a sketch you can download and print.

Print

Laina has also generously offered to give away one of her LLD Delicious Birthday stamp sets and one of her Die-namics Bring on the Cake die sets to a lucky blog reader.

LainaLambGiveAway-550W

To enter to win the stamp set and die set, simply leave a comment on this blog post.  (Sorry – This particular give away is only valid to residents of the United States.)

We hope you have enjoyed today’s project courtesy of Laina Lamb. Be sure to stop by Laina’s blog to see even more of her beautiful work (and let her know we sent you). You can also find Laina on Facebook, Instagram and Twitter.

Have a great day!

Karen

Winner of the BoBunny Give Away!

BoBunnyLogo-07232014-500W

I’d like to extend a HUGE thank you to BoBunny’s owner Jan Lanoy for sharing such a wonderful project and to BoBunny for their generous give-away of a set of their Double Dot Chevron patterned papers shown below.

BoBunnyPrize-07232014-550W

And now, the moment you’ve all been waiting for…….the winner is……Eileen Lucas!

BoBunnyWinner

Congratulations Eileen! Be sure to email us at customerservice@papercrafterslibrary.com to claim your prize. Please be sure to put “BoBunnyWinner” in the subject line of the email, and then in the email itself, be sure to include your full mailing address and phone number.

Join us next week when we feature another great company.

Karen

Trend Watch – Transparencies

Now you see them, now you don’t.  Or is it, now you don’t see them, now you do?  But wait–now you don’t see them and now you don’t?  LOL!!  Regardless of how you may, or may not see Transparencies–They are everywhere!!

There are so many ways to incorporate see-through touches into your designs; Surfaces, glazes, texture products, accents, embellishments–From the base you decide to create upon, to that final, finishing detail, the creative possibilities are crystal clear!

In today’s Trend Watch report, I’ll show you a few ways that designers are combining transparent elements in their creations, in their own clearly spectacular ways!  Wait until you see these!!

I couldn’t think of a better, more beautiful card to whet your appetite, than with Anna-Karin’s airily transparent card, made out of a myriad of clear and translucent ingredients;  Acetate stock embossed and accented with modeling film & shrink plastic dragonflies; A clear button that secures a glassine bag filled with shaved ice!  And those die cut letters treated scrumptiously with Tim Holtz’s Clear Rock Candy Distress Glitter–Just Beautiful!!

OLYMPUS DIGITAL CAMERADragonfly card designed by Anna-Karin Layers of Ink

Intimidated about using acetate for an entire card base?  Don’t worry, just start simply and use a small piece of acetate to accent your card with, like Pamela Ho did here on her very happy Ferris wheel card.

Pamela used her piece of acetate as a clever, clear overlay to stamp her sentiment and clouds on, then strategically used adhesive to secure to her card front.  This simple and uncomplicated addition of acetate to her card makes it look like the sentiment and clouds are serenely floating over the scene.

Pamela Ho Mama Elephant Away We Go Cardcard design by Pamela Ho Fishy Designs

Pamela Ho Full Card Shotcard design by Pamela Ho Fishy Designs

How about the clear wonders of multi-purpose products like Dimensional Magic, Glossy Accents and Diamond Glaze, just to name a few?  Not just awesome, clear, multi-surface adhesives, these products are fantastic dimension builders on designs that give just the right amount of transparent shininess.

Check out Jessi Fogan’s gleaming space ship that she first stamped onto card stock, colored with markers and fussy cut, then gave a layer of Dimensional Magic to.  That rocket is virtually bursting through the stratosphere!!

Jessi Fogan One Crafty Mama Blast Bd CardHave a Blast b-day card from Jessi Fogan-One Crafty Mama

Here, Elaine’s pretty papered chipboard numbers are a sturdy surface for the Diamond Glaze she used to highlight this feminine 60th Birthday card with.  This gorgeous celebration of 60 decades will look this fresh and shiny (and Young!) for many years to come!!

Elaines 60 bd card using diamond glaze60th celebration b-day card designed by Elaine Hughes–Marker Geek

Remember getting those little cups of ice cream as a child? Me?  I remember my grand-parents having a freezer full of frozen treats to choose from and I always chose the little cup of orange & vanilla ice cream that came with its own little wooden spoon, tucked inside its own little bag.

Linda Coughlin, The Funkie Junkie, brought that memory back in vivid color with her Summer Nostalgia creation, with its very own wooden spoon tucked neatly inside a translucent glassine mini-bag!!  I’m sure Linda’s creation will bring back your own nostalgic, ice cream memories!

Funkie Junkie Linda CouglinSummer Nostalgia card designed by Linda Couglin-The Funkie Junkie for Artistic Outpost

Linda’s creative use of glassine bags is a signature detail for her.  Not only does she use them as embellishments in her designs, she cleverly uses them as surfaces to create upon, too!!

These glassine packets are just enough frosty and just enough see-through that you really can’t make out the festive little Christmas goodies that are tucked inside.  Talk about Merry!!

Linda Coughlin Funkie Junkie Christmas GlassineShabby Glassine Christmas Packets created by Linda-The Funkie Junkie-Coughlin

I can’t forget to mention a favorite diaphanous surface of mine–Vellum!  It has to be one of the most versatile papers you can have in your paper crafting inventory.  It can be used in so many translucent-y wonderful ways.

Natalie Strand stitched her layer of vellum over an ombre effect background, then heat embossed doilies and a sentiment to draw your eye to those seemingly floating images.  Add a few clear rhinestones and it’s sheer magic!!

Natalie Strand Vegatablog Vellum CardRainbow Ombre Birthday Wishes card by Natalie Strand-Vegatablog

Another use of vellum is showcased beautifully by Debby Hughes in this stunning baby shower card.  The vellum panel seems to gently lift the die cut and stamped words right off the face of the card and the enamel dots seem to be floating on their own!  So pretty and delicate.

Debby Hughes Baby Shower Card with vellumBaby Shower card designed by Debby Hughes-Lime Doodle Designs

Don’t forget to WOW ’em with those final crisp and clear touches of embellishments.  Some of my favorite embellishments are the simple ones that can bring the entire flavor of the design together.

Clear rhinestones are a fabulous way to add sparkly, clear fun and a touch of posh to any card design.  Meihsia Liu uses a swirl of clear rhinestones to romanticize her creation of Love!  Ooo Laa Laa!!

IMG_3592Love is in the Air card designed by Meihsia Liu-www.meihsia.blogspot.com

Laura Sterckx Wows big-time with her clean & simple style of card design embellished with an easy flair of clear sequined embellishing!  Laura’s random sprinkling of see-through sequins on her Hello card reminds me of bubbles!  A darling finishing touch to her water colored greeting.

Laura Steryk Hello Card with clear sequinsWater color Hello card designed by Laura Sterckx-Making Cards is Fun

Viewing Laura’s Hello card up close, you can see the super cute anchor resist background that tied right in to my thought of her clear sequins as bubbles!! Ahoy Matey!!

Laura Steryk Close Up of Hello CardHello card created by Laura Sterckx-Making Cards is Fun

So, you see–Transparencies are everywhere and I’ve barely touched the tip of the transparent iceberg!  There’s so much more out there to write about–maybe there’s another article in this?  Hmmm? LOL!!  (Be sure to subscribe to our newsletter!!)

But, I think you get the idea!  See-through alternatives in all things for card crafting are available.  I bet you’ve got some clear and translucent goodies in your inventory that you’re looking at in a whole new way, now!!

Thanks for joining me today!! Happy crafting!!

By Shari

PCL Membership Highlights July 14 – July 25

Today we wanted to show you a behind-the-scenes sneak peek of some of the projects that were released to our members these past two weeks. So the sneak peek you see below is a snapshot of some of the video tutorials & pdf handouts our members received for the weeks of July 14, 2014 – July 25, 2014.

MemberHighlightsxJuly28_2014

Each week at Paper Crafter’s Library our monthly members can expect to receive access to a minimum of 5 exclusive videos each week – totaling around 20 videos each month. In planning for our projects we ensure that we cover a range of project types so that there is something for everyone whatever their interest or preference – whether it be card making, stamping, scrapbooking, altered art, mixed media, 3D items, templates, techniques etc. Projects range in difficulty level – so there will always be projects in library for whatever your paper crafting “level” whether you are a beginning paper crafter, or a more advanced paper crafter.

Michelle shared this Opposites art journal page for our members.  The black and white color scheme fits in perfectly with the theme of the page!

OppositesArtJournalPage--07172014-550W

Other highlights these two weeks:

  • Distress Bleed technique
  • An iron off technique
  • Masking to create a one layer card
  • A scrapbook page
  • Some cards from our Gorgeous Grunge Creative Inspiration Collection
  • Some cards from our Flower Patch Creative Inspiration Collection

Read about all the perks of being a Paper Crafter’s Library member you can visit our Benefits of Membership page HERE.

BecomeAMemberGreen

Featured Artist/Designer: Bibiana Martinez-Ziegler

Today we’re thrilled to welcome Bibiana Martinez-Ziegler. Before we show you Bibiana’s project, let’s get to know her a little bit more…

BibianaProfilePic-07242014-250WHi, my name is Bibiana.  I am from South America, Colombia, but I consider myself as well a little bit Mexican, French and American since I have lived for several years in these 3 last countries.  My current home is in the sunny state of California in the USA.

Although, my formal training is in languages, (I teach French and Spanish), I love to decorate, I have several hobbies (collecting nativities from around the world is one of them) and my various collections grow day by day…but certainly the one that has taken mayor stage is the one of rubber stamping.  Not long after I started “collecting” rubber stamps and all that comes with this hobby, I began teaching card making and the urge to share this passion, with a wider audience besides my students, became more present and my personal blog “Stamping with Bibiana” came to life… followed by my video tutorials shared at my YouTube channel, under the same name. You can discover as well, some of my passions through my boards in Pinterest.  I currently design for  “Lost Coast Designs”, for “Lavinia Stamps” and for “Memory Box, where I am also the coordinator for their International blogs: the Spanish one: “A crear se dijo!” and the French one: “Un Brin de Créativité“.  And lastly, I am thrilled and very grateful to be able to participate as a “Guest Designer” at various sites, like today’s post here at Paper Crafter’s Library with these 2 cards featuring a “sponged Lattice background” technique.

KONICA MINOLTA DIGITAL CAMERA

Baby Card

KONICA MINOLTA DIGITAL CAMERA

Floral Card

KONICA MINOLTA DIGITAL CAMERA

We hope you have enjoyed today’s project courtesy of Bibiana Martinez-Ziegler.  Be sure to stop by Bibiana’s blog to see even more of her beautiful work (and let her know we sent you).

Have a great day!

Karen

Featured Company: BoBunny

BoBunnyLogo-07232014-500W

This week we are thrilled to welcome BoBunny! In today’s spotlight you’ll learn more about BoBunny, see a fantastic project by Jan Lanoy and have the opportunity to win a set of two sheets of each of the sixteen colors of Double Dot Chevrons patterned papers – for a total of 32 sheets of patterned papers (details at the end of this post).

BoBunnyPrize-07232014-550W

About BoBunny

The story of BoBunny Press began with a young girl named Jan Lanoy. She was raised in the Ozark area of Arkansas, then headed west to study art in college. In 1974, she married Don and packed away her paint box while she raised three sons. As the family moved from Arkansas to Texas to Taiwan and then to Utah, Jan satisfied her creative side by restoring houses. Her children claim she can do anything with a power drill and a hammer!

That old paint box wasn’t reopened until 1996 when, at the urging of her sister, Jan started designing scrapbook papers. She still vividly remember standing outside a local craft store in Layton, Utah, terrified to show off her first two designs.

Now, 17 years later, after starting with 2 designs in a single store, BoBunny products can have now been sold in at least 45 countries around the world.

Each item still carries Jan’s personal attention to detail and color, but she’s no longer doing it all on her own. Her team of graphic designers, each with different styles and expertise, help to create the variety of product lines that BoBunny is known for. Whether your taste is whimsical, elegant, classic or playful, there’s something for everyone with BoBunny.

BoBunny’s Designer

Today we welcome Jan Lanoy. We are so excited to have her showcase her work today on Paper Crafter’s Library.

BoBunnyDesigner-07232014-250W

Cass Scrapbook Layout

This gorgeous layout features our newest addition to our Double Dot family, Chevron! Using Chiffon Chevron for the base, this layout came together in a snap! Wild Berry Chevron, Sugar Chevron & Licorice Chevron pull it all together using a variety of shapes and sizes to highlight this fun photo. Last but never least, embellishments! BoBunny Curly Q stamp, new Double Dot Licorice ink pad, new BoBunny Stamp Block Set and new Double Dot jewels in Ruby Red & Tuxedo add a touch of elegance to this layout. Finally, BoBunny Wild Berry Daisy Blossoms finish it off with just the right touch!

BoBunny1-07232014-550W

Supplies:

Double Dot Chevron: Chiffon, Wild Berry, Sugar & Licorice. Curly Q stamp, Double Dot Licorice Ink Pad, BoBunny Stamp Block Set, Double Dot Ruby Red Jewels, Double Dot Tuxedo Jewels, BoBunny Blossoms Wild Berry Daisy.

We hope you have enjoyed today’s feature. We want to extend a sincere thank you to Jan Lanoy for her fabulous project and for sharing her company, Bo Bunny, with us. Be sure to visit Bo Bunny to see more of their products and their blog for some inspiration!

In order to enter the give-away to win the set of 32 Double Dot Chevron patterned papers shown above, please leave us a comment in the comments section of this post. One winner will be announced next Wednesday on the Paper Crafter’s Library blog!

Karen


Winner of the Graphic 45 Give Away!

I’d like to extend a HUGE thank you to Graphic 45’s guest designer Andrew Roberts for sharing such a wonderful project and to Graphic 45 for their generous give-away of their By The Sea collection shown below.

Graphic45PrizePack-07162014-550W

And now, the moment you’ve all been waiting for…….the winner is……SuZeQ!

Graphic45Winner

Congratulations SuZeQ! Be sure to email us at customerservice@papercrafterslibrary.com to claim your prize. Please be sure to put “Graphic 45 Winner” in the subject line of the email, and then in the email itself, be sure to include your full mailing address and phone number.

Join us next week when we feature another great company.

Karen

Trend Watch – Nesting Dies

I love having nesting dies in my card-making materials.  If one isn’t quite the right size for a sentiment, I can always move up a size and still use the same shape.  I also like that I can use a size bigger or smaller to add a layer or more color to what I’m doing.  These are probably the most common ways nesting dies are used, but there are also a lot of other neat ideas out there for their use.

Chari created this card for Lawn Fawn using circle nesting dies to create the Captain America shield.  Isn’t it cute?

Hero Card

Hero card by Chari Moss, image source Lawn Fawn Blog

This birthday card by Ardyth almost looks disco-themed.  The nesting circles make such a nice effect.

Happy Birthday Card

Birthday card by Ardyth Percy-Robb, image source MASKerade

The various size banner cards add a lot to the visual interest of Nicky’s card, and it’s so nice she didn’t have to try to cut them out by hand!

Clockworks_Banners

Clockworks banner card by Nicky Dexter, image source Dexterous Designs

Nesting dies are great for creating layered windows in cards.  Lyssa also used banner dies, but created this cheery card with a framed window that opens to the inside of the card.

Banner Die Window

Wish card by Lyssa Griffin Zwolanek, image source Song of My Heart Stampers

I love how this card has a window frame through to the striped background.  It is so cute!

Star Window Frame

Star card by Jean Manis, image source Right as Rain

These dies are also great for making cards with striking shapes and folds.  My dear Partner-in-Crafting-Crime made the half-cut flip wedding card below.  I’m sure it got a big “wow” when it was opened!

IMG_1398

Wedding card by Katie Schelp, image source Life as a Schelp

This gate-fold card by Debbi is another great use for nesting dies.  The possibilities are endless!

Gate fold card

Gate-fold Alien card by Debbi V, image source her Pinterest page

Jaclyn’s card uses nesting dies to create a beautiful background.  I’m looking forward to trying something like this.  The effect is so stunning.

Circle Background Card

Card by Jaclyn Miller, image source Designs by Jax

If you’re up for a tedious project, this butterfly by Amber was created with nesting circle dies and some glue (and a lot of patience!)

Butterflies with Circles

Butterfly card by Amber Kemp-Gerstel, image source Damask Love

Shapes created by nesting dies are also great for other projects, like this patriotic wreath by Lynette.

Patriotic wreath

Patriotic Wreath by Lynette Kauffman, image source Lawn Fawn Blog

Plenty of companies sell nesting dies, including, but definitely not limited to, Lawn Fawn, Sizzix, and Stampin’ Up.

Lawn Fawn Stackable Dies

Scalloped Circle Stackable dies by Lawn Fawn

Regal Label Framelits

Regal Label Framelits by Sizzix

Ornate Labels Framelits

Ornate Labels #3 Framelits by Sizzix

Banner Framelits

Banners Framelits Die by Stampin’ Up