Featured Artist/Designer: Michelle Williams

Welcome to another Featured Artist/Designer Spotlight. Today we’re thrilled to welcome Michelle Williams.  Before we show you Michelle’s project, let’s get to know her a little bit more…

MichelleWilliamsProfilePic-12182014-250WHello! I’m Michelle from Brisbane, Australia. You could have knocked me down with a feather when I was invited to be featured on Paper Crafters Library! What an honour! A little about me – I have crafted my whole life long, but became seriously addicted to card making when my eldest daughter started school seven years ago. It took me a couple of years to find my own style. When I stumbled across the clean and simple (CAS) style, and then one-layer cards, which I found particularly challenging, I knew I had found my niche. It took me forever to gain confidence in putting stamp to paper for a one-layer card, but over time I have discovered that stamping with confidence is the key – I get the best results when I don’t hesitate! I still experiment, but most cards I make will fall into a CAS style, even when I’m watercolouring!

Thank You Card and Bookmark Gift Set

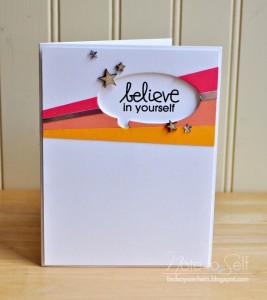
For my projects today, I have chosen to focus on my favourite style – ultra-CAS one-layer cards, but also make a version with a few layers for those who like CAS style, but don’t feel comfortable with the one-layer format.  The first two projects are exactly the same, using different colours.  I created these card and bookmark gift-tag sets as end of year teacher presents. Inside the boxes are tubes of hand cream in the same colours as the flowers on the cards.

MichelleWilliams1-12182014-550W

MichelleWilliams2-12182014-550W

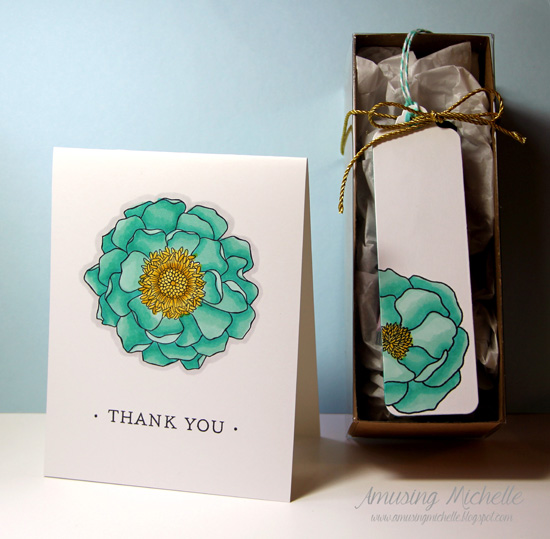
For the third project, I added a few layers. On all three cards, the flower is the focal point, brightly coloured with a simple sentiment. I coloured using Copics on all three projects. This is a new skill for me and I’m slowly improving!

MichelleWilliams3-12182014-550W

Supplies

When you look at my supply list you will find that I have used products from multiple companies, and this is my usual style – I use what I like and often mix products up to achieve the look I’m after.

Stamps: Stampin’ Up! Blended Bloom, Janes Doodles Pretty Peonies, WPlus9 Fresh Cut Florals (sentiment), Papertrey Ink Botanical Blocks (sentiment and dots)
Dies: Nestabilities circles, Papertrey Ink Bookmark
Ink: Memento Tuxedo Black
Card: Simon Says Stamp #120lb, Papertrey Ink Hisbiscus Burst, Stampin’ Up Basic Black
Copics: R20, R22, R24, Y21, Y26, YR14, BG11, BG13, BG15, RV13, RV14, RV17

I hope you’ve enjoyed my cards today. It’s been an absolute thrill for me to be here!

We hope you have enjoyed today’s project courtesy of Michelle Williams.  Be sure to stop by Michelle’s blog to see even more of her beautiful work (and let her know we sent you). You can also find Michelle on Facebook, Pinterest, Instagram and Twitter.

Happy Crafting!

Winner of the May Arts Ribbon Give Away!

MayArtsLogo-09102014-500W

I’d like to extend a HUGE thank you to May Arts Ribbon’s guest designer Tracy McLennon for sharing such a beautiful Christmas scrapbook page and to May Arts Ribbon for their generous give-away of their collection shown below.

MayArtsPrize-12102014-550W

And now, the moment you’ve all been waiting for…….the winner is……Renee VanEpps!

MayArtsWinner

Congratulations Renee! Be sure to email us at customerservice@papercrafterslibrary.com to claim your prize. Please be sure to put “May Arts Ribbon Winner” in the subject line of the email, and then in the email itself, be sure to include your full mailing address and phone number.

Join us next week when we feature another great company!

Featured Company: Graphic 45

We are happy to bring you this week’s Featured Company: Graphic 45. We are so excited to be featuring them regularly on Paper Crafter’s Library! And this week we have a “Time To Flourish” collection prize package give-away valued at $36.  Details will be at the end of this post.

Graphic45PrizePack-12172014-550W

Graphic 45 Designer – Keri Sallee

Our Graphic 45 Guest Designer for this week is Keri Sallee who is part of the 2014 Graphic 45 Design Team. You can see Keri’s fabulous project below, but first, here is a little more about her:

KeriSalleeProfilePic-12172014-250WKeri Sallee is a lover of all things creative, from writing to cooking to art to music. Before shifting her focus to paper crafting and mixed media art, she went to school for music ministry and studied as a classically trained soprano.

She currently designs for Graphic 45, Marion Smith Designs and The Crafter’s Workshop. Previously she has also designed for Susan K Weckesser, The Canvas Corp family of companies and Scrapbook News and Review.

For the last 9 years she has lived in beautiful Northwest Arkansas with her husband of 12 years and her three crazy kiddos, ages 11, 7, & almost 5.

You can find Keri on her blog, Facebook, Twitter, Pinterest and Instagram.

Altered Day Planner

Jazzing up your day planner is all the rage, but it can get extremely expensive to invest in some planners, plus all the fun stuff. Graphic 45’s “Time to Flourish” Collection is a calendar inspired collection that works perfectly to add some fun and personalization to your day planner.

I am always looking for ways to keep things inexpensive, so when I saw this day planner at Wal*Mart for only $1, I knew it was perfect for this project.

KeriSallee1-12172014-550W

By simply covering it with paper from the “Time to Flourish” collection with some matte gel medium and adding a few fussy cut images and stickers, I was able to turn this Plain Jane planner into something luscious that I would be happy to whip out of my purse to write down any and every appointment.

KeriSallee2-12172014-550W

A bonus for my cheap-o planner was that it came with a plastic cover, so all my pretty images are well protected.

Because of this cover, I had to keep my cover fairly flat in dimension, so I used Ranger Archival Ink in Sepia to add some depth, along with lots of layers. I also added a few bits of paper doilies by Wiltons to add more texture.

KeriSallee3-12172014-550W

I used Graphic 45 Washi Tape to cover my spine to keep it flexible.

KeriSallee4-12172014-550W

In the “Time to Flourish” Collection, there is a “cut apart” page for each month of the year. Using the 8×8 and 12×12 pages, I could easily add names, images and quotes to my otherwise boring planner.

Here are few of my favorite months:

KeriSallee5-12172014-550W

KeriSallee6-12172014-550W

KeriSallee7-12172014-550W

To keep it easy, I used the same “sketch” for each month and gave it a more “finished” look by edging my pages with Graphic 45 Washi Tape.

I was also able to label special days of the year using pieces from the same “cut apart” papers.

KeriSallee8-12172014-550W

I loved adding quotes to my calendar to keep me inspire all year long!

KeriSallee9-12172014-550W

KeriSallee10-12172014-550W

I hope you enjoyed my project today and I hope it inspired you to think outside the box. And remember: it doesn’t always take a lot of $$ to be creative…you just have to look in the right places.

XOXO,
KERI

Supplies

Graphic 45 “Time to Flourish” 12×12 & 8×8 “Cut Apart” Pages
Graphic 45 “Time to Flourish” 12×12 August and February Flourish Pages
Graphic 45 “Time to Flourish” Decorative Stickers
Graphic 45 “Time to Flourish” Alphabet Stickers
Graphic 45 “Time to Flourish” 6×6 Patterns and Solids
Graphic 45 Washi Tape
Liquitex Matte Gel Medium
Beacon 3-N-1 Adhesive

**NOTE: I only used 1 sticker from the Alphabet set and 2 sheets from the Patterns & Solids…these can be easily substituted to keep costs down! 🙂 **

I would like to extend a warm thank you to Keri for sharing her fabulous project with us! Please take a minute to stop by Keri’s blog and of course the Graphic 45 blog to check out all their amazing creations! Be sure to leave a comment on this post to enter to win the Graphic 45 collection listed above.

Trend Watch – Turning Negatives into Pretty Positives

I am all over the die cutting trend.  I have at least two machines that I use to help me die cut and I keep them pretty busy.  There are so many fun things you can do with the shapes, letters and expressions.  But like a lot of you, I get kind of bummed when I have to throw away the paper extras or die cut negatives, especially when the paper is so pretty.  Well, I looked around the internet and found that a lot of crafty people have come up with cards and pages out of the negatives created from their die cuts.  So its like getting two crafts in one!  If you are thoughtful when you cut out an image you can plan your second project from the negative.  Take a look at some of what I found.

This baby card is so sweet and simple.  I love how Suze fills in the negative space with another heart and a bow that looks like a little charm necklace.  So cute.

baby heart

card by Suze Bain photo courtesy of Can’t Stop Crafting

What about stamping in the middle of the negative mounted on another piece of paper?  This is super clever and works really well with the quote bubble die.

quote bubble

card by Lindsay Amrhein photo courtesy of Note to Self

Sam’s card is so awesome.  I love how the leaves fit in each other like a puzzle and the integrated Thanks is another intricate piece of the puzzle.  What a lovely card.

thanks leaves

card by Sam Simpson photo courtesy of A Blog by Sam

The peek a boo pink behind the grey works so well.  The layers remain flat but the color combinations with this technique are endless.  As a recent member of the 40 club, I would have loved to get this card for my birthday.

40th Starry Birhtday Sep-14

card by Jen Nelson photo courtesy of The Tiny Blue Butterfly

How sweet is this baby card?  I just love how the patterned paper behind the elephant die cut negative makes the elephant perfect for a baby card.

elephant

card by Jen Carter photo courtesy of Jen’s Ink Spot

This sweet tag is a Karolyn creation and just the perfect spot of color for a gift.  I love the extra time she spent giving each gift on the tag it own color personality.

Karolyn Loncon 25 Days of Christmas Tags_thumb[2]

tag by Karolyn Loncon photo courtesy of Paper Therapy

Dawn chose to back vellum behind her die cut negative creation.  What a cool look.  The faux pearls are such a great finishing look.

mint window

card by Dawn Olchefske photo courtesy of Do Stamping with Dawn

Die cut negatives lend themselves to easy cards sets too. You can whip out a birthday set like Iliana with coordinating colors of stamps and paper and save the butterflies for the envelopes.

butterfly card set

card set by Ilina Crouse photo courtesy of Creativity Within

You can mimic the look of the trendy Polaroid by die cutting a square out of a rectangle and framing a word, picture or stamp image like this one.

dahlia peek a boo

card by Darlene McCallum photo courtesy of Dreaming about Rubber Stamps


Again with my obsession with all things shaker, but these are so cool.  Image on top, lovely sprinklies in the back, this card has is all and you can still use the stitched circle from the middle on another project!  Win win.

quick note shaker

card by Nichol Magouirk photo courtesy of Blogged by Nichol Magouirk

What a cool scene Karolyn built around her ship negative.  Isn’t that a fun technique to spill the sequins outside of the shaker portion of the card?

float my boat

card by Karolyn Loncon photo courtesy of Paper Therapy

This awesome page uses the positives and the negatives and comes out with this great big positive.  This is super beautiful.  The motion created on this page is very inspiring.

Remember This sized blog

page by Stacy Cohen photo courtesy of That’s my Story and I’m Sticking To It

So, I know not too long ago, I wrote an article encouraging you to use up your scraps and I am kind of going back on that by saying save your die cut negatives.  But in my defense, I am still encouraging you to use them as well as to save them!   I hope you have found some cool new ways to incorporate them in your paper projects.

So go ahead… make something pretty.

I have found a few products to continue to inspire you.

birdie die

circle die

avery die

vellum

vellumwhite

Winner of the Cut @ Home Give Away!

CutAtHomeLogo-12052014-550W

I’d like to extend a HUGE thank you to Cut @ Home’s designer Patti Senter for sharing a Manly Man Gift Box and Mini video tutorial and to Cut @ Home for their generous give-away shown below.

PattiSenterGiveAway-12052014-550W

And now, the moment you’ve all been waiting for…….the winner is……Ann!

Cut@HomeWinner

Congratulations Ann! Be sure to email us at customerservice@papercrafterslibrary.com to claim your prize. Please be sure to put “Cut @ Home Winner” in the subject line of the email, and then in the email itself, be sure to include your full mailing address and phone number.

Join us next week when we feature another great company!

Featured Artist/Designer: Heather Pulvirenti

Welcome to another Featured Artist/Designer Spotlight. Today we’re thrilled to welcome Heather Pulvirenti.  Before we show you Heather’s project, let’s get to know her a little bit more…

HeatherPulvirentiProfilePic-12112014-250WHello! I am so excited and honored to be featured on the Paper Crafter’s Library today! My name is Heather Pulvirenti, though most people in the blogosphere know me as Heather P. 🙂 I live in Columbia, MD with my husband Jason, our 9 1/2 year old daughter Lindsay, and an assortment of little boogers (aka our cats and dog).

I was born in England, and have spent most of my life in the US (in Maryland and Virginia), except for the four years we lived in Canberra, Australia (my mom was career Air Force).  I am currently a SAHM, but since my daughter is off during the day at school, I fill my days working on remodeling projects around the house, and running my little Etsy business.

I started paper crafting about 10 years ago after being invited by my husband’s aunt to a Stampin’ Up! workshop, and I haven’t looked back since.  LOL, my style and go-to colors have definitely changed over time, but there’s something so enjoyable about creating that never waivers.

Thanks Card

If there’s one thing you should know about me, I am completely obsessed with heat embossing.  It’s fast, fun and really adds a little something extra to cards/projects.  To create today’s card, I started by first cutting a medium gray card base.  I then cut a strip of light gray card stock and stamped the sentiment in Versamark ink before heat embossing with white powder.  Next, I stamped an assortment of flower and leaf images in Versmark ink onto mint card stock, and then heat embossed them with white powder as well.  Once that was done, I secured the light gray card stock to the card front, then cut a strip off the bottom of the mint card stock.  To finish up, I adhered the two sections of mint card stock to the card base with pop dots, then embellished with green enamel dots.

HeatherPulvirenti1-12112014-550W

HeatherPulvirenti2-12112014-550W

Supplies

Simon Says Stamp Summer Garden Stamp Set
Simon Says Stamp Thanks Stamp Set
Versamark Ink
Hero Arts White Embossing Powder
Simon Says Stamp Fog Gray Card Stock
Simon Says Stamp Slate Gray Card Stock
Hero Arts Shallows Card Stock
Doodlebug Designs Limeade Enamel Dots

We hope you have enjoyed today’s project courtesy of Heather Pulvirenti. Be sure to stop by Heather’s blog to see even more of her beautiful work (and let her know we sent you). You can also find Heather on Facebook.

Have a great day!

Winner of the Faber-Castell Give Away!

DMC_Newlogo_RegMark_2012

I’d like to extend a HUGE thank you to Faber-Castell’s guest designer Zoey Emanuela Scarpelli for sharing such a wonderful project and to Faber-Castell for their generous give-away of prize pack consisting of some Red Gelatos, Metallic Gelatos, Gold/Silver Gelatos and an Essential PITT Artist Pen Set.

FaberCastellPrizePack-12032014

And now, the moment you’ve all been waiting for…….the winner is……Virginia L!

FaberCastellGiveAway

Congratulations Virginia! Be sure to email us at customerservice@papercrafterslibrary.com to claim your prize. Please be sure to put “Faber-Castell Winner” in the subject line of the email, and then in the email itself, be sure to include your full mailing address and phone number.

Join us next week when we feature another great company!

Featured Company: May Arts Ribbon


MayArtsLogo-09102014-500W

We are happy to bring you this week’s Featured Company: May Arts Ribbon.  And this week we are giving away these three beautiful ribbons to one lucky reader (Details at the end of the post.)  Please note that this give-away is only open to residents of Canada and the United States.

MayArtsPrize-12102014-550W

May Arts Ribbon Designer – Tracy McLennon

Today we welcome Tracy McLennon. We are so excited to have her showcase her work today on Paper Crafter’s Library. You can see Tracy’s fabulous project below, but first, here is a little more about her:

MayArtsProfilePic-12102014-250WHello, my name is Tracy McLennon and I live my crafty life in Nova Scotia, on the east coast of Canada. I am married to my super talented band teacher husband, Sean. I have 2 beautiful teenage step daughters, Margaret and Zoe, and we have a crazy pooch named Kya.

I have been a scrapbooker for about 17 years now. My love and obsession for it began when I was working at a pro photographic shop and they began to bring in scrapbooking product. I gravitated towards it, as I have always been crafty and enjoyed the arts. Shortly after that I began teaching classes at the store and I have been teaching ever since. I would say I am a scrapbooker and altered home décor creative artist. I do the occasional card, but my passion is for scrapbooking. I also have a background in photography, calligraphy and graphic design.  I am a May Arts Ribbon, Ribbonista. I have loved every minute of creating with their stunning ribbons and look forward to creating so much more in the future.

You can find more of my creations on my blog www.ScrappyChick101.blogspot.ca.  Thank you so much for having me here on behalf of May Arts Ribbon.

Seasons Greetings Layout

MayArts1-12102014-550W

I wanted to create a full on Christmasy layout for this post. So I sat back and thought about what holiday photos I may have on hand. I wasn’t inspired. Then I thought about a photo that my friend had posted last Christmas….THIS is the photo that I used for my layout. I just remembered how stinking cute that photo was of her sweet little rescue pooch with Santa. She was kind enough to email me the photo right away, and then I got started!

I wanted to create a very Classic Christmas looking layout, with red, green and a little glitzy gold. I used the Merry & Bright collection from Pink Paislee, I thought the colours suited my ribbon choices and the photo perfectly.

There are so many different ways of using ribbon on your scrapbook layouts and other papercrafts. I LOVE to loop, layer and swag all of the different textured ribbon. To do this, I always have my ruler and a hot glue gun on hand, to manipulate the ribbon the way I envision it.  Ribbon is one of those embellishments that you can always have on hand to add that perfect bit of texture and dimension to a project.

Here are some close up photos of my layout.

MayArts5-12102014-550W

MayArts2-12102014-550W

MayArts3-12102014-550W

MayArts4-12102014-550W

Supplies

Metallic String – Gold
Adhesive Velvet Ric Rac – Green
Knotted Edge Satin – Red
String Beads – Pearlized
Burlap String – Natural

Pink Paislee – Merry & Bright Collection
Buttons
Corner Rounder
Hot Glue

We hope you have enjoyed today’s feature. We want to extend a sincere thank you to Tracy McLennon for her fabulous project and May Arts Ribbon for sharing their company with us. Be sure to visit May Arts Ribbon to see more of their products and their blog for some inspiration!

In order to enter the give-away to win the prize shown above, please leave us a comment in the comments section of this post. The winner will be announced next Wednesday.

Happy Crafting!

Trend Watch – From OUTER SPACE!

Okay, so I’m not actually in outer space, but I think these cards and their GORGEOUS backgrounds might make you wish you were!  I’ve always enjoyed looking up at the stars, and I think these cards capture the beauty of outer space.

Debby’s cute birthday card has a rocket that was embossed on vellum. I like how that makes the little “window” translucent! The fire coming out of her rocket is also so pretty.

Blast Off card by Debby Hughes

Card by Debby Hughes, image source Lime Doodle Design

The cute bunny flying in the rocket in Lori’s card would make anyone want to “shoot for the stars.” The debossed yellow circle in the front panel gives a perfect moon effect, and the circle behind the front panel also sets off the colors and front panel so well.

Shoot for the Stars card by Lori Tecler

Card by Lori Tecler, image source inking aloud

This card by Heidi has a fun little green alien bringing birthday greetings. The alien and rocket are popped up from the page and make a neat shadow on the background of the rocket. It seems like the rocket might blast right off the page!

Birthday Blast Off card by Heidi Baks

Card by Heidi Baks, image source RunningwScissorsStamper

Studio Calico recently came out with this cute rocket set that was used for the next two cards.

Emily’s card has a beautiful star map in the background, and the string she used as an accent adds such a whimsical touch to the card.

Hooray Stars Card by Emily Branch

Card by Emily Branch, image source Emily Branch Designs

The background of JJ’s card begins the part of my trend post that is a trend within a trend! As I sorted through the cards I had collected for this post, I realized I could probably claim my trend was gorgeous backgrounds, because all of them have created beautiful starry galaxies for their cards. (Be sure to go back and check out the neat backgrounds of the cards before these ones too!)

This little astronaut is headed out into the great unknown with a beautiful background behind him.

You're Out of this World by JJ Bolton

Card by JJ Bolton, image source Ribbon Girls

Karen’s card has a sweet sentiment with a very neat star map by Papertrey Ink. The colors she used for the background blend together so well.

Moon & Stars card by Karen Haman

Card by Karen Haman, image source carefree creations

The background on this encouragement card by Sarah is so pretty. I like how she used sentiment stamps to make up the background on top of the beautiful blended colors.

Out of this World by Sarah Gray

Card by Sarah Gray, image source a blog named Hero

Jennifer’s card uses embossing paste stars and distress inks, along with a few other materials to make this striking starry background. The vellum for the sentiment really allows the background to shine through.

Stars by Jennifer McGuire

Card by Jennifer McGuire, image source Jennifer McGuire Ink

Neat and Tangled’s Time Warp and A Long Time Ago sets make my inner (or not-so-inner?) geek giggle with delight! Mayuri’s card with the heart in the center is so happy! I like the background spatter she used in conjunction with the Time Warp set.

A Long Time Ago by Mayuri

Card by Mayuri, image source Candles in the Garden

Taheerah also used the A Long Time Ago set from Neat and Tangled on top of this gorgeous galaxy background. She also features some of the versatility of the sentiments in this set. How perfect is the “You Joined the (Work) Force” phrase!?

A Long Time Ago by Taheerah Atchia

Card by Taheerah Atchia, image source fill your paper with the breathings of your {Heart}

The background on Taheera’s card (above) and this card by Kristina both look like they could be straight out of some of the deep space photos that NASA features on their website. (Check these out for more inspiration!) The white embossing on top of Kristina’s background really sets off the sentiment well!

You Are Pretty Much the Best Ever by Kristina Werner

Card by Kristina Werner, image source kwernerdesignblog

This stamp set by Inkadinkado would make a fun card with a Jetsons theme.

Outer Space Wood Stamps by Inkadinkado

Outer Space Layering Wood Stamps by Inkadinkadoo

This set by Hero Arts offers a few more sentiments for space-themed cards in addition to the traditional “Out of this World”.

Shoot for the Moon by Hero Arts

Shoot for the Moon by Hero Arts

I hope the rest of your day is filled with dreaming of gorgeous galaxies that are far, far away, and you’re inspired to go make some beautiful cards of your own!

Winner of the 3 month membership to Paper Crafter’s Library

Happy Monday everyone!  We don’t have a Keep It CASual video tutorial for you today but we do have the winner of last week’s Keep it CASual giveaway for a 3 month membership to Paper Crafter’s Library.

And the winner is…Deborah Mitchell.

KeepItCASualWinner

Congratulations Deborah!  Please email me at customerservice@papercrafterslibrary.com to claim your prize. Be sure to put Keep it CASual winner in the subject line.

Happy Crafting!