
Today on the Paper Crafter’s Library blog, we’re continuing our weekly featured artist spotlight whereby each week we spotlight a different artist/designer in the paper crafting & mixed media world and introduce you to their fabulous work.
Today we’re thrilled to welcome Kelly Griglione. Before we show you Kelly’s project, let’s get to know her a little bit more…
 Hi! I’m Kelly, and like many of us, crafting has always been a large part of my life. I have such fond memories of time spent with my Grandma at her kitchen table learning every type of craft imaginable. My passion is for paper: collecting it (19th century valentines/postcards/scrapbooks) and making things with it (cards/home decor/party decorations/scrapbooks). I currently love pushing the boundaries in card making, and I get such a thrill figuring out how to make something work the way I want it to. Find me at www.notablenest.blogspot.com. I’d absolutely love to see you there!
I am absolutely thrilled to be guest posting today. I can’t wait to show you some fun projects using the 3D folding technique, most commonly used to turn a flat star into a barn star.

There are many instructions on the internet, but these are the basic steps.

You can now use your dimensional barn star on a card, gift tag, or home decor item like this framed Field of Stars I made for Christmas.

No doubt you have seen many other fabulous projects with these fun barn stars. Well, what if we applied that same folding technique of scoring down middle, then alternating mountain and valley folds, to other shapes besides a five-pointed star?
Let’s take a look!
Here’s a 3D Star of Bethlehem hanging from my ceiling with invisible fishing line. It was simple to find clip art online, trace/cut with the Silhouette, and then fold into a dimensional star. On a side note, I also added deer silhouettes to dress up my year-round canvas for Christmas.

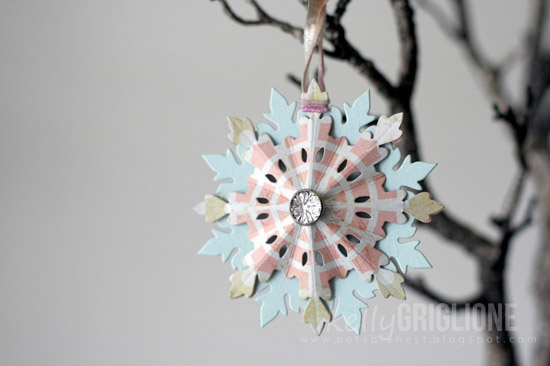
Don’t have any star shapes? No problem! You can also use this folding technique with large snowflakes. As you see, this snowflake has an even number of points (unlike the 5-pointed star) but it works just as well. Just score down the middle from point to point, and valley to valley, and then alternate folds. Chunky glitter makes the dimensional snowflake even more of a focal point. (I also tried the “pile of thread” technique perfected by Laura Bassen to layer behind the snowflake … super fun!)

Take it a step further and make a second dimensional snowflake. Glue the two snowflakes back-to-back and you have a sweet ornament.
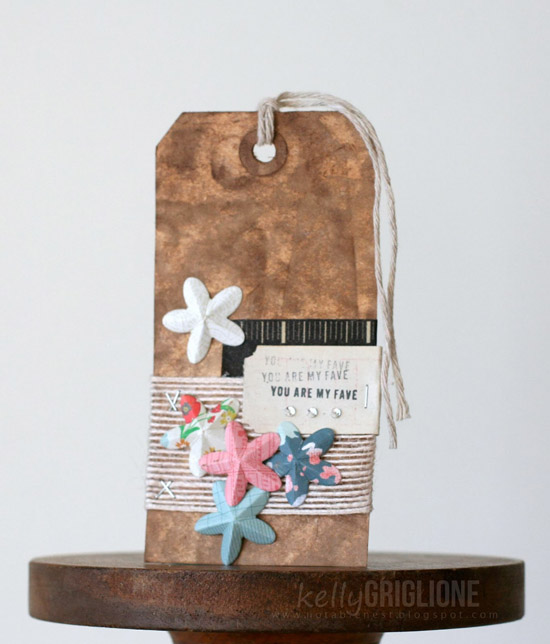
Use the dimensional folding technique on small flower punches or dies, and then cluster them together on a gift tag. You can even overlap them slightly. I love using dimensional items on tags because you don’t have to worry about envelopes or mail. These flowers would look so different if they were layered flat on the tag.
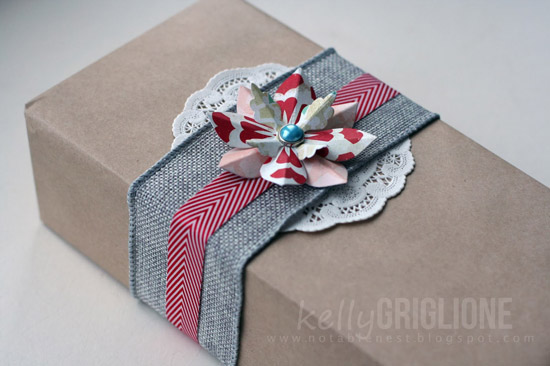
After making the small flowers, I was anxious to see what this folding technique would do for a layered flower. So excited when I saw the results! This dimensional flower makes such a cute present topper. You may notice that the middle of this flower is down and the ends are high, which is opposite from the earlier examples where the center juts out and the ends lie flat on the project.
Going along with the idea of pushing the dimension inward, I wanted to find out what would happen if just the middle of the shape went inward. After cutting out the large star, I scored a small star in the middle. This was done by replacing one cutting plate from the Big Shot with a thinner shim and running it through with the smaller star die. The outside margin of the star is folded as normal, and then you reverse folding on the inside. Big impact!

Thank you very much, Paper Crafter’s Library, for having me today. I hope you get a chance to look at your punches, dies, and/or electronic images and see which ones you could make dimensional with this folding technique. If you do make something, I’d love to hear about it. Stop by my blog anytime and let me know!
Supplies:
Bethlehem Star
Paper (Georgia Pacific)
Happy Birthday Card
Paper (Crate Paper, Fourteen)
Dies (Papertrey Ink, Damask Snowflake; MFT Die Namics, Accent It Celebrate)
Stamps (Papertrey Ink, Happy Hexagons)
Other (Washi Tape, Target; glitter; thread; sequins)
Snowflake Ornament
Paper (Crate Paper, Peppermint; The Paper Company, Ice Blue Metallic Cover)
Dies (Papertrey Ink, Damask Snowflake)
Embellishments (American Crafts, Large Diamond Brads)
Other (ribbon)
You are My Fave Tag
Paper (Crate Paper, 6×6 Storyteller)
Dies (Papertrey Ink Flower Fusion #3)
Stamps (Dear Lizzy Roller Stamp)
Other (washi tape, Target; tag, 7 Gypsies; Me & My Big Ideas, gems; ticket; Tiny Attacher; ribbon)
Flower Gift Topper
Paper (Crate Papper, Peppermint)
Dies (Papertrey Ink, Limitless Layers)
Embellishments (American Crafts, pearl beads)
Inverted White Star Card
Paper (American Crafts, Lucky Charm; Crate Paper, Peppermint)
Dies (Papertrey Ink, Seeing Stars and Wonderful Words; MFT Die Namics, High Rise Alphabet Uppercase)
Other (washi tape, Target)
We hope you have enjoyed today’s projects courtesy of Kelly Griglione. Also, be sure to stop by Kelly’s blog to see even more of her beautiful work (and let her know we sent you).

These are all so beautiful and unique, especially loving that last card!
Such a fabulous collection of projects with an awesome technique! Mahalo for sharing Kelly!
I love the inverted centre of the last star. I am going to try that one out. I have made 3d stars before and find the centre is always too squishy for my taste. i think this will alleviate the problem and it looks to cool as well.
Nicely done!!! I like all of the examples but especially like the inverted center on the last card. I think this will actually give the 3-D effect more stability. Thanks!
These are all amazing, love the dimensional look! Great job Kelly!!
Like I always say ….you are amazing ! I love these stars and the snowflake is beautiful! Thanks for sharing Kelly.
Love these projects!
Fabulous Kelly! Me second favorite after the star is the layered flower! Thanks for the inspiration!
WOWOWOWOW! you really went the extra mile with all these amazing 3D like projects 🙂 love how your amazing mind works with crafts. Great feature
Fabulous projects!
Kelly is magical!
Thank You!!