Welcome to another Featured Artist/Designer Spotlight. Today we’re thrilled to welcome Karolyn Loncon. Before we show you Karolyn’s project, let’s get to know her a little bit more…
 Hello! My name is Karolyn Loncon. I’m a retired Legal Assistant, married to Garry since 1980, and mom to Amy and Ashley, who’s married to Blake and the mother to Brecken, Brenner and Brynley. I’m blessed to live in Issaquah, Washington in the summer, and Chandler, Arizona in the winter.
I love most paper crafts, but especially stamping and card-making. The name of my blog is Paper Therapy. I love to laugh, travel and play BINGO (don’t judge – LOL)!
I started paper crafting in 2002 when my older daughter “abandoned” me to go to college. I scrapbooked as my therapy. Shortly thereafter, a friend invited me to a Stampin’ Up! party, and the rest is history. Once I discovered stamping and card making, my need for instant gratification took over. I haven’t touched a scrapbook since! Ha!
I would say that my style is mostly clean and simple, although I throw in some fun and cute every now and then. I’ve been fortunate to have many of my projects published in paper crafting magazines. I also currently design projects for Avery Elle Stamps and Runway Inspired Challenge, and have recently enjoyed participating as one of the Guest Artists for the Online Card Classes. So much fun!!
It’s always fun to be invited by Andrea to share a couple of projects with you all, so let’s get started, shall we?
Puppy Love
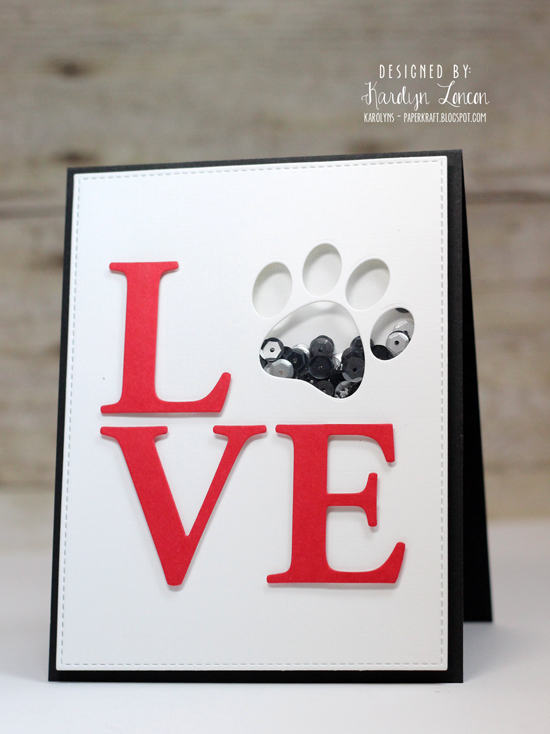
I’m an animal lover, and am really enjoying the cat and dog trend that I’m seeing in so many areas of our little crafty world! So both of the projects I’m sharing today have a dog theme to them. My first project is a fun little shaker card that I created using some recently released My Favorite Things products. It’s actually very simple to create. Here’s how I did it:
1. Trim an A2 top folding card base from black cardstock; score and fold at 5.5; press crease with Teflon Bone Folder.
2. Die cut image panel from white cardstock using the stitched rectangle die from the Blueprints 13 Die-Namics set.
3. Die cut the letters from red cardstock using the LOVE Centerpiece Die-Namic. Using the negative of the die cut as a guide, adhere the letters to the image panel with foam tape.
4. Position the large paw print die (from the Pet Accents Die-Namics) next to the L, and run through die cut machine.
5. Trim out a piece of acrylic cardstock to cover the negative of the die cut paw print; adhere to the back of the image panel with adhesive tape runner.
6. Layer two thicknesses of foam tape around the outside of the paw print to provide an area for the sequins and shaker materials. You’ll also need to add two layers of foam tape around the outside of the image panel back. Sprinkle sequins and microbeads inside the shaker area. Trim a piece of white cardstock slightly smaller than the image panel. Remove the foam tape release tape and adhere the smaller panel to the back to seal off the shaker.
7. Adhere assembled shaker front to the card base with adhesive tape runner.
Here’s a close up of the shaker card:

My mom’s dog recently passed away, so I think I’ll send this to her. It’s clean, simple and pretty straight forward. And it’s kind of fun to have that shaker aspect to it, don’t you think?
Supplies
PAPER: Red Hot, Black Licorice cardstock and Acrylic cardstock (My Favorite Things); White Linen cardstock (Ellen Hutson Essentials)
OTHER: LOVE Centerpiece Die-Namic, Pet Accents Die-Namics and Blueprints 13 Die-Namics (My Favorite Things); Midnight Blend Sequins (Avery Elle), Black, Silver and Clear Microbeads (POP/American Crafts)
Fire Hydrant
Okay, so my second card is another fun one. If you know me at all, you know I love to laugh. And when I saw one of the sentiments from the You Make My Tail Wag stamp set from My Favorite Things, I laughed out loud and just HAD to make a card with it!
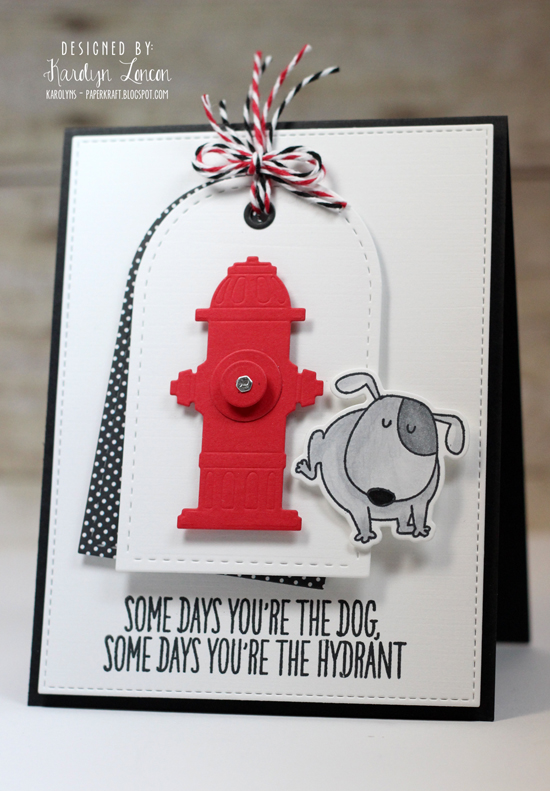
Hilarious, right?!! Hopefully you’re not offended, because I think it’s pretty darned funny.
Here’s how I made it:
1. Trim an A2 top folding card base from black cardstock; score at 5.5” and crease with Teflon Bone Folder.
2. Die cut image panel from white cardstock using the stitched rectangle included in the Blueprints 13 Die-Namics set.
3. Stamp sentiment from You Make My Tail Wag using black dye ink; adhere image panel to card base with foam squares.
4. Die cut tag from white cardstock and black polka dot paper using the Anytime Tags Dies; adhere the two together, tilting the back tag just slightly to the left, using foam squares; thread red/white and black/white baker’s twine through the tag hole and tie into a bow; trim ends of baker’s twine. Adhere tags to the image panel with foam squares.
5. Die cut the fire hydrant from red and silver foil cardstock using the (Fire Hydrant Die from Memory Box), and assemble. Adhere to the tag with foam squares.
6. Stamp and die cut the dog from the You Make My Tail Wag stamp set (and coordinating dies) using Tuxedo Black ink; color with Copic Markers; adhere to image panel with foam squares.

There you have it, super easy and sure to bring a smile to any dog-lover’s face, right?!!
Supplies
STAMPS: You Make My Tail Wag (My Favorite Things)
INK: Black Licorice Hybrid Dye Ink (My Favorite Things); Tuxedo Black Ink (Memento)
PAPER: Red Hot and Black Licorice cardstock (My Favorite Things); Black and White Polka Dot Paper (Simple Stories); Silver Foil cardstock (Die Cuts With a Vew)
OTHER: Anytime Tags Dies (Lil Inker Designs), Fire Hydrant Die (Memory Box), You Make My Tail Wag Die-Namics and Blueprints 13 Die-Namics (My Favorite Things), Maraschino and Charcoal Baker’s Twine (The Twinery), Copic Markers
That’s it for me today, friends! Thanks so much for dropping by to see my projects! And thank you to the sweet folks at Papercrafter’s Library for inviting me back – I love sharing with you all!!
We hope you have enjoyed today’s project courtesy of Karolyn Loncon. Be sure to stop by Karolyn’s blog to see even more of her beautiful work (and let her know we sent you).
Happy Crafting!
Both of these cards are awesome but I REALLY love the first one!! That paw print rocks! TFS!
Yay for Karolyn…she absolutely ROCKS!
So happy to see Karolyn featured here! She is one crafty chica and I love her style!
The cards are fantasctic!
Really cute cards! Love that fire hydrant…and the message. So true! Looking forward to seeing more of your cards.
Thank you for featuring the uber-talented and much-loved Karolyn!! I mean, seriously, just look at these fabulous and fun cards?!! She ROCKS!! Hugs, Darnell
I love these cards! Outstanding! Your work is amazing!