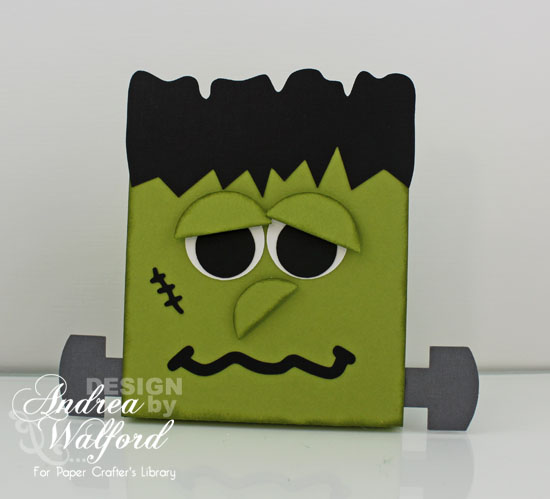
We are getting into the halloween spirit here in the stamping studio! This week we have created a variety of Halloween projects. This weekend is Thanksgiving here in Canada and that means that Halloween is just around the corner. I hope that you enjoiy all of the weeks projects and have a Wonderful Thanksgiving!
Tiny Treats Halloween Card
Andrea was inspired to create this simple Halloween card by the pumpkin image. She has had some fun lately coloring with her Copic markers and the pumpkin image just made her smile. What a cute card!
Supplies:
Stamps: Tiny Treats – Halloween
Ink: Jet Black Archival ink (Ranger); Tuxedo Black Memento ink (Tsukineko); YR12, YR15, YR18, Y11, Y19, YG11, YG13 and YG17 Copic markers (Copic)
Paper: True Black CS, Orange Zest CS, White CS, Textile Halloween Prints DP (papertrey ink)
Accessories: bone folder, 1 3/4″ Circle punch, paper snips, Stampin’ Dimensionals (Stampin’ Up!); Tin Types impression plate, Mat Stack 5 die (papertrey ink); Big Shot (Sizzix); Tape Runner XL, 3D Foam (thermo-web); Standard Circles Large Nestabilities dies, Grand Calibur (Spellbinders)
Frankie Treat Pouch
Andrea has also created some really great Frankenstein treat holders for our members this week. These two projects include exclusive printable templates as well as svg files for the pouch bases and all of the face elements. The Frankie Treat Pouch is designed to hold a 4″ x 6″ cello bag filled with treats and would make a great gift for teachers or neighbours!
We have a video tutorial and pdf for our members here. (You must be logged in to view the page)
Supplies:
Ink: Old Olive Classic ink (Stampin’ Up!)
Paper: Lucky Limeade CS, Basic Black CS, Whisper White CS, Basic Gray CS (Stampin’ Up!); Copy paper (Office Supply Store)
Accessories: 3/4″ Circle punch (optional), 1″ Circle punch (optional), 1 1/4″ Circle punch (optional), bone folder, paper snips, sponge dauber, Stampin’ Dimensionals, Sticky Strip, Signo White Gel pen (Stampin’ Up!); Tombow multi-purpose liquid glue (Tombow); ruler, small cello bag, craft knife, self healing craft mat (Craft Store); Dotto Repositionable adhesive (optional)(EK Success); stapler (Office Supply Store)
Frankie Candy Wrapper Pouch
Andrea loved the Frankie Treat Pouch so much that she decided to create a smaller version of the pouch, ending up with this Frankie Candy Wrapper Pouch, so that her children could share treats with their classmates!
We have a video tutorial and pdf for our members here. (You must be logged in to view the page)
Supplies:
Ink: Old Olive Classic ink (Stampin’ Up!)
Paper: Basic Gray CS, Old Olive CS, Basic Black CS, Whisper White CS, Designer Series Paper Stacks Brights Collection (Stampin’ Up!)
Accessories: 3/4″ Circle punch (optional), 1/2″ Circle punch (optional), 1/4″ Circle punch (optional), bone folder, sponge dauber, paper snips, Basic Gray3/8″ Taffeta ribbon, Craft scissors, Stampin’ Dimensionals, Signo White Gel pen (Stampin’ Up!); craft knife, self healing craft mat, ruler (Craft Store); Tombow multi-purpose liquid glue (Tombow)
Have a great weekend!


I’m LOVIN’ all the Halloween inspiration! Such fun projects! Makes me want to craft all weekend!
I don’t know that I’d have the time, patience or money to color the pumpkin as you did, but it turned out great. I learn something every time I watch a PCL video. The other projects are adorable! Thanks for continuing to educate and share with us.
Fantastic Halloween treats! I love how easily you make your card. TFS
I love the way you photograph your cards. Do you take them on a ceramic tile or something to get the reflection or is that done in photoshop:)
I love this!!!
Cute card and treat containers.
Cute card, but love the Frankie treat holders.