Now you see them, now you don’t. Or is it, now you don’t see them, now you do? But wait–now you don’t see them and now you don’t? LOL!! Regardless of how you may, or may not see Transparencies–They are everywhere!!
There are so many ways to incorporate see-through touches into your designs; Surfaces, glazes, texture products, accents, embellishments–From the base you decide to create upon, to that final, finishing detail, the creative possibilities are crystal clear!
In today’s Trend Watch report, I’ll show you a few ways that designers are combining transparent elements in their creations, in their own clearly spectacular ways! Wait until you see these!!
I couldn’t think of a better, more beautiful card to whet your appetite, than with Anna-Karin’s airily transparent card, made out of a myriad of clear and translucent ingredients; Acetate stock embossed and accented with modeling film & shrink plastic dragonflies; A clear button that secures a glassine bag filled with shaved ice! And those die cut letters treated scrumptiously with Tim Holtz’s Clear Rock Candy Distress Glitter–Just Beautiful!!
 Dragonfly card designed by Anna-Karin Layers of Ink
Intimidated about using acetate for an entire card base? Don’t worry, just start simply and use a small piece of acetate to accent your card with, like Pamela Ho did here on her very happy Ferris wheel card.
Pamela used her piece of acetate as a clever, clear overlay to stamp her sentiment and clouds on, then strategically used adhesive to secure to her card front. This simple and uncomplicated addition of acetate to her card makes it look like the sentiment and clouds are serenely floating over the scene.
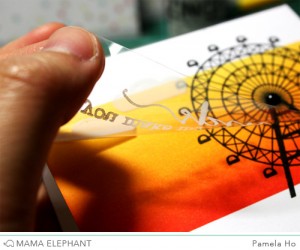 card design by Pamela Ho Fishy Designs
 card design by Pamela Ho Fishy Designs
How about the clear wonders of multi-purpose products like Dimensional Magic, Glossy Accents and Diamond Glaze, just to name a few? Not just awesome, clear, multi-surface adhesives, these products are fantastic dimension builders on designs that give just the right amount of transparent shininess.
Check out Jessi Fogan’s gleaming space ship that she first stamped onto card stock, colored with markers and fussy cut, then gave a layer of Dimensional Magic to. That rocket is virtually bursting through the stratosphere!!
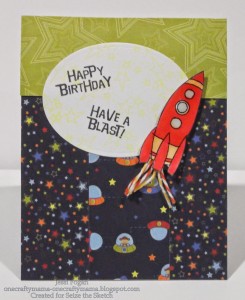 Have a Blast b-day card from Jessi Fogan-One Crafty Mama
Here, Elaine’s pretty papered chipboard numbers are a sturdy surface for the Diamond Glaze she used to highlight this feminine 60th Birthday card with. This gorgeous celebration of 60 decades will look this fresh and shiny (and Young!) for many years to come!!
 60th celebration b-day card designed by Elaine Hughes–Marker Geek
Remember getting those little cups of ice cream as a child? Me? I remember my grand-parents having a freezer full of frozen treats to choose from and I always chose the little cup of orange & vanilla ice cream that came with its own little wooden spoon, tucked inside its own little bag.
Linda Coughlin, The Funkie Junkie, brought that memory back in vivid color with her Summer Nostalgia creation, with its very own wooden spoon tucked neatly inside a translucent glassine mini-bag!! I’m sure Linda’s creation will bring back your own nostalgic, ice cream memories!
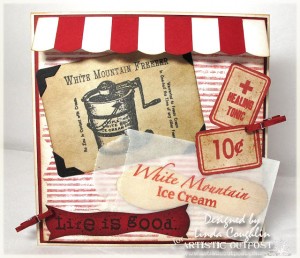 Summer Nostalgia card designed by Linda Couglin-The Funkie Junkie for Artistic Outpost
Linda’s creative use of glassine bags is a signature detail for her. Not only does she use them as embellishments in her designs, she cleverly uses them as surfaces to create upon, too!!
These glassine packets are just enough frosty and just enough see-through that you really can’t make out the festive little Christmas goodies that are tucked inside. Talk about Merry!!
 Shabby Glassine Christmas Packets created by Linda-The Funkie Junkie-Coughlin
I can’t forget to mention a favorite diaphanous surface of mine–Vellum! It has to be one of the most versatile papers you can have in your paper crafting inventory. It can be used in so many translucent-y wonderful ways.
Natalie Strand stitched her layer of vellum over an ombre effect background, then heat embossed doilies and a sentiment to draw your eye to those seemingly floating images. Add a few clear rhinestones and it’s sheer magic!!
 Rainbow Ombre Birthday Wishes card by Natalie Strand-Vegatablog
Another use of vellum is showcased beautifully by Debby Hughes in this stunning baby shower card. The vellum panel seems to gently lift the die cut and stamped words right off the face of the card and the enamel dots seem to be floating on their own! So pretty and delicate.
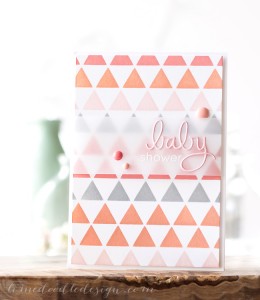 Baby Shower card designed by Debby Hughes-Lime Doodle Designs
Don’t forget to WOW ’em with those final crisp and clear touches of embellishments. Some of my favorite embellishments are the simple ones that can bring the entire flavor of the design together.
Clear rhinestones are a fabulous way to add sparkly, clear fun and a touch of posh to any card design. Meihsia Liu uses a swirl of clear rhinestones to romanticize her creation of Love! Ooo Laa Laa!!
 Love is in the Air card designed by Meihsia Liu-www.meihsia.blogspot.com
Laura Sterckx Wows big-time with her clean & simple style of card design embellished with an easy flair of clear sequined embellishing! Laura’s random sprinkling of see-through sequins on her Hello card reminds me of bubbles! A darling finishing touch to her water colored greeting.
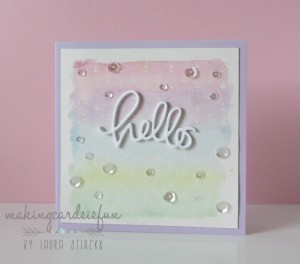 Water color Hello card designed by Laura Sterckx-Making Cards is Fun
Viewing Laura’s Hello card up close, you can see the super cute anchor resist background that tied right in to my thought of her clear sequins as bubbles!! Ahoy Matey!!
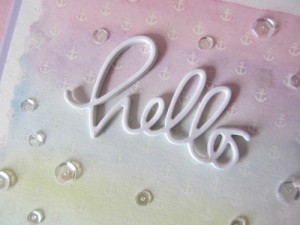 Hello card created by Laura Sterckx-Making Cards is Fun
So, you see–Transparencies are everywhere and I’ve barely touched the tip of the transparent iceberg! There’s so much more out there to write about–maybe there’s another article in this? Hmmm? LOL!! (Be sure to subscribe to our newsletter!!)
But, I think you get the idea! See-through alternatives in all things for card crafting are available. I bet you’ve got some clear and translucent goodies in your inventory that you’re looking at in a whole new way, now!!
Thanks for joining me today!! Happy crafting!!
By Shari
Such a wonderful, well written and informative article, Shari, full of great crafting tips and techniques. Love all the fantastic examples you’ve shared. What an honor to have my work spotlighted in your article. Thank you so much for including it!
This is an awesome blog post, Shari! I am so happy and honored to be featured here! 🙂 THANK YOU!!!! Xoxox
I’m so excited to be sharing blog space with such talented people! Some very fun ideas to explore here 🙂
Cool article Shari! Congrats Jessi, on being one of the featured artists!
magnifique
I had no idea what “diaphanous” meant, so I quickly looked it up. Not only have I seen some lovely cards, I have also learned a new word. Interesting posting!
Thank You, Martie!! Glad you came by!
Thank You All sooo much for coming by PCL and taking the time to comment! Your feedback is valuable and appreciated 🙂 Hope you’re enjoying all of the fun articles here at PCL!!