
This week we’re excited to welcome another company that is new to Paper Crafter’s Library: Tiddly Inks.
Tiddly Inks’ images are illustrated by Christy Croll. Tiddly Inks offers their cute and unique images mainly as digital stamps, along with some clear stamp sets as well. Christy is a self-trained illustrator who likes simple, cute and quirky drawings with a sense of humor. She draws what amuses her, which means some days it is quirky and cute and other days it is a bit of a twisted gothic feel.
This week Tiddly Inks is giving away the two 3″ x 4″ clear stamp sets shown below.

In addition, they are offering a fabulous deal for any of you who want to purchase the digital version of the stamp used in the feature (shown below), which is called “Fox” Me Up. You can purchase this image for only $1 when you use the discount code PCL at checkout in the shop, www.tiddlyinks.com

Today we are thrilled to welcome 3 different Tiddly Inks Designers, each sharing their work. Below you’ll find a little bit about them as well as their project.
Tiddly Inks Designer – Lisa West
 My name is Lisa and I live on the South Coast of the UK with my hubby, 5 year old boy and two year old girl. I have crafted on and off since I was a little girl, but have been seriously papercrafting for just over 10 years and have been very lucky to design for some fabulous companies. When I’m not crafting, which doesn’t happen often, I love to cook, bake, garden, watch TV/ movies and spend time with family.
Tag Shaped Get Well Soon Card

Supplies
Fix Me Up Image, sentiment from Wryn New Wings,Copics, Copic X-Press It Blending Card, Basic Gray Hipster 6×6 Paper Pad, Kraft Card, Spellbinders Plain and Scalloped Oval Dies, Go Kreate Tag Dies, Hessian Ribbon, Distress Ink Walnut Stain and cream ribbon.
Tiddly Inks Designer – Portia Beacham
 Portia is a chalkboard artist during the day and a comedy writer and Shakespearean actress by night! Born in Alaska, she currently lives in Arizona and loves creating characters as well as paper crafts. She is open to new techniques and loves being inspired by unique artists like Christy Croll!!!!
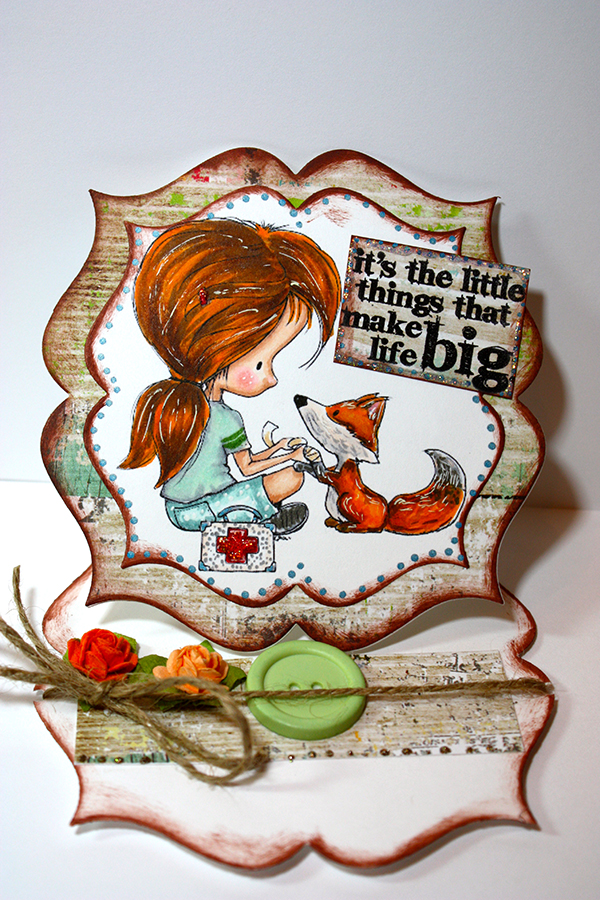
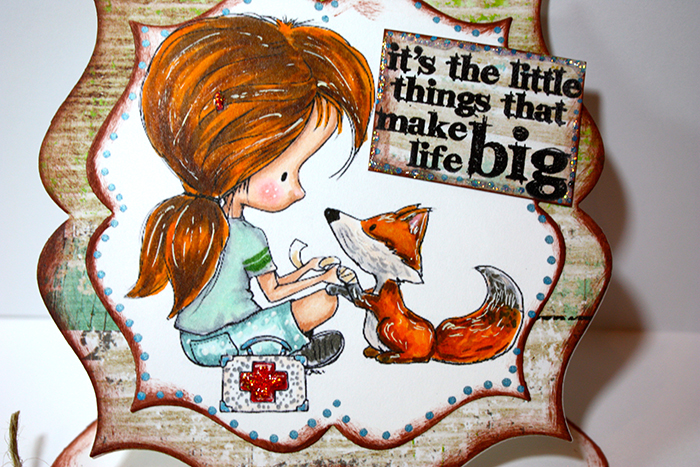
Fix Me Up Shaped Easel Card
Supplies:
“Fix Me Up” digi stamp by Christy Croll, Tiddly Inks
Colored in Copic Sketch Markers
Diamond and Platinum Stickles
Melted Chocolate Paint by Dylusions
1.2mm Blue Metalic Marker by ek tools
Sizzix Die Cut 559202
Paper Roses
Jute
Green Button
Paper by Brandin O’Neil “Nest” for Webster Pages
Sentiment Clear Cling Stamp By Tim Holtz
Tombow Mono Liquid Glue
Tiddly Inks Designer – Karen Hanson
 Karen is a mom, wife, teacher and crafter in Calgary, Alberta, Canada.
A paper crafter at heart, Karen loves to create cards, scrapbook layouts and altered items.
Karen currently hosts the ScrappyCanuck Studios blog, where you will find projects she creates for the ones she loves.
Karen is a mom, wife, teacher and crafter in Calgary, Alberta, Canada.
A paper crafter at heart, Karen loves to create cards, scrapbook layouts and altered items.
Karen currently hosts the ScrappyCanuck Studios blog, where you will find projects she creates for the ones she loves.
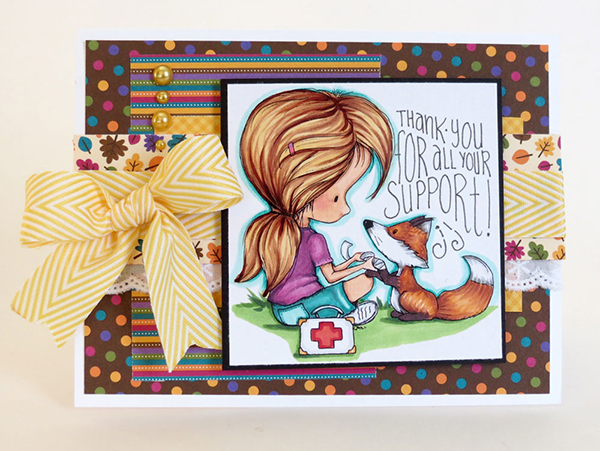
Thank You For All Your Support
This little 4 1/4″X 5 1/2″ card was inspired by the warm colours of the cute fox in the Tiddly Ink image. The Copic colors used for the image were chosen to match the DoodleBug Forest Friends paper, and the card was topped off with a Chevron Twill bow from May Arts Ribbon. The sentiment was hand lettered to add a personal touch, focusing on the “helping hand” theme in the image.
Supplies:
Doodlebug Forest friends patterned paper
May Arts ribbon – 3/4″ Chevron Twill in yellow
May Arts ribbon – 3/4″ white eyelet
Copic markers
Tiddly Inks Designer – Myndi Fraser

I am a mom to five wonderful kids, spanning the ages of 18 to 2, and one Ragdoll cat. I have a great husband who puts up with all of us. I have lived all over the world as a Navy Brat, and then as a member of the Air Force. Now, I am a stay at home mom, and my kids keep me plenty busy.
I started crafting about five years ago, and I started colouring with Copics two years ago, and it has been my main crafting focus since then, although I am starting to get into mixed media now as well.
Get Well / Thank You Card
I made a card and left it sentiment free. It could be used as a “get well” card or a “thank you” card to someone who helped you through an illness. I distressed the edges of all the layers, inking up the edges of the image with Tim Holtz Distress Ink in Victorian Velvet. I layered them all with the lace for the mat. I used hot glue to adhere the flowers, and craft glue to adhere the pearl string.


Supplies:
Michele R Designs digital papers in “Isabella”; flowers (ivory 25mm open roses, cream tulips, 2-tone pink and ivory 10mm open roses) and white decorative gallon lace from Wild Orchid Crafts; pearl string from Live & Love Crafts; Tim Holtz Distress ink in Victorian Velvet; Beacons 3-in-1 craft glue; Zots clear adhesive dots
We hope you have enjoyed today’s feature. We want to extend a sincere thank you to all the Tiddly Inks designers for their fabulous project and Tiddly Inks for sharing their company with us. Also, be sure to visit their blog to see more inspiration using their products!
In order to enter the give-away to win the prize shown above, please leave us a comment in the comments section of this post. The winner will be announced next Wednesday.
Happy Crafting!


 Our Graphic 45 Guest Designer for this week is

 I’m a St. Patrick’s day baby who lives in Beautiful British Columbia, Canada. When I’m not in the studio making cards, I’m a Grade One elementary teacher to joyful, energetic 5 and 6 year olds, happy wife to Tony, proud mom to Jake, and loving GrandMoe to Ashlynn. I am thrilled to be invited back to the Paper Crafter’s Library after two years! I’ve been busy these past 2 years completing my Masters of Education from Gonzaga University while working full time. Now that I’m finished, I’m excited to be back in the studio!


 Hi, all! My name is Amy Rohl, and I live in Wisconsin with my husband and our family. During the school year, I work as a school based speech language pathologist and squeeze in crafting time whenever possible. I have been stamping and crafting for 10+ years and love sharing what I create with others on my blog and social media. My favorite technic is incorporating bits and pieces of cool technics I see others using and I’m inspired by just about anything on Pinterest. I’d describe my style as primarily clean and simple with a sprinkle of something to make you giggle or smile.


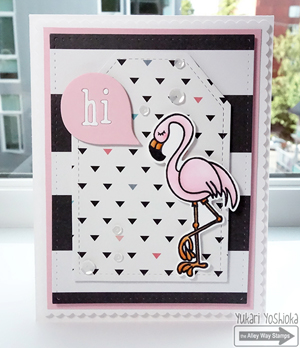 Hi by Yukari Yoshioka, image source
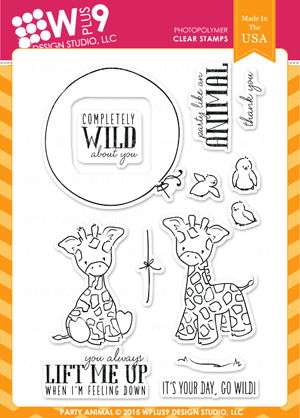
  Party like an animal by Shannon McComb, image source
  Best Friends Forever by Joni Andaya, image source
  Congratulations by Joanna Harty, image source
 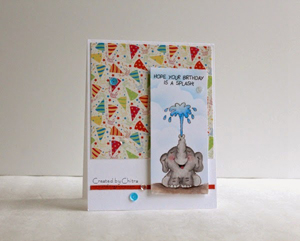 Birthday Splash by Chitra Nair, image source


![August NPL 2_thumb[1]](https://blog.papercrafterslibrary.com/wp-content/uploads/2015/08/August-NPL-2_thumb1.jpg)


