
Welcome to another Featured Artist/Designer Spotlight. Today we’re thrilled to welcome Joyce Mehrberg. Before we show you Joyce’s project, let’s get to know her a little bit more…
 I never really thought of myself as a creative person until I started stamping in the summer of 2010, when I had my youngest daughter’s birthday party at Paper Source. Once I discovered clear stamps and the on-line blogging community, I was hooked. I am currently on the CASology Design Team, and I would describe my stamping style as mostly CAS, with a little bit of cute and some graphic thrown in for fun. I like mixing stamps from all different stamp companies, and could not create without my dies and Big Shot machine. I live in a small beach town in San Diego County with my husband, two teenage daughters and our dog. I worked in the corporate world for many years before retiring to spend more time with my family. My other interests include spinning, reading and hanging out with my family.
Thanks Card
Hi. Today I am going to show you how to make a very simple card that packs a big punch. It’s a great way to use up patterned paper scraps as well.

Cut a card base 4 7/8″ by 7″ and score at 3 1/2″.

You will need a 3″ by 4 7/8″ piece of patterned paper, a 3/4″ by 4 7/8″ piece of coordinating paper, a matching solid paper about 1/8″ by 4 7/8 and a few die cuts of the same word. I used the ‘thanks’ Wet Paint die by Papertrey Ink, and I cut it out three times and glued them all together for dimension and stability.
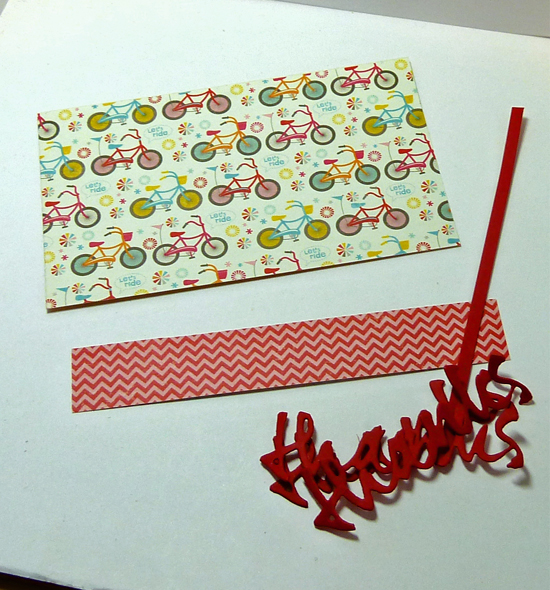
Adhere your patterned paper to your card base, and then adhere the thin piece of card stock over the place where your two patterns meet. I used my corner chomper to round the lower right corner.

The next thing you need to do is to slice the card front about an inch from the right side. This is the only tricky part, because you want to slice right up to the fold–but no further. The best way I found to do this is to use my Fiskars trimmer. I placed the left edge of my card at the 3 7/8″ mark and put a little stack of scraps right at the top of my card to block the blade from continuing over the front of the card and on to the back.

Here is a closer view of the cut area.

Adhere the right strip to the card base. You want only the larger portion on the left to be able to open.

Adhere the stacked die cut word so that most of the word is attached to the card front and a little bit of the word is hanging over the edge.
Here I have made a little set of these cards. They would make a great gift.

Supplies
Card Stock: Recollections 110 pound White, Papertrey Pure Poppy
Pattern Paper: My Minds Eye My Girl
Dies: Papertrey Wet Paint Dies
We hope you have enjoyed today’s project courtesy of Joyce Mehrberg. Be sure to stop by Joyce’s blog to see even more of her beautiful work (and let her know we sent you).
Have a great day!
Karen
So happy to see Joyce featured here today! What a fun card and great tutorial, thanks Joyce!!
Congratulations Joyce on being featured here. How exciting! I love your card design and want to give this a try.
What a fantastic post! Joyce is a very talented crafter and makes the most fabulous cards. She is also a very dear friend and I love seeing the spotlight on her. Her blog is loaded with fabulous inspiration and she is always leaving wonderful and thoughtful comments. Today card project is something I have never seen before and will definitely be trying it!! Thanks for the great feature!
It’s a rare day when I see something crafty that I have NEVER seen before…and wow, this technique you shared today is one of them! I can not wait to bring out my trimmer and give this one a try! Not only a cute card with the patterned paper you chose,but a very interesting technique that I predict will start popping up everywhere now. Congrats on the guest designer spotlight!
Fab card Joyce. Haven’t seen this idea before- really like the lovely papers decorating the inside too.
Clever idea, Joyce! Congratulations on the guest designer spotlight.
Great post, Joyce! Congratulations on the guest designer spotlight!
Very fun card and so clever, Joyce! Thanks for the “how to” instructions, I just have to try this 🙂
Congratulations on being spotlighted, Joyce! What a fantastic feature … so enjoyed your tutorial … and what a really cool technique you showcased … added to my list of techniques to try! Anita 🙂
Joyce, a big congrats to you and I love your post. So fun to see your card and how you made it too. Just too cute.
Congratulations Joyce!!!!! You make so many inspiring cards,so it’s nice to see you featured. Love this fun technique and wonderful step by step ……such a fun way to make a card with a twist!
Congratulations to Joyce as Featured Designer! She is so deserving of this and love her detailed instructions to replicate her design. WTG!
Joyce is an amazing, versatile, creative card designer and I am always in awe of her work! This card set is so unique, like nothing I’ve seen before, and I LOVE it! Must try! So wonderful to get to know more about Joyce…she is definitely deserving of the spotlight!
Yay! Joyce 🙂 awesome tutorial, never done anything like it but u inspired me. Have to try a card like this
Wow — definitely cool and very well done – what a fun idea and good pics and how-tos!!!!
I’m terribly late but wanted to say ‘congrats’, Joyce! I love your card and the wonderful tutorial on how you made it. Great way to add some punch to a simple design!
Congratulations on your Spotlight, Joyce. I’ve always been inspired by your cards and this “new” technique will be one I try.